Squadron.com
This is Academy Kit No. FA164-1664 in 1/72
scale.
One of the models I’ve always wanted to build and add to my “Canadian
Collection” has been the Hawker Typhoon. Three RCAF Squadrons flew the
Typhoon in the later stages of World War II, prior to, and after D-Day,
through to the end of the war. While the Typhoon in WW2 was generally
associated with air to ground rocket warfare, the Canadian Squadrons
flew bomb equipped Typhoons in ground attack sorties.
When the Academy kit of the Typhoon hit the
Hobby Store shelves, I immediately picked up a couple to stock my
overloaded room full of other un-built kits. Up to that point, all I had
for a Typhoon project was an elderly Airfix kit with a couple of
Aeroclub detail and conversion kits for the Typhoon. The reviews of the
Academy kit were quite favourable, and it appeared to be a good basis
for a nice looking model.
Upon opening the box, one finds a crisply
molded set of light grey styrene sprues, with nicely detailed parts, and
fine recessed panel lines. Alternate parts are also provided for the
three-bladed prop and spinner and the four-bladed prop and spinner
configuration of the massive fighter.

One omission is the larger stabilizers
associated with the four-bladed prop versions of the Typhoon, and the
kit only supplies the smaller earlier stabilizers. Suitable parts can be
robbed from a Matchbox Tempest kit, if necessary. The Canadian Wing of
Typhoons were all equipped with bomb racks, and the Academy kit provides
only rockets for the underwing armament, so some minor conversion will
be necessary to replicate an RCAF “Bombphoon”.
Research
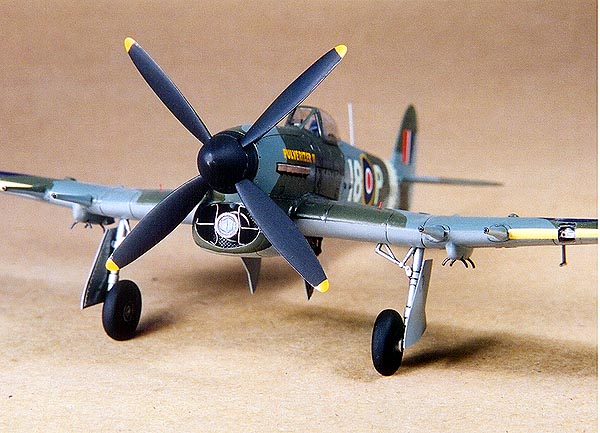
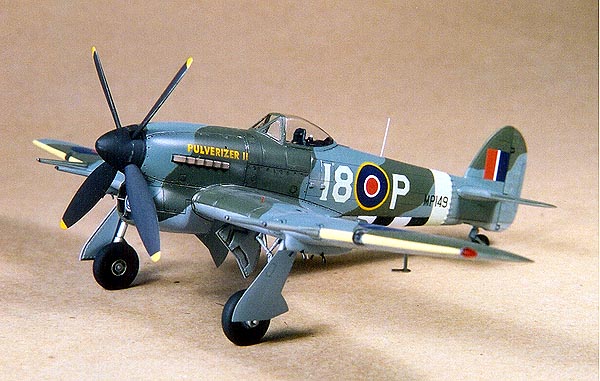
Based on my research and available decals,
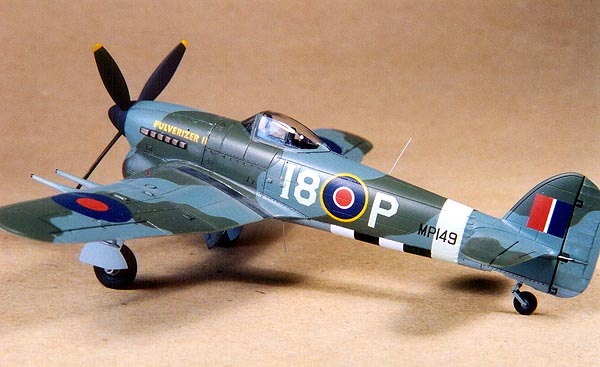
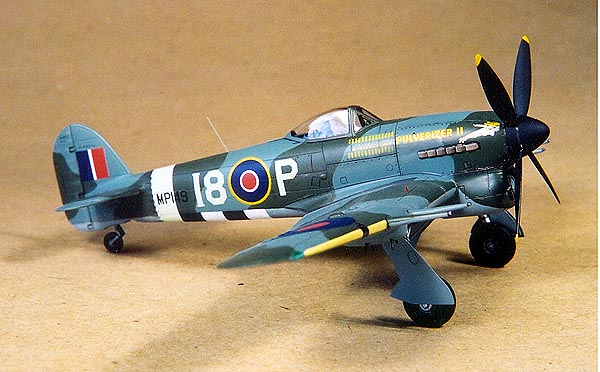
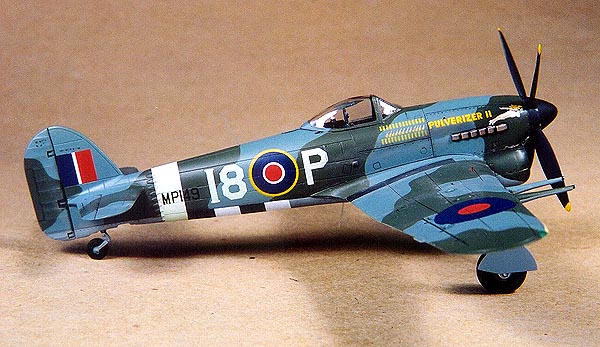
I decided to model a Typhoon of 440 Squadron, named "Pulverizer II",
coded I8-P, flown by Harry Hardy, DFC, CD, in the summer of 1944.
Pulverizer II was eventually lost on Christmas Day, 1944, while
assisting in the Battle of the Ardennes. Harry Hardy was strafing a tank
when the aircraft was hit in the tail. Hardy was able to gain altitude
and bail out over Holland, and the aircraft crashed. I had a sheet of
Arrow Graphics decals (No. D-24-72) which provided a variety of markings
for Typhoons flown by all three of the Canadian squadrons, including
Pulverizer II. I also went through my stash of references for the
Typhoon and discovered that the serial number as provided on the Arrow
Graphics sheet was incorrect, given as JP-149, when in fact it should be
MP-149. Evidence was gleaned from the following photo references:
-
440 Squadron History – photo on page 44
showing MP-149 “Pulverizer II” at Eindhoven in the winter of 1944-45.
-
Metal Canvas – photo on page 79 showing a
detail of Pulverizer II nose markings and mission tally.
-
RCAF Squadrons and Aircraft – photo on page
138 showing Pulverizer II, MP-149.
(A full list of references is provided at
the end of the article)
The detail photo in the “Metal Canvas” book also showed other omissions
from the Arrow Graphics decal sheet - a scantily clad diving girl on the
nose and an impressive mission tally. The photos also indicated that the
“Pulverizer II” lettering was not white, and appeared to be of a shade
matching the yellow markings in the black and white photos. A note and a
cheque to Mike Grant Decals solved that problem, as I also needed some
other custom decals for another project I was working on.
Bomb Rack Conversion
Now that the basic markings were sorted
out, I pulled an ancient Airfix Typhoon off the shelf and carved the
bomb racks off the wings. These were refined, filed and sanded to a more
correct shape based on the drawings and photos at hand. The next step
was to replicate the cannon shell ejector chute that came out of the
inside edge of the bomb rack fairing, which was cobbled together from
some small sections of 0.005” sheet styrene. These assembles were glued
onto the wings with liquid glue in order to “fair” them in and get a
nice tight fit.
Main Construction
Now that the “major conversion” effort was
done, the rest of the model was built up in very short order, following
the kit instructions. The cockpit was finished in a “light black” colour
(flat black mixed with a few drops of Gunship Grey), and highlited with
a bit of dry brushing and graphite rubbing. Very little filling or
sanding was required on any of the joints to get a nice smooth finish.
The cannons were the only bits to need a bit of TLC to fill and smooth
the step-joints. It was about this time, when I was admiring the clean
finish of the Academy kit, that I ran across some reference notes which
indicated that the serial number range in which Pulverizer II fell was a
later production batch that were fitted with the larger Tempest style
stabilizers. I debated breaking off the kit stabilizers and replacing
them, but I rationalized the effort and possible screw-ups and left the
model as-is. While “the modeller’s eye” might spot this small
discrepancy, I figured that for a nice display model, it was OK as-is.
Minor detailing of the Academy kit exterior consisted of filing down the
exhaust stubs to a narrower profile, cleaning up and re-scribing a few
panel lines along the fuselage seams and wing leading edges, and
boxing-in the wing landing lamps and adding a small foil lamp to each
one before glueing the clear covers in place. I also cut out the wingtip
navigation lights and replaced them with small chips of clear green and
red plastic which were sanded and polished into the wings. The canopy
and windscreen were glued to the model with Micro-Scale Kristal Kleer
after a dip in Future, and masked off with Bare Metal Foil. The rest of
the clear bits were also masked off at that time with masking tape and
BMF.
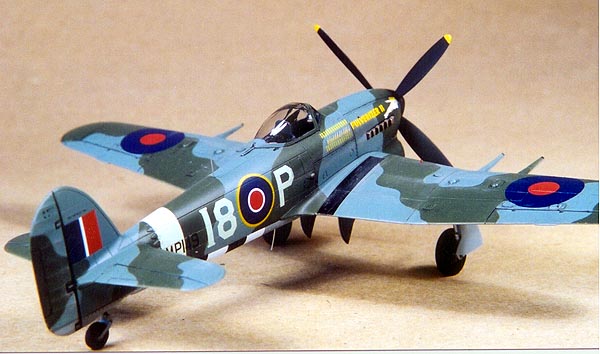
The first painting exercise was to spray
some black paint onto the canopy areas to insure that the interior
framing would appear as black under the camouflage paint overcoats. The
next step was to spray on some XtraColour X-3 Sea Grey Medium onto the
undersides and slightly up the sides of the fuselage. Allowing a week
for that to dry, the next step was to mask off the undersides and spray
on some XtraColour X-6 Ocean Grey to the topside of the model. Leaving
the underside masking in place, another week passed before I applied
masking tape cut into the camouflage pattern to cover the Ocean Grey
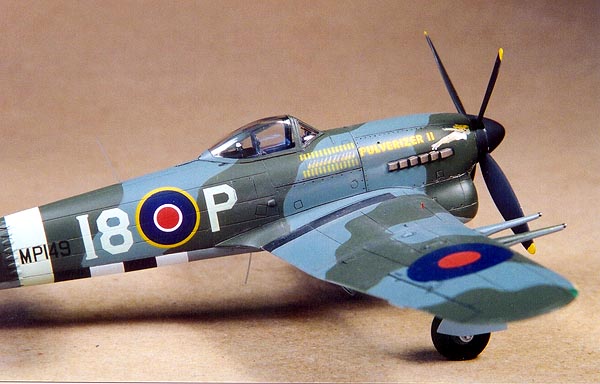
areas. I noticed on most of the photos that the camouflage on the
Typhoons was a fairly tightly sprayed edge, almost sharp-edged in
places. To simulate this, I carefully lifted the edges of the masking
tape masks to allow a slight amount of underspray. Using my trusty 25
year old Badger 200 airbrush, I sprayed on some XtraColour X-1 RAF Dark
Green in a few light coats to finish the painting stage of the model
project.
The high gloss finish of the XtraColour enamels allows decalling to
proceed immediately after the paint has cured - usually 24 hours or so,
however I usually wait a week as most of my modelling time is found on
the weekends. A number of decal sheets were used to assemble the final
markings:
-
Squadron Codes: from Arrow Graphics sheet
D-24-72
-
Roundels and fin markings, sky fuselage
band, invasion stripes: XtraDecals X039-72
-
Mission tally markings: Almark decals sheet
No. A-23
-
Minor stencilling: Microscale sheet No.
72-0292
-
Diving Girl on nose: hand painted.
A moderate application of Solvaset insured
that all of the decals snuggled down and provided a “painted-on look”.
The rest of the fiddly bits were prepared as follows:
-
Undercarriage doors- painted Sea Grey
Medium while the model was being painted.
-
Tailwheel assembly: painted and installed
into the fuselage halves prior to painting the model.
-
Undercarriage legs: Sprayed with Floquil’s
Old Silver and treated to a “muddy wash” of water paint.
-
Wheels/tires: Mixed dark grey/black tires
with Floquil Old Silver hubs, detailed with a wash of water paints.
 With
the model set up on a jig of toothpicks stuck into the landing gear
sockets and the rest of the fiddly bits held in small clips, I sprayed a
mixture of Testor’s Dullcote mixed with a bit of Glosscote onto
everything to get a semi-gloss sheen. This overcoat really blended-in
the decals and started to make the model look quite good. The rest of
the parts were assembled, and all the masking was removed. Minor residue
from the Bare Metal Foil adhesive on the canopy was easily cleaned up
with some Turtle Wax applied with a cotton swab.
With
the model set up on a jig of toothpicks stuck into the landing gear
sockets and the rest of the fiddly bits held in small clips, I sprayed a
mixture of Testor’s Dullcote mixed with a bit of Glosscote onto
everything to get a semi-gloss sheen. This overcoat really blended-in
the decals and started to make the model look quite good. The rest of
the parts were assembled, and all the masking was removed. Minor residue
from the Bare Metal Foil adhesive on the canopy was easily cleaned up
with some Turtle Wax applied with a cotton swab.
Once the landing gear and gear doors were in place, another minor
problem with the Academy kit showed up. The main gear doors are too
short at the top edges near the wing undersides. The “fix” would be to
add a piece of sheet plastic to the upper edge to add about 2.5mm more
to the kit part. At this point I also made up the small cylindrical
carberettor air filter assembly and glued it into the radiator center
section. Some lead foil strips were then bent, folded and glued into
place with Zap-A-Gap to simulate the struts that held this air filter in
place. I also added small landing gear position indicators to the upper
wings using small bits of stretched sprue painted red.
The last bit of work was to add some weathering, paint chipping and dark
washes in some of the panel lines. The very last step was to get out my
palette of chalk pastels and apply some dust, dirt, and exhaust stains
to the model to replicate the dry, dusty conditions found on the
European forward airfields that the Canadian Typhoon Squadrons operated
from. The small whip antennas were added from stretched sprue to finish
off the model. Once I was satisfied with the final detailing, I placed
the model on a base to reduce any further handling, and for display in
my model cabinet.
-
Typhoon and Tempest-The Canadian Story, by
Hugh Halliday, copywrite 1992, Canav Books.
-
Canada’s Air Force at War and Peace, Volume
1, by Larry Milberry, copywrite 2001, Canav Books
-
RCAF at War 1939-1945, by Larry Milberry,
copywrite 1990, Canav Books.
-
440 Squadron History, The Hanger Bookshelf,
copywrite 1983, Canada’s Wings Inc.
-
Metal Canvas, by Stephen Fochuk, copywrite
1999, Vanwell Publishing Ltd.
-
RCAF Squadrons and Aircraft 1924-1968, by
S. Kostenuk and J. Griffin, copywrite 1977, Historical Publication No.
14, National Museums of Man/Canadian War Museum, Samuel Stephens/Hakkert
Co.
-
Ducimus Camouflage and Markings No.
4-Typhoon and Tempest, by R.C. Jones and R.L. Ward.
-
Scale Models magazine, November 1975,
article and drawings by A.L. Bentley.
-
High Flight magazine, issue unknown,
article “Typhoon Attack” by Carl Vincent.
-
Squadron/Signal Typhoon and Tempest in
Action, No. 102, by Jerry Scutts, copywrite 1990, Squadron Signal
Publications.
 Home
| What's New |
Features |
Gallery |
Reviews |
Reference |
Forum |
Search
Home
| What's New |
Features |
Gallery |
Reviews |
Reference |
Forum |
Search