|
Tupolev Tu-16 "Badger"
by
Peter Nebelung
 |
|
Tupolev Tu-16 "Badger" |

Hobbycraft's
1/72 scale Tu-16 Badger is available online from Squadron.com
I was commissioned to build this kit for Hobbycraft Canada, as a display model
for trade shows. Upon opening the box, I found a large pile of plastic, a decent
set of decals, and instructions that appeared to be quite adequate to do the
job. This was to be a strictly out of the box build, so no additions were made.
I started my construction by building the cockpit, pretty much as normal. The
seats are built up from several parts, and required painting before assembly.
Once completed, they were set aside as the rest of the cockpit was built. As per
the instructions, I painted the entire front and back end Testors aircraft
interior black, followed by a dry brushing in Testors aluminum. I figured the
interior was going to be a dark pit, and the aluminum would show better than
light grey. After painting, the seats were added and the pit was installed in
the front fuselage. The two front fuselage halves were then glued together. Also
installed was the simplified rear gunners position, comprising a bulkhead and a
seat in the rear fuselage.
I generally do a lot of subassemblies at one time, so while working on the pit,
I also built the bomb bays, bombs, missles, wheel wells, landing gear, remote
operated gun turrets, wings, tailplanes and the separate control surfaces. Most
of this is simply a matter of cutting the parts off the sprue, cleaning up some
minor dings and ejection marks, painting, and then gluing the items together.
Gluing was done using either Plastiweld, or very thin CA. A note on fitting the
wheel well bays to the wings. When you go to clean up the openings in the wheel
fairings, be careful as the apparent mold ridge is really the bay mounting, so
removal of said ridge will cause you some grief. The bay will drop right on
through the fairing. Take a bit of time here to fully understand the way this
fits together.
By this time, the rear fuselage halves were ready to mate, with the nose gear
bay, ballast, and rear gunners’ position already installed. At this point, you
stick in the remote turrets and start gluing the halves together. Watch how you
do this, as I ended up with one of my turrets glued in at a 45 degree angle.
Next time, I’ll put a bit of oil on the turret race first. Proceed along slowly,
gluing the seam a inch or so at a time. The fit is pretty good, but there is a
wow in the top mid part of the fuselage, which you need to watch for. Once that
is completed, it’s on to the fuselage nose. This joint is a pig. Minimize the
amount of fill by use of shims, and then fair it properly. This was the only bad
part of the model, all the other bits could have been avoided by proper dry
fitting.
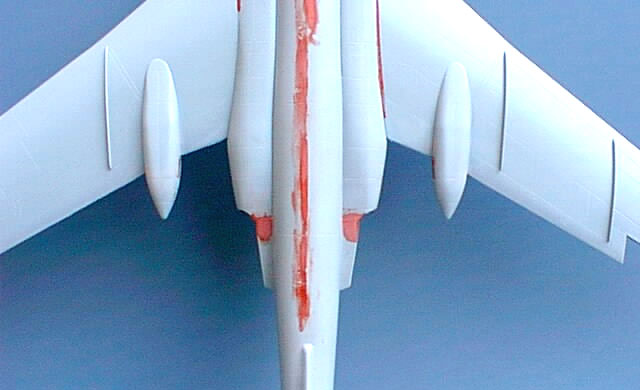
Once the fuselage is complete, you can put on the engine pods, which come in two
halves, with an exhaust nozzle. There is no ducting or turbine face here, what
you get here is a plug to seal off the intakes. Works for me. Be careful with
the exhaust nozzles. They end up being partialy blanked off by the fuselage
fairing, so a bit of dry fitting and work with a rat tailed file is indicated.
Second item to watch is the pitch alignment of the engine pod. The slots in the
fuselage are a tad off, and the engines will sit a bit tail end down. Again, do
a bit of fitting and file work. Evidence of this is seen in the photo above.
Otherwise, the fit between pod and fuselage is very nice, just flow some glue
down the seam. No filling was required on my model.
At this point, we are ready to add the wings and tail planes. You have to give
Trumpeter a hand here, as the wing installation is a piece of cake. The ends of
the wings fit perfectly, with the required anhedral built in. The mating
surfaces allow for lots of glue to hold this monster together. Once completed,
only a little bit of fill is required, as some of the edges are a tad rounded. I
found the overall fit of the main components to be very good, with little to
complain about. Installation of the separate control surfaces also goes fairly
well, with only minor adjustment of the fit between the hinge points and the
slots on the surfaces. I canted them off a bit, with the elevators raised
slightly.
At this stage we have a complete airframe. What paint scheme should we use? The
Hobbycraft boxing comes with several choices for marking, including Indonesian,
Iraqi, and Egyptian. The Indonesian one is natural metal, and very boring. The
Iraqi is camo, tan and brown, which is a bit better. The Egyption one, however,
is very interesting. We have a tan base, with reddish brown blotches all over.
The blotches are bordered with a greyish green. This looks interesting. A color
interpretation of this one is in the Squadron In Action booklet, along with the
Iraqi and Indonesian aircraft
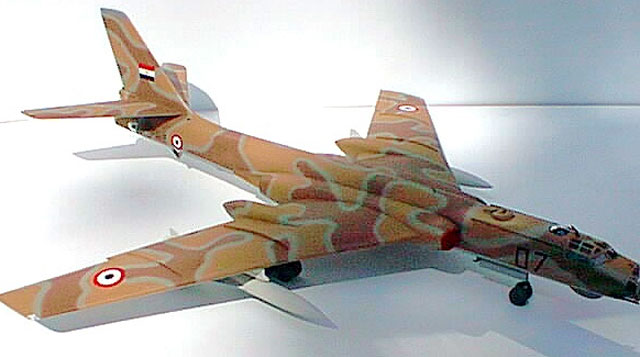
Off to the paint shop we go. The canopy has been installed, along with the nose
and other glass bits, masked and sealed. The base coat of tan is laid on and
allowed to dry. I did the red-brown blotches free hand, following the nicely
done artwork supplied with the kit. Once that was done, I waited a few days for
it all to become nice and hard, as the outlines would require me to rest my hand
on the model surfaces. Outlines were done with RLM 02 from Gunze. The exhaust
nozzles were painted titanium, and the radomes painted Tamiya German grey, which
I also used for the wheels. I find it makes a good color for weathered rubber
and such. As a last step, the bottom was masked and sprayed a light grey.
|
Final Assembly and
Decals |
We are now into the home stretch, with only the finer details left to install.
As the main airframe has been progressing, I have taken odd moments to build up
the weaponry, landing gear, boarding hatches and sorting out the various antenna
suites.
This kit gives you a choice of weapons, and depending on what model and
nationality you are building, you get a choice of 16 small bombs, 8 medium size
and 4 bloody big ones. You can mix and match, for a bit of variety. I choose to
do the 8 mid sized bombs, which were painted mustard yellow as per the
instructions. It should be noted that the instructions only give color names,
and no specs, so mustard yellow, according to my interpretation, was made to be
Southwest Airlines yellow. This worked out nicely as far as I was concerned.
Painting and drybrushing the bomb bays added a bit to the overall look.
The external ordnance comprises either Kingfish or Silkwork missiles. I chose to
do the Kingfish, a standoff tactical nuke or high explosive weapon. The
Silkworms are for use with the Iraqi version. These are fairly basic, and go
together easily. Fit here was also very good, requiring only the clean up of the
seams’ extruded plastic from gluing. My only complaint here is the
representation of the tail end of the Kingfish. There are no nozzles or anthing,
just a big flat blank.
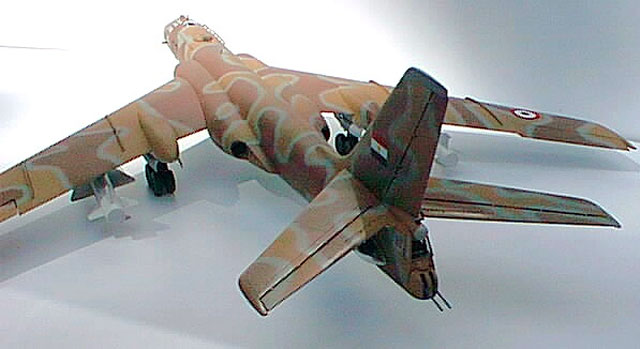
One thing to mention here, all the doors, both gear and bomb bay, will need to
be installed using wires. The tabs given are way too small to do the job
properly. We are talking less than 1/32 square here. If you do this now, you
will avoid making a mess later when the doors keep falling off. I must have
knocked them lose a dozen times.
The landing gear fits neatly into the bays, but a note of caution! When I did my
preliminary test of the sit and ballast situation, the model sat firmly on all 3
points. Later, after final assembly, I found the nose gear to be a good
millimeter off the ground and the aircraft balanced neatly on the main bogeys.
Apparently I didn’t insert the mains into their sockets deeply enough the first
time and they rotated a bit forward, allowing the nose wheel to touch. There is
a possiblity that the main gear legs need to be shorted a bit to give the proper
sit.
Decaling was started once localized areas of Future had hardened, as the number
of decals was judged to be too small for a total spray job. Not to mention that
it would have taken a lot of Future as this is a huge model. It is every bit as
big as a B-17 in 1/48th scale. I have to complement Hobbycraft on the radical
improvement they have made in the decal department. These went on perfectly and
are opaque, thin, and in register. After the decals were dry, a sealer coat of
Future was applied, and left to harden. The gloss was knocked down with a coat
of future and tamiya flat base.
The final bits to go on were the various antennas. These were all painted
seperately, and then positioned and glued with CA. A small area of paint was
scrapped away to ensure a proper glue joint. Even so, I had to put them on a few
times as I kept on removing them with my hand while shifting the model.
I was very impressed with this kit. Overall, the quality is very good, with no
major flaws. Detail is low, but quite adequete for the average builder. The
model lends itself to detailing, and can be built up to a real masterpiece. I
ended up buying one for my collection, and will be doing a full detail job on
it. I expect to do it in the Soviet Naval colors, but I must admit, the Egyptian
scheme looks fantastic.
Model, Images and
Article Copyright © 2002 by Peter Nebelung
Page Created 29 March 2002
Last updated 04 June 2007
Back to HyperScale Main Page
Back to Features Page |
 Home
| What's New |
Features |
Gallery |
Reviews |
Reference |
Forum |
Search
Home
| What's New |
Features |
Gallery |
Reviews |
Reference |
Forum |
Search