|
T-62A
by
Jose
Rodriguez
 |
|
T-62A |

Tamiya's 1/35
scale T-62A is available online from Squadron.com
This is the Tamiya T-62A, kit No. 35108. I paid about USD$18.00 for it. For a detailed history on this vehicle you can check this web
site
http://www.fas.org/man/dod-101/sys/land/row/t62tank.htm
The Kit In The Box
This kit is an older Tamiya molding and its motorized past is
shown through the inside brackets designed to hold an electric motor and
batteries and through its split hull designed to snap on place. Despite its age
and toy-like origins, this kit still can be made into a decent representation of
a T-62A. Here the word "representation" can mean opposite things depending on
whom you talk to.
A casual scan of web postings on this kit will yield a litany of
What's-Wrong-With-This-Kit items. Here are a few of the gems I found:
-
Kit is too long in the hull.
-
Kit lacks the downward slope to the
rear hull.
-
Kit lacks the very noticeable external
fuel lines around the external fuel drums.
-
Kit lacks all of the mounting brackets
for the tanks and boxes on the fenders.
-
Kit's turret is not quite right.
-
Fittings like the corner station
keeping lights are also missing.
-
The road wheels are awful (I don't
know what the pundits mean by that).
-
The 10 bolt heads around each drive
sprocket are missing.
-
Main gun barrel lacks detail around
the fume extractor and it has the wrong diameter.
Of course, if you want a T-62A, the Tamiya offering is your only
option so your next step is to either spend money in photo etched and resin
parts that will cost more than the kit itself, or if you are a scratch building
master with nothing else to do then you can build your own.
To all these comments I say, humbug. I built this thing and it
looks like a T-62A to me. I'm not planning to go to a show and I don't build for
that purpose; I build just to have fun.
|
Building Tamiya's 1/35
Scale T-62A |
What can the reasonable builder with a full time job, and a
family and a budget do to make this kit better?
As a reference I used Steven Zagola's Modern Soviet Combat
Tanks, and Armor of the Afghanistan War by Zaloga, Luczak and Beldam. Here is
another heresy, the best reference I had was the box art. I don't know the
artist who paints Tamiya's boxes but this guy knows his stuff. The painting on
the box cover showed details that perfectly matched every picture of the real
thing.
Enhancements
I started by getting rid of the kit's original grab handles,
which were not grab handles but a thin ridge of plastic. I replaced these tawdry
representations with brass rod. Anybody with a pair of pliers and a drill can do
this.
I got Eduard's photo etched set for U.S. $11.60 (set 35 007).
The engine screens were nice but the rest of the set I could have done without.
Just because it comes with the set it doesn't mean that it is worth your time
and effort to add it or replace it on the kit. I know that this sounds like
blasphemy but I don't think that photo etched sets are the last Coke in the
desert. Sometimes some parts in the set are essential to replace bad kit parts
but many other times I don't think they are worth the trouble. I used less than
half of the parts in the set. There, I said it. Now the pundits can get raving
mad and flame me. Humbug.
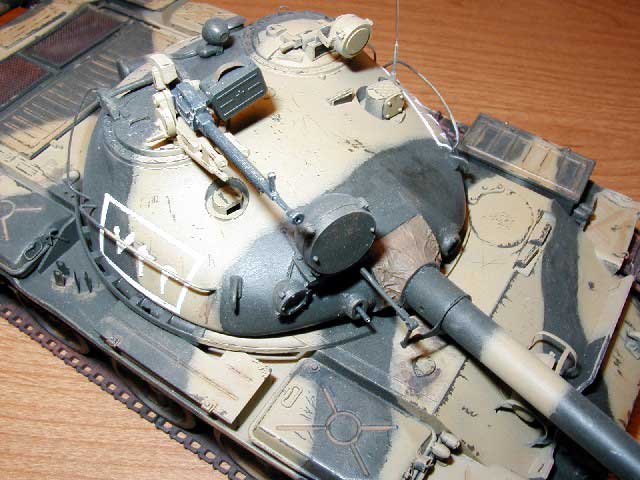
The cargo baskets around the turret are also brass rod. The
mantle canvas is aluminum foil glued on top of the original plastic surface. I
think the wrinkles in the foil better represent the canvas texture. I got the
foil from my wife's kitchen pantry.
The carrying handles on the external fuel tanks are wrong on the
kit yet the box art shows these handles correctly, and also shows the gizmo that
connects the tanks to the hull's fenders. I repositioned my new handles made out
of electrical wire and scratched built these connectors out of beer can aluminum
using the box art as reference. If you cannot blow money on references, the box
art will be a great and already paid for help.
There is a shovel molded onto the left side of the hull, next to
a toolbox. It looked kind of funky so I removed it and didn't replace it with
anything. Stuff gets stolen, you know.
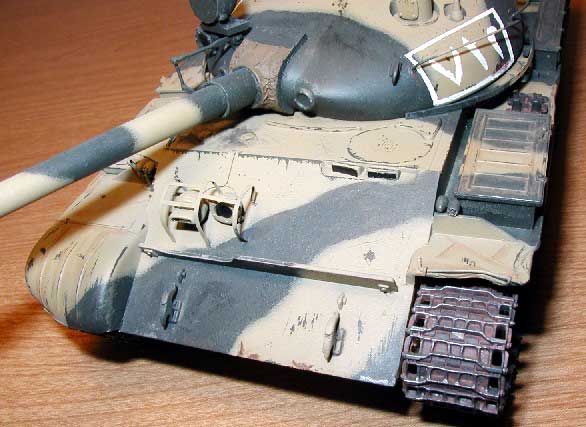
I took a match and heated some dents on the fenders. It is not
uncommon for these tanks to have missing front splashguards so my model is
missing one. There is a torsion spring that allows the guars to flap up and
down. I erased the ones molded in the kit and replaced them with brass rod.
I drilled the lights out before painting. After painting was
done I painted the hole with silver and then filled it up with MicroScale
Kristal Klear. This stuff dries up into a nice clear surface resembling glass.
Make sure the stuff dries up with the headlights pointing upwards otherwise it
will run off onto the hull. I just propped the tank vertical against the wall
while the lenses cured.
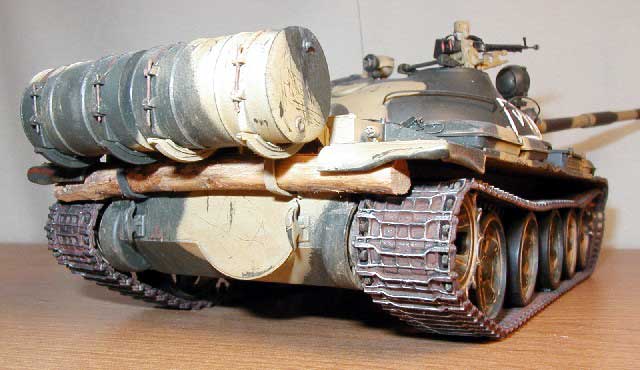
The fuel drums on the back have no fuel lines, a complaint found
somewhere else. Well, my references didn't show any fuel lines attached to these
drums. Maybe T-72's and later show that hardware but I couldn't find any
pictures of such lines in T-62's so I left them out. I did find this comment
from another T-62A builder, "these drums are not connected to the tank, and the
fuel is transferred to the main fuel tanks by hand pump when needed." So there,
the pundits missed the boat in this one. I replaced the attaching straps around
the drums with masking tape and scratch built the turnbuckle bolts with brass
rod.
The log at the back of the tank is a real stick I found in my front yard. I
didn't have to paint it and I scratch built from vinyl the mounting brackets
that were missing in the kit.
T-62A Aftermarket Summary
This is a list of other aftermarket doodads available for this
kit. I'm sure I'm missing a few. You also can see how a simple tank project may
end up costing you an arm and a leg. Prices will vary depending where you shop,
but you get the idea how your initial project can spiral out of control like a
Pentagon project:
-
 Friulmodel: T-62 tank tracks (U.S.
$27.00) Friulmodel: T-62 tank tracks (U.S.
$27.00)
-
Model Kasten: T-62 tracks (U.S.
$27.95)
-
Verlinden: T-62A detail set (U.S.
$35.95). Nice set, but priced at almost twice the kit's original price. Some
pundits have bashed this update set as being full of errors and basically
worthless. I cannot comment because I couldn’t tell the difference between an
accurate set and one full of errors. Like Bob Dylan says, “I can’t tell a real
blonde from a fake.”
-
Verlinden: 12.7mm AA HMG
-
Verlinden: damaged T-62 road wheels
(U.S. $12.00)
-
Barrel Depot: turned aluminum barrel
for 115mm smoothbore main gun
-
AEF Designs: Egyptian T-62A 'Modified'
Turret. This company made a truckload of accessories for the T-62 but it is now
out of business. If you would rather be searching for long gone products in the
web instead of building then this could be your newfound fun
-
Chesapeake Model Designs: T-62M turret
and gun barrel
-
Chesapeake Model Designs: T-55/62
Starfish Road wheels
-
Washington Armor Productions: KTD-2
Laser Range Finder
-
Airwaves: T-62A Photo etch set (U.S.
$11.60)
-
Aires: T-62BDD conversion (U.S.
$26.40)
-
Armor Research Accessories: 115mm
ammunition (U.S. $5.00)
-
Hudson & Allen: Russian tow cables
-
Warrior Scale Models: Afghan T-62 tank
crew (U.S. $20.75)
Let's say that you buy the kit, add the Verlinden detail set and
a set of tracks from Friulmodel then your little project is now costing you
about U.S. $81.00. Add shipping if you have to order by mail, add taxes, some
paint and you start approaching the one hundred bucks barrier. Want a few
figures to build a diorama? Boom! You broke through the barrier. Don't let your
wife find out. What's ironic is that you still have a $18.00 model that is too
long and still have to scratch build the grab handles using your own brass rod.
The law of diminishing returns kicks in at some point and it is up to you to
decide when you hit this point. I think that the aftermarket accessory makers
are the best things that could have happened to our hobby, but I'm not made of
money either. Deciding when plain fun turns into economic anguish is a personal
call, and I have a low threshold for blowing money (yes, I'm cheap). I think
that building the plain $18.00 dollar kit is as much fun as building the $100.00
plus kit. I can justify a $12.00 photo etched set and maybe a good reference
book, but after that I start to cringe, and my wife would whack me on the back
of the head if she were to know that I blew over $50.00 in a plastic tank.
|
Painting, Markings and
Weathering |
Here is another place where the connoisseurs are going to scream
bloody murder.
Humbug.
If you open Zaloga's book on page 37 you will see a black and
white picture of a lot of Syrian T-62 tanks captured by the IDF in the Beeka
Valley, Lebanon, 1982. One of the tanks in the picture is what I tried to model
here. I said tried because I don't have pictures of every side of the tank so I
had to make up the "dark" sides.
The Tamiya instructions also have one of these tanks as one of
the finishing options but the Arabic identification numerals are missing, and
Tamiya provides no decals whatsoever for this option. The tank in the Tamiya
manual is described as been sent to the USA by the IDF. My suspicion is that all
markings were erased before these tanks (about ten) were shipped to the USA for
evaluation by the U.S. Army. Using Tamiya's reference and the picture in
Zaloga's book I painted my tank.
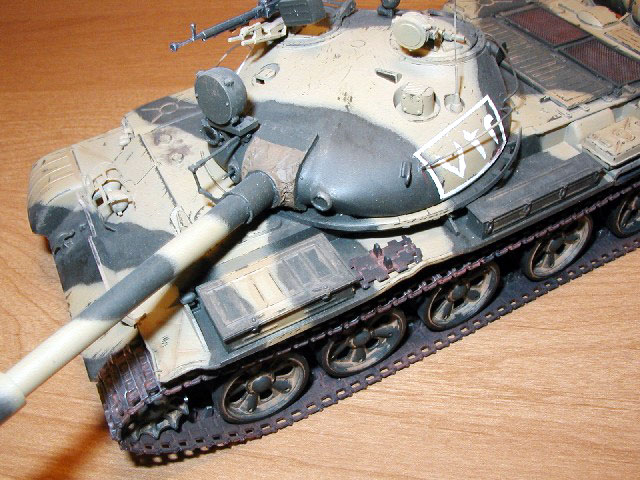
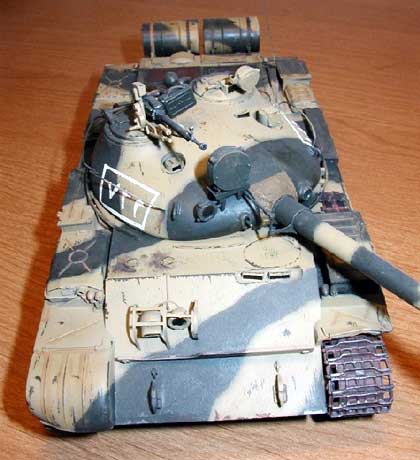
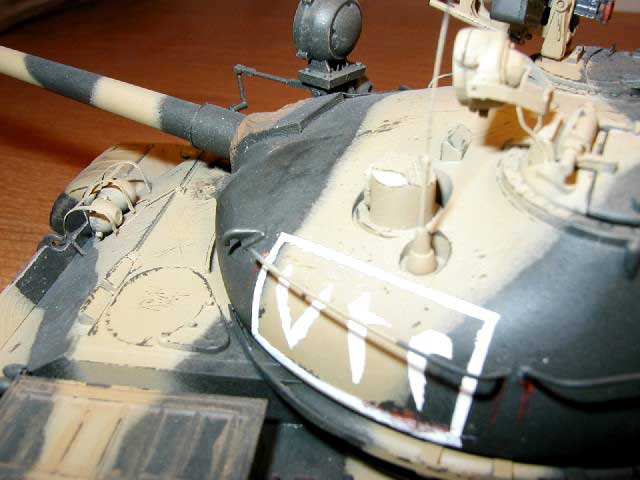
I hand painted with a brush the white ID numbers in Arabic using
a home made template cut out of masking tape. The Arab speaking among us will
have to excuse my bad calligraphy; after all, I'm just an analphabet infidel
when it comes to Arabic lettering. I think the number reads as 732 or 723; I’m
not sure.
To continue ruffling feathers, I picked the camouflage colors by eyeball. I
couldn't find any reference to Syrian colors other than "dark green" and "ochre"
so I went to my local hobby shop and bought a bottle of "dark green" and another
of "ochre." The green happens to be Tamiya Dark Green XF-61 and the ochre is
Tamiya Dark Yellow XF-60 So much for scientific research. Humbug again. If you
want to paint one of these Syrian tanks, you're more than welcome to use
whatever you feel like. That is what I did.
I painted the ochre on top of the green and then proceeded to scratch it with a
knife. This ochre camouflage was added by the Syrians on top of the factory
green color so it makes sense that normal wear and tear would expose the
original green below.
I painted the tracks gunmetal and then slathered them with a
mixture of brown and red pastels mixed with soapy water to simulate rust. I
highlighted the metal exposed to the road with silver paint. The tracks are
supposed to fall over the road wheels under their own weight. This doesn't
happen with the Tamiya tracks so you need to hold them to the top of the wheels.
Glues have a hard time sticking to the track's plastic. I used and recommend
tying them down with invisible thread or fine wire. It is hard to get your
fingers in there to get the thread tied up but it beats fighting with blobs of
glue that don't do anything.
I weathered the model with pastels and highlighted high wear areas with a 2B
pencil.
While it would be great to pay twenty bucks for a kit and have
it come out of the box as a flawless representation of the real thing, and have
the instruction sheet come with a FS numbered paint scheme cross referenced to
every paint maker; and of course, all the decals would be made by a top firm and
in perfect register, this ain't gonna happen, ever.
I don't care how much you pay for a kit, or who makes it.
Always, somebody, somewhere will find delight in pointing out what went wrong.
You can lose sleep about these imperfections and don't buy the kit. Maybe
somebody else will put out a better model (which will have its own
shortcomings). You can wait for the resin and brass gurus to come with an
expensive, hard to find fix; or you can say humbug and build the darn thing to
the best of your abilities and budget.
If I can put the finished model in my shelf and say, "yeah, it
looks like a T-62", then I have succeeded!
Click the thumbnails below to view
larger images:
Model, Images and
Article Copyright © 2002 by Jose
Rodriguez
Page Created 20 April 2002
Last updated 04 June 2007
Back to HyperScale Main Page
Back to Features Page |
 Home
| What's New |
Features |
Gallery |
Reviews |
Reference |
Forum |
Search
Home
| What's New |
Features |
Gallery |
Reviews |
Reference |
Forum |
Search


