|
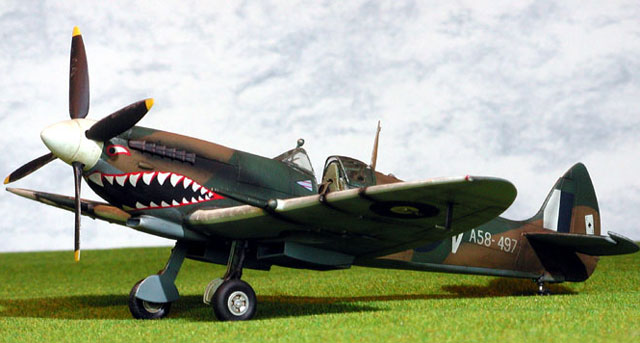
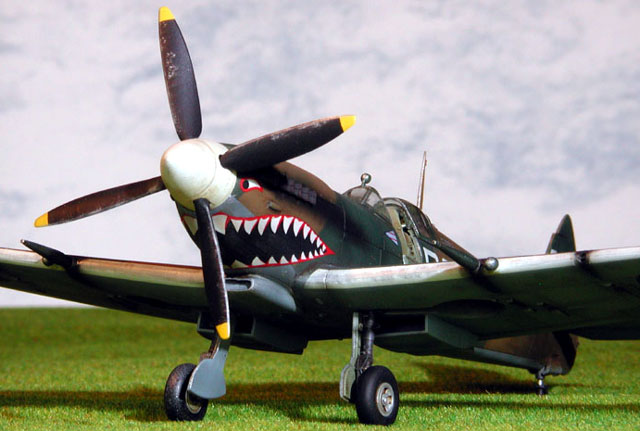
Spitfire Mk. VIII
by
Darren Howie
 |
|
Spitfire Mk. VIII |

Hasegawa's 1/48 Spitfire Mk. VIII RAAF is available online from
Squadron.com
During my visit to the last airshow at Avalon in Victoria,
Australia I had the pleasure to meet and talk with Bobby Gibbes, one
of the top RAAF aces from World War II. A very entertaining
conversation ensued for over 50 minutes while F-15’s and other
modern aircraft performed overhead.
What a fantastic day!
Bobby was a true gentlemen, extremely humble and a true character in
every respect. Truly inspired by meeting him I just had to go and
build one of his aircraft.
Both Hasegawa and ICM had recently released Spitfire MKVIII’s and I
decided to build Hasegawa’s Spitfire.
|
Hasegawa's
Spitfire VIII in 1/48 Scale |
Construction
Debate has raged over all the discussion boards on the relative
merits of the various late model Merlin Spitfire’s and I do not
intend to add to that debate here. People can make their own mind up
on the various different kits.
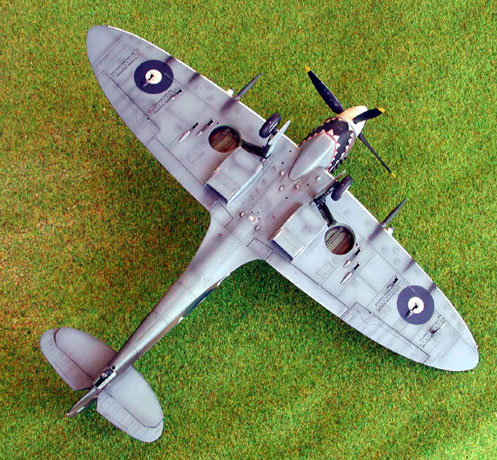
Hasegawa’s Spitfire goes together like a dream! What more can I say.
The only modifications I did make was to cut out the crew access
door, to give a better view into one of the better cockpit’s I have
ever seen in plastic. I also added a set of seatbelts. With the crew
door open it would look quite barren inside without the addition of
the belts.
With the crew door cut out, I replaced it with a spare door from
a Tamiya Spitfire MkV kit I happened to have and the fit was
excellent. In summary, the kit went together superbly a true
representation of the modern kit engineering.
Bobby Gibbes’ Spitfire Mk VIII
What a nightmare! Trying to find information on Bobby Gibbes
first Spitfire MK VIII was almost impossible.
From what I can find Bobby flew two Spitfire MKVIII’s. The first
is the one I have modeled and a second in the later scheme when 80
wing arrived at Morotai again with shark teeth and RG-V codes. There
is almost no information available on the internet or in any of my
relatively large library on Bobby Gibbes’ first Spitfire Mk VIII.
Osprey’s late mark Spitfire aces book has a side profile and from my
searching is the only profile I have managed to find of his first
Spitfire. There is one photo at the Australian War Memorial webpage
of the cockpit of his second aircraft but no good wide views to help
with markings.
There is also apparently a photo floating around of this aircraft
burning after its’ crash following an engine failure after take off.
It is of quite poor quality though not showing too much detail taken
from quite some distance. Hopefully there are some more pictures of
this aircraft somewhere, if so please let me know if you know of
any.
Anyway with pretty limited references I decided to build it using
the Carpena decals which are based on the profile in the Osprey
book.
The story of the colors used by Australian Spitfire Mk VIII’s is
long and complicated. In fact even after all the reading I’ve done
it still is very confusing and much doubt exists over individual
aircraft today. I settled on the advertised scheme of Foliage green
and dark earth over azure blue with white ID stripes on the leading
edges of the wings. Just as it would of looked prior to its
destruction in a take off accident at Sattler field outside Darwin
in December 1944. Of great help was the Australian Spitfire marking
webpage, which has an excellent forum and is very informative on
colors and markings.
Painting and Weathering
I received many emails from people about how I went about
weathering my F-104G (in an earlier HyperScale Feature Article). The
techniques I use are basically the same on all of my kits. The only
difference being how subtle I wish the weathering effect to be based
on the subject, where and when it flew and what type of conditions
it may have experienced in service.
Cockpit
Having painted the cockpit in Aeromaster British interior green
and matt black for the panel the weathering process begins.
Gloss varnish the entire cockpit! This is most important to
ensure nice smooth running of the washes to come in the following
steps. I use coloured chinograph pencils now for all my instrument
panel work. Lightly rubbing them over the raised details to get a
nice subtle effect. Do not push too hard or the chinograph comes off
too thick. Easy does it!
Click the thumbnails below to view larger images:
I then run a heavy wash of raw umber, which should be very thin
in all nooks and crannies of the entire cockpit. The raw umber is a
very cheap acrylic tube paint thinned with water and dishwashing
detergent to reduce surface tension and help it to run nicely. Let
it dry and then drybrush the base colours to create some highlights.
Time for a shadow wash of more raw umber for all the corners and
deep shadows that would occur within the cockpit. Now matt varnish
the entire cockpit and then pick out the faces of all the gauges in
gloss varnish to simulate glass.
Done!!
By all means experiment as that is how all good discoveries are
made and no technique is set in stone!
Airframe
I used Gunze Sangyo for all my exterior painting on this
particular kit.
Preshading was used on this kit. I used RLM 66 as my colour of
choice, as I did not want anything too stark to show through the
Azure blue underneath. The basic scheme was painted as detailed
above. With basic scheme finished it’s time for a solid coat of
gloss varnish. My weathering method takes a bit of work once the
basic colors are finished but I think the end result is worth it.

Depending how old I wish the airframe to look I spray Gunze Smoke
down various panels and also into any shadow areas. The more
weathered I want the aircraft the denser the coating of smoke on the
aircrafts panels! Don’t get to carried away as it is very effective
and the Gunze smoke is quite a bit darker than Tamiya smoke.
I now run a wash of Raw umber through all panel lines and again
any shadow areas. Give it about 20 minutes to dry then I use an old
T-shirt made damp to gradually wipe off quite a bit of the wash.
ALWAYS go in the direction of the airflow as it will create a nice
layer of grime in the correct direction. I also use damp pipe
cleaners to get into those hard to get to spots. With the wash
finished, let it dry for 24hrs or so and finish with a coat of flat
varnish.
Now out with the artist pastels. I rub mine against a sheet of 1200
grade sandpaper to get it nice and fine. Apply liberally as a bit
will disappear when clear coated. I use pastels for gunpowder smoke,
exhausts, red browns for panel corrosion streaks etc. Let your
imagination run wild!!
With the pastels on, time for another matt coat. Be careful
handling the kit after the application of the pastels.It is very
easy to lay down a very impressive finger print on the surface of
your lovely plastic production! With the pastelling finished it’s
now time for some chipped metal. I use model master chrome silver
toned down with some medium brown or tan, drybrushed onto all the
area’s of wear and places where chipping would be expected.
Again another matt coat and some more freshly chipped paint. I
also use a silver pastel for panel scratches and light marks after
the final matt coat.
Weathering complete!!
My only tip when weathering is most people underestimate the amount
of weathering on REAL aircraft.
If you have ever walked around any radial engine aircraft which
still flies you will know what I mean.
There is oil everywhere!!
Remember most of the aircraft we base our models on are hardly
ever washed and many operated from extremely primitive airfields and
terrible conditions.This all leads to extremely dirty and old
looking aeroplanes.
As a rule I have a mental picture of exactly how I want the
finished kit to look before I start the weathering process and then
gradually work the kit towards the final finished product.
Use your imagination!
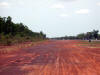
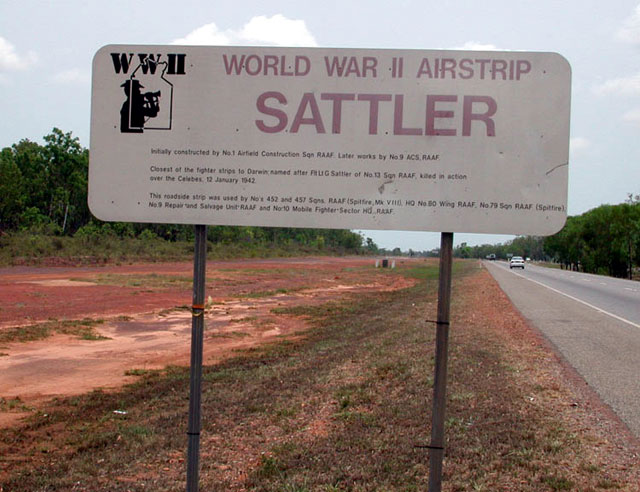
Sattler Field
Having recently gone on holiday to the Northern Territory in
Australia an unexpected opportunity arose.
Driving down the Stuart highway just outside Darwin we drove right
past the old Sattler Field where 457 Squadron part of 80 Wing where
based.
Out came the camera for a few snaps of the original strip where
this very aircraft both flew and met its end.
This is quite an interesting drive as almost all Darwins dispersal
strips are placed at about 7-10 km apart right beside the Stuart
highway.7-Mile,Sattler and many others on the drive out of Darwin on
the way Kakadu National park.
Photography
All of my pictures are taken with my Nikon Coolpix 990. I can
only recommend this camera to anyone after a digital camera for
model photography.
Most of the close ups where taken using my new Nikon Cool-Light.
It is a ring light which mounts around the lens to illuminate
your object in beautiful soft light while taking macro photographs.
If you have a Coolpix rush to get one of these, you can see from the
results it is brilliant for macro model photography.
I enjoyed this project enormously. Having more of an attachment than
normal made quite a bit of difference in my attitude to this kit.
The kit goes together beautifully and forms to me a great base on
which to build a late model Australian Spitfire and I am happy with
how it turned out. At the end of the day that is all that really
matters.
Have fun.
Click the thumbnails below
to view larger images:
Model,
Images and Article Copyright © 2002 by
Darren Howie
Page
Created 29 November 2002
Last updated
04 June 2007
Back to HyperScale Main
Page
Back to Features
Page |  Home
| What's New |
Features |
Gallery |
Reviews |
Reference |
Forum |
Search
Home
| What's New |
Features |
Gallery |
Reviews |
Reference |
Forum |
Search/darrens spit/pit 1.jpg)
/darrens spit/pit2.jpg)
/darrens spit/pit3.jpg)