|
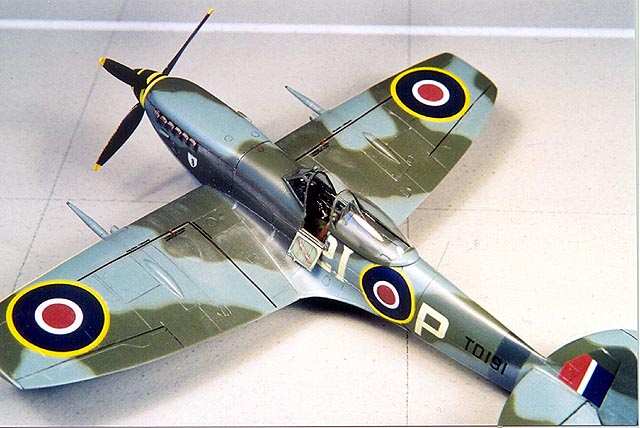
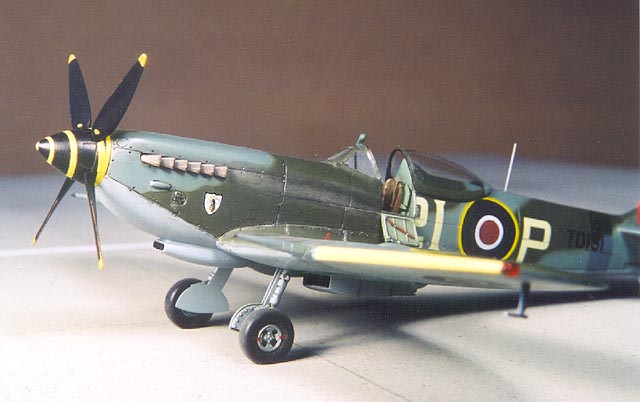
Spitfire LF XVIe
by Geoff McDonell
|
|
|
Supermarine Spitfire LF
XVIe |

Hasegawa's 1/72
scale Spitfire VIII is available online from
Squadron.com
Inspiration struck me one day, while flipping
through some of the recent excellent books about the Canadian
participation in WW2 I’d picked up over the last year. I hadn’t
completed a Spitfire model in some years, and wanted to build an example
of one of the Canadian aircraft for which I’d hidden away some decals
for a long time ago.
The Hasegawa 1/72 scale Spitfire Mk. VIII/IX kits were a good starting
point for my late war Spitfire XVIe. My decal
stash yielded a small set of markings for a Spitfire XVIe of 443
“Hornet” squadron, which were produced by Tally-Ho Decals in 1993.
My model project began by assembling the resources I’d need:
-
Decals
-
Hasegawa Spitfire VIII
kit (Kit No. AP41:1200)
-
Heller Spitfire XVIe kit
-
Aeroclub vacuformed
Spitfire wing set
-
Squadron vacuformed
canopy set
-
Cooper Details resin
Spitfire cockpit Detail set
-
“Spitfire-The Canadians”
books by Robert Bracken
-
my file of Spitfire
photos, magazine articles and drawings
I spent a couple evenings studying my references
and intended to use the drawings in
Robert Bracken’s book as my main
reference. The first step was to remove the upper rear fuselage portions
of the Hasegawa kit, cutting along a line straight back from the canopy
rail to the panel line at the base of the fin. Similar cuts were made to
the Heller kit fuselage halves to remove those sections for use on the
Hasegawa kit.
The Heller fuselage parts were glued onto the Hasegawa fuselage halves
with Zap-A-Gap and faired-in using a bit of Milliput and an evening of
gentle sanding. I also rescribed and restored panel lines and the radio
access panel using Dymo tape for a straightedge and some etched steel
scribing templates.
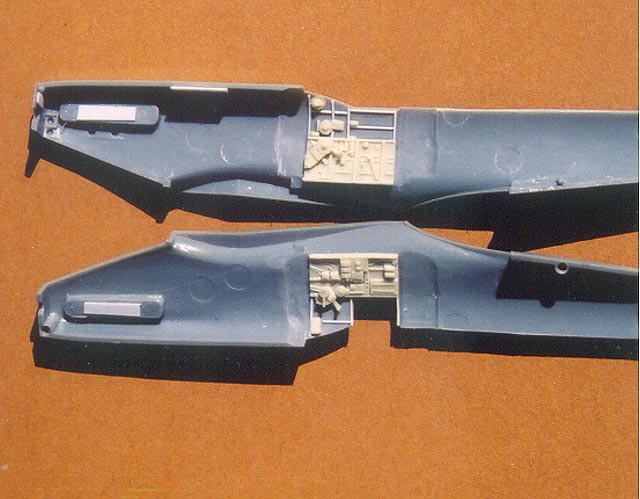
At this point, my attention turned to decorating the interior of the
kit. I’d already decided to display the model with the canopy open and
the access door hung open, so rather than use the cockpit facsimiles
provided in the Hasegawa kit, I chose to use the Cooper Details Set of
cast resin parts. Relying on the instructions in the detail set, I
separated, then glued in, the various parts, and detailed the instrument
panel. Humbrol’s Interior Grey-Green was used as a base coat for all of
the interior bits, and then a wash of dark grey water colour brought out
some appearance of depth. A light dry-brush with some lightened Humbrol
Grey-Green and a touch of aluminum powder rubbed onto worn areas
completed the cockpit detailing. The seat was painted to simulate a worn
brown bakelite material, as per my references.
Once the cockpit was done, the fuselage halves were glued together, then
the instrument panel, and seat bulkhead were fitted through the bottom
open area. At this point, the floor assembly was glued in place to
complete the fuselage.
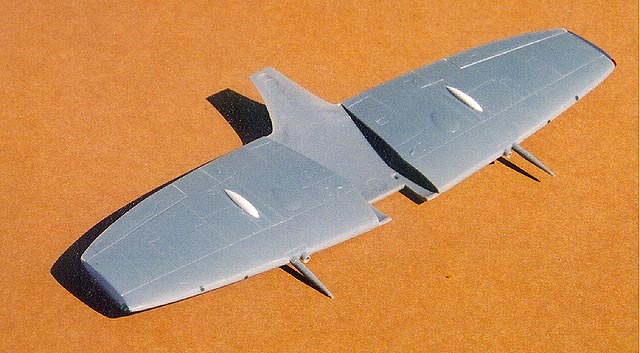
Attention then turned to the wings. These parts were assembled, leaving
off the wing tips that Hasegawa provides. The Heller kit donated the
clipped wing tips for the “LF” version of the Spitfire I was modelling,
and in order to modify the wing to the universal “e” wing, the following
modifications were made:
-
20mm cannons cut off, and
glued onto the outboard stubs
-
inboard stubs were
drilled out to accept the 0.50 cal. gun barrels
-
upper wing blisters
removed and replaced with new blisters donated from a set of Aeroclub
brand vacuformed Spitfire wings.
-
Shell ejection chute
openings were filled and new ones cut to match the “e” wing gun
positions.
-
Filled in the outboard
machine gun ports on the wing leading edges.
-
Filled in the short
Mk.VIII ailerons and fill in some inaccurate panel lines on the Hasegawa
wings.
The detail I added was to cut notches into the
wingtips, into which chips of red and green clear plastic styrene were
glued to represent the navigation lights. I’d prepared the clear red and
clear green plastic chips by drilling in small pips to simulate the
lamps inside the navigation lights. These were filed down, sanded, then
polished into the wing.
An evening of test-fitting, shaving, trimming and test assembly runs
were made to get a nice snug, flush fitting wing to fuselage joint.
While the general fit of the Hasegawa kit was very good, I’ve learned
that a little bit of test-fitting, with some careful checking, trimming
or shimming will yield a very nice joint which should not need any
filler.
The model built up quickly at this point, and was soon ready for paint.
Small details at the head rest/armor plating were added, and all the
seams and panel lines were given a last “once-over” to make sure there
were no flaws. I checked the basic model against the drawings in Robert
Bracken’s book “Spitfire-The Canadians” to make sure I’d got the details
right. So far, so good. I’d glued the rudder on with a very small
offset, just to make the model a little more animated.
The first paint colour to be airbrushed on was the
light sea grey undersides. I stuck the landing gear doors to some
rolled-up masking tape (rolled sticky side out), and mounted the landing
gear legs in some alligator clips held in clothespins. The model itself
was mounted on a small dowel stuck in the propeller hole in the nose.
I mixed up a 60% paint/30% thinner supply of Xtracolour’s X-3 (BS637)
Sea Grey Medium, with a couple drops of Testor’s Model Master Gloss
White, and shot it onto the model in 3-4 coats one weekend afternoon. I
sat the model aside and let it dry for a week before going back to check
out the results. A few small dust motes were removed with a careful
slice of a new #11 X-Acto blade and a few small imperfections were
polished out.
I masked off the undersides and fuselage belly, making sure that the
tape edges along the fuselage were carefully pulled away from the
surface to allow a fine feathered edge. The other delicate area of
masking was the cockpit. I’d already glued on and blended in the
vacuformed windshield so it could be painted into the model, so some
careful masking was called for. Bare metal foil was used to mask off the
exterior of the windscreen, while small strips of masking tape were
applied along the inside edges of the cockpit opening. The tape then
built up with more small strips to close off as much of the cockpit as
possible, to the point where I could stuff some dampened tissue into the
cockpit hole that was left.
Again, turning to my stash of Xtracolour paint, I thinned some X-6 Ocean
Grey and shot it onto the model, misting it on for the initial coats,
followed by a couple heavier coats to get a nice solid application,
without being too thick. A week later, when that was dry, I again
polished out the usual small “dusties” that seem to be attracted to wet
paint.
The final step in paint application was to cut out masking mats made
from stiff paper, to cover the grey areas on the upper surface. These
were created by photocopying some Spitfire camouflage drawings onto some
stiff paper, then cutting out the “grey” areas and sticking them onto
the model with small bits of rolled over masking tape to hold the mask
just off the surface, to create a scale sprayed edge camouflage pattern.
Xtracolour’s X-BS641 dark green was applied with my Badger 200 airbrush
and then the model was put aside for another week before I dared touch
it again. It’s not that the Xtracolour takes so long to dry, it’s just
that the only time I can do any painting is on weekends, and during the
weeknights, I turn to other activities while the paint dries good and
hard.
Removing the masking mats resulted in a very nice fine feathered edge
camouflage pattern. The rest of the masking tape, bare metal foil and
cockpit “stuffing” was removed and the final paint step could then be
completed. The model was to represent a post – VE day aircraft, which
had the sky rear fuselage band painted out. Examination of many
contemporary photos showed variations in lighter or darker colours of
camouflage paint being applied to the aircraft to cover up this fuselage
band. I chose to mask off the area where the rear fuselage band would
have been, and sprayed on darkened shades of the green and grey upper
surface colours to simulate this. The fabric control surfaces were
dry-brushed with some lightened base camouflage colours to simulate a
bit of fading.
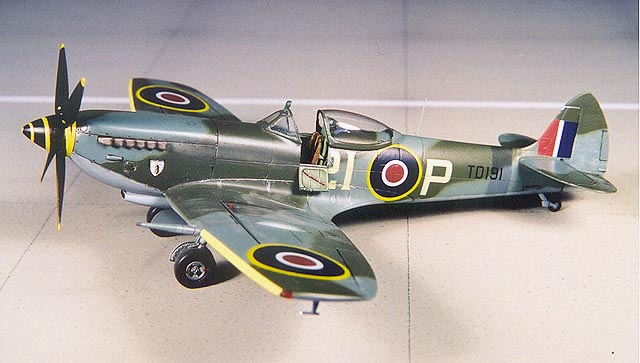
The decal sheet produced by Tally Ho reminded me of
the old Model Decals line from England – same type of appearance. Since
the Xtracolour paint is a gloss finish, decaling could begin
immediately, once the paint was dry. The upper wing roundels as produced
by Tally-Ho seemed to be oversized at 66” diameter, compared to drawings
and other references, so I substituted some scale 48” diameter type C-1
roundels from my spares box of misc. British markings. The rest of the
Tally-Ho decals were used as is. They were just a tad on the “thickish”
side and required a mix of white glue, diluted with water and Solveset
to lay down and snuggle into the surface details. As a standard
procedure, on any “new” decals I use (ones with which I’ve had no
previous experience), I always use my white glue cocktail to make sure I
don’t get any “silvering”.
I used some Arrow Graphics brand “Spitfire Scribbles” decals for the
miscellaneous stenciling and wing walk demarcations, to add a bit more
visual interest to the model.
After all the decals were dry, I applied a dark grey water colour wash
to various panel lines to provide some detailing. A darker, near black,
wash was applied to all the control surface lines to give them a bit
more depth.
The windscreen was again masked off with Bare Metal foil in preparation
for a shot of Dullcoat to seal the decals in and provide a dull sheen
over the gloss paint. I used a mix of Testors Dullcote and Glosscote
mixed with lacquer thinner, from the small glass bottles. I sprayed this
mixture onto the model through my airbrush to achieve a thin, fine
sheen.
At this point, additional weathering was added to the model by applying
various shades of chalk pastels to give the model a bit more of a “worn
look”. Wing roots and access panels were also picked out with some
aluminum powder applied with the end of a sharpened wooden toothpick to
create some more wear and tear.
Once the basic airframe was essentially done, attention turned to the
final details – prop and spinner; landing gear, and the “fiddly bits”:
antennas and pitot tube.
The landing gear was detailed by adding etched brass oleo scissors from
Airwaves set No AC7221 and a fine wire brake line running along the rear
of the inner gear door face. Tires and prop were painted a “faded black”
mix of Gunship grey and flat black. The tires were further detailed with
a wash of flat black run into the rims to give them some depth. The
wheel hubs were painted with Humbrol’s “Steel” enamel.
The spiral effect on the prop spinner was created by first painting the
spinner yellow (I had temporarily glued the front and back pieces of the
spinner together with white glue so I could pop it apart to assemble it
with the prop later on). I then cut a long curved strip of masking tape
and wrapped it around the spinner and base plate. Semi-gloss black was
sprayed on, then the masking removed to reveal the yellow spiral.
I further detailed the prop by adding the small yellow manufacturers
marks at the prop blade roots and dry brushing a bit of gold/brass paint
along the leading edges to represent the wear on the brass protective
leading edge stripes on each blade.
The 0.50 cal. greens in the inner gun ports were added by glueing heat
tempered hypodermic needle sections inside the hollowed out stubs in the
wings.
The last step was to glue on the canopy and fix a length of stretched
sprue into the rear upper fuselage deck to finish the model. Finally
finished!
While not exactly a “straight from the box”
project, using the resin cockpit details, doing the surgery and the
conversion did not present any big challenges and it was a pretty quick
build-up, all things considered.
Given the number of pretty good 1/72 scale kits of
the Merlin and Griffon engined Spitfires available, there is ample
opportunity for a lot of kit-bashing and parts swapping to create many
interesting variations on the venerable Spitfire.
Click the thumbnails below
to view larger images:
Model, Images and Text Copyright © 2002 by
Geoff Mc Donell
Page Created 02 May, 2002
Last Updated 04 June, 2007
Back to HyperScale
Main Page
Back to
Features Index
|
 Home
| What's New |
Features |
Gallery |
Reviews |
Reference |
Forum |
Search
Home
| What's New |
Features |
Gallery |
Reviews |
Reference |
Forum |
Search


