|
SOC
Seagull
by Gil Hodges
 |
|
Hawker Hurricane Mk. I |

HyperScale is proudly supported by Squadron.com
In defense of being accused of being addicted to Chrome Yellow, let me state
that this model project is entirely the fault of Jules Bringier of Classic
Airframes! He was inquiring here on Hyperscale as to where he could lay his
hands on the plans for the SOC Seagull. Now I could only conclude that this was
so Classic Airframes could consider releasing a Seagull in 1/48. Well, I wasn't
going to let him do that before I built my WINGS 1/48 vacuform kit. I wouldn't
have been able to bear the guilt!
The SOC (Scout/Observation/Curtiss) Seagull was designed in the early 1930s
as a catapult launched seaplane that would serve on cruisers and battleships as
the "eyes of the fleet." It wasn't very innovative, using a proven 600hp Pratt &
Whitney R-1340 "Wasp" engine; and conventional 2-seat biplane floatplane
construction that was typical for 1930. The result was a sturdy, reliable
observation plane that outlasted it's intended successor, the SO3C Seamew! It
served well into WWII with both the Navy and the Coast Guard.
Although the Seagull was a scouting plane, it did have an ability to bite.
It's normal armament was a fixed forward firing .30 caliber machine gun, and a
rearward firing flexible mount .30 caliber. It could also carry two 100lb. bombs
when needed.
|
Wings Vacform 1/48
Scale Seagull |
In the Box
The Wings vacuform kit of the SOC is typical of their U.S. Navy biplane kits
- very good. The airframe parts are well molded with a sharp outline. That makes
it easy to determine where to score the parts for removal. The parts have petite
panel and rib detail.
The kit includes some metal parts; an engine, all of the struts, and the
prop. The instructions are good, if a little short on details. Some extra
reference material will be helpful, but isn't a necessity. The one downfall of
the kit is that no decals are included.
Construction
The fit of all of the major assemblies is very good once they've been sanded
down and mated up.
The first step with any vacuform is to check for thinly formed parts. These
can be re-enforced with a little superglue on the inside of the part. None was
needed on this Wings kit. All of the major parts were removed from the backing
sheet by "scoring" around each piece with a new X-Acto blade and then flexing
the backing sheet until the part snapped free. The parts were then sanded on a
sheet of 220 grit sandpaper that had been taped down to a sheet of glass.
Remember, go slow and check the fit of each component often. It's always easier
to sand a little more off than to fill and sand later! The major subassemblies
were glued together with Tenex weld cement.
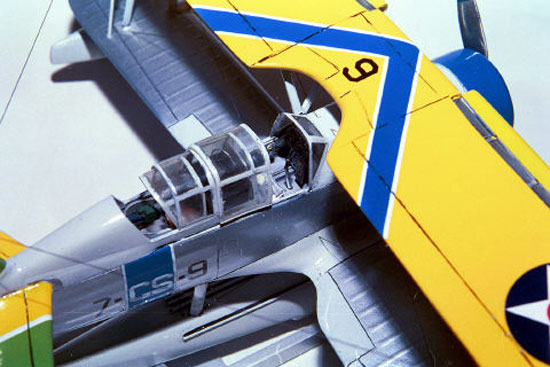
The kit floor and instrument panels were used. The seats, sticks, rudder
pedals, side details, radios, were all either scratchbuilt or grabbed from the
spares box. The rear machine gun and flex mount also came from the spares depot.
The interior was assembled, painted aluminum with black boxes and panels, and
installed into the fuselage. The fuselage halves were then glued together. A
scratchbuilt instrument visor was added over the front main panel.
The Wings Seagull kit has one major engineering anomaly. The tailplanes
CANNOT be added to the fuselage without either removing the rudder, removing the
elevators, or cutting the tailplanes in half to create butt-joints. The
instructions do not show this. I elected to remove the rudder and the elevators
(for that more "candid" appearance). The fit of the tail planes into the rear
fuselage is the roughest part of the kit. I took care to get them aligned
correctly, and then filled the gaps at the base of the fin with thick superglue.
The rudder and elevators were cleaned up and readied for painting.
The bottom wing is molded as one piece and the upper half of the lower wing
includes the wing root. Although this is a bit more complex to cut and sand, it
works well. The instructions are very clear in this area, advising the modeler
to go slow and test fit often. The overall fit was good, but a little filler was
required. Once again, I used "mark one eyeball" to align the bottom wing with
the tailplanes.
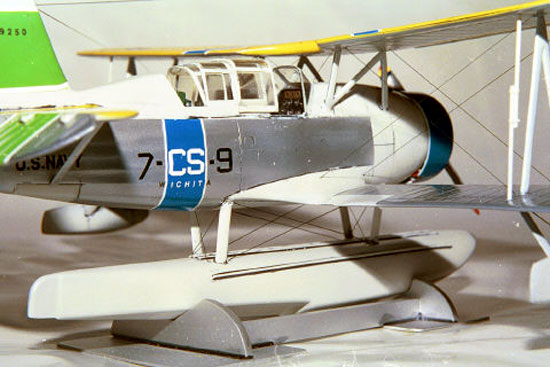
The kit features metal "N" struts for the cabanes and the wings. These (and the
metal float struts) are supposed to have locating pins on their ends. Some did,
some didn't, and some of the pins were too short. I replaced the metal float
struts with plastic airfoil strut stock. I finally resorted to removing all of
the molded pins and replaced them with bits of floral wire. This required
drilling over 40 holes with a #72 drill bit; but the gain in strength and
stability was worth it. Holes were also drilled into the wings, fuselage, and
the floats for strut locations and rigging wires.
The vacuform greenhouse canopy was dipped in Future. After it dried it was
masked with Tamiya tape and then carefully cut apart. The windscreen and the
center section were then glued to the fuselage with superglue. The sliding
sections were set aside to be added later.
The cabanes were placed onto the fuselage and the top wing was then placed
onto the cabanes. The wing was then carefully aligned and held in place with one
hand while the cabanes were glued to the fuselage with superglue. A thin piece
of wire was used to carefully apply a drop around the base of each strut. The
same basic method was used for the main float. The struts were placed in
position on the float, the float was then held onto the fuselage and glue was
applied at the juncture of the struts and the float. The wingtip floats were
assembled the same way.
The last assembly to be modified was the upper wing. I decided that the slats
would look better down, so they were carefully cut away from the wing. The gaps
in the leading edge were filled with plastic sheet. Actuator slots were then
carefully cut and filed into the "slat wells." Evergreen strip stock was used as
actuators. They were glued to the underside of each slat.
The kit metal engine, although nicely molded, was slightly too large for the
cowling. I replaced it with another from the spares box. A sheet plastic
"firewall" was made for the front of the fuselage. After some final sanding, the
model was ready for painting.
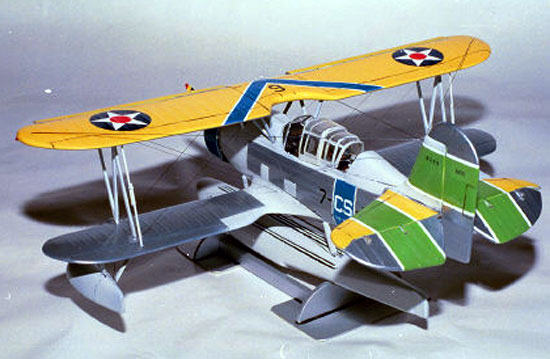
The basic color scheme for most SOCs was light gray metal areas, doped silver
fabric areas, and chrome yellow upper wing and tail surfaces. USAF interior
light gray, Floquil platinum mist, and Model Master chrome yellow were used for
those. I chose the rest of the colors and markings in a rather backward manner.
After looking at my shelf of built 1930s Navy stuff, I decided that something
with green tail markings and blue stripes would blend in nicely. Green tail
stripes meant that the plane would be from VCS-7. Blue fuselage stripes,
chevron, and cowling meant that it would be from the 3rd section of the
squadron, planes 9-12. A solid painted cowl narrowed it down to the first plane
in the the 3rd section, #9. After a little research in an old IPMS magazine;
Dirty Plastic (1982), I determined that it would be from the USS Wichita.
The model was masked off and silver was applied to all "stripe" areas that
weren't already silver. That enable the white that was applied to the tail
surfaces to cover better. When it was dry, the edge stripes were masked and
Model Master willow green was sprayed on. Testors blue (the small bottle) was
thinned with lacquer thinner and sprayed onto the fuselage, cowl, and upper
wing. A coat of future was sprayed on to prepare the model for decalling.
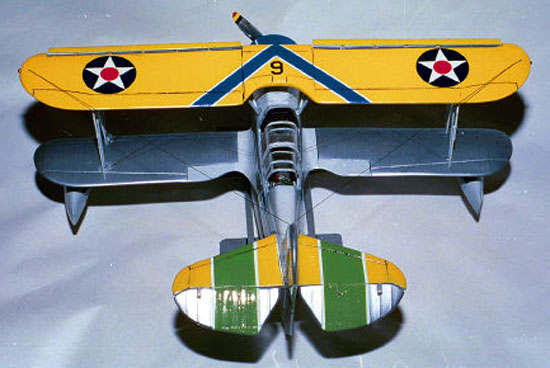
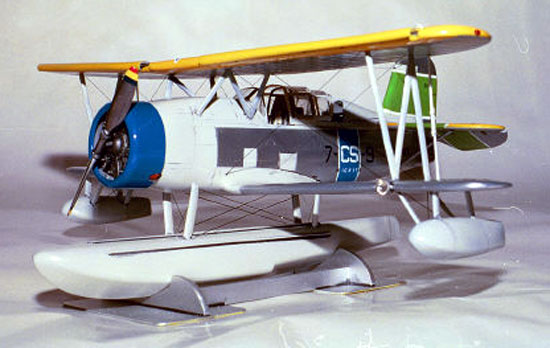
Most of the decals came from the spares box. I decided since the tail
markings were edged in white, the fuselage band and chevron should also be that
way (better late than never). Woodland Scenics dry transfer white stripes were
used for the chevron while Scalemaster white stripe decal was used on the
fuselage. The white "CS"'s had to be cut from white 6's and 8's on an old
Microscale sheet of numbers. That way they matched the black 7's and 9's from
another sheet. The serial numbers and the SOC on the tail are dry transfers from
Woodland Scenics, as are the 9's on the upper and lower wings, and the "Wichita"
on each side. All of the decals were sealed with another coat of Future. Detail
Master acrylic black wash was then liberally applied to the model. The excess
was removed with a damp paper towel. A damp pipe cleaner was used to get into
the tight spots.
The upper wing was attached to the cabanes and the outer "N" struts were
glued into place. The aileron actuators were made by gluing two overlapping
lengths of rod stock together. The adjustment bands are thin pieces of Tamiya
tape wrapped around them. They were glued into place and painted gray.
The wing rigging was added next. Black sprue was stretched, cut to slightly
longer than needed lengths, and glued into their holes with a drop of super
glue. The model was then held over a candle flame, carefully holding it at a
height that would heat the sprue enough to snap it taut. Stubborn wires were
heated with a piece of "glowing" wooden toothpick. Just light it on fire, gently
blow it out until it glows and hold it near the offending wire.
Once the wing rigging was done, the floats and their rigging were added.
The firewall and engine were glued to the front of the fuselage. Short
sections of tubing were added for the exhaust pipes. The cowling was then glued
into place. The kit metal propeller was polished with a straight pin, and then
buffed with a triple grit sanding stick. The tips were painted blue-yellow-red.
Holes were drilled into the upper wing for wing tip lights and the radio
antenna. A "railroad" lens was added to the lower wing for a landing light.
The canopy sections and the tail planes and rudder were added to complete the
model.
A final coat of Future was applied to seal the wash and hide any errant glue
marks.
A cradle was made from sheet plastic and strip stock. It was painted aluminum.
Now the Wings 1/48 SOC Seagull helps fill an important gap in my collection
of nifty 1930s U.S. Navy aircraft.
Model, Images and
Article Copyright © 2002 by Gil Hodges
Page Created 02 February, 2002
Last updated 04 June, 2007
Back to HyperScale Main Page
Back to Features Page |
 Home
| What's New |
Features |
Gallery |
Reviews |
Reference |
Forum |
Search
Home
| What's New |
Features |
Gallery |
Reviews |
Reference |
Forum |
Search