|
PBY Catalina
by
Tomas Chmelik
|
|
|
PBY Catalina |
images by Roman Kucera

Revell-Monogram's
1/48 scale PBY-5A Catalina is available online from
Squadron.com
This is my PBY Catalina in 1/48 scale from
Monogram.
Despite its size, the model was a pleasure to built. The model is well
engineered; the quality of moldings and level of detail is up to current
standards with finely engraved lines (with a few problems on curved
surfaces, but nothing serious), good level of interior detail and very
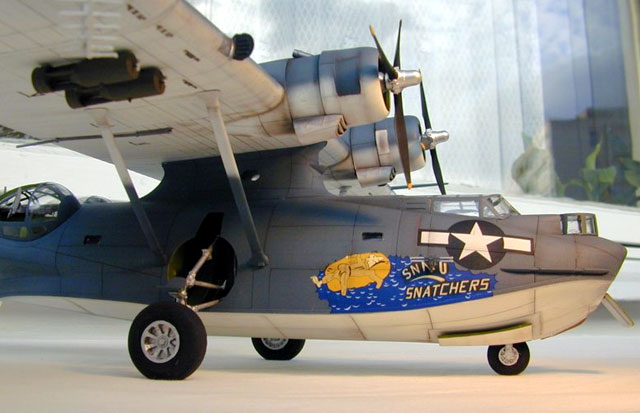
good decals. Model offers two options – one classical WWII pacific
theatre plane “Snafu Snatchers” (bluegray over white), the second is a
more colorful postwar rescue version.
The model was bought with an intention to build
WWII version so I even did not thing about building the second option.
The model was built straight from the box, without
any additional research or photographic evidence.
The construction started with interior. This was
made in separate subassemblies (front of the plane including cockpit,
fuselage turrets behind the wing trailing edge).
The interior was painted according instructions,
received a usual wash and drybrushing and was ready to be put in the
fuselage. The overall fit of interior into the fuselage was absolutely
without problems; the only omission is that there is no interior
depicted behind the cockpit wall. However, after installation of the
clear parts, there is not much to be seen, so I left this as it was. At
this stage I tried to put some weight into he fuselage, because there
was no doubt that the model will be a tail sitter. Unfortunately, there
is not much space where to put the weight in, which, together with the
fact that the amount of weight required could be too much for struts,
led me to decision to use a clear support rod (included) instead of
risky “balancing” of the model.
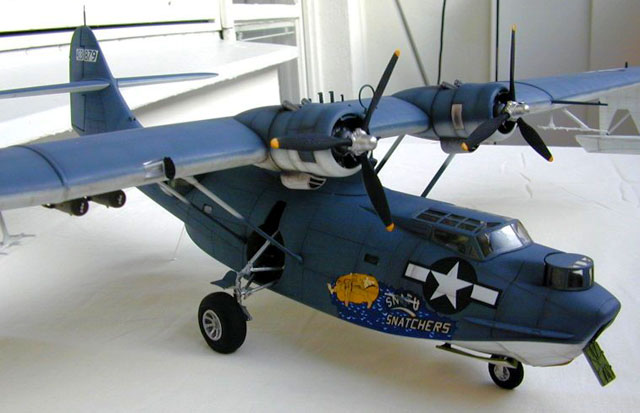
The wing was made as a separate subassembly and was glued to the
fuselage after painting and general weathering. The overall fit of the
model is very good, the only places where the putty was needed was the
wing and bottom of the fuselage. All this contributed to the fact, that
construction itself was much quicker than I expected. I tried to keep as
much interior details away prior to painting to avoid damage; the same
goes for external details. Once the fuselage and wing was ready for
painting, I installed details, which were in my opinion better to be
installed before painting. Radar antennae and other extremely delicate
things were left for the last assembly stage (suggested !).
The fuselage and wings were then preshaded black
prior application of camouflage colors. The white was applied in several
layers. Especially the wing with its size was a hard job, mainly due to
problems with my airbrush and quality of my Model Master paint (too
old). I started with semi-gloss white, then turned to gloss white
(semi-gloss did not sprayed properly) and finally returned back with a
new bottle of semi-gloss (Oh…patience…). I decided to mask only the
underside of the fuselage, spraying the wing freehand. (Today, I would
probably use some kind of soft masking on the cutting edge of the
wings.) Then the bluegray was sprayed on topsides, Agama brand paint was
used. I have a very good experience with their flat paints, as they are
easy to spray and are good in achieving relatively soft edges when
spraying freehand. The can be also brushed over without damaging the
layer under. They just need a bit more time to get fully cured.
The paint was then made lighter with few drops of
light gray and postshading was sprayed freehand. Especially the wing
with its uniform surface started to look much better and after finishing
postshading the model was ready for next steps.
 The
whole model was gloss coated with a Model Master gloss coat (larger
bottles, quick drying) and after necessary curing a wash with enamel
black and brown diluted paint was slightly applied, the model was then
decaled. Decals reacted well to setting solutions and went perfectly to
every single panel line they were covering. The whole surface was then
coated with a flat varnish and pastels were used to round up weathering.
I wanted to make weathering subtle, but noticeable. When I was
satisfied, the wing and fuselage was cemented together and support
struts were installed. I entered some problems with these struts - they
were somewhat shorter on one side and fixing of this problem caused some
damage to already finished surface. This was fixed with a brush and some
paint. The
whole model was gloss coated with a Model Master gloss coat (larger
bottles, quick drying) and after necessary curing a wash with enamel
black and brown diluted paint was slightly applied, the model was then
decaled. Decals reacted well to setting solutions and went perfectly to
every single panel line they were covering. The whole surface was then
coated with a flat varnish and pastels were used to round up weathering.
I wanted to make weathering subtle, but noticeable. When I was
satisfied, the wing and fuselage was cemented together and support
struts were installed. I entered some problems with these struts - they
were somewhat shorter on one side and fixing of this problem caused some
damage to already finished surface. This was fixed with a brush and some
paint.
Other details such as remaining antennae were installed and pained and
model then received another light coat of flat varnish. Clear parts
were, after careful painting by hand (internal color, external color),
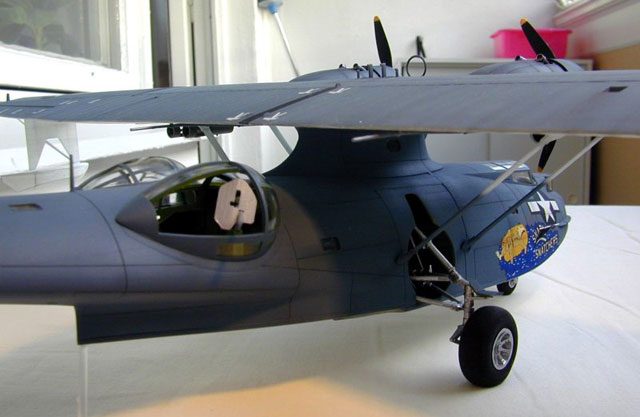
glued with white glue and after installation of the undercarriage struts
and wheels (especially complex main struts are bit problematic to be
installed at this stage due to not easy access to the wheel wells) the
model was finished.
To conclude, the model was a real pleasure to
build. Catalina is a nice looking airplane and again, despite its size,
the model is relatively easy and can turn with a little effort into an
eye-catching part of the collection even of the beginner. My only
problems were large surface areas (no problem for those using airbrush),
delicate main struts and somewhat not easy installation of the wing
after general painting. Generally, no serious problems here. The model
was built to be given as a present and I am looking forward building the
next one for myself!
The model was photographed by my fellow friend, Roman Kucera. Thanks
Roman!
Click the thumbnails below to view larger
images:
[photogallery/photo17215/real.htm]
Model, Images and Text Copyright © 2002 by
Tomas Chmelik
Images Copyright © 2002 by Roman Kucera
Page Created 20 November, 2002
Last Updated 04 June, 2007
Back to HyperScale
Main Page
Back to
Features Index
|
 Home
| What's New |
Features |
Gallery |
Reviews |
Reference |
Forum |
Search
Home
| What's New |
Features |
Gallery |
Reviews |
Reference |
Forum |
Search