|
P-51D Mustang Racer
"Hi-Time II"
in 1/144 Scale
by Alex Bernardo
 |
|
North American P-51D Mustang Air
Racer
"Hi-Time II" |

HyperScale is proudly supported by
Squadron.com
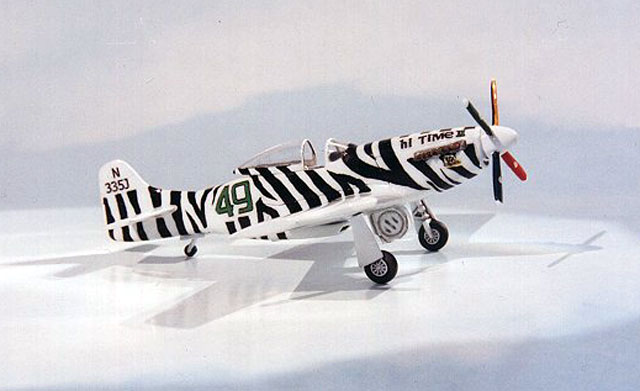
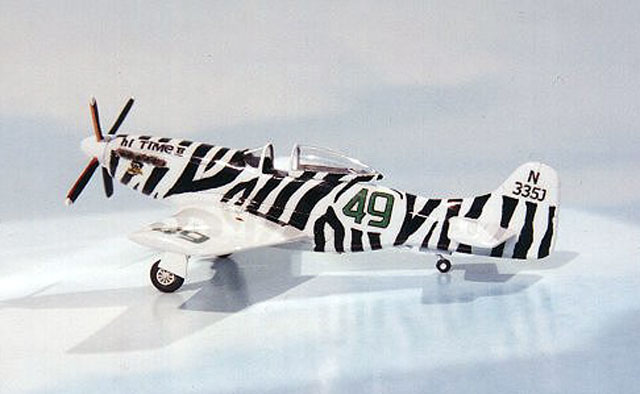
Here is Academy's 1/144 P-51D Mustang finished as the 1960s
Air Racer, "Hi-Time II".
This model depicts an aircraft that took second place
during the 1964-closed course race in Reno, Nevada, flown by E.D. Weiner. I
picked this aircraft because of its eye catching zebra-striped paint scheme.
E.D. Weiner had a second aircraft for unlimited class cross-country, which was
overall black and white checkerboard.
-
 There
was no cockpit to speak of, so I cut open the fuselage to begin construction
of the cockpit. The entire cockpit made of various sizes of sheet plastic,
which included: Fuselage ribs, main instrument panel with drilled out
instrument bezels, side control console, various gauge panels on both sides of
the cockpit, Cockpit floor, new seat with seat cushion and painted aluminum
foil for seatbelts, Rear fuel tank, control stick cut from copper wire, and
main instrument panel shroud. There
was no cockpit to speak of, so I cut open the fuselage to begin construction
of the cockpit. The entire cockpit made of various sizes of sheet plastic,
which included: Fuselage ribs, main instrument panel with drilled out
instrument bezels, side control console, various gauge panels on both sides of
the cockpit, Cockpit floor, new seat with seat cushion and painted aluminum
foil for seatbelts, Rear fuel tank, control stick cut from copper wire, and
main instrument panel shroud.
-
As an air racer, the wingspan
was shortened to 30 feet. Using a razor saw, the tips from the main wing and
horizontal stabs were cut off.
-
Made oil cool vent doors from
sheet plastic.
-
Trimmed off the existing
exhaust ports. Drilled holes and inserted small pieces of copper wire. The
wire was painted with Polly’s flat rust acrylic paint. Dried brushed with
Testor’s flat steel enamel paint. Painted the ends with Floquil flat black
enamel paint. Finally, given wash, which was mixture of PolyScale clear flat
and a few drops of PolyScale flat grimy black acrylic paints.
-
Boxed in the main landing gear
bays w/ sheet plastic. The main landing gear doors were too thick for 1/144
scale. The doors were filed down to 1/3 of the original thickness. More
definition was added to the belly doors by creating templates from paper-thin
sheet plastic and gluing them into place.
-
Since this is an air racer it
should have an unblemished look. With that in mind, the majority of the
recessed panel lines were filled in w/ small strips of styrene and super glue,
and then sanded down and then polished to a smooth finish. Panel lines around
the engine and wing root were retained to show some definition.
-
The kit came with one prop hub
without props to give the in flight appearance and another hub with props for
static display. The in flight hub had the correct size and shape. The static
hub had gaps and the shape and size was incorrect. I removed the prop blades
from the static hub and attached them to the in flight hub.
-
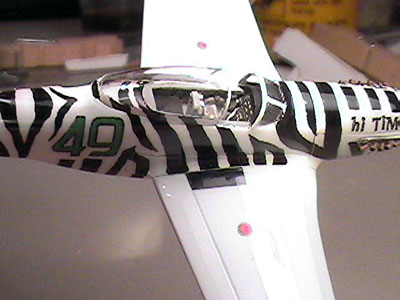
The existing canopy was used as
a male mold for creating “Heat-n-Smash” canopies.
-
All artwork was done on my home
computer. I printed the artwork on Cannon bubble jet printer and took them to
a local printers called “Insty-Prints” and had the art photocopied on to decal
paper. Subsequently, coating the decals with Micro Scale liquid decal film to
ensure the decals don’t bleed in water. Luckily, the model was painted
overall white, which provided an excellent back ground for the decal. This
helps the decals retain the color brightness of the artwork.
-
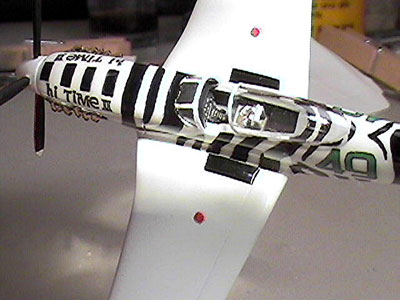 The
model was painted with a base color of Tamiya flat white acrylic paint. I
hand painted the zebra stripes using Floquil’s flat black enamel paint. I
used my hobby knife to scrape off any mistakes with the black paint. The
model was painted with a base color of Tamiya flat white acrylic paint. I
hand painted the zebra stripes using Floquil’s flat black enamel paint. I
used my hobby knife to scrape off any mistakes with the black paint.
-
I applied one coat of Tamiya’s clear gloss acrylic paint.
After the paint has dried, the decals were applied. Next, I applied three
more coats of clear gloss to help smooth out all surfaces. I left the model
alone for four days to ensure the paint has cured properly for the next step.
-
All surfaces were repeatedly polished with the following
sandpaper grits: 2400, 3200, 3600, 4000, 6000, 8000, and 12000. Remarkably,
the surface transformed into a glass like finish. I did not wet sand the
surfaces. I thought the water would break down the acrylic paint.
-
I cut pieces from an old cotton T-shirt and used them to apply
and remove very thin coats of Nu-finish car wax. I removed the wax as soon as
it dried.
Model, Images and
Article Copyright © 2002 by Alex
Bernardo
Page Created 02 June 2002
Last updated 04 June 2007
Back to HyperScale Main Page
Back to Features Page |
 Home
| What's New |
Features |
Gallery |
Reviews |
Reference |
Forum |
Search
Home
| What's New |
Features |
Gallery |
Reviews |
Reference |
Forum |
Search