|
Bell P-39K-1 Airacobra
by
Werner Scheibling
 |
|
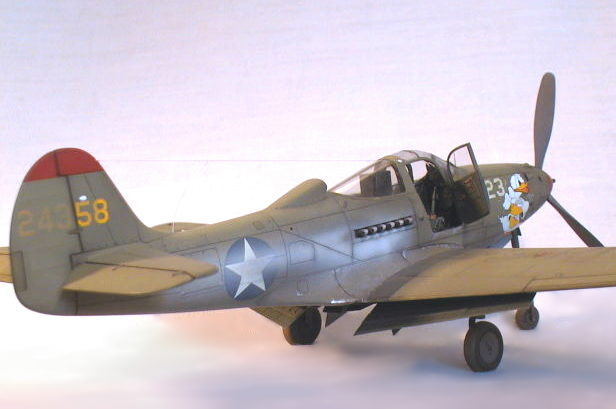
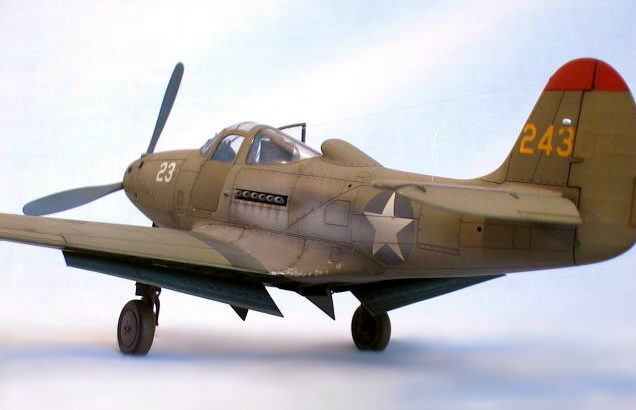
'White 23', serial 42-4358, 40th FS, 35th FG
Nadzab, New Guinea, February 1943
Lt William McDonough downed two Ki-43 'Oscars' during the air battle over
Wau, New Guinea, on 6th February 1943, flying this plane |

Eduard's 1/48
scale P-39 Airacobra "Profipack"is available online from
Squadron.com
Here is my effort at Eduard's 1/48th scale Airacobra.
I was waiting for the arrival of this new, state-of-the-art kit with great
anticipation. Six years ago I turned a Monogram/Pro-Modeller kit into a P-400.
This involved re-scribing all panel lines, a tedious task I was not willing to
undertake once again.
Naturally I was curious how the new kit would compare in size and proportion to
Monogram`s classic moulding. I found that both kits are identical in length and
wingspan, exactly matching the measurement details given in my references. The
proportions around the front of the fuselage and especially the placement of
ailerons and flaps inside the wing area and shape and size of oil- and coolant
radiator outlets are noticeably different. Unfortunately neither Monogram’s nor
Eduard’s kit corresponds exactly to any of the line drawings in my references,
which – to make things worse - all contradict each other. In the end I decided
to rather trust my eyes and examine as many photos as possible.
The Eduard kit captures, in my very personal opinion, the attractive lines of
Bell’s unconventional design more faithfully, especially around the wingroot/
air-intake area, where Monogram’s wing is very shallow. But let’s be fair and
not forget that the two kits are more than 30 years apart in their gestation and
Monogram's mouldmakers had to work without the help of PCs and CAD software.
|
Eduard's 1/48 Scale
Airacobra |
My ‘Cobra’ was built using Eduard’s ‘P-39 ProfiPack’ issue and Cutting Edge’s
resin cockpit update set. Additionally I integrated the PE flap and main
wheelbay assembly from Eduard’s old update set, which was engineered for
Monogram’s P-39. I had these leftovers hanging around in my brass box for many
years, knowing they would come in handy one day.
The ProfiPack version comes with a lovely PE-sheet, its items replacing some
of the original moulded parts or adding exceptionally fine detail. Eduard even
offer photoetched brake lines. Here they proved themselves to be a bit
overambitious by providing a hydraulic line for the front wheel. Unfortunately
the P-39’s front wheel never had a brake system and was a simple self-centering,
castoring construction.
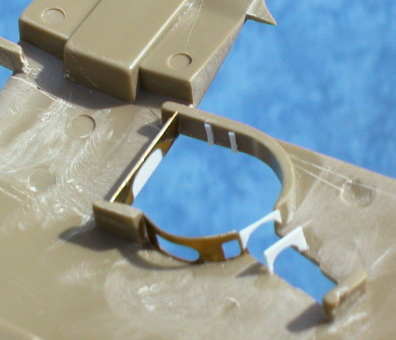
As you can see in my photos, the old Eduard PE flap assembly fits the new kit
nicely after a few minor alterations. The flaps and wing inserts had to be
shortened at their outer ends by roughly three millimetres.
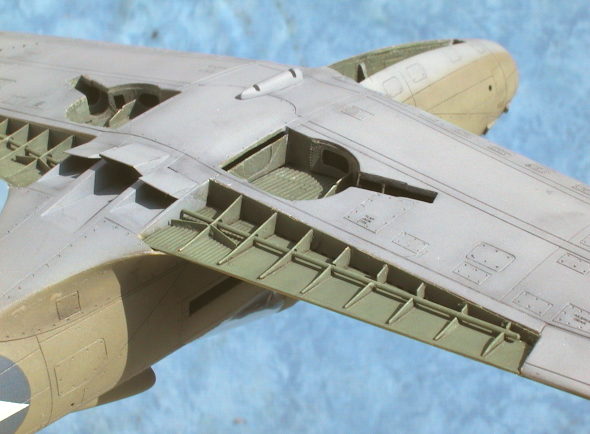
Accomodating the wheelbay brass sections was slightly more tricky and involved
quite a bit of dry fitting and reworking with a diamond nail file. The parts
were bonded together with gap-filling superglue. The ‘roof’ of each wheelbay
rests firmly on three ‘pillars’ that were not removed from the original wing
moulding. This assembly was reinforced using epoxy resin glue, because the whole
weight of the finished model rests on this section via the undercarriage legs.
Click the thumbnails below to view
larger images:
The finished model is incredibly heavy, because of the metal nose weight –
supplied by Eduard - and the resin cockpit parts. This heaviness caused the
model to literally nose dive out of my loose grip one tired evening and
ground-loop onto my work surface, causing some minor cracks in my lovingly
polished canopy.
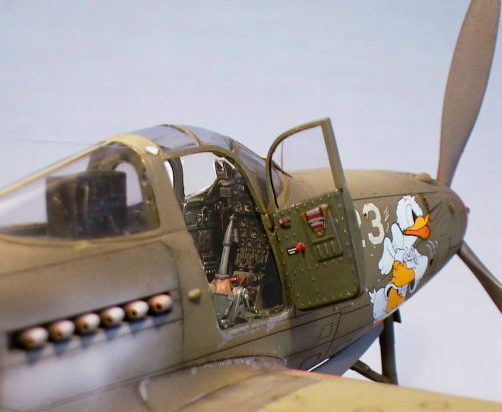
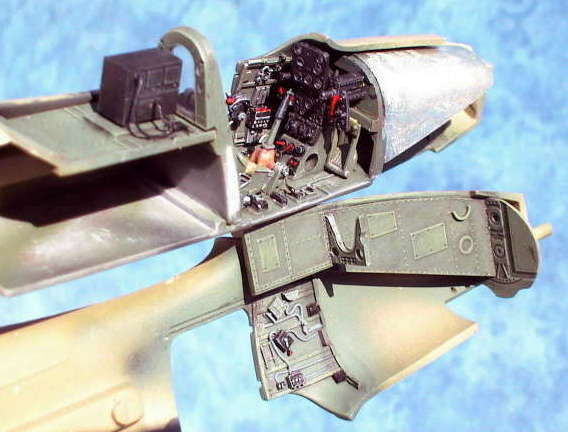
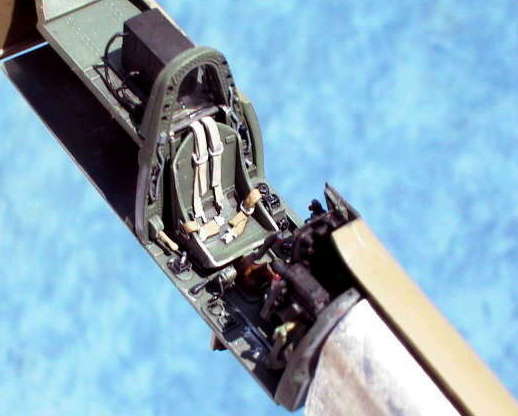
The cockpit interior is 99% Cutting Edge resin with the exception of the rear
decking plus radio-set (original Eduard) and two Aires Browning M2s.
Unfortunately my mid-production Airacobra didn’t sport the full array of radio
equipment that Cutting Edge provides with it’s lovely crafted resin part, but I
do already know where else to use these goodies!
Click the thumbnails below to view
larger images:
This was the first time I worked with Cutting Edge’s grey resin and I noticed
that it is extremely tough and resistant to breaking, which makes the cutting
and sanding of even very delicate parts rather easy. The two cockpit sidewall
panels were sanded down to nearly see-through thinness and were still strong
enough to be handled without too much care.
I also liked the odourless formula very much, something that I always find
irritating with other brands of resin.
All reviewers who have built this kit before have mentioned the
disproportionally thick trailing edges of wing and rudder. This is a
demonstration of the limitations of Eduard’s moulding process. Sanding the two
fuselage halves on a flat surface takes a matter of minutes. Thinning the wing’s
trailing edges however is a rather tricky business, if you want to preserve the
proper shape of the ‘NACA’ wingtips, that most US fighter designs of the period
incorporated. I spent hours sanding the trailing edges of all three parts of the
main flying surfaces with sandpaper attached to a straight block of wood.
The lower part of the wing was attached to the completed fuselage first. After
this bond had hardened over night, the two top wing halves were fitted. This
ensured a gapless fit around the fuselage/wing-root joint and wing leading edge.
After this section had hardened completely, I bonded the tricky trailing edges
with thin, fast-curing superglue, applied in short sections, squeezing the two
parts together as hard as I could until the cyanoacrylate had set. After all
this was done, I had to carefully give the wingtips and trailing edges their
final sharp-edged shape with a sanding block, avoiding any damage to the wingtip
position lights. If these lights would be separate items, like on Mauve’s/Eduard’s
P-40 N for instance, this would have been a very much less delicate and time
consuming operation.
Apart from this the whole kit went together really well.
As most pictures of parked P-39s show drooped elevators as a result of lacking
internal mass balance, I tried to represent this feature on my Cobra as well.
First I removed the elevators from the tailplane by repeatedly scribing along
the joint line, ignoring the hinges. Then I restored the bevelled edges, where
tailplane and elevator meet and constructed new hinge tabs from plastic sheet.
The two elevators were finally connected with a rod made from brass wire, that
runs through an opening in the fuselage, and fixed in a slightly drooped
position with superglue.
Further modifications/additions:
-
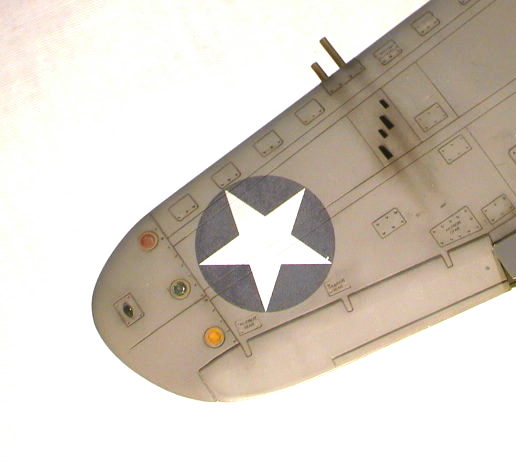
USAAF wingtip ID-lights (front to rear:
red/green/amber) had to be added to the underside of the starboard wingtip, as
Eduard ignores this feature completely. I deducted from studying my
references, that only very early P-39s/P-400s had wings without these
ID-lights (feel free to correct me if I'm wrong). To reproduce this feature, I
drilled three evenly spaced holes into the lower wing surface, blanked them
from behind with a strip of styrene and painted the holes the appropriate
colour. After the paint had dried, I filled the openings with clear epoxy
resin, which was sanded and polished after it had hardened thoroughly.
-
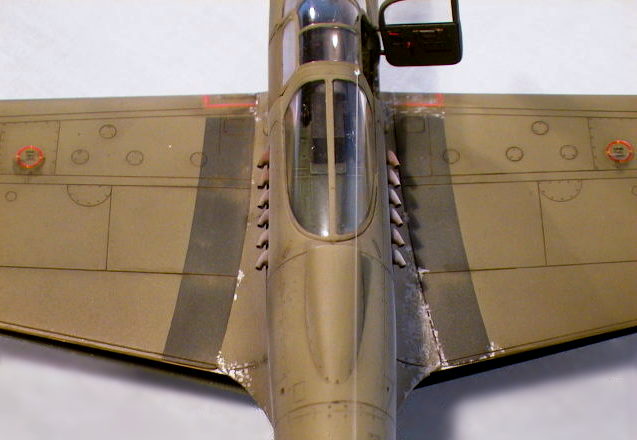
 On the real
plane the wing armament of four .30 Brownings was protected from damage by a
wing leading edge insert with smooth steel tubes that enclosed the gun barrels
completely at their full length. This was reproduced by using two different
widths of hypo-tubing (0,5mm and 1,1mm) inserted into each other. This looks
most realistic, but sadly enough only the eagle-eyed will be able to spot it.
The cannon barrel was made from 1,4mm styrene tubing. I'm really not dead
serious about these tenths of millimetres. I just used what material I had at
hand, trying to achieve the closest possible approximation. On the real
plane the wing armament of four .30 Brownings was protected from damage by a
wing leading edge insert with smooth steel tubes that enclosed the gun barrels
completely at their full length. This was reproduced by using two different
widths of hypo-tubing (0,5mm and 1,1mm) inserted into each other. This looks
most realistic, but sadly enough only the eagle-eyed will be able to spot it.
The cannon barrel was made from 1,4mm styrene tubing. I'm really not dead
serious about these tenths of millimetres. I just used what material I had at
hand, trying to achieve the closest possible approximation.
-
The pitot tube is a construction of hypo-tubing,
brass wire and a little snippet of styrene sheet.
-
The underfuselage rack's sway-braces were
constructed from thin stretched spue and four little styrene discs. I omitted
the drop tank, as I have serious doubts about its shape. The plane looks
better without it, anyway.
-
'White 23' operated under unspeakably tough
tropical conditions and had its main wheel covers removed to prevent damage in
case the plane should sink into mud (the narrow gauge wheels certainly didn't
help with this matter). For the same reason the chromium plated oleo sections
of all three undercarriage legs were protected by garters. I have no idea what
these covers were made from, but I guess something like thin leather or doped
fabric would have been the most likely materials used in those days. I used
very fine cigarette paper for this detail, first crumpled, then straightened
and carefully stuck to the undercarriage legs.
-
Talking about undercarriage legs. The nosewheel
strut/ front wheel assembly is in my opinion one of the weakest points of
Eduard's kit, which is to me even more annoying as it is one of the most
prominent, eye-catching features.
I personally think that the strut is slightly too thick and the early balloon
type tyre too thin and too small in diameter. I can only rely on my eyes, as I
don't know the exact measurements, but Monogram's old mouldings obviously
support my judgement. The U-yoke for the wheel is too straight in both
directions and the oleo leg is shown nearly completely compressed, something
that is rarely seen on pictures of parked aircraft.
The oleo section was replaced with a longer section of strong brass wire,
covering this assembly with the previously mentioned garters. The U-yoke was
carefully shaped to a more rounded, horse-shoe shape and angled further
backwards. Finally it was attached offset to the right. The balloon-tyre was
widened slightly by inserting a slice of thin styrene sheet between the two
wheel halves. Luckily I still had the retraction strut from Pro-Modeller's P-39
hanging around, which is so much more realistic in shape compared to Eduard's
rather simplistic offering.
This whole operation made me think of the lovely cast brass nose strut once
available for AMT's Grumman F7F Tigercat. Wouldn't such a piece of jewellery
plus a proper resin wheel look great on the Airacobra, too?!
Finally both main undercarriage legs got brake lines, bent to shape from 0,3mm
steel wire.
-
The exhaust stacks are also Pro-Modeller
leftovers, their outlets opened with a 0,5mm drill. The only reason for this
modification was my carelessness, messing up the original parts by using a
blunt drill.
-
The armoured metal panel in front of the wind
shield was replicated with very thin styrene sheet and a bead sight was added
from stretched sprue.
|
Painting, Decals and
Weathering |
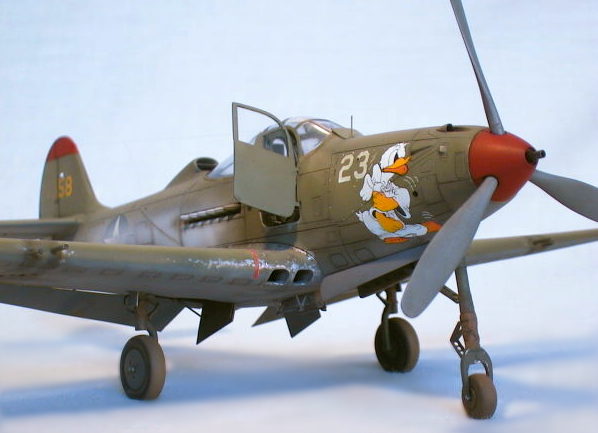
As an old fan of Carl Barks' immortal Duck stories it had to be Lt William
McDonough's white 23, sporting Donald Duck in angelic disguise, only seconds
short of one of his famous temper tantrums. 1943, by the way, was also the year
when Donald was awarded his first and only 'Oscar' for his role in Disney's
anti-Nazi-cartoon 'Der Fuehrer's Face – Donald in Nutzi-Land'. OK, enough said
about my favourite duck, and back to modelling.
I could find two rather grainy b/w pictures of McDonough's Airacobra in my
references. What they show clearly, is:
-
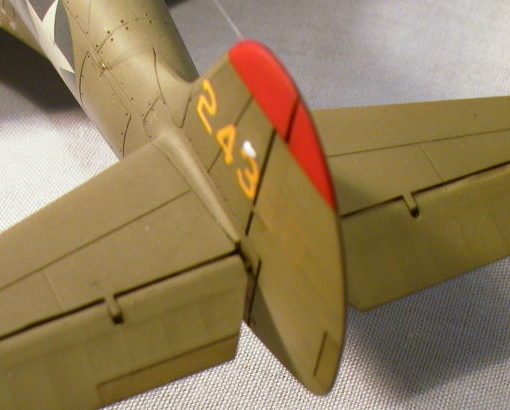
The fabric covered control surfaces were heavily
weathered and bleached, an effect also to be seen on many other SWP Airacobras.
The yellow serial stencilling had nearly disappeared from the rudder.
-
The Donald character only adorned the starboard
side of the fuselage.
-
The 'Aeroproducts' prop blades were not painted
black with yellow tips, but left in a grey-silver finish (perhaps completely
unpainted?).
I used LIFECOLOR acrylics US olive drab 41 and US olive drab 41/weathered for
the upper surfaces and Aeromaster US Neutral Grey 43 for the undersurfaces.
To avoid a monotonous, dull look and in order to represent a strongly
weathered aircraft, I first pre-shaded selected areas of the upper surfaces with
black and other areas, like the fuselage spine, in light grey. Then several thin
coats of Olive Drab paint were built up with diluted LIFECOLOR. The pre-shaded
areas give the OD the desired difference in appearance. As LIFECOLOR is a very
finely pigmented and not so opaque paint, the process of colour build up is
easily controllable and a very subtle finish is possible. After the paint had
dried for a day or so, I polished the surface with a piece of old towel. The
next step was spraying on several layers of highly diluted 'weathered Olive
Drab', polishing it irregularly with the old towel between layers.
The look of the undersurfaces was broken up by overspraying Aeromasters Neutral
Grey 43 with slightly lightened hues of the same colour.
Cutting Edge decals, printed by Microscale, went onto the towel-polished
LIFECOLOR/Aeromaster surface without a hint of silvering. Absolutely no need for
a gloss coat here. As we are talking about a strongly weathered finish, I did
not apply any stencilling to the upper surfaces.
Paint chipping was simulated with Humbrol silver enamel, painted on with a '000'
brush and oversprayed with flat varnish.
I tried something new to accentuate the panel lines in a more subtle way
compared to an overall wash with black paint. I applied black/very dark
grey/brown pastel dust to the panel lines with a pointy '00' brush, gently
removing the excess with a soft wide brush. When happy with the appearance, I
just sealed everything with Aeromaster flat varnish, that turned into a bone-dry
finish with some additional drops of Tamiya's acrylic flat base. Afterwards,
only selected panel lines, where leaking hydraulic fluid or oil would have
slowly seeped through from inside, were further pronounced with Humbrol matt
black, strongly diluted in white spirit.
The exhaust staining was built up in several layers. First a 'basecoat' of
black, brown and orange pastel dust was applied to the area behind the exhaust
stacks. The whitish-grey 'lead' residue was airbrushed on with strongly diluted
Gunze acrylics. I use these paints for that job, because they take a long time
to harden and can easily be rubbed off/toned down with a dry towel or a piece of
tissue dipped in plain alcohol.
A bit more light coloured pastel dust here and there, and the staining was
sealed in with ultra flat varnish.
I certainly enjoyed building this kit very much and do hope, that Eduard will
surprise the modelling community with many more kits in the next years to come.
Resources
-
Eduard 1/48th scale kit #8062, P-39 Airacobra 'ProfiPack'
-
Cutting Edge resin set #CEC48269, Super Detailed
Cockpit for Eduard's P-39
-
Cutting Edge decals #CED48035, P-39 Airacobra (o.o.p.)
-
leftovers from Eduard's PE-set #48175 for
Monogram's P-39
-
Aires resin set #4009, Browning M2 .50 cal.
machine guns
References
-
P-39 Airacobra In Action, by Ernie McDowell,
Squadron/Signal Publications #1043
ISBN: 0-89747-102-4
-
P-39 Airacobra Aces of World War 2, by George
Mellinger and John Stanaway, Osprey Aircraft of the Aces #36, Osprey
Publishing Ltd, ISBN: 1-84176-204-
-
P-39 Airacobra In Detail, by Bert Kinzey, Detail
& Scale Aviation Publication
Vol. 63, Squadron/Signal Publishing, ISBN: 1-888974-16-8
-
Bell P-39/P-63 Airacobra & Kingcobra, by
Frederick A. Johnsen, WarbirdTech Series Vol. 17, Specialty Press Publishers,
ISBN: 1-58007-010-8
-
Bell's Cobras - Mid-engined Flying Guns Pt.1, by
Ken Wixey, Air Enthusiast bimonthly No.81, May/June 1999, Key Publishing Ltd.
-
Zeno's Warbird Video Drive-In ,
http://www.zenoswarbirdvideos.com/ Watch two official USAAF training films
('Introduction to the P-39', 'How to Fly the P-39') for free (!) and you'll
get to know all those little switches and levers in your lovingly modelled
cockpit interior. I'm still amazed at what you can find on the web!
Click the thumbnails below to view larger
pictures:
Model, Images and
Article Copyright © 2002 by Werner Scheibling
Page Created 25 February, 2002
Last updated 04 June 2007
Back to HyperScale Main Page
Back to Features Page
|
 Home
| What's New |
Features |
Gallery |
Reviews |
Reference |
Forum |
Search
Home
| What's New |
Features |
Gallery |
Reviews |
Reference |
Forum |
Search