|
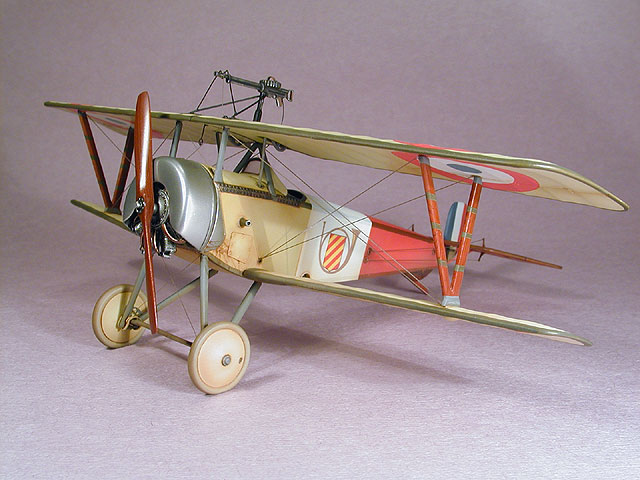
Nieuport 11 Bebe
by
Gregg Cooper
 |
|
Nieuport 11 Bebe |

Eduard's 1/48 scale Nieuport 11 is available online from
Squadron.com
A long time ago, when I was just twelve, I was invited to a
Christmas “dance” party put on by one of the girls from my sixth
grade class. This was my very first dance party, and my folks made a
HUGE deal out of it! (You know, pictures, new jacket, and Angel
Flight polyester suit with vest ….)
Also, I was to bring a gift for a “boy” to be used as part of a
gift exchange to be held at the party. It just so happened that my
local discount store had a bunch of Revell 1/28 scale Fokker
Triplanes in Werner Voss’ markings at a discount price. (Remember
the skinny white boxes with the photograph of the built-up model?) I
was with my mother and convinced her that the Fokker kit was the
perfect gift to bring to the party. What she did not know was that I
was already planning on a way, somehow, to bring the Fokker back
home after the party. I was thinking of things to say later to my
folks… “Look mom, I got my own gift in the exchange!” Hehehehe…
I convinced a buddy of mine who ended up with the Fokker kit to
trade gifts with me. After an eternity of building and painting the
model (a day or two) I had a pretty good looking Voss Triplane to
show off complete with streaked Testors Olive Drab over the light
blue plastic. Best model I had ever built!
The joke was on me however, when Christmas morning came around and I
found a familiar sized skinny box under the tree from my folks.
Guess what was inside. Yep! A Revell Werner Voss Triplane kit! My
mom had seen how excited I was about the model and secretly
purchased two, stashing one under the tree for Christmas morning.
Boy did I feel like a putz. Especially because I knew that she knew
my secret. I never did build the second Triplane either, and have
not touched a WWI model again until now.
|
Eduard's
1/48 Scale Nieuport 11 Bebe |
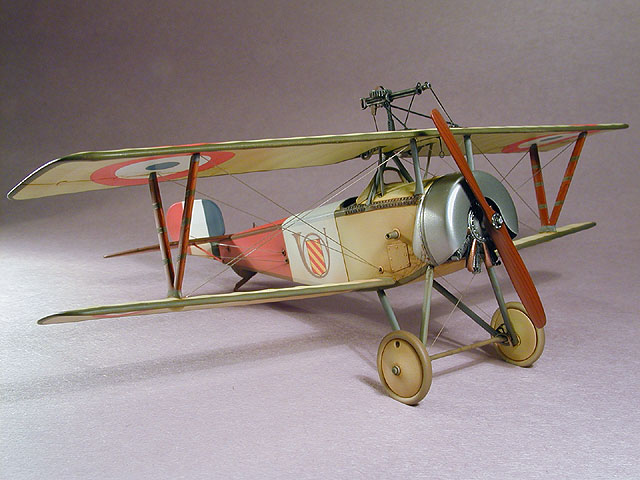
Having decided to try WWI modeling again, I wanted to start with
an easy project. Eduard has become the standard bearer in 1/48 scale
WWI model manufacturing, and was the logical place to look for a
first project. Now, just because I haven’t built a WWI kit doesn’t
mean that I haven’t kept up with the kit reviews. I already knew
that Eduard’s Nieuport series of models were well detailed, easy to
assemble with no fit problems, and being Nieuports, have very little
rigging. Perfect! I chose Eduard’s 1/48 scale Nieuport 11 Bebe for
my first shot.
The Bebe kit is the newest Nieuport that Eduard has released and
features a brand new Le Rhone motor that is better detailed than the
earlier Nieuport 17 kits. (Recent re-issues of the Nieuport 17 kit
have the new motor in them as well.)
I figured the Profipak boxing would be a great out-of-the-box
project, and started my build with the IPMS out-of-the-box rules in
mind. (Please see my Gekko series of articles -
Part One -
Interior;
Part Two -
Construction;
Part Three -
Painting; for more details on out-of-the-box modeling).
Following the kit’s instruction sequence, I started this
adventure with the fuselage interior. Here I was to get my first
reminder of just how unfamiliar I was with WWI modeling.
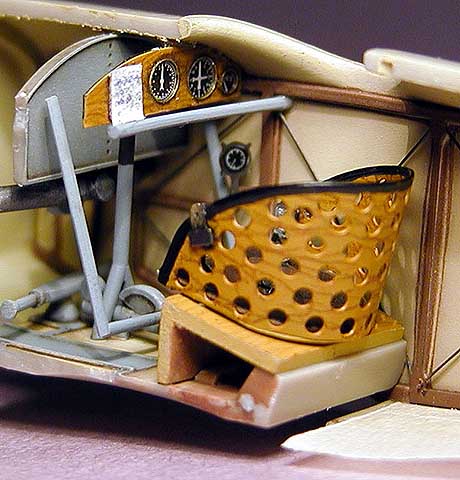
Fuselage Interior
After opening up the guide holes for the control wires, aileron
pushrods, and also the pilot’s footstep, I installed the etched part
Eduard provides to enhance the interior sides that includes rib and
stringer details with truss wires, only to find that the footstep
cutouts in the etched piece and the plastic parts do not align. This
was obviously not an easy fix, and one that I would have to live
with. A little disappointed, but figuring the inside of the footstep
would not show, I carried on. I built the interior using Eduard’s
painting suggestions, only to find additional information on
interior colors later.
One mistake I made was painting the entire forward fuselage
interior to simulate fabric covering. In reality, these surfaces
were made from thin plywood, covered on the outside with cloth,
while the interior surfaces of the fuselage were left natural or
varnished plywood. So my model is clear doped linen on the inside of
the cockpit where it should be plywood. Maybe the fitters applied
fabric to the inside of my airplane as well. I also painted the fuel
tank gray before discovering that it was actually made from copper
and left unpainted.
The seat is a photoetched assembly provided with the Profipak
version of the kit and includes a cushion and harness. The seat and
photoetched dashboard was painted in simulated wood tones using
brown colored pencil over a base of tan paint followed by a
“varnish” mix of clear Tamiya orange and yellow.
The kit’s instructions are unclear on the position of the control
column attaching to the linkage details on the floor, so I “winged”
it only to find beautiful reference later on the Internet that
showed my placing of the column a little too far forward. Behind the
seat, the fuselage is open and viewable for a ways back. The etched
rib details help with the details on the fuselage sides, however,
the floor behind the seat can be seen as well, and will have a
visible seam after the fuselage halves are cemented together. My
solution was to place a piece of masking tape (conveniently the same
color as the interior) cut to the shape of the fuselage bottom and
fitted into one side of the fuselage. When the fuselage halves are
glued together the tape hides the seam.
Given the mistakes I made, and the ones that Eduard made, I am
pleased with the overall look of the interior. Next time things will
be different!
 Fuselage
Exterior Fuselage
Exterior
After the fuselage was together, the rest of the model went
together surprisingly quick.
Looking at my references, I discovered some improvements could be
made to the kit here and there. The fuel tank and oil tank both have
filler caps located in the upper front of the fuselage, directly
behind the cowl, and on the cowl itself. These were scribed with a
round template and then the “filler cap” was given a domed profile
with a drop of epoxy. The cheek pieces of the cowling were actually
air slots that let air out of the cowling, and needed the slits in
the bottom deepened and expanded to simulate the openings.
The horizontal tail surfaces needed holes opened in them to allow
the elevator control cables to pass through, and on the upper wing,
some locating holes for alternate Lewis gun mounts needed filling.
Wings
The upper wing of the real aircraft was actually an assembly of
two wings halves, right and left, that joins in the center. Since
the kit’s wing is one piece, I scribed a cord-wise line around the
center of the wing where the panels would join.
The ailerons needed hinge straps, and these were added using Bare
Metal Foil tabs on the upper and lower surfaces of the hinge lines.
After these details were added, I took special pains to ensure that
the lower wing and tail were attached with correct alignment.
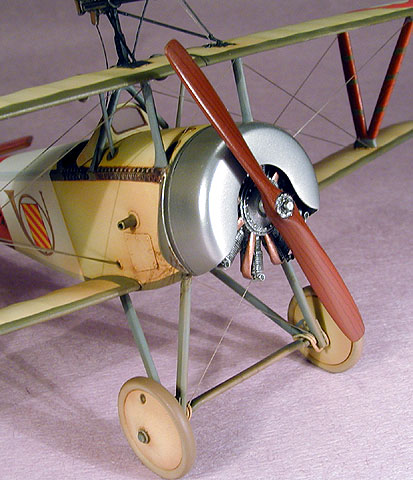
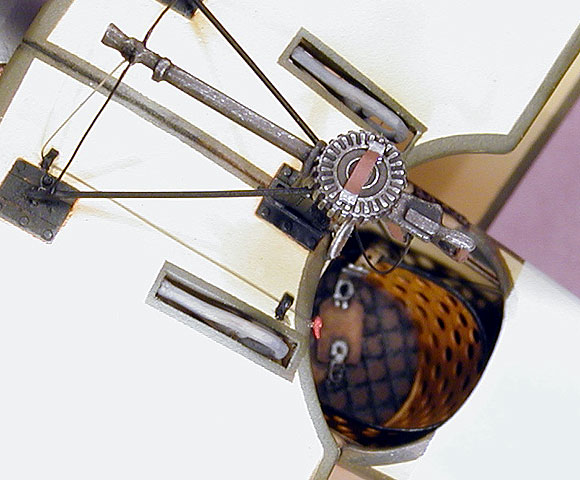
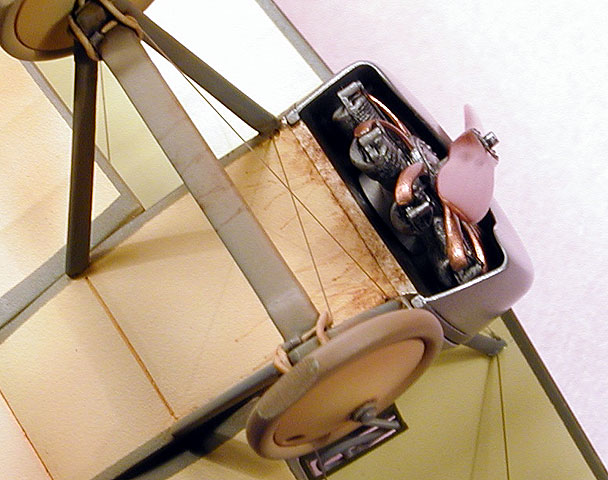
Motor and Cowling
The motor and cowling were tackled next. I was pleased to find
that the Le Rhone motor had very nice details, including the intake
manifolds, and would look great with the etched pushrods provided.
Painted in Alclad II dark aluminum and copper, followed by a wash of
black oil paints, I am pleased with the look. All it needs is plug
wires.
The Bebe’s cowling was retained with a steel strap around its
back-end, which was simulated by scribing the strap around the rear
of the cowling. To make the “strap” look like a separate part, and
to add depth, I masked it off from the cowl and airbrushed a heavy
application of Gunze Mr. Surfacer 500, which left the “strap” with a
pronounced raised look. The entire cowling was primed with Mr.
Surfacer 1000 and then airbrushed with Alclad II aluminum.
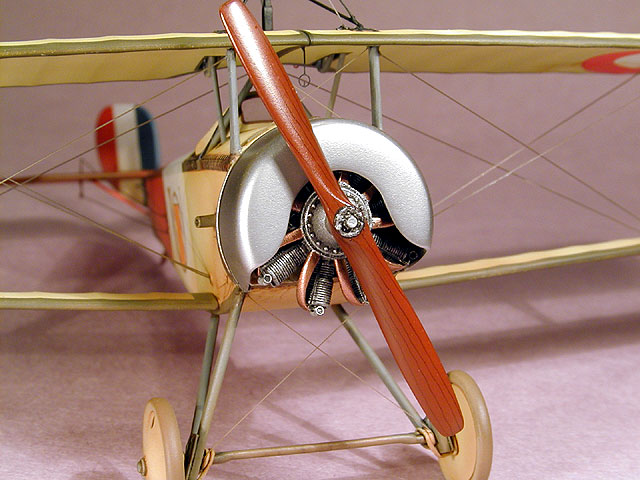
Wood Finish for Propeller and "V" Struts
I was worried about simulating the wooden construction of the
propeller and “V” struts. I have tried to simulate wood before,
using oil paints, washes, drybrushing, decals, airbrushing and other
techniques, but I was never happy with the results. I decided to try
colored pencils over a base coat of neutral wood coloring.
I experimented on the seat first, and was pleased enough to try
it on the propeller and struts. I chose a light chestnut mixture of
Tamiya paint for the base coat. Using black colored pencil, I drew
onto the parts a facsimile of wood grain.
For the final finish, I wanted a dark, reddish mahogany color to
the parts, choosing a mixture of Tamiya clear red and orange.
Thinned with lacquer thinner (really, it works!) the Tamiya clear
mixture provided the varnished mahogany look I was after. The
lacquer thinner dries the Tamiya clears very fast, and very hard.
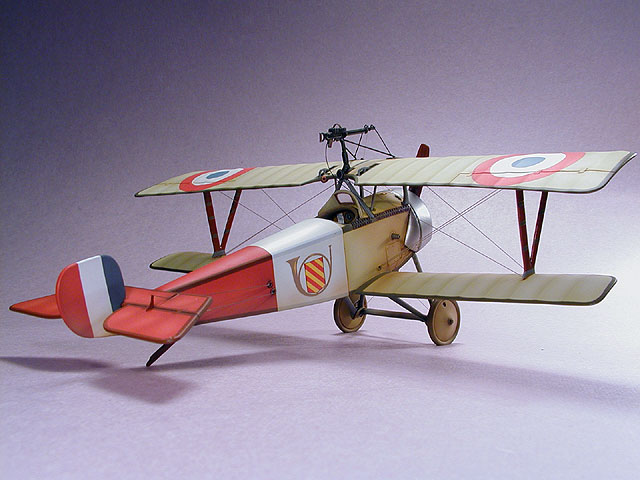
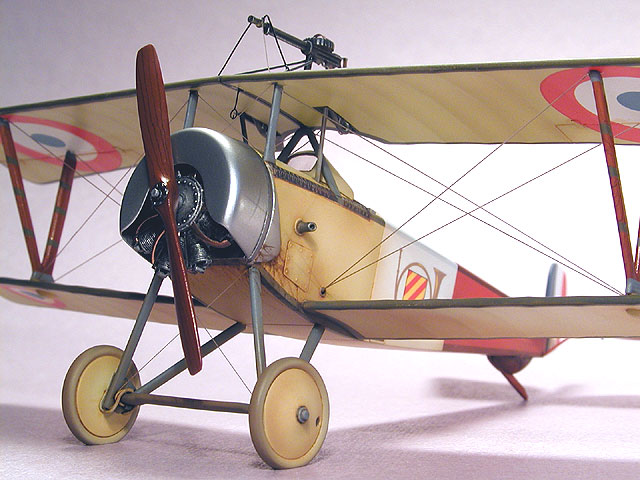
Not having much choice in aftermarket decals, I chose to use the
kit decals to model an airplane flown by Lt. Armand de Turenne of
Escadrille N48 in 1916. Armand de Turenne was a French ace that
would score the majority of his 15 victories on SPADs later in his
career as commander of Spa12.
The Profipak release includes markings for his Bebe in two
different schemes.
Usually, I like to have at least one photo available of the
particular airplane I am modeling. I searched for a very long time,
trying to locate a photo of de Turenne’s plane, but never could
locate one. Trusting to Eduard, I carried on anyway. I chose the
early scheme that had a natural linen finish on the forward
fuselage. Later, de Turenne had the forward fuselage painted in
blue.
French Nieuports of this time were finished in a “natural” color.
Some sources say they were finished in clear-doped linen, and others
say they were actually finished in a light yellowish color extremely
similar to clear-doped linen. Given the fact that the Nieuport 11
had plywood forward fuselage sides, covered with linen, I would
think the aircraft had a colored finish.
The photos I have looked at show a very uniform appearance,
indicating, to me, a solid color application. I mixed up a
concoction of Tamiya paints to match Humbrol OAK as a base color for
my Nieuport. I painted the Nieuport in the same fashion as related
in Part 3 of my Gekko article, simulating darker rib areas,
and lighter fabric using an airbrush with various thinners and
lighter mixes of the base color.
Most Nieuport 11s had fuselages and flying surfaces edged in a
darker color that is also controversial, in that nobody can identify
the exact color. Some say black, some say brown, and others a khaki
color. I chose a greenish khaki color for my model. The Profipak
includes some very handy vinyl masks that make this chore a breeze.
After the weathered base color was applied to the wings and
fuselage, I applied the vinyl masks and painted the khaki color with
no problems. I really liked these masks! Also, the reinforcing tapes
on the V struts were masked and sprayed in the same khaki color used
for the edges of the flying surfaces. Using this color on the V
struts was a guess, as Eduard provides silver decals for the job,
but I did not feel that silver was correct for this early aircraft.
Photos seemed to indicate a dark color or sometimes a light color
here.
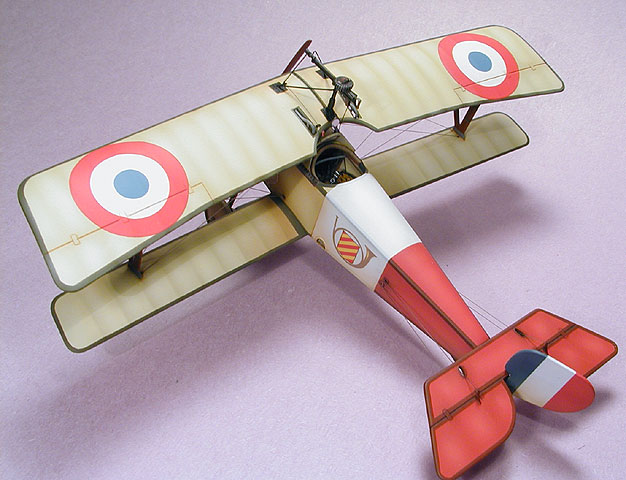
 Armand de Turenne’s Bebe was flamboyantly colored with large
white and red areas painted aft of the cockpit. I wanted to simulate
the poor coverage qualities of early dope (or paint) by having the
khaki edging showing through the colors. I did this by extremely
thinning Tamiya colors with Gunze Mr. Color thinner and applying
them in light misty coats until the colors were apparent, yet
transparent. The white was masked and sprayed first, followed by red
after the white had cured for an hour or so. The rudder was also
masked and painted tri-color at this time, matching the colors to
the decals used for the roundels. Eduard’s instructions called for
dark edging around the rudder, and a vinyl mask is supplied for this
task. I elected not to paint the rudder with dark edges however,
because I could not find a single photo of a Bebe that had this
feature. A quick, thin coat of Testor's Metalizer Sealer prepared the
model for decals. I used the kit decals for de Turenne’s coat of
arms, and an Aeromaster sheet for the roundels. Armand de Turenne’s Bebe was flamboyantly colored with large
white and red areas painted aft of the cockpit. I wanted to simulate
the poor coverage qualities of early dope (or paint) by having the
khaki edging showing through the colors. I did this by extremely
thinning Tamiya colors with Gunze Mr. Color thinner and applying
them in light misty coats until the colors were apparent, yet
transparent. The white was masked and sprayed first, followed by red
after the white had cured for an hour or so. The rudder was also
masked and painted tri-color at this time, matching the colors to
the decals used for the roundels. Eduard’s instructions called for
dark edging around the rudder, and a vinyl mask is supplied for this
task. I elected not to paint the rudder with dark edges however,
because I could not find a single photo of a Bebe that had this
feature. A quick, thin coat of Testor's Metalizer Sealer prepared the
model for decals. I used the kit decals for de Turenne’s coat of
arms, and an Aeromaster sheet for the roundels.
A wash consisting of oil paint thinned with Naphtha (lighter fluid)
was applied to all panels and joints on the model. I used a
dark-yellowish raw sienna in the “natural” and white colored areas,
and raw umber in the red areas. When all was dry, I chose a 50/50
mixture of Testor's Metalizer Sealer and Dulcote thinned with
lacquer thinner for the final finish. I prefer a flat or matte
finish on aircraft models, and couldn’t stand to make it any
shinier.
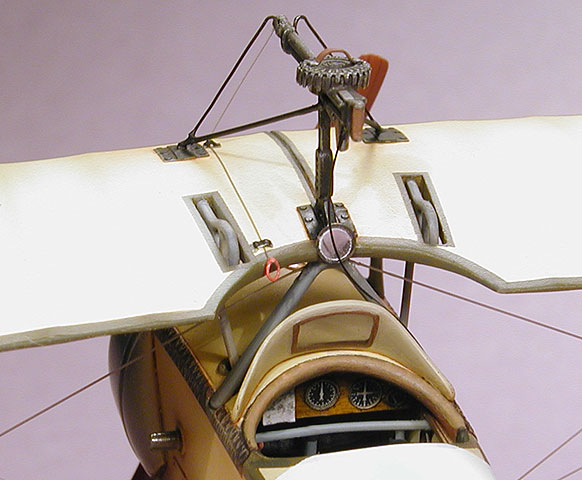
Upper Wing
With all of the major components painted, it was time to think
about attaching the upper wing. (YIKES!) I was more than a little
nervous about screwing up the whole model! Thoughts of complicated
alignment jigs, and hours of setting things straight were in my head
for days as I contemplated the best way to approach attaching the
upper wing. I decided to attach all of the struts to the lower
wing/fuselage assembly and see how things stood. To assure proper
alignment of the struts, I made a template for the angle of forward
rake on the V struts. When the upper wing was placed on the struts
to check out how much alignment I would need to adjust, I was amazed
to find that the whole assembly was spot-on. I used some thin ZAP CA
applied with a wire to attach the wing where it was. The landing
struts were next, and proved to be no problem. Whew!
Rigging
Invisible nylon thread was used for the rigging. I used .006 for
the flying and landing wires, while .004 was used for the control
cables. The rigging was installed into holes I had previously
drilled halfway into the wings and struts, using very thick Crazy
Glue (brand name) GEL CA. This stuff is super thick, and one tiny
drop will stay on the end of a line or sprue. After one end of the
line is in its hole, a tiny drop of CA accelerator is applied
directly to the joint, instantly securing the line. On the other
end, it’s a matter of measuring and trimming the line until it fits
snuggly in the anchor hole, attached in the same manner. Some of the
rigging did not get as tight as I wished it could have. Heat applied
to the rigging helped to tighten some of the anomalies, but the
nylon line seems to expand and contract with the weather. Weird. I
know that many modelers drill a hole all the way through the wing,
allowing the rigging to be pulled tight under tension while the hole
is filled with CA, to be snipped off later and sanded flush. Maybe
next time I will try that, but I was not comfortable with the risk
of ruining the finish on this one. I am going to have to experiment
a little more.
Exterior Details
After the rigging was complete, other details were added to the
exterior. The Profipak includes many etched exterior details
including two different styles of Lewis gun mounts, windshield
framing, control horns, mirrors, gun sights, and more.
The Lewis mounts on the photoetch fret are an improvement over
the plastic parts of the regular kit, but are really, really
delicate. It can be tricky as well attaching the etched base plates
for the Lewis mount in the exact position on the wing to align with
the delicate mount itself. I ruined the original etched mount that
Eduard suggested on the instructions for de Turenne’s airplane, and
was forced to revert to the other mount provided, incorrect or not.
Naturally, I ruined part of this one as well! So, I replaced the
damaged etched part with one made from .010 brass rod, ruining my
out-of-the-box efforts. Oh well!
The Lewis gun was painted and attached, the motor and cowling
attached, propeller and wheels installed, and finally the
windshield. I elected to use the clear styrene windshield, masked
and painted, instead of the etched one because I was not happy with
the fit of the etched piece.
At this point, the model could be considered finished, but I felt
that it needed some connection to the ground, so I airbrushed a
light dusting of earth color around the landing gear, tail, bottom
of the fuselage and the bottom of the lower wing. Since the model
was no longer out-of-the-box, I decided to enhance a few other
details as well. Bungies were added to the landing gear using .010
lead wire, a Bowden cable was attached to the Lewis gun, and a
release cable with pull-ring attached to the front of the Lewis gun
mount. Some oil streaks and stains were added as well.
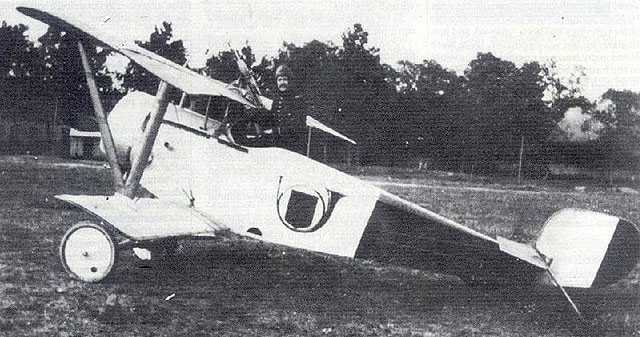
All in all, this little model was a great pleasure to build, and
I would recommend it to anyone wishing to build an entry level WWI
model. I learned that you cannot have enough info on WWI subjects,
and also that you will not find enough info on WWI subjects. As a
final ironic twist to this story, right after the model was
finished, Bob Laskodi sent me a beautiful picture of Armand de
Turenne standing next to his Nieuport Bebe. Happily, the details
Eduard provides as to painting and markings are correct. The photo
clearly shows dark edges around the rudder,( which I will be adding
to the model shortly) and dark tapes on the V struts. Eduard also
got the correct Lewis mount for this aircraft; the very same one I
mangled during assembly. Oh well! I don’t think I will fix that one.
Obviously, Eduard had this photo to base their kit upon, and after
seeing the photo, I believe that Eduard did a VERY nice job of
replicating the aircraft in kit form. Wouldn’t it be nice if
manufacturers included such photos in their instructions?
Photography
The photos of the model were taken on my kitchen table using two
halogen spotlights, one incandescent floodlight, and a hand-held
Olympus C-2100 Ultra Zoom digital camera. The camera settings were
placed in manual mode, white balance set to “incandescent”, macro
mode enabled, exposed at F 8.0 at 1/15 of a second.
Here is a list of references used in the construction of this
model. Of particular note are the websites listed.
The WWI Modeling Page is LOADED with good stuff and features an
ongoing e-mail list of discussion topics. The Aerodrome has lots of
info and features several WWI discussion boards featuring many
helpful folks to answer questions no matter how absurd. And you MUST
check out Fine Art Models…
Books
-
Windsock Datafile Special NIEUPORT
FIGHTERS Volume 1 by J.M. Bruce
-
Osprey Aircraft Of The Aces #33
NIEUPORT ACES OF WORLD WAR I by Norman Frank
-
Squadron Signal In Action #167 NIEUPORT
FIGHTERS by Peter Cooksley
Websites
Model,
Images and Article Copyright © 2002 by
Gregg Cooper
Page
Created 18 November 2002
Last updated
04 June 2007
Back to HyperScale Main
Page
Back to Features
Page |  Home
| What's New |
Features |
Gallery |
Reviews |
Reference |
Forum |
Search
Home
| What's New |
Features |
Gallery |
Reviews |
Reference |
Forum |
Search