|
Mosquito vs. Me
410
Wg Cdr E.
D. Crew - Oberleutnant R. Pahl
0050hrs April 19, 1944
by Mark Beckwith
|
|
|
DeHavilland Mosquito and
Messerschmitt Me 410 |

Tamiya's 1/48
scale Mosquito NF.XIII and
Revell's 1/48
scale Me 410B-1 are
available online from
Squadron.com
The last attack of the “Baby Blitz’
took occurred on the night of 18/19th April 1944. Operation
Steinbock began on January 21st 1944 and was intended as a
renewed offensive on London to disrupt preparations for the invasion of
Europe by the allies, and as an attempt to demoralize the British
civilian population in retaliation to the increasing bombing of German
cities by the RAF.
One of the participating units was I/KG51. Now
equipped with Me410A’s the Edelweiss Geschwader had seen action on the
Eastern front with Ju88’s before moving to the west. Based at Evreux in
France and commanded by Maj Hans Unrau, the squadron’s mission was to
fly intruder mission over southern Briton. These missions were not
going well, with two or three crews failing to return from each night’s
sortie. There were very few survivors, with the British night fighter
squadrons of Mosquito NF MkXIII’s proving more than a match for the
German intruders. One of the participating pilots on that last raid was
24-year-old Oberleutnant Richard Pahl.
Richard Pahl joined the Luftwaffe in 1939 as a
candidate officer and subsequently joined KG51 flying Ju88’s on the
eastern front. He was wounded three times, the last of which in 1943
was nearly fatal when he received a bullet through the lungs and just
managed to bring his aircraft and crew home safely before collapsing at
the controls as the bomber rolled to a stop. Following months of
convalescence he was offered a training assignment but he insisted on
returning to his unit, now based in France and flying the Me410A on
night intruder missions over southern England.
On the 16th of April, 1944, Richard
wrote a farewell letter to his family, perhaps due to some sort of
premonition. Two days later during the night of 18/19th
April, Richard, who had taken a mission originally assigned to a
comrade, left his base flying a Me410A 9K+JH WNr 12005 and failed to
return. On the 20th his unit celebrated his promotion to
Hauptmann, retroactive to 1st April in his absence.
The following is the Pilot’s Individual Report of
Wg Cdr (later AVM, CB, DSO, DFC, MA, FRAeS) E. D. Crew of 96 Squadron.
‘Wg Cdr E. D. Crew DFC,
(pilot) and WO W. R. Croysdill (operator) took off West Malling at
0100hrs and landed there at 0230hrs. I was patrolling over the channel
at 23,000ft under Wartling GCI (Controller F/C Powell), when I was
vectored onto a bogey on a course of 340.’
‘Contact was obtained at four
miles slightly below and crossing port to starboard on an a/c taking
slight evasive action. At full speed the range closed easily and I did
not use N2O at all. After four minutes, range was 1,000ft and I
obtained an indistinct visual of a twin engined a/c, which, on closing
to 300ft, I believed to be a Ju88. No exhausts were visible. I eased
the nose of the Mosquito up and fired a short burst from dead astern,
just as the e/a began to dive. This was followed by a last flash from
the centre section and cockpit area, and flames.’
‘I followed the a/c down and
fired again, with more strikes in the same area, resulting in more white
flames and e/a dived very steeply to port. A third deflection burst
produced more strikes and flashes and e/a disappeared below me. Visual
and contact was lost. I noticed that outboard of each engine there was
a cylindrical bulge beneath each wing, resembling the long range tanks
of the Fw190.’
‘Shortly afterwards, I was
put on another contact at 4,000ft height. This e/a was at 3.5 miles
range, below and to port, flying in a southerly direction. I turned to
starboard as it crossed and followed it down through a steep port
orbit. Evasive action was moderate and window was being used. As I
straightened out of the orbit, an a/c crossed in front at almost
collision range, and I had to pull up sharply to avoid hitting it, so
that I had no chance to open fire. As it passed below me, I recognized
the twin fins and rudders of a Do217. But though I turned round
immediately I could not regain contact, and because of the nearness of
the French coast I was told to return on 330.’
‘Time of combat 0048. Place
of combat R11. At 0050 according to the ROC MG fire was heard at sea,
at 055 an a/c later identified as an Me410 crashed in Brighton reference
Q72. No ack-ack was heard in the area before 0110, AI 2 (G) report that
20mm cannon strikes have been found on this Me410.’
‘This a/c was originally
claimed as a Ju88 probably destroyed. It is now claimed as an Me410
destroyed in view of the evidence of the British crash.’
‘Wg Cdr Crew states that his
operator said at the time it was a Me410 but he contradicted him and
insisted that it was a Ju88. The inability to see exhausts from above
would also point to its having been, in fact, an Me410.
Armament report: rounds
fired: 20mm SAPI 48, 20mm HEI 48. Total 96
Stoppages: Nil
Cine camera exposed 1ft
automatically’
 Later
Wg Cdr Crew stated that his aircraft on this sortie was a Mosquito NF
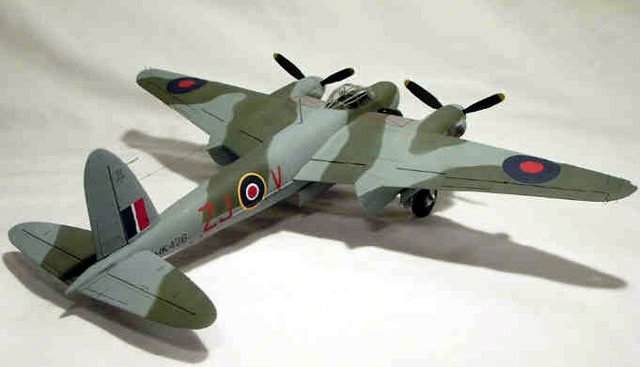
MkXIII coded ZJ-V and according to his log the serial number was HK426.
It’s worth noting that one week later he took delivery of a new
aircraft, serial number MM499 that it also bore the code ZJ-V,
presumably HK426 received different coding at that point. Later
Wg Cdr Crew stated that his aircraft on this sortie was a Mosquito NF
MkXIII coded ZJ-V and according to his log the serial number was HK426.
It’s worth noting that one week later he took delivery of a new
aircraft, serial number MM499 that it also bore the code ZJ-V,
presumably HK426 received different coding at that point.
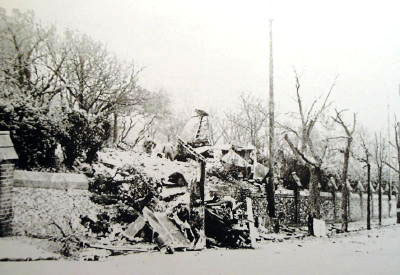
According to the
Brighton and Hove Herald,
Richard Pahl’s body was found hanging from his parachute on a tree
opposite the churchyard in which his aircraft crashed. He was found to
have sustained a shrapnel wound to the head. He was also wearing his
Iron Cross (first Class). The body of his companion on his last flight,
Wilhelm Schubert, was washed ashore on the 20th April, the
same day Operation Steinbock was suspended. Both men were 24 years old
when they died. The RAF buried Richard Pahl in Brighton Borough
Cemetery with full military honours. Photographs were taken and sent to
Pahl's family through the channels of the International Red Cross.
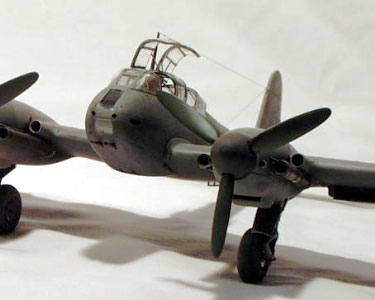
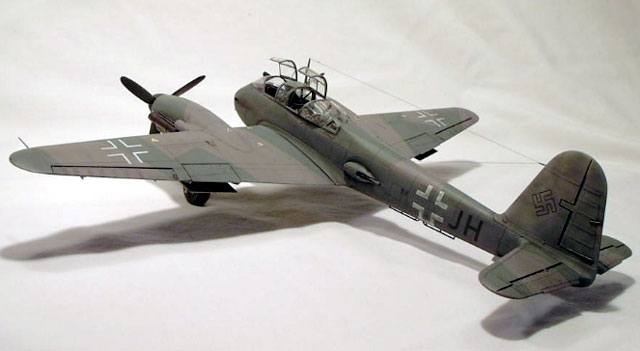
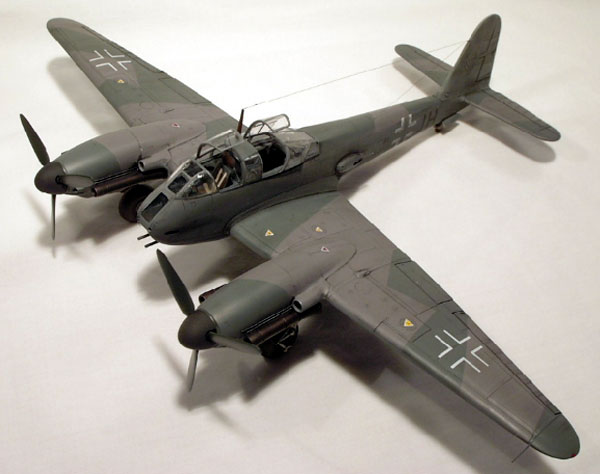
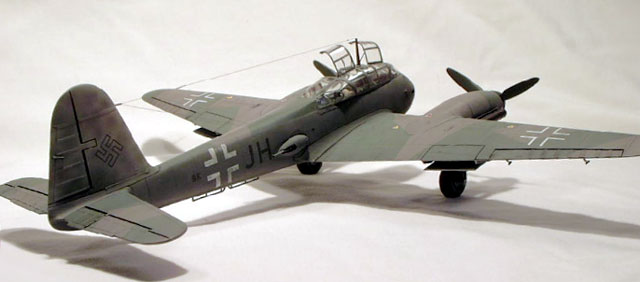
Oberleutnant R.
Pahl's
Messerschmitt 410A "Hornisse"
|
The Messerschmitt Me410 was based on the design of the previous Me210
twin-engined fighter. Nicknamed the "Hornisse (Hornet), Me410 had wing
slats and a lengthened fuselage. Two 1,750 hp Damlier Benz 603A engines
replaced the 1,350 hp DB 601F powerplants found in the Me210. These
more powerful engines required redesigned nacelles which were longer
than those on the Me210. Both the Me210 and the 410 carried a crew of
two who were seated in tandem beneath a single framed canopy.
Six Me210s were modified to Me410 standards, and these were joined in
flight testing by the first true Me410V-1 prototype in late 1942.
During 1943 291 Me410s were built, and these were followed by an
additional 722 in 1944. The Danau Flugeugbau in Hungry also built 34
Me410s in 1943 and 74 in 1944 before the plant was destroyed by allied
bombing attacks.
The first production version of the Hornisse was the Me410A-1 light
bomber. This was followed by several variants and sub-variants for the
Zerstorer, bomber destroyer, and photographic reconnaissance roles.
Revell 1/48
Messerschmitt 410A "Hornisse"
|
The Kit
Released in 2000, the Me
410 family of kits is in the same class as the
ProModeler Helldiver, Me110, and others; kits which in my opinion
represent the absolute best value in our hobby. Well-engineered, pretty
good fit (we are modelers aren’t we?) the only draw back is the flimsy
flip top box but we can’t have everything, right? The kit comes with
the sprues packed in separate bags.
My version was not ProModeler
so the instruction sheet is fairly basic with a graphical illustration.
The colour callouts during construction are generally useful (not so the
camouflage illustration). The decal sheet was typical Revell, which is
to say not bad, but not great. My sheet was also slightly out of
register.
Construction
Guess what? Construction begins with the cockpit.
In a fit of efficiency several months ago I had painted all the German
aircraft’s cockpits in my stash with RLM66 so I got off to a quick
start. I assembled according to the instructions. I worked from photos
to try and get all the colours right. With the detailing completed, dry
brushing done and a light wash applied I was ready to continue the
airframe.
As Pahl's airplane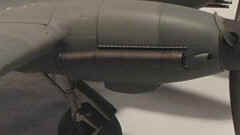 was used as an Intruder, I had to install exhaust shrouds. References
I've seen show that they could have been either straight or
was used as an Intruder, I had to install exhaust shrouds. References
I've seen show that they could have been either straight or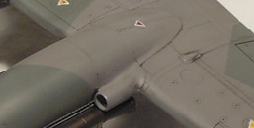 angled pipes and as I had some spare shrouds to hand from Dragon's
Ju-88G-1/G-10 kit I decided to used them. The problem is the two
intakes on the port side of each engine nacelle are angled too low and
the wrong shape. In a fairly simple surgery I removed the kit intakes
with my razor saw and grafted on some Evergreen tube of the correct
diameter. When the epoxy glue had set up (I used epoxy as I did not
want to run the risk of the pieces coming adrift during the
blending/sanding process) I faired them in with Squadron Green putty and
sanded to clean up. I decided to leave installation of the shrouds
themselves until after painting.
angled pipes and as I had some spare shrouds to hand from Dragon's
Ju-88G-1/G-10 kit I decided to used them. The problem is the two
intakes on the port side of each engine nacelle are angled too low and
the wrong shape. In a fairly simple surgery I removed the kit intakes
with my razor saw and grafted on some Evergreen tube of the correct
diameter. When the epoxy glue had set up (I used epoxy as I did not
want to run the risk of the pieces coming adrift during the
blending/sanding process) I faired them in with Squadron Green putty and
sanded to clean up. I decided to leave installation of the shrouds
themselves until after painting.
Airframe construction proceeded
mostly with no great problems. There is one problem area with the kit,
the lower forward section of the fuselage. I had a very large step to
fill and fair in. When this was done I rescribed the area and it looked
passable. The only other area of the kit I used filler was where the
upper forward portion of the engine nacelles, no big problem just a
little time consuming. To cut to the bottom line, if care is taken in
the construction of this kit, the average builder will have no trouble.
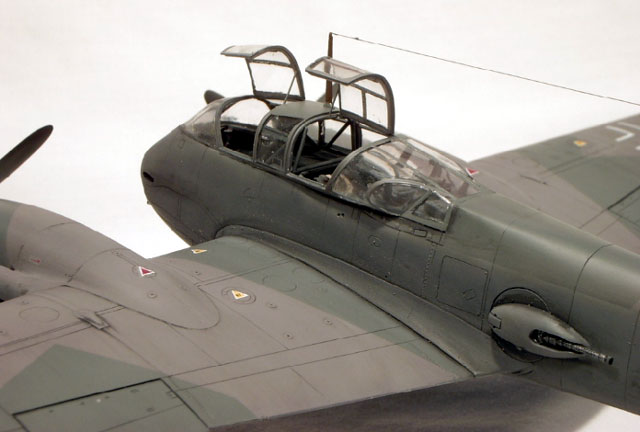
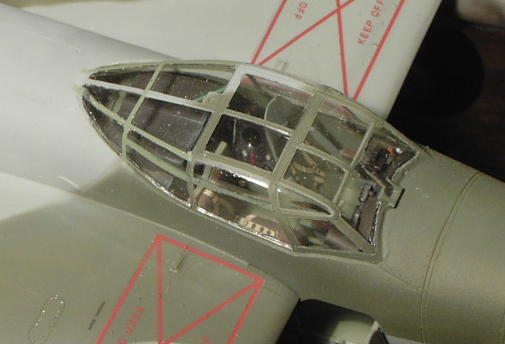
With the airframe complete the
final stage is to attach the canopy. The framing on the Me410’s canopy
is in the inside and outside of the glass. I used Eduard EZ Masks again
and masked the inside before spraying the frames RLM66. When that was
dry I assembled the canopy exactly as described in the instructions. I
test fitted many times with careful adjustments in between and was able
to finally get the canopy to fit with no gaps. When it was on and the
glue cured, I masked the outside of the glass with the rest of the masks
and prepared the kit for painting by washing it in water with a little
soap.
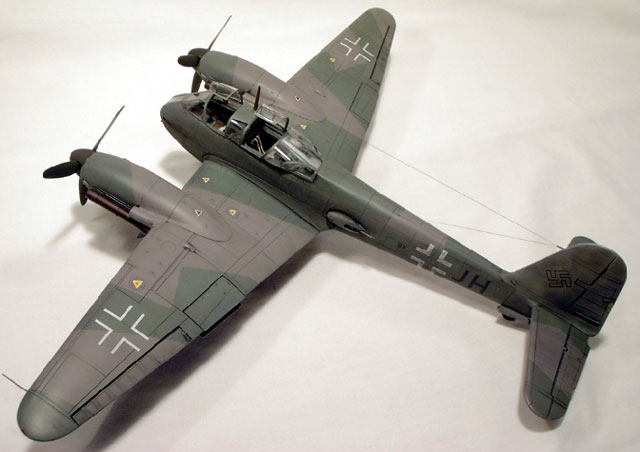
Paint and Decals
Richard Pahl’s Me410 was an intruder and was
painted as such. I found a dearth of references available on intruder
schemes so I used a little intuition coupled with some basic principles
in choosing the colours or the kit. I elected to go with 74/75 upper
surfaces painted in the standard splinter scheme. Before it was painted
with temporary black 22, Pahl’s 410 would have had RLM76 lower and
sides, including the vertical stabilizer. This would then have been
mottled with 74/75/02. Pictures I have of Pahl’s airplane seem to
indicate the tail was only lightly mottled with the black. Therefore, I
decided on my scheme for Pahl’s 410 to be 74/75 splinter for the upper
surfaces and temp black for the fuselage sides and lower surfaces. I
intended to use RLM66 for the black as the black markings would not show
up against it.
First I painted the splinter
pattern using Model Master enamels, I masked with Tamiya tape. When the
74/75 was dry I applied the 76 to the tail fin and then mottled with the
74/75/02/66. When that was dry I finished off the paint job with the 66
on the sides and bottom. During this process there were several touch
ups to do but eventually I was happy with the finish and sealed and
gloss coated with Testors Metalizer Sealer.
With the gloss coat dry I began
decaling. The underside was simple, I only applied the wing crosses as
all the stenciling would have been painted over with the Temp black 22.
I applied the upper wing and fuselage crosses next, followed by the few
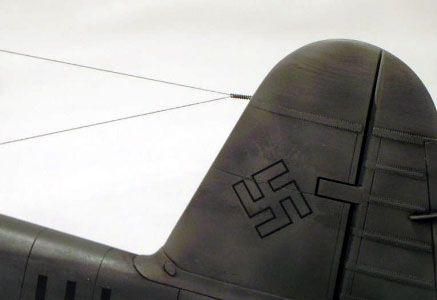
stencils and octane triangles on the wings. The swastika (style of
which matched a photo of Pahl's wrecked aircraft) came from a generic
sheet. All went with no trouble. The triangle markings on the upper
wings were out of register so I had to paint the white border on one
side of each. Pahl's plane that night was coded 9K+JH with WNr.
120005. I made these decals on my PC by simply typing them out using
the Ronnie Olsthoorn's Luftwaffe font (downloaded from
http://www.furball.warbirdsiii.com/downloads/001.html) and printed
them on a laser printer. Next I photocopied them from the paper
printout onto a clear decal sheet and sealed with Mircoscale Liquid
Decal Film. I applied them when they were dry (about an hour to be
safe), again, with little trouble. After I had applied the decals, I
noticed from some photos of Pahl's plane that the WNr. was not present
on the fin in the normal position. I decided that that they may have
been painted over, so I removed the WNr decals. Last, I shot some more
Metalizer Sealer to seal the decals (Note; this really helps to get the
decals to settle down but it is very hot and literally liquefies the
decals, which is fine if you don’t touch them!).
When the sealer was dry I
decided to try a sludge wash for the first time as I wanted to show
Pahl’s airplane as well used. I mixed up the sludge using pastels,
washing detergent and water to the consistency of toothpaste. Then I
just painted it on all the panel lines and other areas of the airframe I
wanted to dirty up. When it was dry, I wiped it off again with a damp
cloth, being sure to leave some of it still on! I was quite pleased
with the result, though next time I will mix the pastels lighter as I
think it turned out a little dark.
Last task at the spray bench was
to fade the paint down with my very dilute gray mix and then apply the
Dull Coat. At the same time I dry brushed some RLM66 over the fuselage
crosses as several photos of multiple aircraft types show that often the
white crosses were painted over lightly. With this done, it was time to
attach all the breakable bits.
More Construction
I attached the undercarriage first, being careful
to get the alignment right and then added the covers. Next I used some
hypodermic needle for the guns, which I had blued with a cigarette
lighter after cutting them to length with a Dremel.
Click
the thumbnails below to view larger images:
I then attached the aerial mast and installed an
aerial wire made from stretched sprue. I used a piece of filament from
a broken 60w light bulb for the tension spring. I removed the masking
from the glass, did a little touching up and then installed the
crewmen's access glass pieces. I fashion a couple of props out of more
stretched sprue and glued them in the appropriate places. Finished.
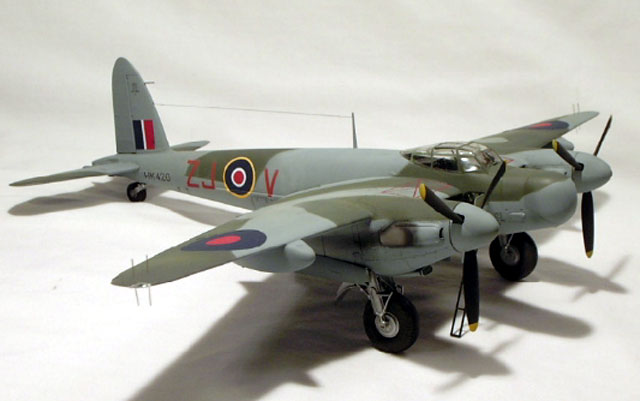
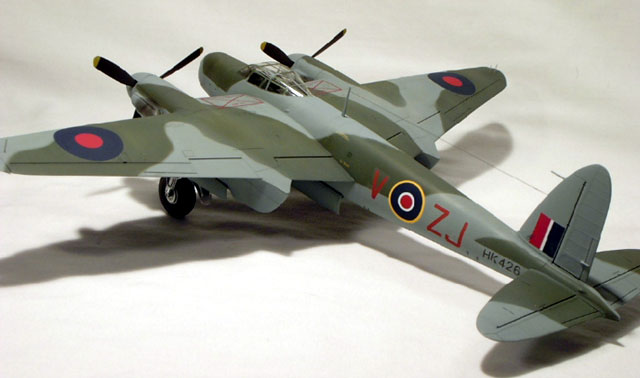
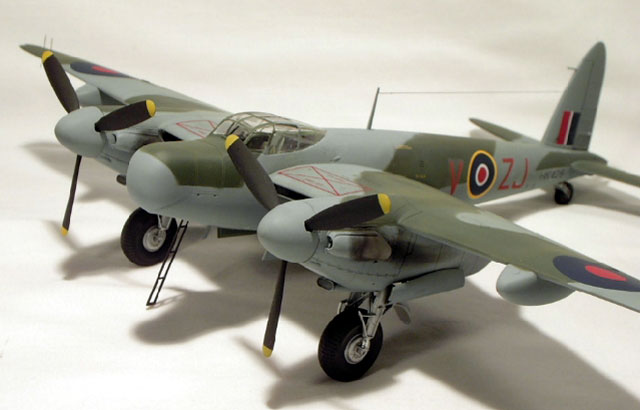
Wg. Cdr. E. D.
Crew's De Havilland Mosquito NF MkXIII
|
It is one of the paradoxes of aircraft
development that some of the world's greatest airplanes have achieved
their fame doing jobs other than the one for which they were originally
designed. No better example of this could be found than the Mosquito,
which, conceived as a bomber, became one of the war's most potent
fighters. More than this, indeed, it was probably the most successfully
versatile of any twin-engined type built between 1939 and 1945. It
excelled in all the widely varied roles. Its duties included the duties
of low-level and high-attack day and night bomber, long-range
photo-reconnaissance, mine layer, pathfinder, high-speed military
transport, long-range day and night fighter, and fighter-bomber. It
served in Europe, the Middle and Far east and on the Russian front. In
fact the ubiquitous Mosquito reigned supreme among General Purpose
types; and of the grand total of 7,781 Mosquitos built, 6,710 were
delivered during the war years.
The first night fighter version was the NF MkII,
which was equipped with a MkIV Airborne Intercept Radar on the nose.
However, it's limited range at low altitudes proved problematic versus
the low altitude high speed attackers such as the Me410. For this
reason, the Mosquito NF MkII came to be equipped with the new
Centimetric radar known as the A.I. MkVIII. The official designation of
this aircraft was NF MkXII. The new A.I. MkVIII radar was also fitted
to an airframe based on the Mosquito FB MkVI inside a "Bullnose" radome
on the nose, resulting in the NF MkXIII. This Mosquito boasted
reinforced wings, could carry 50 gallon drop tanks, and was powered by
two of either the Merlin 21 or 23 engines. The sting of this Mosquito
came from four 20mm cannons installed just under the nose. Later, the
lightweight and improved American made CR-720 radar was mounted on the
NF MkXVII version of the Mosquito which would enter air combat soon
thereafter.
No fewer than twenty-seven
different versions of the Mosquito went into service during the war
years, and some of the most spectacular operations of the air war stood
to its credit. The Mosquito carried phenomenal loads over extremely long
distances, performing feats out of all proportion to the specification
originally envisaged by its designers. In short, the Mosquito was an
outstanding warplane on every count.
Mosquitos were active on D-Day, and right up to the end of the war.
Others were license built in Canada and Australia. Production did not
end in Britain until late 1950.
Tamiya 1/48 De
Havilland Mosquito NF Mk XIII.
|
The Kit
When Tamiya released the first
of their family of Mosquitos, they were met with enthusiasm as an
well-engineered and relatively accurate representation of arguably the
war’s most effective twin engined fighter/bomber. The breakdown of the
kit suggested multiple versions would be available and subsequently the
NF MkXIII was released.
The sprues are laid out in a
logical way, with the bull nose parts for the night fighter version on a
separate sprue in a separate bag. All sprues are packaged in their own
bags, including the clear parts. Instructions are typical Tamiya,
graphically displayed with colour callout noted during the construction
stages. As normal, the colour callouts are for Tamiya paints only.
Construction
In a slight departure from the
norm, construction begins with the wings. Of course, as any
self-respecting modeler would, I ignored the instructions and began with
the cockpit! Considering the Mosquito’s cockpit cannot be displayed
open, there is a surprising amount of detail in the kit parts. I began
by painting all the cockpits parts while still on the sprue with the
appropriate colours using Model Master acrylics. Once the paint was
dry, which with MM acrylics is not very long, I began assembly. I spent
extra time on some of the details to ensure I got as many of the
different colours in the right place on the instrument panel, using
various web-based sources.
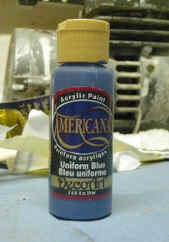 A
quick note about the paints I use for detailing. I use acrylic craft
paints available at most craft/hobby stores. They come in a very large
selection of colours and as they are designed for brush painting are
very easy to use. What’s more, they are very cheap, $2.00 Cdn for a
small squeezable bottle that will last a virtual modeling lifetime. One
of my favorites is Licorice Black, which is great from tires. I’ve done
some experimenting with spraying them but haven’t had a great deal of
success. There are several brands; the picture to the left shows what
to look out for. A
quick note about the paints I use for detailing. I use acrylic craft
paints available at most craft/hobby stores. They come in a very large
selection of colours and as they are designed for brush painting are
very easy to use. What’s more, they are very cheap, $2.00 Cdn for a
small squeezable bottle that will last a virtual modeling lifetime. One
of my favorites is Licorice Black, which is great from tires. I’ve done
some experimenting with spraying them but haven’t had a great deal of
success. There are several brands; the picture to the left shows what
to look out for.
Back to the cockpit. I made
good progress and was fairly happy with the result I achieved with the
detailing. As the cockpit was to be enclosed, I used the kit decals for
the seatbelts, which are only acceptable if a viewer will be unable to
see them! ‘Nuf said about them. The underside to the cockpit floor is
also the bomb bay. The detail there is very good, and I wondered if a
NF would ever be parked with the bomb bay doors open. After posting the
question on “Plane Talking” Derek Pennington (It’s a Mosquito – who else
would need to respond?) responded with an informative piece explaining
that it might well be quite common as RBF tags would have been placed in
the breaches of the 20mm cannons. Later, I found out that (through Les
Piper) although the doors might well have been left
 open,
the kit fuel tank configuration was actually wrong for this version. open,
the kit fuel tank configuration was actually wrong for this version.
With cockpit assembled, I dry
brushed and washed as appropriate and set the assembly aside until
needed. Next up I tackled the wings and undercarriage assembly. I
encountered no real problems, the slipper tanks went together well, as
did the wings and engine nacelles. I was surprised to find a very
slight short shot in the molding of the port wing upper half, though it
was easy to fix with a little filler. The undercarriage is made up of
seven pieces for each side. I decided to use SNJ for the natural metal
finish so I applied it before removing any of the parts from the sprues.
Once the SNJ was dry, I masked the wheel hubs with Parafilm M and shot
the black for the tires with Gunze acrylic Matt Black. Next, I removed
the parts from the sprue trees and used kitchen foil for the oleos.
With all this done, I assembled the undercarriage carefully to avoid
marring the SNJ finish and touched using a silver ink pen. With the
wings complete the next step was to join the fuselage halves and
complete final assembly.
I’ve had a bad run of luck
lately with joining fuselage halves together, and this one was no
exception. Somehow I managed to get the two halves slightly offset on
the vertical plane, and ended up with a step. This took a long time to
fix and I ended up losing a lot of the surface detail. I think I’m just
going to go back to tube glue for this task in the future as at least it
gives some time for adjustments to be made before curing. Once I’d
fixed my own screw up on the fuselage, the rest of the final assembly
went well. The wings in this kit are joined by means of a spar, which
is attached to the [now] captured cockpit assembly and secured, with
locking pins placed through the wing from the underside. This gives a
very secure join that, in my case, needed no filler. Next was the tail
with a straightforward assembly job and it was ready for the paint
stage.
Paint and Decals
After washing the model in water
with a little detergent, I masked off the wheel wells and bomb bay with
blue tack, and used Eduard EZ Masks for the canopy. With that done I
sprayed the base coat of Model Master enamel RAF Medium Sea Grey to the
underside and left it to cure. Once ready, I flipped the model over and
sprayed the upper side the same colour. When this was fully cured, I
then marked out the camouflage pattern lightly with pencil and masked it
with rolled up “worms” of blue tack. I like using this masking method
because there is a lot of control on the softness of the demarcation by
varying the amount of overhang on the individual pieces. Also, because
the stuff is so flexible, it is very easy to mask in the exact pattern
desired. I wanted quite a hard edge to this pattern and set my masking
accordingly and after filling in the gaps with tissue paper to avoid
over spray, I applied the RAF Dark Green, which was also MM enamel.
After fixing the inevitable imperfections, I sealed the entire model
with Testors Metalizer Sealer, making sure I got a good gloss finish in
preparation to decaling.
I used a combination of the kit
decals, some from the spares box, and squadron codes from a sheet by
Tally- Ho. For reasons I’m not completely sure about, I had problems
with silvering on almost all the decals, though it was especially bad
with the Tally-Ho decals. It took a long time to get results I was
marginally happy with, even with gluing some down with Future. There is
still some slight silvering on the Serial Numbers and the V on the port
side has a little visible carrier film. Anyhow, once I had sworn,
cursed, threatened, and cajoled my way through the decaling process, I
sealed it all with some more metalizer sealer. With the decaling
complete and sealed, I applied a very light wash to bring out some of
the details and when that was dry, I faded the whole kit down with a
couple of light coats of very diluted gray. With this done, I applied a
couple of coats of Dull Coat.
Click
the thumbnails below to view larger images:
When all was fully cured I
started painting the exhaust covers. I started with blue tack again and
masked the rear half of each shroud and shot Burnt Iron Metalizer.
Next, I cleaned out the airbrush and loaded it with Burnt Metal
Metalizer and filled in the centre of each patch of the darker colour.
When it was completely dry I polished it up just a little and then left
it aside to be completed with pastels.
More Construction
With the decals on, the paint
faded and the Dull Coat applied it was back to the bench to complete the
model. I permanently attached the undercarriage, front and rear. Once
the gear was attached, I added the covers and then the bomb bay covers
that I had previously separated. Next I completed the underside by
adding the antennas and removed the masking from the small window on the
underside of the fuselage. When it was able to sit on its own wheels, I
flipped the airplane over and attached the other bits and pieces like
the radar antenna on the wing tips, the pitot tube on the tail, and
finally the main mast on the fuselage.
Next was some subtle pastel work
around the main airframe, the tires and wheel wells and the exhaust
shrouds and staining. With this all done, I installed an aerial wire
made from stretched sprue. Finished.
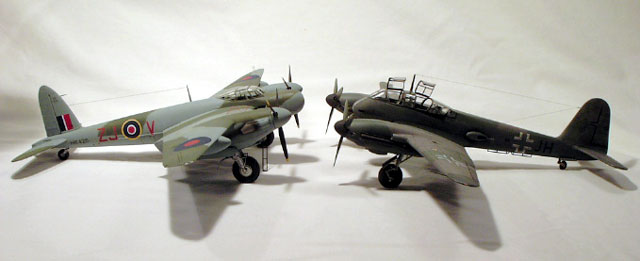
The aircraft are interesting and the modeling was
very rewarding. Both kits are very good. The Revell is somewhat
cheaper and so for me, represents better value for money. However, in
terms of value alone, both kits give hours of pleasure, are excellent
representations of their subjects and look good on the shelf. Both kits
are highly recommended.
Sources,
References and Acknowledgements
|
The
notes on the history from each aircraft are from the kit instructions.
The links below contain some excellent information on each aircraft.
http://www.surfmydot.com/96squadron/history.htm
http://www.accessweb.com/users/mconstab/index.html-ssi
http://www.aviation-history.com/
http://www.rcaf.com/database/aircraft/mosquito.htm
"The
Luftwaffe in the Battle of Britain" by Armand van Ishoven
"History of the RAF" by Chaz Bowyer
Thanks to Derek Pennington and Les Piper for their help on the
discussion boards.
Model, Images and Text Copyright © 2002 by
Mark Beckwith
Page Created 26 September, 2002
Last Updated 04 June, 2007
Back to HyperScale
Main Page
Back to
Features Index
|
 Home
| What's New |
Features |
Gallery |
Reviews |
Reference |
Forum |
Search
Home
| What's New |
Features |
Gallery |
Reviews |
Reference |
Forum |
Search