|
Mirage III
by Jose R. Rodriguez
|
 |
|
Mirage III |

HyperScale is proudly supported by
Squadron.com
I originally
started to write this feature with a long history on the Mirage but
because I found myself constantly referring to Greg Goebel’s excellent
site as a source of information, I decided that it would make more sense
to refer you to his site directly where you can find the Mirage III
history.
http://www.vectorsite.net/avmir3.html
Greg Goebel maintains
this site and he is the author of the articles found on said place. His
site is a mother lode of information on many aircraft types and I highly
recommend it if you are an aviation history buff.
The Mirage legend
grew out of its use by the Israeli Air Force. The IAF used the Mirage as
an air superiority fighter and as a ground attacker even though the
“experts” had dismissed the little Mirage with its lack of range and
sophisticated electronics as a wanna-be fighter that could not perform the
tasks of a “real” fighter, i.e. a much more expensive and heavier machined
stuffed with avionics and missiles.
War after war in the
Middle East the Mirage proved the experts wrong, and to add insult to
injury, the IAF asked from Dassault to build Mirages with all-weather
radars and Doppler deleted because the sun always shined on the desert and
they felt radars were dead weight. The Mirage 5 was born to an illustrious
career and the saved weight was used to carry more fuel.
The fighting style of
the IAF was simple; ground controllers vectored the Mirage to intercept
enemy formations and the Mirage pilots approached their enemy at full
speed with cannon blazing. The ensuing melee had nothing to envy a WWI or
WWII dogfight. Missiles were fired but the preferred weapon of choice was
the twin 30-millimeter DEFA cannon as Mirage pilots liked to get close and
personal.
For an account of the
Mirage in Israeli service use this link to the official IAF site,
http://www.iaf.org.il/iaf/doa_iis.dll/Serve/item/english/1.3.3.6.3.3.html
The top jet pilot ace
in the world is IAF’s Giora Epstein with 17 confirmed kills, all in
Mirages using mostly cannon fire. Again, Epstein’s accomplishments fly on
the face of the accepted wisdom that sophisticated avionics and weapon
systems is what makes the fighter, not the hand to eye coordination and
skill of a regular Joe firing a cannon up the tail pipe of an enemy jet.
For an account of
Giora Epstein's exploits use this link to the official IAF site. This is
highly recommended reading for those advocates of fire-and-forget missile
technology. His flight log accounts make a Tom Clancy novel a lame read.
http://www.iaf.org.il/iaf/doa_iis.dll/Serve/level/English/1.3.2.3.2.html
After you have read
the information on these sites you will get a good picture of why the
Mirage III occupies such a prominent place in the history of aviation.
Sadly, here in the USA the Mirage is just another one of them weird French
planes. Because American consumers’ taste and money drives what the
mainstream kit makers put on the market, you won’t see a good offering of
the Mirage III as a kit in 1/48th scale. The Heller M.IIIC/B
offering is decent but long in the tooth and a new tool Mirage III would
be welcomed by us Mirage enthusiasts. Because we Mirage fans seen to be a
silent minority without deep pockets, we will continue to see new kits of
aircraft already available or new kits of aircraft with rather short and
lackluster careers but which have a higher “cool” appeal. I won’t name any
names. The only hope lies in the kit makers from Europe to take on the
Mirage cause and give us a decent M.IIIE and M.V, at an affordable price I
pray. Eduard has announced that it is working on a Mirage III, variant
unknown, to be delivered by 2003. Like the disciple Thomas who had to
stick his fingers in Jesus’ wound to make sure he was talking to his
master, I will believe it when I lay my fingers on the plastic. I just
don’t want to get my hopes up and then be disappointed.
This “not made in
America” stigma seems to follow the Mirage when you do a casual search of
the web. I have found sites that just crucify Marcel Dassault’s design for
being too small, too simple, and for not having an all weather radar
capable of tracking and shooting multiple targets at once. If is funny to
read how these “experts” dismissed the Mirage off hand as not a serious
contender to the title of “real” fighter jet.
Of course, the facts
and the records contradict the written opinions so I rest my case.
Here is a link to a
brief bio of Marcel Dassault whose real surname is Bloch; yes, the same
Bloch associated with the Bloch aircraft of the thirties and forties.
http://www.allstar.fiu.edu/aero/dassault.htm
Granted, the Mirage
was not perfect. The delta wing does not fly at low speed so take off
distances are very long, painfully long with a heavy load on board.
Approach speeds are high and at a very high angle of attack. The delta
wing generates high drag during high-g maneuvering thus slowing down the
aircraft (a trait the IAF pilots used to allow a pursuing enemy to
overshoot a turn and place them in front of them). The range was always a
problem due to the lack of space to hold fuel. But the Mirage was the
little fighter that could, over and over again.
Perhaps the Mirage
III family was the last of the true fighter plane breed were the pilot
mattered and electronic gadgetry was of no use.
I had the Academy kit
for the Mirage IIIC and bought the Fujimi kit thinking that it could be
better than the one from Academy. Don’t be a fool and keep your money
because the Academy kit is a copy of the Fujimi offering, as I found out
when I put both kits side by side.
The Academy kit is
not a 100% faithful copy of the Fujimi. It is obvious that the Korean
company created its own molds but that they used the Fujimi kit as the
master. Fujimi uses a finely raised panel lines and rivets while Academy
went to recessed panel lines and rivets. Much of the finely raised detail
of the Fujimi kit is gone in the Academy as the Koreas simplified the
finish of their molds. All sprues contain the same parts on the same
places but the Academy sprues are a mirror image of the Fujimi sprues
(locations of parts are reversed).
If you try to mate an
Academy fuselage halve to a Fujimi halve, the Academy part is slightly
longer and the cockpit location is slightly off but the locator pins and
mostly the whole fuselage is a match.
These kits show their
age. I will list their obvious shortcomings,
-
They are in
1/50th scale. Ignore the 1/48th labels on the box.
-
One-piece
canopies. There is no option to have an open canopy.
-
A poor
cockpit with a toy-like instrument panel, no sidewall detail, an
ejection seat that looks like a tombstone and no detail worth
mentioning.
-
No wheel
wells. I’m not talking about missing detail; I’m talking about missing
the whole wheel well and having a gapping hole where the wheel is
supposed to retract.
-
No engine
or afterburner detail. Another gapping hole that let’s you see from the
exhaust opening to the back of the cockpit.
-
Decals are
toy-like and out of register. No stencils. They are not usable if you
want a serious model.
To be fair, I can say
that these kits are a faithful representation of the M.IIIC. There are no
obvious shape problems and they accurately represent a Mirage. There is no
need to “fix” any parts other than the nose landing gear strut. More on
this later.
By now a sensible
person would have decided to toss these kits into the trash or give-away
heap. My common sense was superseded by my thriftiness. Darned it, I paid
for these things and somehow I was gonna make them work! I always thought
about using aluminum foil to finish an airplane thus this project looked
like a good idea to experiment with the technique. If the experiment
failed, good riddance; I would just put the failed project in the trash. I
still think that a more sensible approach would have been to put the kits
in the trash and build the Heller M.IIIC/B that I have in my closet. At
least it has an afterburner, multi-piece canopies, wheel wells and it is
in 1/48th scale, plus it is French like the real thing.
After dry fitting
parts I decided that the Academy fuselage fitted better than the one from
Fujimi but that the Fujimi wings looked better than the Academy ones so I
ended up building a mutt with an Academy fuselage, Fujimi wings and
intakes and a mixed of other parts from both kits. To this brew I added
the Eduard photo etched set 48 128 designed for the Heller kit and a
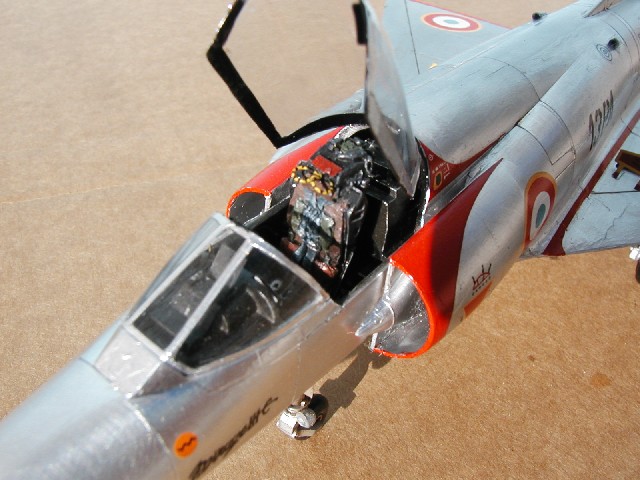
Martin Baker MB Mark 4 ejection seat from Airwaves (SC48020).
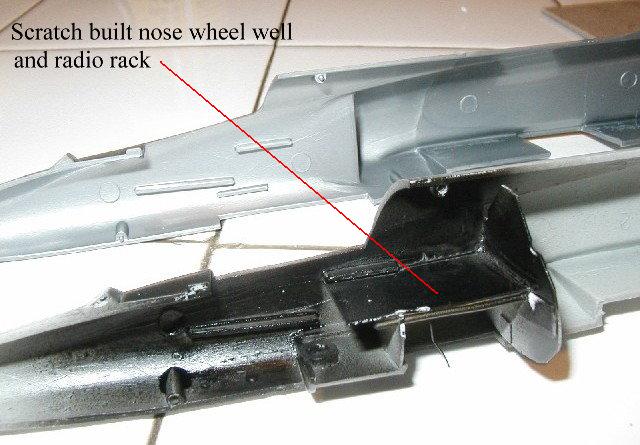
I removed the lower
part of the original bang seat from the floor using my motor tool because
they come molded as one piece. Using plastic card I created a radio rack
behind the pilot and enclosed the front wheel well. Using Eduard parts I
added some detail to the wheel well and I filled the newly created space
with brass wire to simulate hoses. The hydraulic actuators are hollow
aluminum tubing with brass rod pistons. I enclosed the back of the cockpit
with more plastic card. I used the Eduard instrument panel and side
panels. Because the Eduard parts were not designed to fit a 1/50th
scale Academy/Fujimi kit I didn’t expect a perfect fit, and I didn’t have
one. I used Verlinden’s excellent book on the Belgian Mirage 5 to guide me
through this cockpit nightmare. After many hours of monkey see- monkey do
I created something that resembled a Mirage cockpit from two feet away,
which was good enough for me.
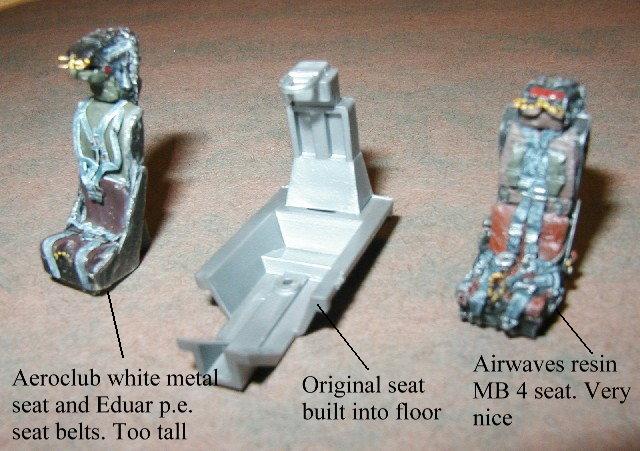
The ejection seat was
a fiasco. I started with a white metal seat from Aeroclub. After I had
this thing done with Eduard p.e. seat belts and painted I stuck it in the
cockpit. To my horror, the top of the seat was so high above the fuselage
that it would be impossible to ever make it fit. I grabbed the Airwaves
resin seat that I had reserved for the Heller M.IIIB project really
thinking if it was worth to use such a nice seat in my Frankenstein
project. This seat didn’t fit either so out came the sand paper, knife,
files and motor tool. I cut the cockpit floor with the motor tool so that
the seat would rest on the fuselage bottom. I trimmed the side detail from
the seat so it would squeeze into the tub, and I sanded the living heck
out of the bottom of the seat so it would sit at the correct height. I
don’t want to ever hear somebody complaining about a Tamiya or Hasegawa
cockpit as being “sparse.”
I wanted to have an
open canopy, don’t ask me why. The mold makers at Academy/Fujimi molded
the canopy frame onto the fuselage so I had to use my motor tool to remove
this frame out. I cut the Academy canopy with a saw to get my front
windscreen. I glued the Fujimi fuselage with its canopy and removed the
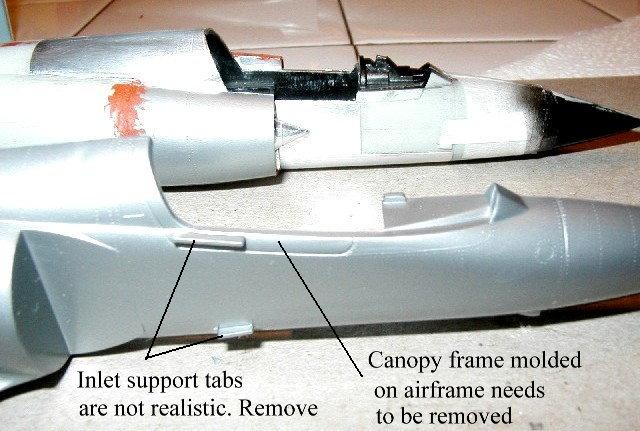
intake support tabs incorrectly molded onto the canopy frame.
Using Squadron’s
thermoplastic clear sheet, I heated and smashed a new canopy using the
Fujimi fuselage and canopy as a mold and then cut my rear canopy from the
resulting stretched clear sheet. I engraved rivet lines on the canopy
frame using a steel owl. This homemade canopy is very flimsy and thin, but
it is clear and it looks the part.
A funny thing
happened. The canopy frame molded into the Academy fuselage doesn’t quite
match the intersection of the front windscreen and the rear canopy. When I
placed my cut windscreen on the Academy fuselage, it was too long. I had
to scratch built part of the fuselage frame that I had taken out with my
motor tool. The Fujimi fuselage does match the clear canopy lines.
If this sounds like a
pain in the neck, remember that I just got started. For the burner can I
used the Eduard p.e. burner can liner sheet rolled into a pipe together
with other brass bits. After painting the whole assembly gunmetal I stuck
this homemade pipe onto the rear fuselage tail cone. Now at least I had
plugged the deep hole at the rear.
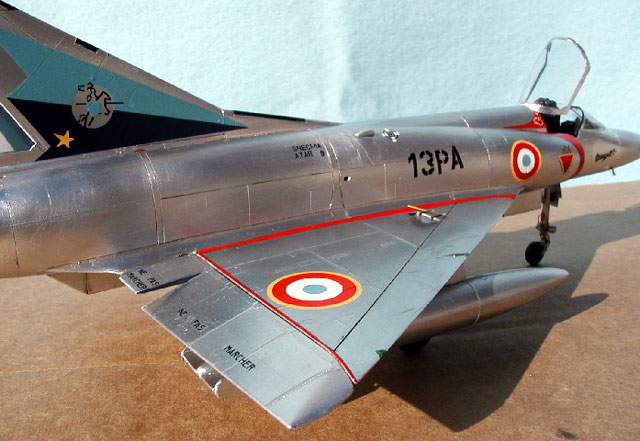
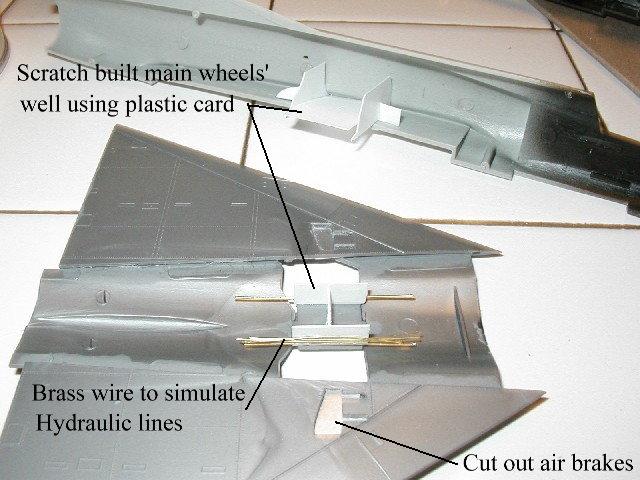
I covered the
bottomless main wheel wells with plastic card and added wire to simulate
plumbing. I would give this section a one-footer seal of approval. There
is a lot of detail missing that is hard to scratch build with just plastic
card and wire. I cut the flaperons from the wings because I wanted to drop
them just like the real thing when parked on the tarmac. I cut the speed
brakes out with my motor tool because I wanted to show then in the open
position using the trimmed down Eduard brass parts. For all these steps
the Verlinden book was a savior as it has clear, quality color pictures of
all these areas.
The front landing
gear is wrong. As the strut goes into the aircraft it bifurcates (fancy
way of saying it “Y’s”). This creates a hefty joint as the landing gear
strut goes into the well. The Academy/Fujimi thing goes straight in as it
were a long pipe. Because I thought that this section was a little bit
hard to see, I decided not to mess with it but in hindsight this was a
mistake because this part is indeed noticeable. As it is it makes the
landing gear leg look too skinny. Again, I created hydraulic actuators
using hollow aluminum tubing and brass rod. I added the very prominent
twin landing lights and some bits of wire. These landing gear mounted twin
lights seem to be in almost every Mirage but I did find a picture of an
early M.IIIC without them. I have no pictures of the aircraft I modeled so
I don’t know if it had lights or not. The front landing gear doors were
scratch built using beer can aluminum. I didn’t paint the bare metal so
the finish is real.
The main landing gear
legs were dressed up with brass scissors (torsion braces) from Eduard and
black anodized wire from my local hardware store. Hydraulic actuators were
again created using aluminum tubing and brass rod. The wheel is designed
to stay put on the spindle by taking a hot knife to the overextended
spindle and melting it into a cap. I just cut the spindle flush with the
wheel and glued in place. My wheel won’t spin now but I can live with
that.
The cannon openings
are below the intakes and are molded as a closed slit. I drilled the hole
for the cannon barrel. The original support tabs for the split plates at
the intakes are inaccurate so I removed them.
Mating the Academy
fuselage together, the fuselage to the Fujimi wings, the Fujimi intakes to
the Academy fuselage, Fujimi ventral fin, and the Academy tail cone to the
Academy fuselage took liberal amounts of plastic card, superglue, putty
and sand paper. I don’t want to hear complaints about a little seam left
after putting together Tamigawa parts. Remember to add some weight to the
nose before you glue the fuselage halves together.
The center missile is
a Matra 530 and it is molded well enough that I decided to add it to the
model. The missile body is Academy and the fins are Fujimi. The smaller
wing mounted Sidewinder/Matra Magic? missiles have fins that are too thick
and no exhaust hole and they look like toys so I decided not to use them.
I have a few pictures of early M.IIIC’s with only the ventral Matra
missile and no smaller missiles under the win tips so this is a genuine
set up. The Fujimi missile color chart for the Matra matches my
photographs. The Academy instructions are a copy of Fujimi’s albeit with
smaller size graphics but it has no missile color references.

Because I decided to
skip the wing-mounted missiles, I had to modify the outboard pylon. Under
wing storage was at a premium in the little Mirage so the outboard
flaperon hinge was modified into a pylon-hinge assembly. I used the extra
hinges I had instead of the pylon-hinge contraction. I had to cut the
hinges in two pieces, sand them and reposition them because my flaperons
were in the down position and the original straight hinges would not fit.
The joy never ends.
I had to scratch
built the two small fins near the tail cone. They are in all photographs I
have. I don’t know what they are for but they are there. I used plastic
card and stretched sprue to build them.
I got the nerve to
try aluminum foiling after reading the article written by Bucky Sheftall
on his P-38 finished in aluminum foil. This article appeared in the July
2002 issue of Fine Scale Modeler. Just to be sure, I got both household
aluminum foil from my pantry and Bare Metal Foil sheets in matt aluminum
from my local hobby shop, where I also got my Micro Scale foil glue. This
stuff comes in the same type of bottles that the decal setting solution
comes in and it looks and smells like white glue (maybe it is overpriced
plain white glue).
I started with the
Academy drop tanks. I applied the glue to the household foil and plastered
the foil on the tanks using a cotton swab and a flat wooden stick to wrap
and smooth the foil on the plastic. My first try ended up with too many
wrinkles because I used a large piece of foil to cover a large area at
once. Next move was to try the Bare Metal Foil on the Fujimi tanks. This
stuff is thinner than household stuff and it is self-adhesive, and it is
also expensive at USD 5.00 a sheet. This time I cut smaller sheets and
applied then by sections, bottom, middle, and top. This time the wrinkles
were gone and the tanks looked good. There is a seam where the different
sheets overlap but it is minor and it doesn’t bother me as much as a
wrinkle.
Click the
thumbnails below to view larger images:
After cutting and
pasting foil for a while, these are my lessons,
-
Wipe model
clean where you are going to apply foil to eliminate oils and dirt. I
used a rag wetted in rubbing alcohol.
-
Do small
sections at the time. Recessed panel lines are an excellent place to
start/finish a foil sheet as you can cut the foil using the panel line
as a guide. I recessed my own panel lines when necessary. The sure way
to end up with a wrinkle is by trying to foil a large, curved area at
once.
-
Have a
sharp knife ready to cut the foil without tearing it.
-
For each
panel use a different foil. For this one I used Bare Metal Foil. For the
next one I used the matt side of the household foil. For the next one I
used the shinny side of the household foil. This gives the finish a
patchwork look of aluminum pieces.
-
Foiling
maybe required before gluing parts together. I foiled the inside of the
intakes and the fuselage section in front of the split plate before
gluing these components together.
-
I applied
the glue to the panel section first, not to the foil. This way you don’t
get foil stuck on the wrong parts (they are tough to remove). I used a
small flat brush to paint the adhesive on. Adhesive must be applied as
smooth as possible otherwise the brush swirls will show up under the
foil. A thin layer is enough to hold the foil.
-
When
applying glue with a brush, keep a water container nearby so you can
dunk the brush in it and keep it wet between foil applications. This way
the glue won’t dry on your brush and ruin it. Regardless of how many
times you wash the brush, it will become sticky so don’t use your best
brush for this job.
-
Any and all
imperfections on the plastic surface will show up. Make sure that your
plastic finish is blemish free. Even dust will show under the foil.
-
You cannot
glue parts that have foil on then. Remove foil before gluing parts
together.
-
Tough,
pointy areas are better off with paint. The tip of the tanks and the tip
of the parachute housing are finished with silver paint. Use silver
paint to touch off spots missed by the foil or where the foil didn’t
stick, like corners. Paint and foil blend so well you won’t be able to
see the touch ups. I used Testor silver enamel as touch up paint.
-
The
excessive shine of the household foil can be tone down with careful
burnishing using steel wool. I used both a circular motion or just up
and down the direction of airflow. With enough burnishing you won’t be
able to tell the difference among the shiny and dull side of household
foil and Bare Metal Foil. By changing the direction of the burnishing
you can give each panel a different metallic look.
-
Have a box
full of cotton swabs (Q-tips) because you are going to use them to
smooth out the foil on the model, and you are going to need a lot of
them.
-
Wait a few
seconds after you apply the glue so it can become tacky and smoother and
then apply foil.
-
I applied
foil first to the leading edge of the wings and then carefully folded
the foil on the upper and under surfaces of the wing, always pushing
back the foil towards the trailing edge with a cotton swab. Anywhere the
foil started to wrinkle because it wanted to change direction, I cut a
slit with the knife along the fold line. This also worked for the
vertical fin. Of course, you may have to experiment if you are foiling a
wing with a deep airfoil, but I think that his method should also work
with fat airfoils.
-
If you
touch the foil with your fingers it will leave your fingerprints on it,
a black smudge on the shiny finish. I think it is some sort of aluminum
oxide. This can be cleaned up with a swab wetted in alcohol. The last
part I foiled was the fuselage mid-section so I could have a place where
to grab the model without leaving fingerprints behind.
-
BE PATIENT.
If you are in a hurry, then spray the model with your favorite metalizer
and forget about the foil. Foiling is a very slow and time consuming
enterprise. If speed is your game, foil is not for you.
Did I achieve the
perfect bare metal finish? No. If you examine the photographs you will
notice a few wrinkles, small but noticeable. I can blame every one of them
in trying to foil too much at once. Smaller pieces of foil avoid wrinkles
but give you seam lines where the foil pieces overlap. I think that the
seam lines are far better than the wrinkles. With careful planning and
some experience you can predict and avoid wrinkle zones, or perhaps the
best method would be to use paint in the high-risk wrinkle zones and use
foil in the easy flat panels.
What is better,
household foil or Bare Metal Foil? Bare Metal Foil is thinner, smoothes
out rather nicely on difficult spots and it is self-adhesive, and it works
great on canopies. Its only drawbacks are price and the fact that it tears
easily. Household foil with Microscale adhesive is dirt cheap and
stronger. Either side of the foil works fine so you can have a really
shinny or a dull effect from the same roll. I used both and I learned that
for the tough curvy spots and canopies, Bare Metal Foil works great; for
large, mostly flat or slightly curved areas the household foils works
rather well. My Mirage is 90% household foil and the rest is Bare Metal
Foil. I will continue to use both in future projects, and I’m going to
experiment with Bare Metal Foil as a canopy mask. I was impressed by the
easy and effective way it worked on the Mirage canopies. The glue residue
left behind was very easy to clean. A hint: after I foiled my canopies, I
dipped them in Future; the idea was that the acrylic coat would keep the
narrow aluminum frames from coming loose. So far it is working.
Would I foil another
model? Yes but not right away. I need a break. This was a very time
consuming task. It took me three months to finish this thing, working a
few hours almost every night. I could have sprayed paint in one night but
instead I spent weeks gluing and rubbing foil to each panel of the model.
I think that the happy medium would be to use both paint and foil to speed
up the process.
The last step is to
preserve the foil in place and keep it clean. Go over the model one more
time and fix any loose bits, chipped spots, and give the finish a rub down
with a rag wetted in alcohol to clean all fingerprints and smudges. Now
you are ready to shoot a layer of Future floor wax. This coat will seal
the panel lines and will prevent your fat fingers from leaving
fingerprints behind. I let my coat dry for 24 hours. The metallic finish
under the Future was not diminished but it was altered. Imagine that you
have a burnished piece of aluminum on the table and then you place a clear
piece of glass over it. You will still see the metal below but you will
also notice that there is a piece of glass above. This is what a thick
coat of Future did to the foil. The metal is still there but you can
notice the hard, clear coat above it. As an experiment I used Testor
metalizer sealer on the fuel tanks instead of Future. This stuff sealed
the foil and dried thin enough that it did not create the glass-over-aluminum
look. The grain and sheen in the aluminum was preserved. For my next
projects I will stick to the metalizer sealer even if my wife complains
about the stench. This is what this project was about, experimentation.
Perhaps the Mirage
III was not the easiest kit to learn foiling with. The area around the
intakes and exhaust nozzle was a lot of work. A single engine prop
monoplane may be an easier subject … in 1/72nd.
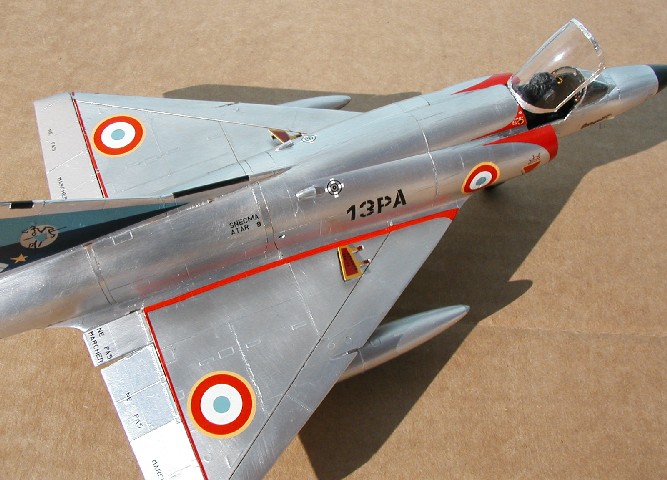
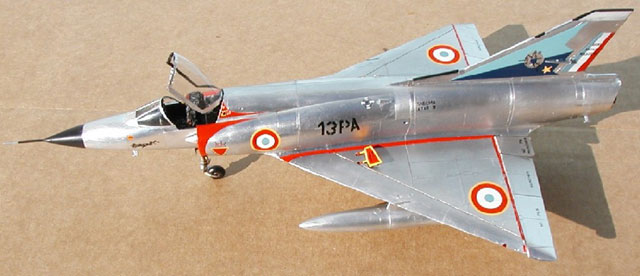
Both the Academy and
the Fujimi decals are mostly useless. The only option in the Academy sheet
is for an IAF M.IIICJ with ID 741. This same aircraft is an option in the
Fujimi sheet. I found a few black and white pictures of this aircraft. You
cannot really tell if the tail colors are blue or black. The blue hue is
different on each sheet. The Stars of David in the Academy sheet are royal
blue while the ones in the Fujimi sheet are baby blue.
The Fujimi sheet has
options, besides IAF 741, for a South African M.IIICZ and a French M.IIIC.
All markings, regardless of nationality, use the same baby blue color. The
gazelle in the South African markings does not look like a gazelle. The
French rudder tricolor is provided but the writing on it is misspelled; it
should read “Avions M. Dassault M.IIIC,” not “Aviation Dassalt.”
None of the sheets
provides any stencils. Easy, you say, just get aftermarket decals. I
searched high and low for all the usual suspects that purvey decals to the
U.S. market and came with nothing. I got lucky with Hannants of the UK.
You have to be careful when you see a decal sheet advertised as for the
“Mirage III.” Even though there are not kits for the M.IIIE and M.V, other
than expensive resin conversions, many of these decals were for these
versions. The only M.IIIC decals I could find at Hannants were from Decal
Carpena, a sheet that had one bare metal French M.IIIC, a Swiss M.IIIS
(based on IIIE airframe) and a couple of M.IIIE and M.V options. I’m sure
that there are more decals out there, and the people on the know will come
up with exotic companies and specially made-for-one-occasion decals but
the hard fact is that for the average U.S. modeler, mostly all these fancy
decals are out of reach or out of production and the pickings are rather
slim.
I ended up using the
M.IIIC in the Carpena sheet – like I had too much choice - for an aircraft
circa 1962. Here is another complain. It is obvious that the folks at
Carpena did their research and provided all the stencils for all versions.
Very good. Then, why print the decal instruction for all aircraft on the
same low quality, blurry photocopied 8x11 sheet? Carpena does not provide
index numbers or letters for the decals on the sheet that reference the
locator sheet; instead, the locator sheet has tiny, almost impossible to
read representations of the stencil. I had a hard time finding out where
some of the stencils were supposed to go, and which stencils to use. As an
example, the big ejection seat warning triangle on the intakes is shown as
a non-descript black triangle on the instructions. The decal sheet has
three styles for this triangle. It is impossible to tell from the
instructions which one is the one that goes in the version you are
building. I don’t need glossy color graphics, but a decent instruction
sheet indicating where ALL decals go would be rather welcome. If there is
no space to index the decal sheet at least the manufacturer should place
the decals for each version in separate, well demarked sections so you
know were to grab the stencils from.
This was my first
time using Carpena decals and I was not too happy. The “13PA” ID was a
disaster as it fell to pieces as I tried to place it on the fuselage. I
had to put it together as best as I could. The stubborn pieces stuck to
the fuselage where they landed when coming off the paper even though they
were soaked in soapy water and setting solution. The solid decals like the
fin squadron patches did not break. I think it is the ink that keeps these
decals from becoming fragments; the clear carrier is just too thin and it
disintegrates once it leaves the paper.
The red trim around
the inlets were missing in the Carpena sheet so I used the ones from
Fujimi instead. Ironically, the toy like Fujimi decals worked like a
charm. Carpena did not provide the fin flash colors, only the blue stripe.
Because of this I had to paint my own rudder colors with my Aztec 410
airbrush. I also painted the yellow and red air brakes.
Once the decals had
dried on the model for 24 hours I used a wash of burnt umber acrylic
artist paints to highlight the panel lines. Pictures of French Mirages
show the bottom of these aircraft to be rather dirty with oil streaks. It
looks like if they were running Diesels instead of a jet engine. For the
final coat I used a thin layer of Testor’s metalizer sealer. I did not
want to add more Future to the already thick coat.
As a future project I
plan to use Testor’s metalizer sealer for the first coat and then finish
the job with satin lacquer to simulate dull and exposed to the elements
aluminum. The metalizer sealer alone will give a very nice metallic sheen
but in my experience bare metal aircraft left outside are not shiny but
rather dull, almost corroded. There is room for a lot of experimentation
on this field.
I used my plain
vanilla Olympus D-510 digital camera. This was the most difficult subject
that I have ever photographed. I tried indoors but the flash bounced of
the aluminum skin and made some spots on the airframe far too bright. I
moved outdoors under bright sunshine and I had better luck, but still the
natural sunlight on the skin proved to be too bright on spots. I had to
take many pictures just to get a few that worked reasonable well.
Photographing aircraft with flat colors is a piece of cake when compared
to this metal wonder. Even if not all the pictures didn’t come up too well
at least the readers should appreciate me kneeling on the wet snow while
photographing this model in the cold.
It’s alive!
Do as I say and not
as I do. Buy the Heller kit if you want a Mirage IIIC and don’t bother
with the Academy/Fujimi offerings. There is no compelling reason to build
the Academy/Fujimi kits when the Heller is available. The Heller kit is
old and outdated but still ahead of the Academy/Fujimi. While the Heller
kit cannot be compared to new tooling offerings from the big players, it
still can be built into a decent replica with some work, the Eduard p.e.
set (specifically designed for it) and an Airwaves MK. IV bang seat. The
Heller decals look far better but I cannot comment if they work or not. I
will find out the hard way.
Regardless of their
shortcomings, the Academy/Fujimi kits build into a good-looking M.IIIC as
there are not obvious shape problems, other than the awful nose landing
gear leg. They make nice starter kits for youngsters, or ceiling hangers.
Which one is better,
Fujimi or Academy? The recessed panel lines of the Academy may give it a
hair thin advantage over the Fujimi, but both are equally obsolete. I
cannot recommend these kits to the serious modeler when the Heller one is
available.
For my next
experiment I will try both metalizer paint and sealer, and foil. Where did
I stash that old dog, that Testor/Hawk F-5A?
By the way, if you
really need to have a Kfir or a Mirage 5 in 1/48th scale then
your best choice is to go with a resin conversion from Eagle Designs.
Their conversions are for both the Esci kit, OOP, and for the Heller. One
day I will fork the bucks and try one.
http://eagledesigns.50megs.com/home.html
Click the thumbnails below
to view larger images:
Text, Images and Model Copyright © 2002 by
Jose R. Rodriguez
Page Created 02 December, 2002
Last Updated
04 June, 2007
Back to HyperScale Main Page
Back to Features Index |
 Home
| What's New |
Features |
Gallery |
Reviews |
Reference |
Forum |
Search
Home
| What's New |
Features |
Gallery |
Reviews |
Reference |
Forum |
Search


