|
Messerschmitt Me 262A-1a/U4 "Pulkzerst÷rer"
by Mattias ─rletun
|
|
|
Messerschmitt Me
262A-1a/U4 |

HyperScale is proudly supported by
Squadron.com
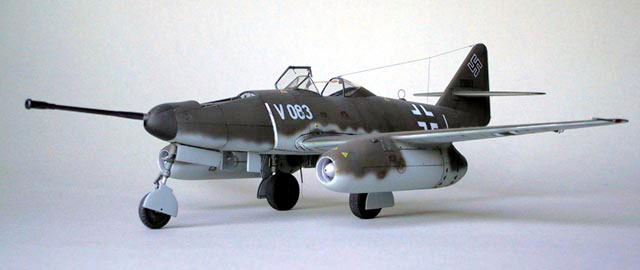
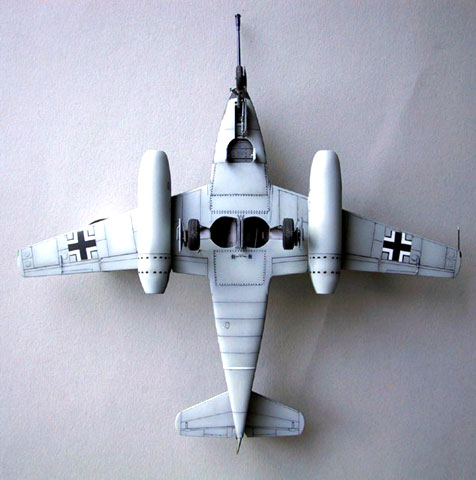
This is the 1/48 scale DML Messerschmitt Me
262A-1a/U4 "Bomber Destroyer" built to represent Werknummer
170083, one of the two airframes test-fitted
with the big Mauser Mk 214A V3 cannon at the
Messerschmitt test airfield in Lager-Lechfeld in March and April of 1945.
The history of the Me 262 has been written down,
rewritten, discussed and debated so many times and by so many competent
historians and modelers already. Thus, I leave the history of the Me 262
in general to those mentioned above and focus on this particular prototype
instead.
(Composite image created using
Photoshop 6.0)
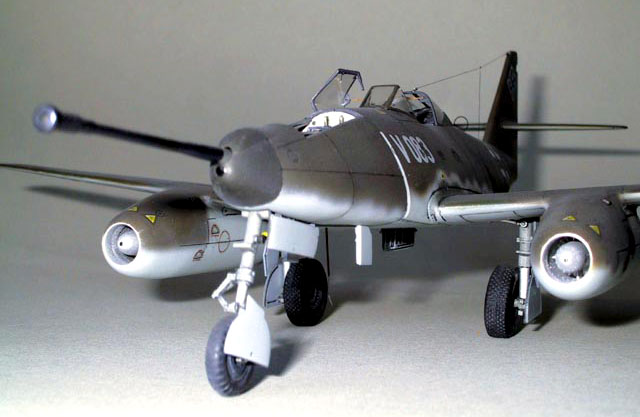
The A-1a/U4 version of the Me 262 was intended to act
as a "Pulkzerst÷rer" (formation or pack destroyer) in the German
skies crowded by allied bombers at the end of the war in the ETO. Two
airframes, Wnr 111899 and Wnr 170083, were
taken off the production line, fitted with new nose sections and became
the prototypes V899 and V083 respectively (the "V" standing for "Versuchsmuster").
The major difference between the Pulkzerst÷rer
and an ordinary 262, was that the entire nose section had been specially
constructed to accommodate the Mauser Mk 214A
V3-cannon. This gun had a calibre of 50 mm, a weight of 490 kilos, a rate
of fire of 45 rounds/minute and carried 22 projectiles, each weighing 1,54
kilos. The size of the gun meant that the nose wheel mechanism had to be
reconstructed and the nose wheel swivelled 90 degrees to lay horizontally
in the bay beneath the gun when fully retracted. The cannon was accessed
by removing a large hatch along the upper nose and the otherwise so sleek
outlines of the 262 were marred by a hump covering the foremost parts of
the gun. The barrel itself protruded from the nose of the aircraft, making
it look like a giant vicious insect.
Rare German Řber-planes have often reached mythical
status and sure enough there are some rumors circulating about V083 as
well. Word has it that it encountered and engaged a formation of B-26
Marauders on April 16 1945 but most likely, it was just a product of an
overactive imagination.
American troops overran Augsburg on the 29th of April
1945 and on 1 May a specially assembled team, led by Colonel Harold E.
Watson, moved into the Messerschmitt office building. Known as "Watson┤s
Whizzers", they had been sent there to retrieve valuable technology and
equipment and ferry it back to the U.S. by ship. When they reached the
test aerodrome of Lechfeld, they found several Me 262┤s in varying
condition. One of them was the A-1a/U4. Colonel Watson named the aircraft
"Wilma Jeanne" after his wife and later it was renamed "Happy Hunter II".
Messerschmitt Chief Test Pilot Karl Baur piloted the aircraft on a few
test flights and the American team test-fired the gun on the ground target
range and was surprised by the highly efficient hydraulic recoil-damping
system which hardly even made the 262 move during firing.
Eventually it was decided that V083 would be flown to
Cherbourg, France and then taken to America by HMS Reaper along with
several other airframes for further evaluation. Messerschmitt test pilot
Ludwig "Willi" Hofmann was chosen to pilot the aircraft on the ferry
flight but during the flight, a turbine blade broke and Hofmann had to
bail out, thus losing this valuable aircraft. Hofmann broke a leg but was
otherwise in good condition after the event. He was paradoxically accused
of sabotage but if that had been the case, it sure would have been a risky
plot.
As most of you probably already know, Trimaster
originally produced a series of 262┤s containing many photo-etched and
white-metal parts. When Trimaster disappeared from the market, the molds
for the 262 were bought by DML and they issued the kits with the metal
parts replaced by injected styrene and only small frets of photo-etched
parts. Now some of the molds are used for mass-production by Italeri and
are thereby very affordable.
The DML/Trimaster 262┤s are generally very accurate,
albeit lacking extended slats and deployed flaps (which is a shame since
the former as per traditional Messerschmitt manner were spring operated
and would automatically extend when the drag was no longer sufficient to
hold them back). The kit features finely recessed panel lines and you will
have to be very careful not to sand them away during construction.
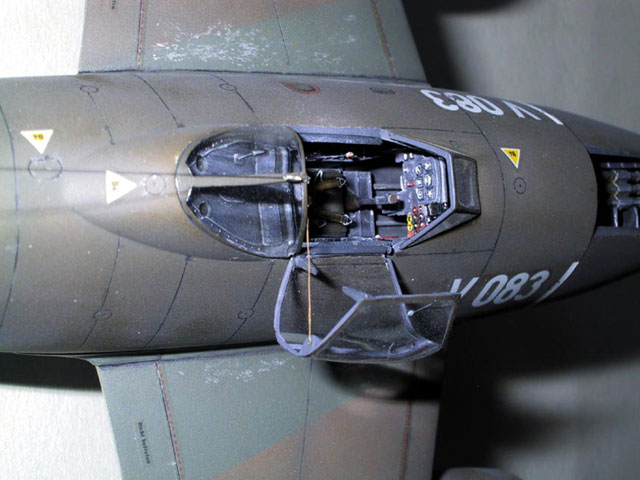
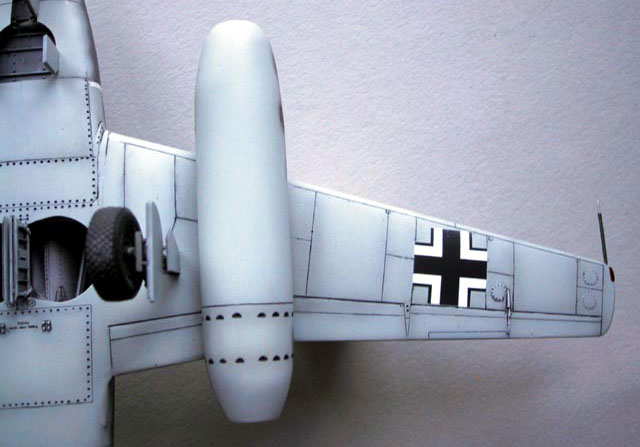
The cockpit, gun compartment and gear wells are all
very well detailed and especially the appearance of the latter is enhanced
with a fiddly but good looking addition of photo-etched parts supplied in
the kit. The tires are made of vinyl, but I am not sure whether it is of
the styrene eating kind like in the AMT Tigercat or not. I will tell you
in a couple of years. The clear parts are of good quality and the decal
sheet contains markings for one aircraft. The decals are nicely centered
but a bit on the thick side. The white areas of the Balkenkreuze and
prototype numbers are far too yellowish for my taste, but more on that
later.
I am a huge fan of German night fighters of WWII and was looking for a
B-1a/U1 (the two-seat radar equipped night fighter) when I stumbled upon
this kit during a visit in Stockholm and since my second perversion in
aircraft is those with the biggest guns (have to talk to a shrink about
that), I bought it right away. Back then I knew nothing about the history
and fit of the DML kit, which in retrospect was a good thing for the shop
owner.
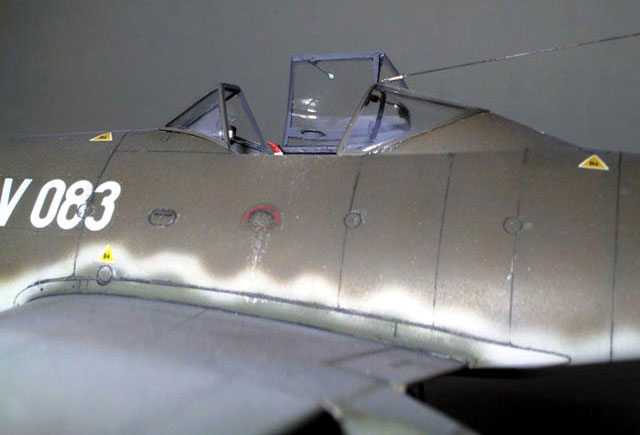
Early on, I decided that this kit was to be built straight from the box
with no additions whatsoever, save for the antenna wire. Construction
starts off with the cockpit which was pre-shaded in black and then
oversprayed with Tamiya XF-63 German Grey (yeah, I
know...) after all the photo-etched levers, the side panels and the foot
pedals had been attached. I drybrushed the interior subtly with RLM 76
Lichtblau and painted the switches and gauges with a brush. The outside of
the cockpit tub, the insides of the fuselage and the fore and aft wheel
bay bulkheads were sprayed in Humbrol Metalizer Polished Aluminium, given
a wash with Tamiya X-19 Smoke and the various little boxes and bottles in
the wheel bay picked out in their right colors. The fuselage halves were
then glued together after having filled the compartment between the
cockpit and the gun bay (which contains a fuel tank on the real thing)
with Blue Tack and more pieces of unfortunate white metal figures from a
role-playing game, just like in my Skyhawk.

Next up was the gun bay/front wheel well assembly. I airbrushed the gun
in a base coat of Tamiya XF-2 Flat White and then
gave it a layer of Humbrol Metalizer Gun Metal. After having polished it,
I dusted on some Humbrol Metalizer Polished Steel unevenly. Yup, you
guessed it: time to gently polish it again and then dust on some Pactra
RC61E Pearl Purple and Gunze Sangyo GUH93 Clear Blue to give it a nice,
bluish-shifting color when wieved from different directions. The shells
were painted Tamiya X-31 Titanium Gold and the gun bay Humbrol Metalizer
Polished Aluminium, again with a Smoke wash. I mixed my own paint for the
front wheel well and landing gears and applied shading, wash and wear to
them using chalk pastel powder, water colors and Bruynzel artist┤s
pencils.
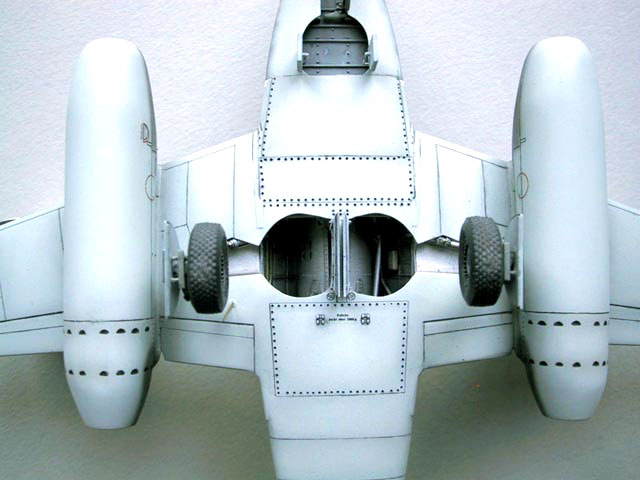
As mentioned earlier, the assembly of the main
gear bays was fiddly to say the least and it is quite a miracle that I did
not take off like a three-stage rocket towards planet Spaceball during
that construction phase. This model really tested my patience to the
limit...! After much holding, folding and fondling of DML┤s steel-hard
photo-etch, I ended up with something looking sufficiently like the
assembly depicted in the instructions and put it aside for a while.
Now I chose to glue the engine nacelles together
which (surprise, surprise) proved no easy task. The panel lines of the
halves did not line up very well and the fit of the intake and the exhaust
was horrible. The join between the nacelles and the lower wing looked like
a WWI trench minus the barbed wire and also needed a lot of filler and
sanding. The upper wing fitted OK but there was a large gap between it and
the engine intakes. By now I knew that this was something quite unlike the
Tamigawa kits I was used to building and that subtle sanding would no
longer get me where I wanted. Unfortunately I had by then not yet
discovered the miracle of Milliput and the gorgeous Green Stuff (made by
Citadel) so I fixed it the hard way with putty, putty and ehh, oh yeah,
putty. I now hated this expensive piece of plastic crap and was about
ready to give it a test flight into a brick wall. I set it aside for about
three months and it sat there on my desk, giving me taunting looks and
shouting all kinds of profanities at me whenever I came close to it. Have
to talk to a shrink about that too.
I finally picked up the gauntlet and decided not
to be bossed around by a lump of styrene anymore. After much sanding and
reshaping of the nacelle/wing joint, the time had come to glue the wing
assembly to the fuselage. It fitted like a dream! No filler needed!
Naaaahhhh, just kidding... The rear wheel bay bulkhead would in no way fit
into the fuselage and once I had cut and sanded it to shape and was about
to attach the wing assembly, the wing-to-fuselage joint was a joke. I had
to fabricate large locating tabs from Evergreen sheet styrene to get a
rough fit and it took a lot of putty, sanding and filing to reshape
the wing roots.
The clear parts were cleaned using water and
washing-up liquid and then dipped in Future to make them shinier and set
aside in a dust-free box to dry.
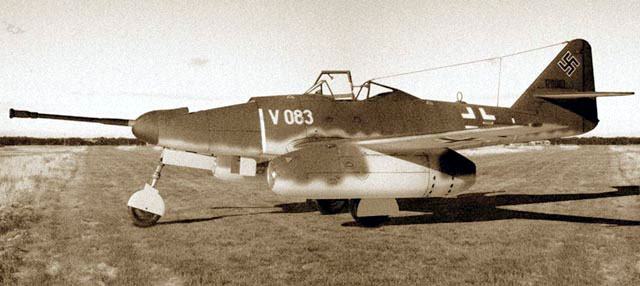
Thanks to the various Internet sites dedicated to the Me 262, text
references to the Pulkzerst÷rer version were not that hard to come
by. To find decent pictures of V083 proved harder. Fortunately I found
four photos of the A-1a/U4 version in the excellent book "Me 262 -
Stormbird Rising" (ISBN: 1855324083) by Hugh Morgan. These photos depict
V083 in slightly different paint schemes (before and after capture by
Watson┤s Whizzers). The main difference lies in the demarcation line
between the upper and lower camouflage colors on the nose section but none
of the photos mentioned above shows this and unfortunately I did not
discover that until a friend of mine sent me a photo of V083┤s nose a few
weeks after I had completed the model. I should have relied on the
box-art, which accurately shows a more wavy and less fuzzy demarcation
line.

The kit painting instructions suggest a splinter camo of Olive Drab and
Dark Green on the upper sides of the wings and Olive Drab on the sides and
top of the fuselage and tail. The correct colors would have been RLM81 (Braunviolet)
and RLM82 (HellgrŘn) on those surfaces and a
slightly darker shade of brown on the new nose section. In some photos,
the foremost part of the nose seems to have an even darker brownish color
and I chose to paint it accordingly. The underside of the aircraft and a
wavy line above the wing root was painted in RLM76 (Lichtblau) on the real
thing.
Using my Hansa 251 airbrush I primed the model
with Tamiya XF-2 Flat White and pre-shaded
all the panel lines with Tamiya XF-69 Nato Black after having wiped off
all residue of mold-release agent and fingerprints. I then sprayed the
whole model except the undersides in RLM81. I did not like the Gunze
version of RLM81, so I decided to mix my own using various Gunze and
Tamiya colors.
The splinter pattern on the wings was masked with
the superb Tamiya masking tape and (Gunze GUH422) RLM82 sprayed on in thin
layers to let some of the pre-shading show through. I mixed a slightly
darker brownish color and used in on the nose section. The Lichtblau in
the form of Gunze GUH417 was then applied carefully and in thin layers,
taking care to create a nice demarcation line between the upper and lower
parts of the airframe. The "nose cone" was sprayed in an even darker brown
color and then some of the panel lines were post-shaded using Tamiya X-19
Smoke since the pre-shading failed to show through on the areas covered by
two layers of paint.
The whole model was then coated in Future applied
in a few thin layers over a couple of days and then it was time for
decalling.
Well, one does not have much of a choice when it comes to the markings
of this aircraft but the decals certainly benefit from some improvement
since the white parts of the decals have a yellowish tint, an unwelcome
phenomenon I have noticed on all my DML kits┤ decals. I applied all the
kit supplied decals except for the fuel type markings (robbed them from a
couple of old sheets from the spares box) and two thin white fuselage
bands at the front and rear of the center fuselage section and also added
a swastika from the Aeromaster sheet #48-025
"Luftwaffe Swastikas" on each
side of the fin. I then sealed the decals with another coat of Future and
began the tedious task of masking the black parts of the Balkenkreuze so
that I could enhance the white parts with Tamiya
XF-2 Flat White. I also masked off and sprayed the fuselage bands at that
time.

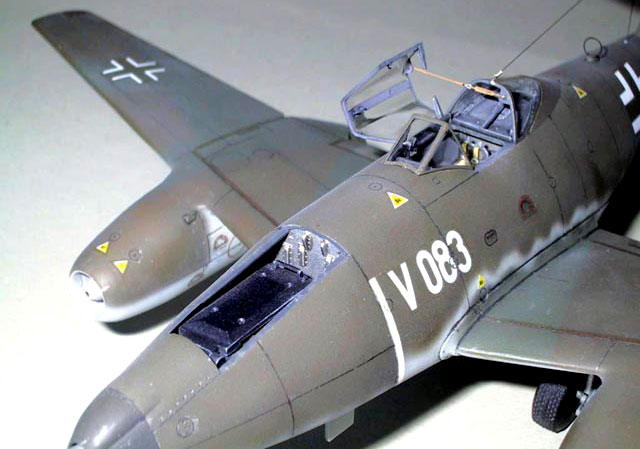
The only decal that did not receive this
treatment was the prototype code V083 on the fuselage sides as those are
far too tricky to mask and I do not possess an ALPS printer to print my
own decals on. Time for another thin coat of Future and then
I applied a panel line wash mixed from brown and
black water colors and a drop of washing-up liquid. I sealed the wash with
Aeromaster Flat Clear and used chalk pastel powder to subtly shade certain
areas of the airframe.
The weathering was kept to a minimum since
this airframe was probably rarely parked outside in the sun like a sitting
duck. Thus, using a silver Bruynzeel artist┤s pen, I only chipped the
paint in the areas most likely accessed by the ground crew and pilots.
A final coat of Aeromaster Flat clear was sprayed on and after that I
attached the landing gear, gear covers, cannon barrel and the rest of the
"small stuff". The clear parts were glued into place using tiny dots of
cyano acrylate (do not do this unless the clear parts are coated with
Future) and antenna wire made from very thin
fishing line was added. I use fishing line
as it is easy to tense by holding a heated metal object (e.g. a
screwdriver) close to the line for a couple of seconds.
The tensioning springs were made from the outer coil of a guitar
string.
This build was quite a challenge to a whimpy Tamigawa-builder like me
and the kit almost made me go insane from time to time. It has some really
tricky areas but if I ever build another one it will probably be much
easier since I would then be able to avoid the worst mistakes caused by
myself. Since I wanted this build to be completely out-of-the-box, nothing
was added to the kit except for the antenna wire and tensioners but I had
real trouble keeping myself from separating the slats, dropping the flaps,
repositioning the ailerons, thinning out various areas and drilling out
others.
Nevertheless, the kit builds into an accurate representation of the
real plane, save for the non-extended slats, and I┤d rather spend my money
on this than on the ridiculously expensive Tamiya kit and all the resin
stuff you "need" to buy for that one. Sure, you would avoid fit problems,
but the A-1a/U4 has got a big, big, BIG GUN IN THE NOSE fer Chrissakes!!!
I have only seen two completed 1/48th scale models of this 262 version on
the Internet, so that made the build all the more interesting. This kit
has also made me less afraid to deal with problem-kits and right now I┤m
working on an AMT Tigercat with loads aftermarket goodies and a lot of
scratch-building involved. Ahead of me is also the Řber-cool Gotha Go 229B
Nachtjńger, which apparently is a bear of a kit so I will need all the
practice I can get before attempting to build it and scratch a new
interior.
It should be noted that some of the difficulties in building this model
of course were due to my own mistakes and clumsiness, but as they say:
Trial and error. Learning by doing. Etc...
Recommended to anyone not afraid to use putty and knife, wanting a kit
that can be built into an accurate replica with a little extra effort.
Happy modelling!
Mattias ─rletun
Umeň, Sweden
Click the thumbnails below
to view larger images:
Model, Images and Text Copyright ę 2002
by Mattias ─rletun
Page Created 23 August, 2002
Last Updated
04 June, 2007
Back to
HyperScale Main Page
Back to
Features Index |
 Home
| What's New |
Features |
Gallery |
Reviews |
Reference |
Forum |
Search
Home
| What's New |
Features |
Gallery |
Reviews |
Reference |
Forum |
Search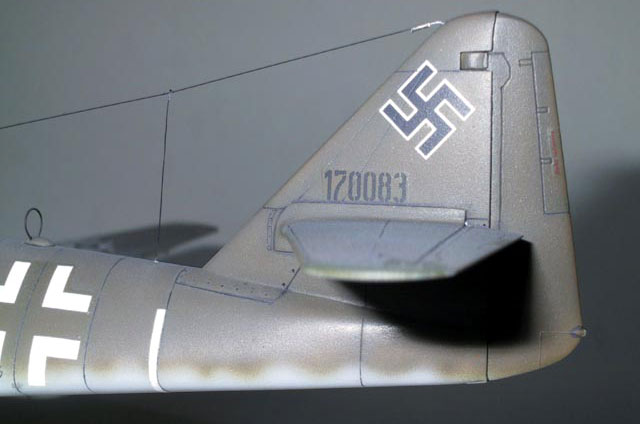