|
by Tony Bell
 |
|
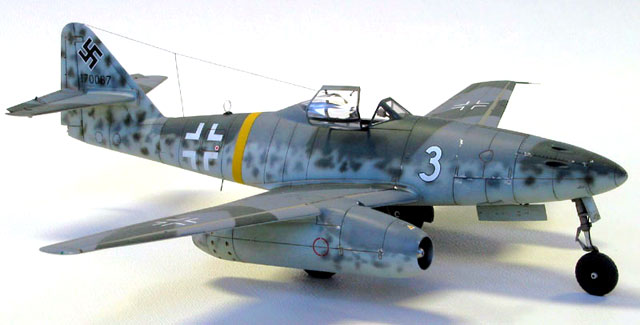
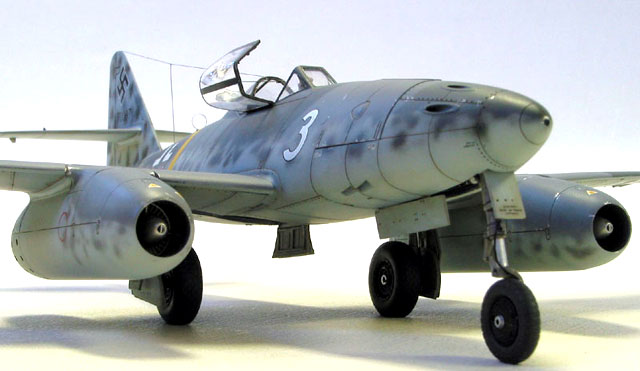
Messerschmitt Me 262A-1a |

Tamiya's 1/48
scale Messerschmitt Me 262A-1a is available online from Squadron.com
Quite a bit has been written about the world’s first
operational jet fighter, the Me-262. So much that it would be pointless to
regurgitate it here. Suffice to say that it represented a revolutionary quantum
leap in performance that was squandered by the Nazis - fortunately for us.
The Kit
Ahhh, Tamiya (spoken like Homer Simpson). There was a lot of
bellyaching on the internet discussion boards when Tamiya announced their
Me-262. Why re-do a subject already covered? Why aren’t the slats/flaps dropped?
Etc., etc.
I have the Italeri release of the Dragon/DML kit, and
comparing the two reveals that the level of detail of the older kit is not too
far off Tamiya’s. Tamiya has a better cockpit, IMHO, but Dragon offers more
petite surface detail. The real difference is in the fit and engineering. The
Dragon kit is a notoriously difficult build, whereas Tamiya’s is, well, Tamiya.
Of course Tamiya also includes a superb little Kettenkraftrad, if that sort of
thing turns your crank, as it does mine.
The Aftermarket Bits
Why on earth should I buy a $40 state-of-the-art kit an then
spend the same amount or more on aftermarket resin and decals? Because I’m a
modeller, that’s why! It’s a sickness, really.
Having been sufficiently impressed with the Cutting Edge
resin cockpit that I used in my
MiG-3 featured on
HyperScale last year, I went out and bought their Me-262 replacement cockpit
on spec. I also elected to purchase the Cutting Edge resin slats, flaps and
control surfaces as well as their replacement main wheels. Oh, and Eagle
Strike’s
Me-262 Sturmbirds, Part I (48-007). And their
Too Little, Too Late, Part II (48-063). And yes, all this did cost me more
than the original kit. Please don’t tell my wife.
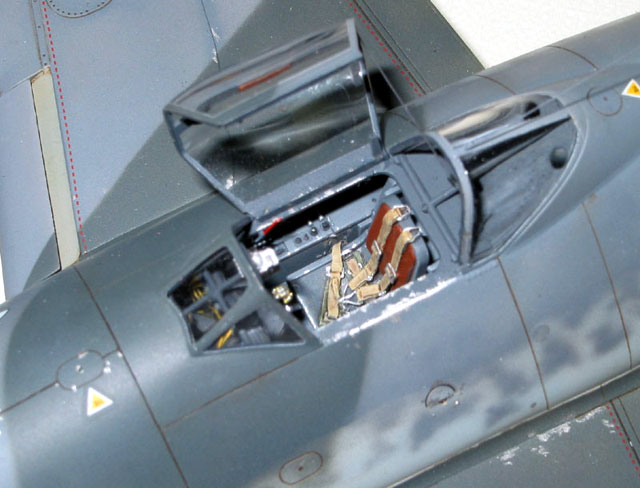
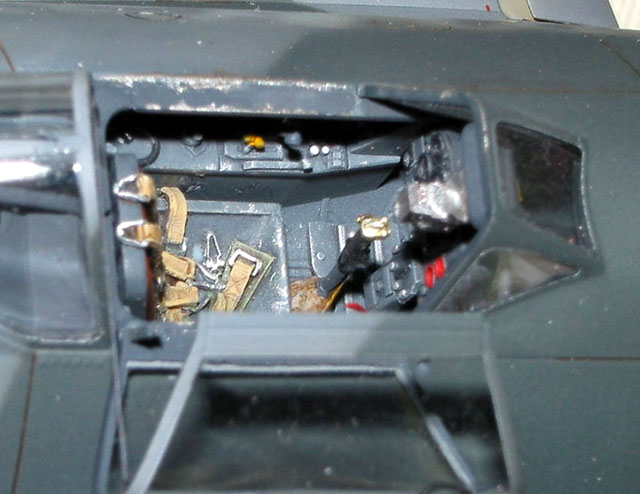
The Cockpit
Let me just start by saying that the stock kit cockpit is
already very good. If you were to add nothing but a seat harness, you would
still end up with a really nice cockpit. The Cutting Edge cockpit, on the other
hand, is really, really nice. For the details of what you get, I will
refer the reader to
Brett
Green’s review here on Hyperscale.
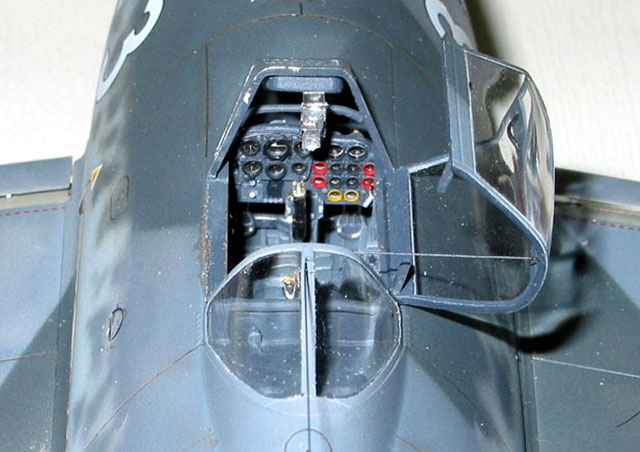
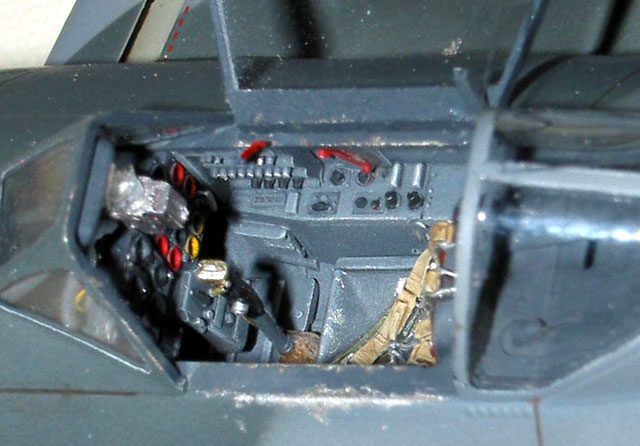
I chose to sand the back resin instrument panel until the
gauges became holes and used the acetate instrument faces. I also added bits of
fine wire to instrument bodies on the rear of the panel. The cockpit was painted
Tamiya RLM 66 dark grey and subjected to the usual wash and drybrush. The
details were picked out in red, yellow, silver and black. The seat was painted
in the same manner as Brett Green’s
1/32
Cutting Edge Bf-109 seat.
The bottom of the cockpit tub is also the inside of the main
wheel well. This was painted Alclad II aluminum along with the insides of the
fuselage, and detailed with some wire and fine solder. To pick out the lovely
detail in this area, I applied a "wash" of Polly Scale clear satin mixed with
black and brown inks and thinned with water.
Click the thumbnails below to view
larger images:
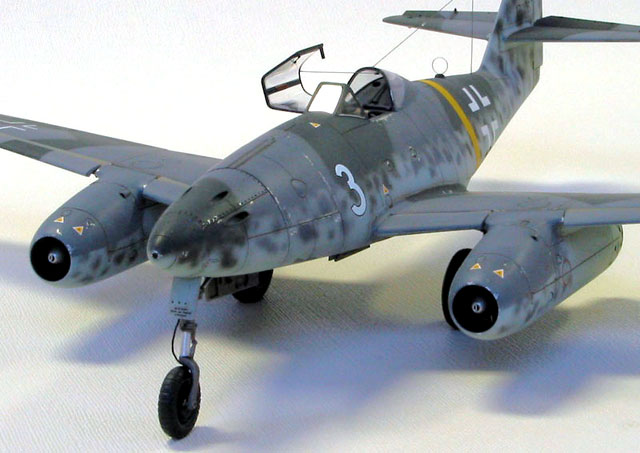
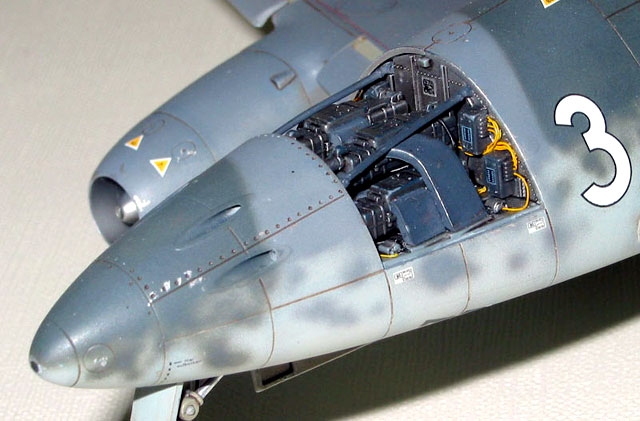
The Four-Gun Nose
Somewhat put off by the boring (to me anyway) Me-262A-2a
fighter-bomber schemes, I wanted to do mine up as the four-gun A-1a variant. I
could have bought the Eagle Parts or Cutting Edge replacement nose, or I could
actually do some modelling and perform this minor surgery myself. Using a pin
vice, drill bits, X-Acto knife and needle file I opened up the upper gun ports
on the kit part. I backed the holes with Evergreen tubing fared in with Mr.
Surfacer 500.
The kit comes with only two MK108 cannons, so I put out a cry
for help on Plane Trading and David Schemel came to my aid, graciously donating
some spares. The cannons were painted a dark semi-gloss blue-grey and then
drybrushed with Humbrol Metal Cote steel. The upper ammo chutes were pinched
from the Italeri kit, and all the chutes painted Tamiya RLM 66 with Humbrol
steel paint chipping. The rest of the gun bay was sprayed Alclad II aluminum
with the same Polly Scale wash as the fuselage interior. Some fine wire and
solder along with some Reheat placard decals finished the detailing in this
area.
This was one area of the kit where the fit was slightly less
than perfect. The fit of the access panels and the piece with the gun ports was
improved by shimming the aft edge of the latter and the bottoms of the former
with strips of 0.010" styrene. A bit of light sanding and some test fitting
resulted in a flawless join. So flawless in fact that the access panels were
press fit in place to mask off the gun bay for painting.
Click the thumbnails below to view
larger images:
The Fuselage
The real Me-262’s construction was typically Messerschmitt,
in that there was a join line running along the top and bottom of the fuselage.
In order to duplicate this, I eased the edges of the fuselage halves by gently
sanding them at a 45° angle. To join the halves together I ran liquid cement
along the inside of the fuselage so as to avoid melting the panel line. The fuel
filler hatches on the spine were rescribed using the Verlinden steel photoetched
template.
Before gluing the fuselage together, the gun bay, nose
weight, forward gun bay bulkhead and cockpit module were all fitted without any
glue. The tolerances in this kit are so tight that none of these parts had any
play in them once the fuselage halves were glued together.
The fit of the horizontal stabilisers was perfect. The elevators
were cut off and replaced with the Cutting Edge ones, which also fit perfectly.
These were attached in the "stick aft" position, this being the most common seen
in reference photos.
The Wings and Engines
The slats were removed from the kit parts by gently scoring
with an X-Acto blade until they could be snapped off. Following the Cutting Edge
instructions, I thinned the edges down to accommodate the resin inserts. I
decided not to use the resin flaps and so left the kit ones alone. The upper and
lower wings were assembled and the engines added. With a tiny bit of trimming
and dry fitting the fit of the wings and engines was flawless. The intakes and
exhausts were painted aluminum and washed with tinted Polly Scale satin.
To obtain a perfect wing to fuselage fit, the aft edge of the
lower wing fuselage insert was shimmed with some 0.005" sheet styrene. Once this
was done the wing was attached to the fuselage with liquid cement. Again, no
filler was needed.
I carefully trimmed and fitted the resin slat inserts and
fixed them in place with superglue. These are best installed after the wings
have been assembled, as they can interfere with the fit of the engines.
|
Painting, Decals and
Weathering |
After a dip in Future, the canopy parts were masked inside
and out and the interior framing painted RLM 66. The front and rear canopy parts
were then attached with liquid cement and the hinged portion tacked on with
masking liquid.
The model was primed with Gunze "Mr. Surfacer 500" thinned
with automotive paint reducer (a less volatile lacquer thinner). After the usual
minor surface imperfections were addressed, the whole model was rubbed down with
1500 grit wet ‘n dry sandpaper and liberal amounts of water.
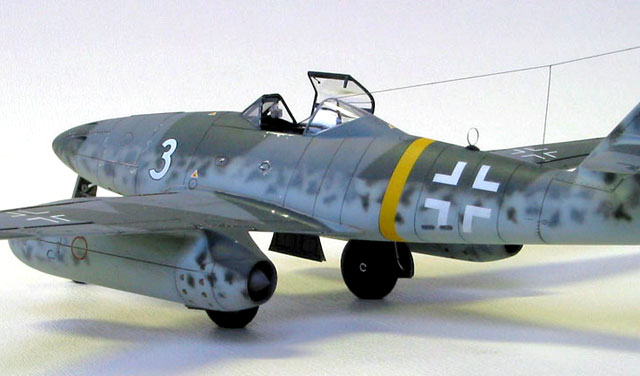
After a wash and a dry the panel lines were pre-shaded with
Tamiya semi-gloss black. The undersides were sprayed with Polly Scale RLM 76
light blue, allowing the pre-shading to barely peek through. The top side RLM 74
dark grey and RLM 75 grey violet were mixed up from Tamiya paints. The 75 was
sprayed first, followed by the 74 using masks cut from heavy paper onto which
the splinter pattern from the Aero Detail book had been photocopied. These masks
were held a few millimetres off the model surface by little rolls of Blu Tac to
provide a slightly feathered edge. Tamiya paint thinned 90% with rubbing alcohol
was used to spray the mottling.
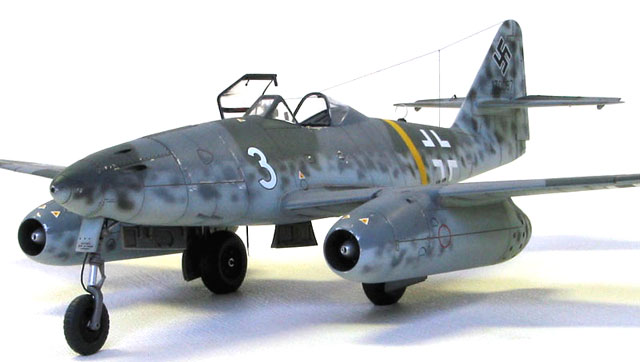
The slat inserts were masked and painted RLM 02, and the
resin slats painted to match the splinter pattern on the wings. The yellow
fuselage stripe was masked and sprayed Tamiya yellow with a touch of red mixed
in. Because the national insignia were so simple, I cut masks from frisket using
the kit decals as guides and sprayed the markings.

At this point, a coat of Future floor polish was sprayed on
prior to applying the decals. The Eagle Strike decals went on easily and
flawlessly needing only a light application of Sovaset to get them to conform.
A light wash of Windsor and Newton burnt umber artists’ oil
paint was applied to the upper surface panel lines and some light paint chipping
applied with a fine brush and Humbrol 11 silver mixed with burnt umber.
After attaching the slats with superglue, the whole model was
sprayed with Polly Scale flat and the exhaust "onions" were airbrushed with a
grey/brown colour mixed from Tamiya paints and thinned 90% with rubbing alcohol.
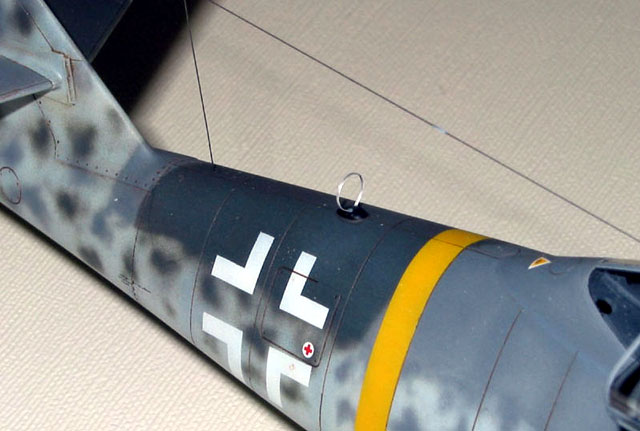
The hinged portion of the canopy is moulded with overscale
lugs to allow it to be attached in the open position. I removed these and
drilled small holes in the hood and sills to accept small pieces of steel wire.
The canopy retaining cable was simulated with nylon thread and a tiny spring was
made by wrapping copper wire around a no. 80 drill bit.
I threaded insulators made from sections of stretched styrene
tube onto a piece of nylon thread which was superglued into holes drilled in the
canopy and tail. The aerial was tightened up with hot air from a paint stripping
gun.
The pitot probe was made from two sizes of hypodermic tube
nested together and attached with white glue.
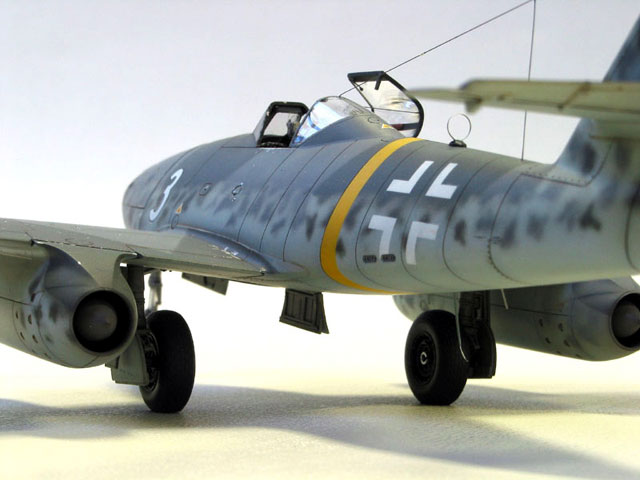
The main landing gear oleo cylinders were shortened by about
half by cutting them off at the top and reinserting them into holes drilled into
the upper half of the landing gear leg. I painted all three wheels Aeromaster
tire black for the tires and Tamiya satin black for the hubs, with silver
details. The brake lines were fine solder painted black. The landing gear and
wheels were all glued together with five minute epoxy to allow time to get the
alignment right.
Click the thumbnails below to view
larger images:
The final touch was to add a drop of five minute epoxy to the
gun camera opening at the tip of the nose.
This model kit was so well engineered and so well detailed
that you would really have to build it with a hammer in order to screw it up. By
paying attention to the basics of seams, alignment, painting and weathering, a
real stunner can be produced right out of the box. If you are so inclined,
between Cutting Edge, Eagle Parts, Verlinden, Eduard, Eagle Strike, Aeromaster
and others, there is enough aftermarket stuff out there to go absolutely nuts.
Click the thumbnails below to view
larger images:
Model, Images and
Article Copyright © 2002 by Tony Bell
Page Created 16 December 2002
Last updated 04 June 2007
Back to HyperScale Main Page
Back to Features Page |
 Home
| What's New |
Features |
Gallery |
Reviews |
Reference |
Forum |
Search
Home
| What's New |
Features |
Gallery |
Reviews |
Reference |
Forum |
Search
/Me-262%20four%20gun%20nose.jpg)
/Me-262%20gun%20bay%202.jpg)
/Me-262%20gun%20bay%203.jpg)
/Me-262%20gear%20well%202.jpg)
/Me-262%20MLG.jpg)
/Me-262%20NLG.jpg)