|
M26 Pershing
by
Valentin E. Bueno
|

|
|
M26 Pershing |

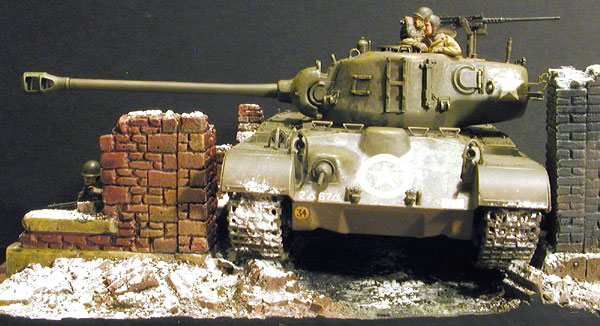
Tamiya's 1/35 M26 Pershing is
available online from Squadron
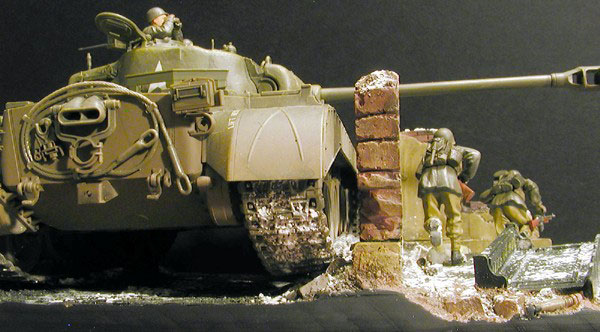
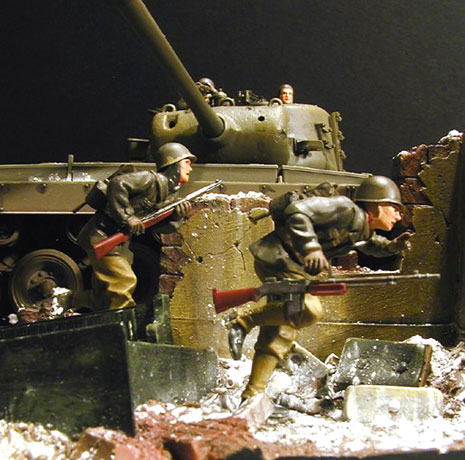
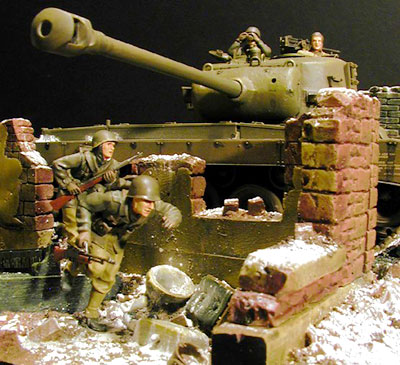 Scene 1: Haiyaku! Scene 1: Haiyaku!
“Hurry it up, Inouye!” I yelled at Danny two
steps behind me.
“Any faster and I’ll run you over, Fujisaki.” Danny shot back.
A new Pershing tank had decided to stop just
East of our position and it looked like it was getting ready to fire.
The Shermans with their 75’s were loud enough. How much louder would the
larger bigger 90’s on the Pershing be? We didn’t want to find out and
tore outta our position. We ducked under the gun tube as the gunner spun
the turret around. I glanced at the huge flat behemoth as it squeezed
itself down the narrow road. Brave driver I thought as I scrambled over
the rubble into the street, making boot prints in the freshly fallen
snow.
Well that’s what I figure the fellow ducking under the gun barrel of
Tamiya’s new 1/35 scale Pershing might be thinking. The kit was an
absolute dream to put together. I built the model completely out of the
box with no additions whatsoever other than the Verlinden diorama base I
placed it on. The running figures came from the new release of the M4A3,
also from Tamiya.
Insert spring A7
into slot B4…
|
Shake the box and the finished model drops out.
Well it might not be quite that easy, but it felt
like it. Therefore I will just hit describe of the more interesting high
points during construction.
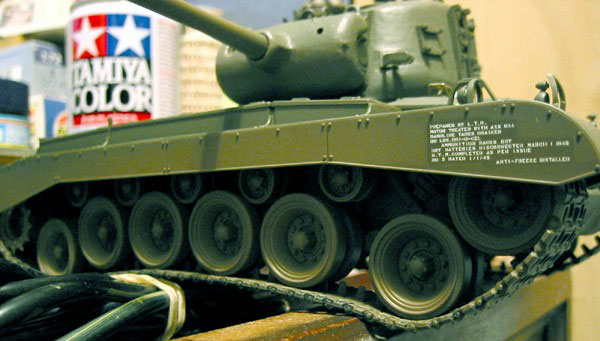
The sprung roadwheels, the first and last roadwheel
on each side, were fun to put together. You will need tweezers if you
have fat fingers like me. The springs are identical and are placed into
position first. These are then secured with a tiny Phillips head screw.
They don’t supply the screwdriver so I have you have a Phillips head
Jewelers screwdriver handy. The rest of the suspension swing arms are
held in place with poly caps to allow them to rotate. Very nice. The
tracks are a rather loose fit, but with the fenders on, you don’t see
how loose they are. I am assuming that they are this loose to allow the
suspension to articulate without popping off all the roadwheels and the
sprocket mounts.
The first thing I did to the upper hull was to add the engine bay
doors/screens. Interestingly enough, there is detail on both sides of
the doors. I didn’t notice any unused locating lugs on the underside of
the upper hull for a future engine bay set as they did on the Tigers and
Panther kits of old. Hmmmm, maybe they are making things easier for the
aftermarket companies to create an engine bay set? I loved the fact that
I could read the lettering by the water cap. Absolutely cool stuff. It’s
like X-mas in July.
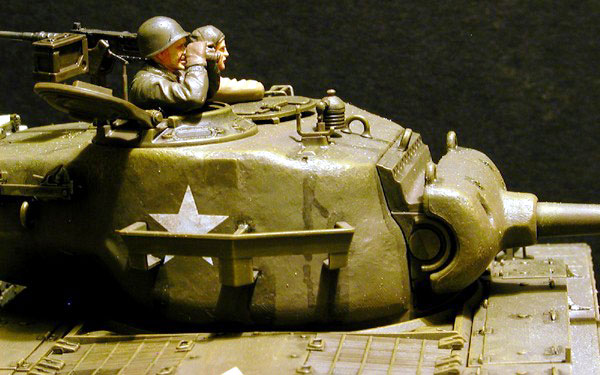
The turret is a huge two-piece affair with nothing whatsoever in side.
Not even a gun breech. The cast molding on the exterior is exquisite. I
almost hated cutting the part from the tree. The fit of the upper and
lower turret halves was very good and all I had to do was sand away the
seam and replicate the cast texture in the areas I had sanded down. This
was done with several applications of Testors Liquid glue and stippling
the soft plastic with a brush. I knew that stuff would come in handy
some day after making the switch to CA all the time 24-7. I knew I would
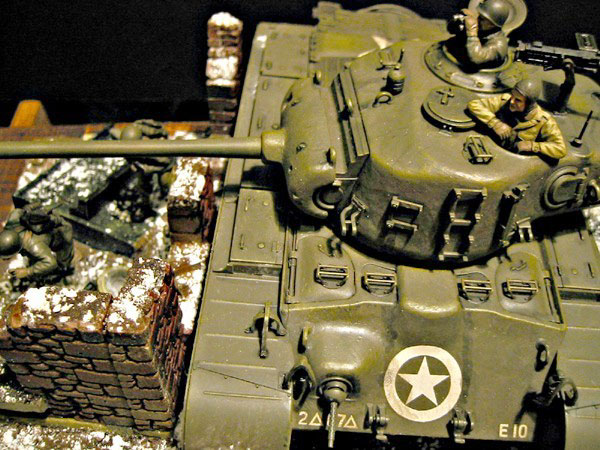
use the Verlinden Dio base ahead of time to show off the articulated
suspension, so I added the mounting shelves for the two figures included
in the kit. The Commander is the familiar old fellow we have seen before
on the Sherman kits, but the loader was new molding and paints up very
easily.
After this it was nothing but snip, clean and glue. Oh joy, oh rapture,
oh the feel of a new Tamiya kit.
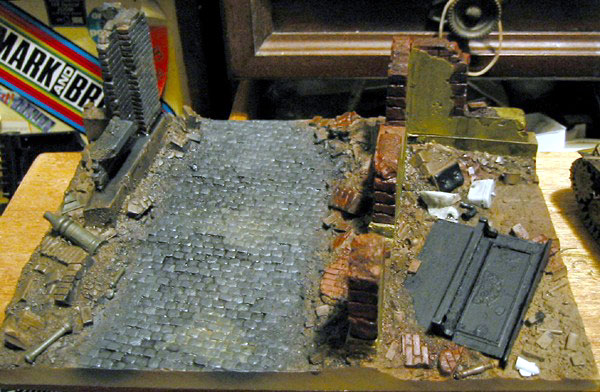
The diorama base is an all resin item from Verlinden’s expanding range
of instant diorama bases. I cannot recommend these heartily enough as an
easy was to display you latest armor (or aircraft) projects. In this
instance I used Downtown WW II, VP1348. I assembled the building walls
as per shown on the box top and airbrushed everything earth brown.
 The
roadway was painted RLM 66 Scale Black and one building was sprayed with
Polly S Oxide Red. I painted this and the tank with the new white “Made
for Acrylics” nozzle on my Aztec airbrush. I have had problems with the
older generation nozzles clogging when I put my Polly S paint through
them. This time the new nozzle worked wonderfully. I guess I can go back
to airbrushing models again. Can you imagine how hard it was to hand
brush a natural metal model? Anyway, the piano and benjo (Japanese for
bathroom) fixtures were painted Polly S RLM 22 Night Black and Model
Master Acryl Light Gray respectively. I didn’t worry about it not being
white as the washes and drybrushing would render the original color
moot. The
roadway was painted RLM 66 Scale Black and one building was sprayed with
Polly S Oxide Red. I painted this and the tank with the new white “Made
for Acrylics” nozzle on my Aztec airbrush. I have had problems with the
older generation nozzles clogging when I put my Polly S paint through
them. This time the new nozzle worked wonderfully. I guess I can go back
to airbrushing models again. Can you imagine how hard it was to hand
brush a natural metal model? Anyway, the piano and benjo (Japanese for
bathroom) fixtures were painted Polly S RLM 22 Night Black and Model
Master Acryl Light Gray respectively. I didn’t worry about it not being
white as the washes and drybrushing would render the original color
moot.
Click
the thumbnails below to view larger images:
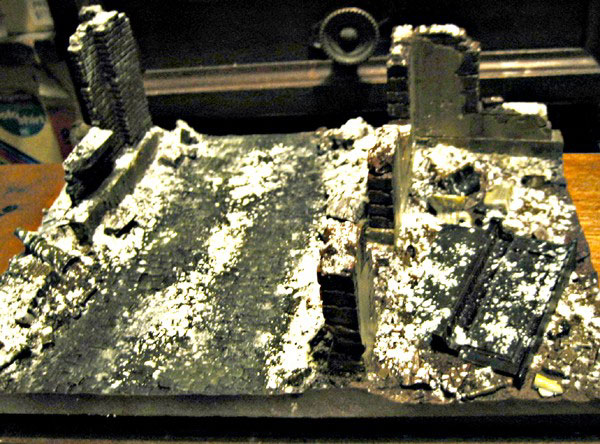
After the paint had dried for a few hours, I gave the entire base a wash
of dirty thinner with some black pastel dust thrown in for good measure.
Using dirty thinner as a wash medium is a great way of recycling old
dirty thinner when you cannot use it to clean brushes anymore. I have
several bottles of absolutely vile Tamiya thinner that I had been using
to clean my brushes after painting and scrapped some black, red or brown
pastel powder into them to give each bottle a different color
characteristic.
After the wash dried, I mixed some Tamiya Flat Base and Future Floor
Polish in a palette and hand brushed this on. I did a small section at a
time and before the mix dried, I tapped some Permastone plaster powder
from a spoon onto the wet base/Future mix to represent the freshly
fallen snow. I apologize if I didn’t get this to look quite right. I
live in Hawaii and we don’t get snow here except on the slopes of Mauna
Loa and Mauna Kea volcanoes. I added the snow for two reasons. The first
reason was to hide my hasty and shoddy base painting work. The second
was to give this method a try and to see how it looked. I like it.
The figures were built straight from the box, again
and painted with Polly S paints. At first I was going to use all three
figures included in the Sherman kit, but after playing soldiers with the
composition, I realized the standing figure was too static compared to
the two running figures. I’ll find someplace to accept this poor
orphaned fellow.
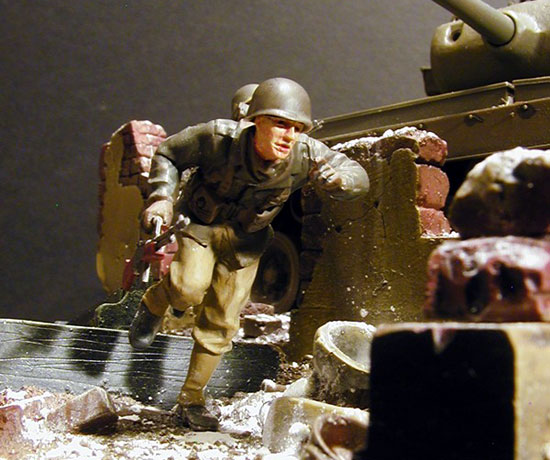
I named these fellows in the above story in honor of
the 100th Battalion 442nd Infantry Regiment made up of Japanese
Americans who served with great distinction in Europe. A large number of
these brave patriots came from Hawaii and thus I couldn’t resist adding
them to my little diorama.
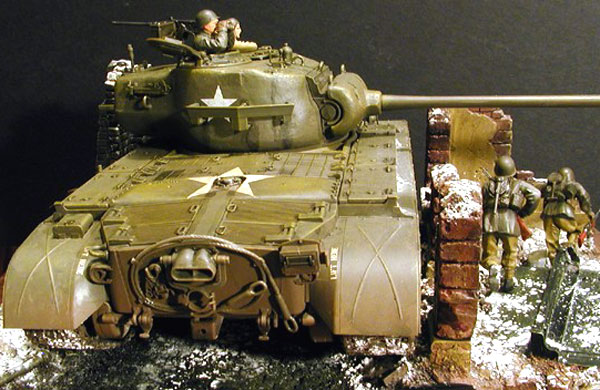
After ducking behind another building about 50 yards from the
Pershing, Inouye and I looked back at the Olive Drab monster in the
alleyway. The turret had turned a full 90 degrees and the commander and
loader had disappeared from their hatches.
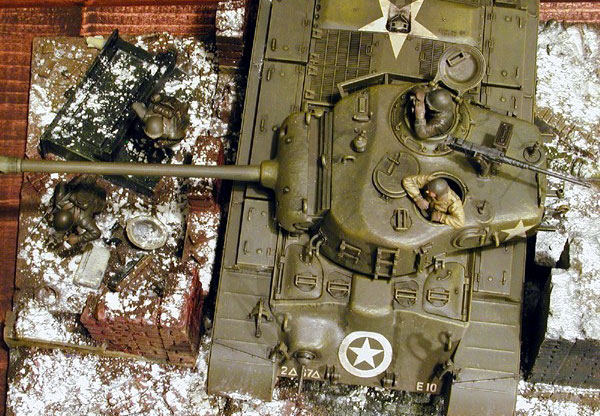
A flash of fire, a bambucha boom,
like Kilauea when she’s angry, and a cloud of dust and snow filled the
air as the massive 90mm gun fired at a target. The war is as good as won
with tanks like these.
We looked at each other slack jawed and then
went off in search of Sarge.
Click the thumbnails below
to view larger images:
Model, Images and Text Copyright © 2002 by
Valentin E. Bueno
Page Created 13 August, 2002
Last Updated 04 June, 2007
Back to HyperScale
Main Page
Back to Features Index
|
 Home
| What's New |
Features |
Gallery |
Reviews |
Reference |
Forum |
Search
Home
| What's New |
Features |
Gallery |
Reviews |
Reference |
Forum |
Search