|
Ki-43-II Oscar
by
Seth
Lorinczi
 |
|
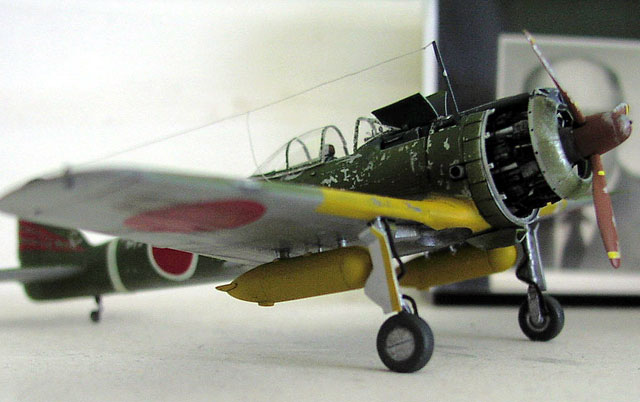
Nakajima Ki-43-II Oscar |

Hasegawa's 1/72
scale Ki-43-II is available online from Squadron.com for less than USD$7
I’m fascinated by the Japanese aircraft of WWII. Modern and
effective, while at the same time underspecified and unprotected, they typify
the struggle between the feudal, pre-20th century world and the modern era which
Japan was so desperate to enter.
 The Nakajima
Ki-43 Hayabusa (“Peregrine Falcon”), the Imperial Army’s state-of-the-art
fighter at the start of the Pacific War, is emblematic of this conflict.
Graceful and tapered in profile, the first model featured long birdlike wings
and a two-blade propeller reminiscent of an earlier era. The Nakajima
Ki-43 Hayabusa (“Peregrine Falcon”), the Imperial Army’s state-of-the-art
fighter at the start of the Pacific War, is emblematic of this conflict.
Graceful and tapered in profile, the first model featured long birdlike wings
and a two-blade propeller reminiscent of an earlier era.
Later versions shortened the wingspan and substituted a
three-blade propeller, among other minor changes.
The redesigns could not to significantly improve the armament, which was
essentially unchanged from that of the First World War, or give the pilot and
fuel system a decent level of protection from enemy fire.
In the hands of an expert, the Hayabusa was an exceptionally
agile, potentially deadly fighter. But the dynamics of the war meant that the
mass production of tough, powerful aircraft (and averagely skilled pilots to fly
them) was essential to victory.
|
Kit
Details |
Hasegawa Nakajima Ki-43-II,
1/72 scale, # 00131
List Price: USD$6.98
Aftermarket Parts:
-
Falcon “Clear-Vax” Canopy
(1/72 Set No. 13, IJAAF WWII)
-
Engines & Things 1/72 Resin
Nakajima Army Type 1
-
Super Scale International
Decals, Sheet 72-70, WWII Japanese Group Markings
|
Enamored by the graceful lines of the first Hayabusa variant
(Ki-43-I), I had planned to use Fujimi’s bare-bones but finely molded and
accurate kit.
Unfortunately, overzealous thinning of the fuselage left me
with, well, very little fuselage at all. A replacement kit proved difficult to
find for less than $20, and given that the commonly available Hasegawa Ki-43-II
kit sells for roughly $6 (and given that I’m a total cheapskate), I settled for
second best.
Not that building the Hasegawa kit was a chore. Though it dates from at least
the 1980’s (and possibly earlier, though I’m no expert), the kit is a decent
representation of the aircraft, though the kit lacks Fujimi’s delicate etched
lines. In any event, I was able to use a few components from the Fujimi kit,
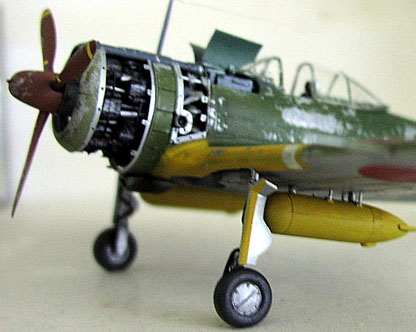
notably the cockpit floor, main gear legs and underwing drop tanks.
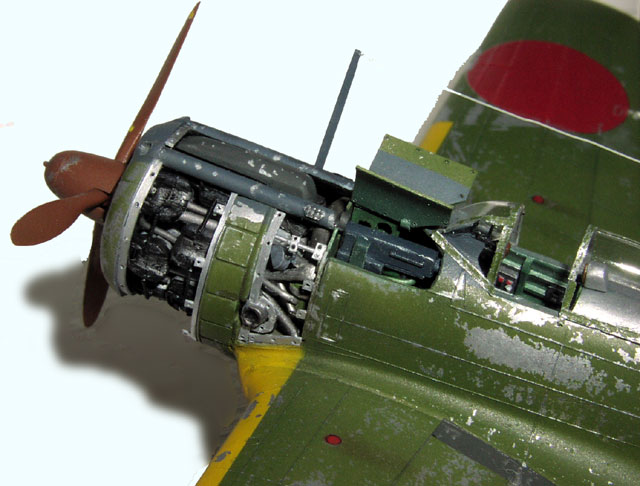
Interiors are my favorite part of any aircraft. I spent many
weeks researching and envisioning the internal layout. I decided early on that I
wanted to display as much of the aircraft as open as possible, so that meant
building all of the cockpit, the front and back of the instrument panel, and the
open gun bay. I had great source material, so the main challenge was in keeping
accurate proportions.
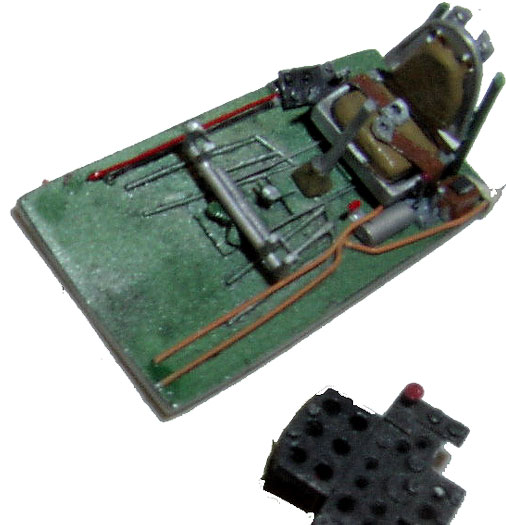
As it turned out, that wasn’t my strong point. The breeches of the fuselage deck
guns should just protrude into the cockpit, but don’t quite make it. And the
rudder pedals, which are accurate down to their cross-shaped mounting and
knurled foot pads, are hidden under the instrument panel. So much for careful
measurements.
After the fuselage was glued up, I turned my attention to the wings. The main
drawback of the Hasegawa wings, other than the landing light mysteriously
transposed to the wrong side wing, is that glue seams pass right through the
flaps, making filling and sanding a large headache. But finally that too was
done and it was time to turn to the engine compartment, which I had recklessly
decided to pose open.
The engine itself, which I purchased in one of my rare aftermarket moments, was
well molded but Spartan, so I had to build exhaust headers and ring-shaped
collector, oil lines, carburetor and all the other accessories. By far the most
difficult process was constructing motor mounts from lengths of paper clip,
which I did not once but three times, shortening each time.
Nothing fancy here. Envisioning a well-peeling green-on-metal
finish, I sprayed the entire model in Floquil Railroad “Old Silver,” which
proved to be durable (and opaque enough to completely conceal the black
pre-shading I’d applied to all the panel lines). After that had dried a day or
so, I sprayed AeroMaster Acrylic “Nakajima IJA Green,” not bothering to lighten
it because much would be peeled off anyway.
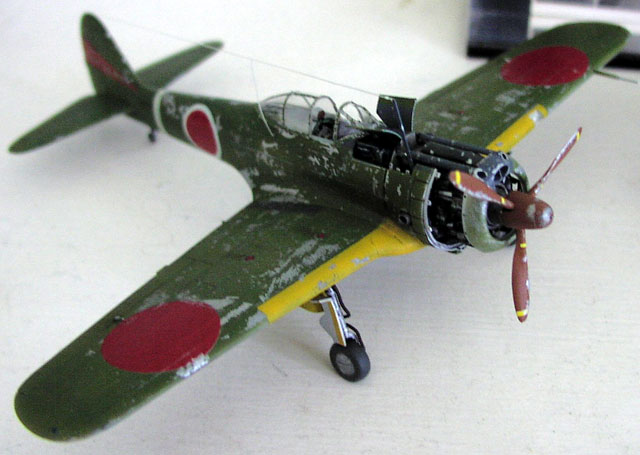
As soon as it was applied, I started peeling it away with masking tape as a
paint removal tool. I’d never tried this method before, but I’m sold: It was
quick, easy and controllable, and yields the most realistic results of any
method I’ve yet tried.
The tail code represents an aircraft of the 64th Fighter Group, for no reason
other than that I cut my original choice, the yellow arrow of the 26th, too
short.
Once everything was painted, decaled, washed, pasteled and
sealed, I mounted the engine, front cowling ring and other odds and ends. After
a couple of completely nerve-wracking hours trimming and pressing, the model was
done.
Not everything worked out as well as I had hoped. Viewed from the side, the
engine sits a little too high in the fuselage, making a slight dead space below
it. There’s supposed to be a mounting bracket for the cowling running over the
gun tubes and carburettor intake duct, but they rode a little too high in the
fuselage for it to look realistic. And were I to do it all again, I’d probably
leave one gun bay access door closed. But what the heck: It looks good sitting
on the shelf, and I have 25 other Japanese kits waiting to be built. At this
rate, I should be done sometime around 2030.
-
“Famous Airplanes of the World, No.
65: Army Type 1 Fighter ‘Hayabusa’” (Bunrido Co. Ltd., 1997)
-
“Japanese Aircraft Interiors
1940-1945,” Robert C. Mikesh (Monogram Aviation Publications, 2001)
-
“Japanese Aircraft of the Pacific
War,” Rene Francillon (Putnam Aeronautical Books, 1987)
Model, Images and
Article Copyright © 2002 by Seth Lorinczi
Page Created 04 February 2002
Last updated 04 June 2007
Back to HyperScale Main Page
Back to Features Page |
 Home
| What's New |
Features |
Gallery |
Reviews |
Reference |
Forum |
Search
Home
| What's New |
Features |
Gallery |
Reviews |
Reference |
Forum |
Search