|
Polikarpov I-16
by Jose R. Rodriguez
|
 |
|
Polikarpov I-16 |

Academy's 1/48 scale I-16 is available
online from Squadron.com
The Polikarpov I-16, the brainchild of Nikolai Nikolayevich
Polikarpov, was a revolution by evolution.
Its roots can be traced to previous Soviet biplanes. If you want to
be simplistic, the I-16 was the monoplane, cantilevered wing version of
previous Soviet biplanes such as the I-15 and I-153. The I-16 had a
retractable landing gear and an enclosed canopy, the first ever in a
fighter airplane. A windscreen replaced the full canopy after pilots
complained about rear visibility. At the time of its inception in 1933,
the I-16 was the most advanced, revolutionary and the best fighter in
service anywhere.
The Type 10 was born from the experiences in the Spanish Civil War.
Pilots complained about low power, low firepower and lack of armor of
the Type 6 then used by the Republicans. When the VVS boss asked the
Polikarpov bureau for a time estimate to upgrade factory production from
the Type 6 to the Type 10, the bureau answered "about one year." The
boss in turn replied, "You got two days." Management by intimidation
works and the Type 10 was ready in time to be supplied to the
Republicans in Spain who dubbed them supermosca (superfly), to
differentiate them from the Type 5/6 that was just a mosca (fly). The
supermosca proved superior to all German and Italian biplanes but
showed its deficiencies when pitted against the new Bf109B and Bf109C.
The Soviets should have seen the writing on the wall when the Bf's
arrived and should have started looking for an I-16 replacement right
away. The Yak-1 was already reaching VVS units when Operation Barbarossa
started in 1941 but their very few numbers passed the brunt of the Nazi
attack on the little I-16 and the biplanes. Perhaps because Stalin
executed almost all the veterans that returned from Spain for being
"tainted" by foreign influences or perhaps because of complacency, the
Soviets were caught with their pants down. They should have been the last
people in Europe to be surprised by the Luftwaffe. The Soviets also
fought the Japanese and confronted the new Zero-sen fighter with their
Type 10's; again, forewarning was not heeded.
The I-16 went to soldier in the front lines until 1943 even though it
was pathetically obsolete by them. It still made a decent ground pounder
and the Soviets were throwing into battle anything that could shoot; if
it could also fly it was a bonus.
This little fighter was not for novice pilots. It could snap and bite in
a second of carelessness. It had a tendency to stall and spin easily;
flaps were mostly useless and pilots had to fly the plane onto the
runway at high speed. It had touchy controls that made the airplane a
handful for an inexperienced pilot and deadly on the hands of an
experienced one. The Germans quickly learnt not to ever slow down their Bf's to engage a supermosca in a dogfight
- the little fighter
could turn the tables in a split second.
This is a link to a very good site on the Polikarpov fighter, in
English,
http://216.219.216.110/polikarpov/i16.html
From the New Zealand Fighter Pilots museum, pictures of flying
rebuilt I-16's,
http://www.nzfpm.co.nz/aircraft/i16.htm
http://www.kiwiaircraftimages.com/i16.html
And another, just for good measure,
http://www.ophetweb.nl/ww2w/ww2htmls/polii16.html
For a site in Spanish regarding the I-16 in Spain check this,
http://usuarios.lycos.es/SANMARCA/
|
Academy's 1/48 scale I-16 |
The object of this review is the Academy kit 2127 in 1/48th scale of
the I-16 Type 10 Polikarpov fighter.
This is Academy’s version of the Hobbycraft I-16, The molds have been slightly modified to change some of
the skin texture and small details but it is still a re-pop of the
Hobbycraft kit. The basic kit can be built with 34 pieces. Add six more
if you put the six 82 mm RS-82 rockets. If you think there is not much
to this kit, you are right. There were many times that I had to remind
myself that this kit was not in 1/72nd scale but in 1/48th. I have built
1/72nd scale fighters bigger than this model. It can be cupped in the
palm
of your hand; yet I spent weeks on this thing. I don't know if you can
qualify my work as detailing; I would prefer to call it correcting
defects.
Don't get me wrong. I think this is a nice kit and you get 90%
of an accurate I-16 straight out of the box. The devil is in the details
and it is that last 10% that made me sweat for about four weeks.
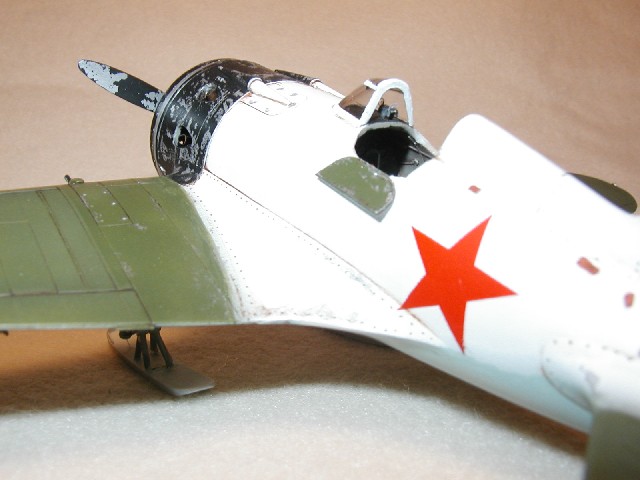
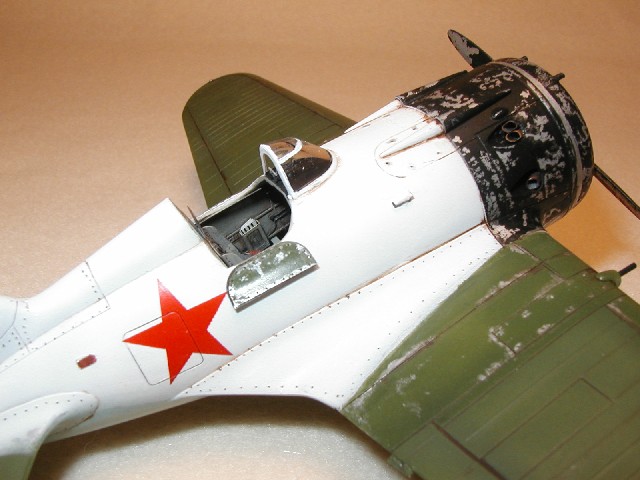
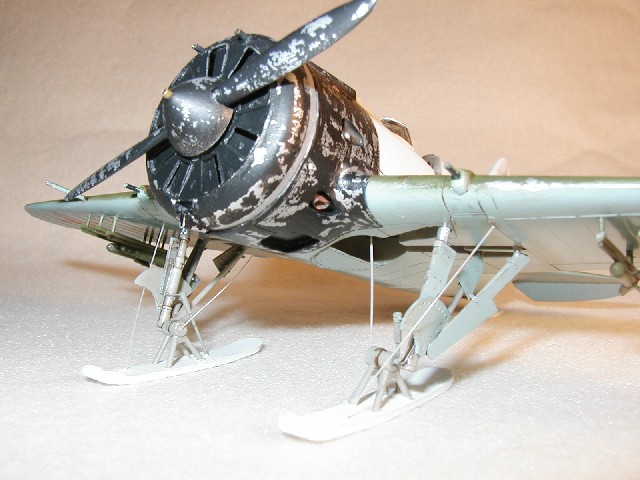
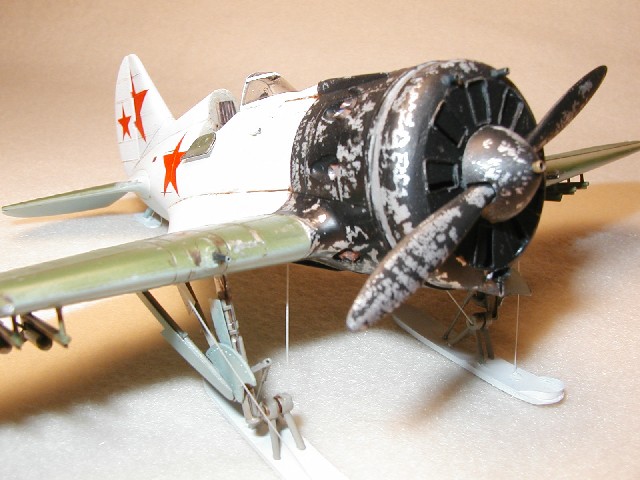
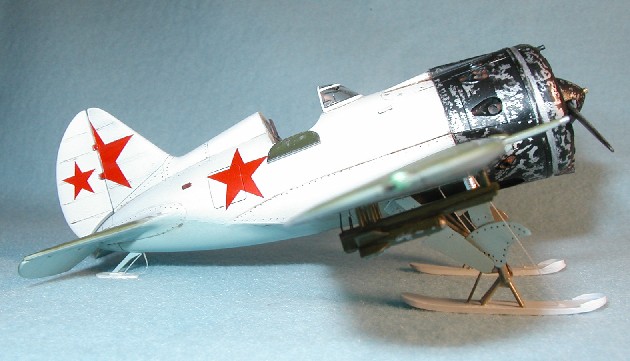
I had plans to build the Spanish Republican aircraft depicted in the box
art but one of the options in the kit is for a VVS aircraft with a
grafted rudder from another plane. This aircraft's picture is in page 29
of the Squadron/Signal Publications book, Polikarpov Fighters in Action,
Part 2. Get this book and you won't need any other reference. There is
also a painting of this same plane on the back cover of this fine
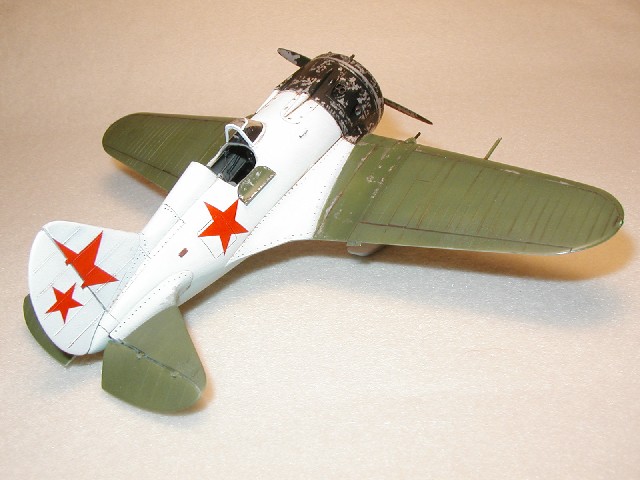
publication. I just couldn't resist the combination of a black nose,
green wings, white fuselage, and patched up tail. My choice also meant
using the skis provided with the kit instead of the wheeled landing
gear. I came to regret this choice later on.
For aftermarket parts I got the Eduard P.E. set EU48335 for USD$16.96.
Squadron sells this airplane kit for USD$18.96. Don't ask me how I can
justify paying for a P.E. set what I almost paid for the plane. I also
got the Moskit exhaust pipes part 48-25, the resin wheels from True
Details part number 48039 and the Black Magic wheel hub masks part
number CEBM48103. Of course, I didn't use the last two items. A Type 5
may be in the future that will use those wheels.
I started construction on the cowling face. I never start in the cockpit
because I don't like painting them. The day somebody comes with a
prepainted aftermarket cockpit will be the happiest day of my life.
The
kit provides two cowlings, one for the Type 10 and the other for a Type
18 or later model, plus there are other goodies such as ShVAK 20 mm
cannon for later versions. The Type 10 cowling doesn't have the air
scoop on the top, just the one on the bottom. The first step was
removing the whole cowling face and replacing it with the Eduard face
plate and then adding the engine cooling vents from inside and the
opening bezels from the outside. The kit cowling does not come with
cooling vanes, and its thick plastic is out of scale. Thick plastic is a
problem on all parts, probably much more noticeable here because of the
kit's small size. The kit's nine-cylinder engine is nicely done but will
be almost invisible behind the cowling.
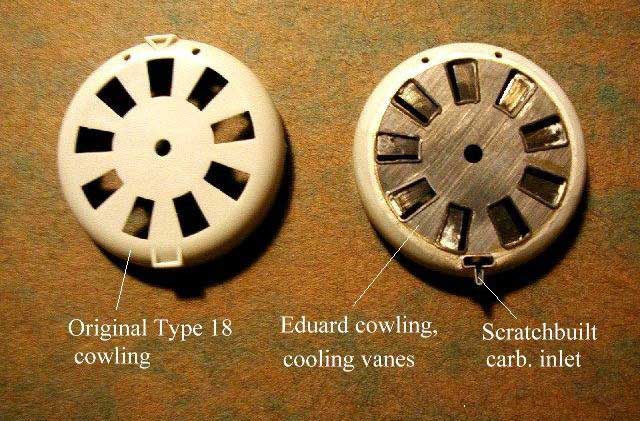
Academy gives a big, fat square facsimile of the air inlet stamped on
the cowling even though their own box art shows the correct T-shaped
inlet used with the M-25V engine. The square inlet would be correct for
the few and early Type 10’s built with the M-25A engine. I took the
original out by drilling a round hole through it and using my primitive
pliers and scissors I cut, bent and reshaped beer can aluminum into a
quasi-correct inlet, stuck it into the round hole in the cowling and
filled in the gaps with putty. Easier said than done. I don't recommend
this operation if you are in a hurry or if you are easily ticked off. I ended
with a good size pile of "prototype" inlets before I built one that was
satisfactory. Academy cannot really be blamed for the fat square air
inlet, as the T-shaped inlet is hard to do with injection plastic.
Even Eduard weaseled out by providing a square inlet instead of the more
complicated T-shaped one.
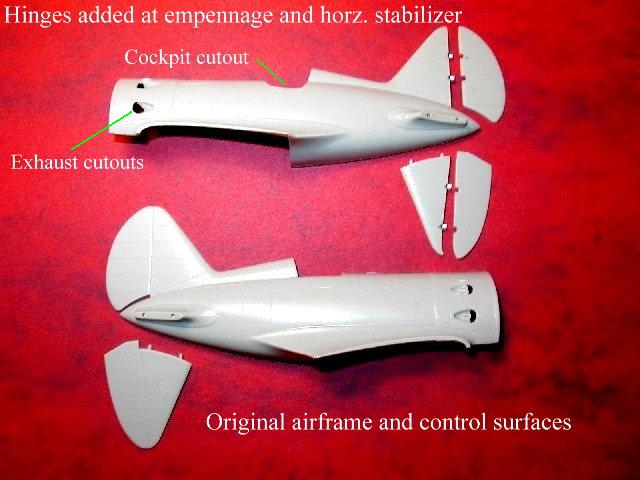
The biggest defect on this kit has to be the missing rudder hinges. The
hinges are big and rather obvious on the real aircraft. I have no
idea why Hobbycraft/Academy chose to mold the empennage-rudder line as a
straight line and ignore the hinges. I wanted to build an aircraft where
the red star ended on these hinges so out came the saw and the cutting
started. Off came the rudder and then the elevators. The elevator hinges
are also missing but at least there is a feeble attempt at a hinge line
that served me as a guide to cut through the plastic. I scratch built
the "male" hinges with plastic card. By cutting the elevators I was able
to repositioned them in a more down, natural position.
Being in a
cutting mood, I also cut both cockpit doors to make sure that the sparse
cockpit detail would show up. I ended the cutting fest by drilling the molded in exhaust pipes to make room for the Moskit pipes. More on this
pipe saga later.
Next came the wings (as you can see, I delayed working in the
cockpit until the last moment). I added machine guns out of brass tubing
and drilled the holes for the rockets. From the picture of the
particular aircraft I built you cannot tell if it carried rockets or
not. Because the I-16 had been relegated to a ground attack role right
after the Yaks started showing up in numbers, I took the license of
assuming that rockets were a wise guess. I added flap trim tabs made out
of beer can aluminum and added the p.e. bits on the wheel wells. Here is
where I ran into a self-inflicted problem. Because I chose to put
retractable skis in my I-16, I had to carve two cavities under the
belly. These cavities exist to allow the tip of the skis to fold against
the fuselage without crushing anything. The pictures in the Squadron
book are excellent and I took my motor tool to start the job when I
realized that the bottom exhaust openings are smack on the middle of the
soon-to-be ski openings. I rechecked my pictures because something
wasn't right here.
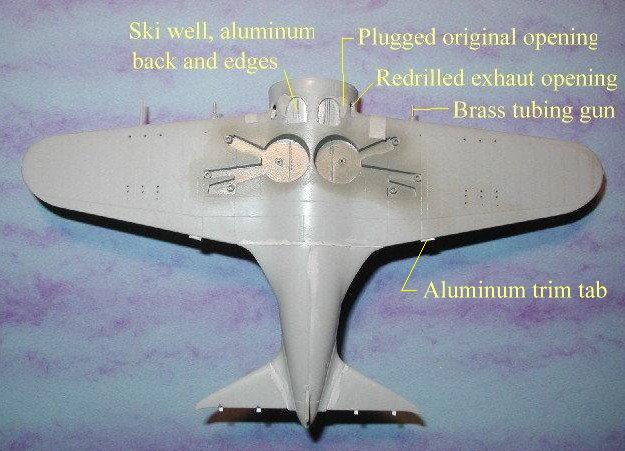
Hobbycraft/Academy is wrong. It took me a good measure of flipping
through the pages and examining photographs to find out what was wrong. Hobbycraft/Academy missed an exhaust port on each side of the fuselage.
Looking at the pictures and at my Polish scale plans from a 1975
magazine called Modelarz, there are four exhaust ports per fuselage
side, not three as in the kit. In the real aircraft these missing
exhaust openings are just a few inches below the wing root waterline. I
don't like to change plans midway through the job. I did what any
insensible person would do. I drilled my ski openings, I plugged with
putty what was left of the original exhaust openings, and I drilled new,
higher exhaust openings near the wing root waterline. I had no spare
fuselage so all this cutting and plugging was a one-time shot. In the
mean time I cursed Academy under my teeth. The photographs show that the
Russians ran into the same problem I did, the lower exhaust ports were
in the way of the ski wells so they did what I did, they plugged them to
make room for the wells. My ski openings were finished with beer can
aluminum. I inserted a strip of aluminum in the rough opening to create
a smoother and rounder shape patterned after the tip of the skis.
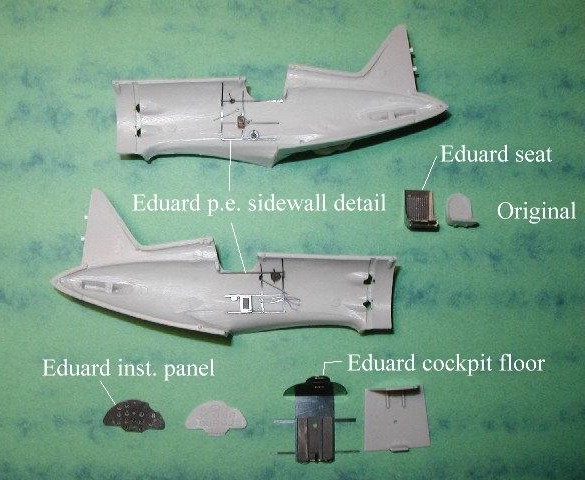
Eduard provides a nice seat and belts, a correct floor that is narrow
and lets you see the bottom of the aircraft, a correct control stick and
rudder pedals, a nice instrument panel that will be swallowed so deep
inside the fuselage to be out of sight, and details for the sides of the
cockpit such as trim wheels and map cases. Almost all this detail is not
visible even with both doors open. If you built this kit with the doors
closed, adding cockpit detail is a waste of time. The cockpit opening is
just big enough for the pilot to stick his head out; if you don't open
the doors, I wouldn't worry too much about detailing anything on the
cockpit other than the headrest.
I painted the instrument panel black to match the pictures in the
Squadron book (as per some writings, it is supposed to be dark green)
and the rest of the cockpit RLM02 gray. I can hear the pundits screaming
bloody murder. RLM02 gray? Burn him on the stake! Nobody really
knows for sure what kind of gray primer was used and the shades proposed
change from day to day. German RLM02 sounds like a good bet for a prewar
Soviet aircraft, when Joseph was getting a lot of help from his pal
Adolf. After their brotherly love ended when Adolf invaded Uncle Joe's
'hood, the Soviets developed their own paints. The war-era Soviets used
a blue-gray called metal use primer. Matches would be Testor's Model
Master 2130 Flanker pale blue when new or Testors Model Master 2739 Flat
interior gray when old or worn. I used RLM02 because the Type 10 was
built in the late thirties, and as I say, nobody knows for sure.
Matting the fuselage to the wings showed a good gap on both sides of the
wing root/fuselage joint. I used white glue and putty to fill the gap. I
glued the elevators in place but left the rudder out for the moment.
There is a venturi tube on the starboard side of the fuselage. The kit
provides nothing. A venturi tube is hourglass shaped. I decided to use
straight stretched sprue as a good enough imitation and the visual
effect is excellent. A venturi rushes air through it so the air pressure
drops inside the venturi and it sucks air from the plumbing connected to
it. This plumbing in turn is hooked to navigational gyros that use this
"vacuum" to spin. Because venturis are prone to icing and bulky, today
they have been replaced by engine driven vacuum pumps. Talking from a
general aviation point of view, there are some old timers that favor the
venturis because they are simple, cheap and reliable. Hand cranked car
engines also have those qualities, but I don't think I want that much
reliability.
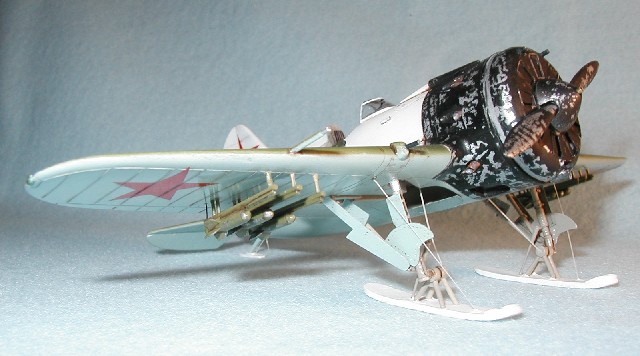
The landing gear in this kit is the most complicated one that I have
ever built. The Eduard parts are very good but demand work. The kit is
missing the rear shock absorbers used with the skis so I scratch built
them from brass tubing and beer can aluminum. I had to scratch built the
oddly shaped main gear doors using plastic card. I added a lip to the
front of the skis, and again, I used beer can aluminum. The oleo struts
are wrapped with household aluminum foil. The wires are stretched sprue.
Despite all my work, my skis are just a passable representation. I think
that one or more weeks on this section alone would have produced a much
more accurate landing gear, but I just had to keep on moving.
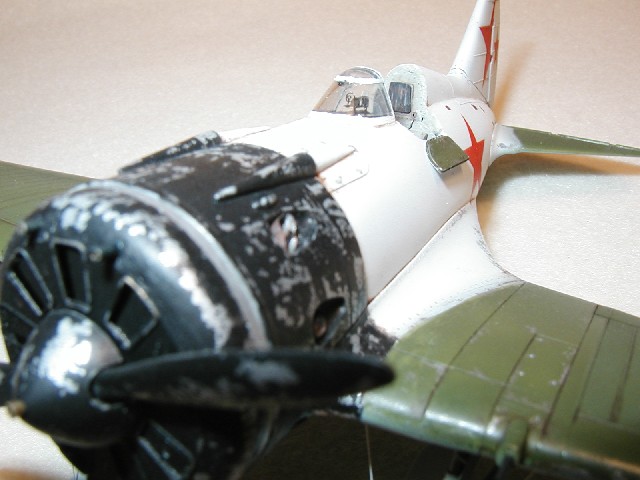
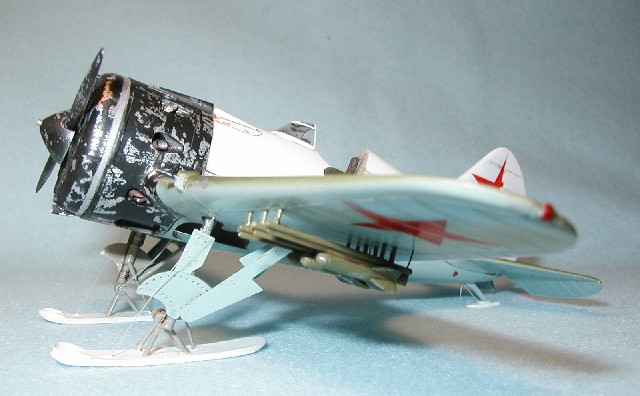
 I
started by painting the nose, front cowling, prop and spinner with
Testor silver enamel. I resprayed these areas with Polly S NATO black
acrylic and I pulled chunks of this overcoat using masking tape. The
tape pulled off more black paint than needed so I retouched the big
silver spots with a brush and more NATO black. I also used this black to
spray the panel lines, you know, the preshading technique that everybody
raves about it. I painted black the beautiful Eduard PAK-1 gun sight
(the kit has none) and the section that is supposed to be under the
windscreen. I
started by painting the nose, front cowling, prop and spinner with
Testor silver enamel. I resprayed these areas with Polly S NATO black
acrylic and I pulled chunks of this overcoat using masking tape. The
tape pulled off more black paint than needed so I retouched the big
silver spots with a brush and more NATO black. I also used this black to
spray the panel lines, you know, the preshading technique that everybody
raves about it. I painted black the beautiful Eduard PAK-1 gun sight
(the kit has none) and the section that is supposed to be under the
windscreen.
For the camouflage colors I followed Academy's instructions and used
FS35550 blue and FS34102 green instead of the premixed Russian colors
available from different paint makers. The FS35550 blue ended up being
Model Master FS35414. Close enough for me. The premixed underside
Russian blue that I have used in the past is so intense that I doubt its
accuracy or usefulness as camouflage. By mistake I bought enamel and
after trying to spray this paint mixed with acrylic retardant, I made a
royal mess in my Aztek airbrush that took me awhile to clean. I wish the
jars were shaped differently between acrylics and enamels, or perhaps I
should read the darned labels.
The green ended up being Model Master Medium Green acrylic, which
matches the premixed Russian top-side green quite well. The white is
Polly S white RLM21 acrylic. I'm a cheap guy so if there is paint left
in the cup I will keep on spraying until all is gone. With this attitude
it is not wonder that the preshading technique doesn't work for me. To
hell with spraying light coats of paint so as not to completely
obliterate the shadow lines. I just keep on spraying until all the paint
is gone. In this case I got lucky and the preshadowing under the white
is barely visible. I glued the masked windscreen in place and then
blocked access to the gun sight with tape before spraying the white
camouflage.
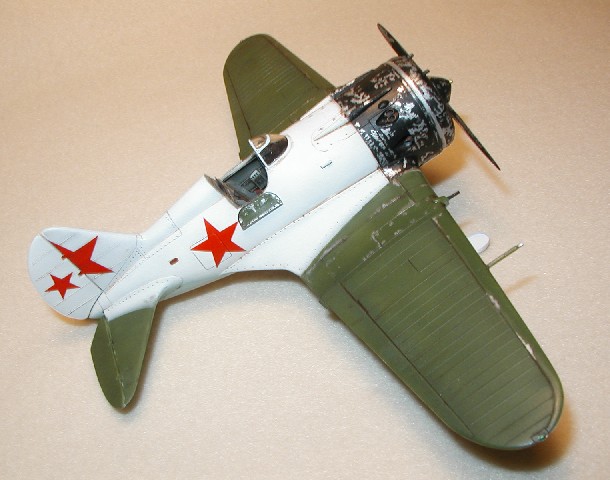
I added paint chips with Testor silver enamel. The I-16 was a full scale
mixed media aircraft made out of metal, plywood and fabric so be careful
where you put the chipping. I coated the whole aircraft with Future
floor wash except the black and chipped sections of the nose. I wanted
the flat black paint on the shiny silver paint. I don't believe on a
uniform shine unless you are modeling a plane that just was rained on.
With the paint on I noticed that the very distinctive rivets and
fasteners of the real aircraft were missing from the kit. I took a steel
awl and punched my own rivet lines and fasteners. Don't ask me how many
rivets per panel because I didn't count them and I don't care. This
additional work did not damage the paint but enhanced the otherwise too
smooth looks of the kit. Weathering was done with burnt umber acrylic
paint from Liquitex mixed with soapy water. I love this stuff; there is
no mess and it is easy to clean with a slightly water dampened rag.
This is the first time I built something from Academy and I didn't like
their decals. They sucked. They were too thick and had a powerful glue
that made placing the decal on the model a one shot deal. Once the decal
touched the model I could only move it by ripping it apart. I used
enough Microscale Solvent to melt a bumper sticker but I couldn't make
the red starts to conform to the raised fabric rib lines. I ended up
cutting the raised and dried decal sections with a knife and retouching
the missing chunks with Tamiya red.
I sprayed Testor Dullcoat on the elevators, fuselage and the fabric
sections of the wings and left the shine on the rest of the aircraft. I
don't believe on a uniform flat finish either because different
materials fade at different rates. At this point you are supposed to add
chalks. I took a look at the model and decided that enough was enough. I
don't believe that adding pastel chalk weathering would make the model
better so I stopped. The navigation lights are Testor silver enamel
coated with Tamiya clear red and green acrylics.
Next came the Moskit pipes from Moscow. They came in three sprues
containing three pipes each. 3 x 3 = 9. There are ten pipes on the Type
10, or at least that is what Academy gives you in the form of molded
pipes on the kit itself. The math doesn't add up. The Russians can build
rockets but they can't count little pipes. Because the pipes were too
long I had to cut them so they would fit between the opening and the
back of the engine. It was a bear to squeeze two pipes through one
opening. The Academy kit Type 10 has dual pipes on the top and bottom
exhaust openings. My homemade bottom openings were too tight for dual
pipes so I only used one pipe; I didn’t want to redrill after the paint
job was done. If somebody ever says to me, "hey dude, you're missing a
pipe here," and points to the correct opening, I will soil my pants in
disbelief. Until then I don't worry about it, plus my lack of foresight
ensured that I had enough pipes to finish the job. The cowling guns are
brass tubing.
A thick and unyielding branch of common sense whacked me on the forehead
and knocked me down from the high horse of I-know-more-than-you. Flat on
my arse I realized that the engine has nine cylinders; how come there
are ten pipes on the kit? Back to the photographs I went. The top
exhaust opening on the port side has dual pipes; so far so good. The top
exhaust opening on the starboard side only has one! Son of a …! The
other exhausts ports only have one pipe each so this arrangement makes
for nine pipes. The Russians can built rockets and count little pipes. I
can do neither.
 Hobbycraft/Academy have molded dual pipes on the top and lower ports for
a total of ten pipes. I, being a dummy, had thought that this was the
gospel and I ended with a bad case of pipefitting. But there is more.
When the bottom port is plugged for the skies, the Russians rerouted the
two lower pipes through the port below the wing root waterline on a dual
pipe mode. As I said, I only have single pipes in my model. If anybody
asks, I’m using exhaust headers. Because of this pipe fiasco I’m
downgrading the kit’s accuracy to 80%. Hobbycraft/Academy have molded dual pipes on the top and lower ports for
a total of ten pipes. I, being a dummy, had thought that this was the
gospel and I ended with a bad case of pipefitting. But there is more.
When the bottom port is plugged for the skies, the Russians rerouted the
two lower pipes through the port below the wing root waterline on a dual
pipe mode. As I said, I only have single pipes in my model. If anybody
asks, I’m using exhaust headers. Because of this pipe fiasco I’m
downgrading the kit’s accuracy to 80%.
But wait, there is more! Later
Type 10’s did have six exhaust ports as the kit, not the eight that are
shown in all my scale drawings. Perhaps this was done to solve the
problem with the retractable skis.
Hobbycraft/Academy is not off the hook though, in the real aircraft the
bottom ports were deleted and their pipes were rerouted to the wing root
ports. The kit deleted the wing root ports and kept the bottom ports with
dual pipes. It is still wrong but not so wrong.
As usual, after you are done building, you find stuff on the web that
tells you how bad you screwed up. The link below will take you to the
VVS dedicated site. This site can be rather anal at times but that is
the attitude to have if you want to be Da Man, Big Daddy, the
know-it-all of VVS stuff. There is an article on a resin plug to fix the
nose problems in the Hobbycraft/Academy kit.
For an Airwaves resin conversion set for the nose check:
http://www.kithobbyist.com/VVS/ModelReviews/Airwaves/airwaves_type10.php
For more Type 10 profiles
http://www.kithobbyist.com/VVS/Markings/I16/type10/type10.html
After reading all the paint schema articles your head will spin and
you would rather paint your model electric blue with pink polka dots
just to avoid the aggravation of being wrong when you thought you were
right.
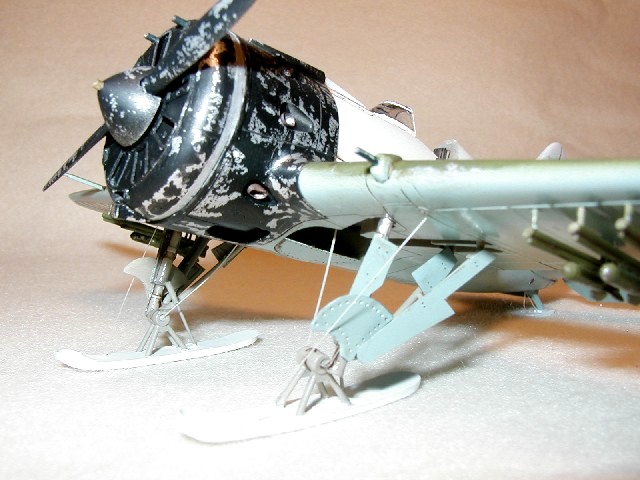
Finally I put the NINE-CYLINDER engine in, just painted in black with a
touch of silver dry brushing, and the cowling. The cowling is as round
as a coin. The fuselage, after all the drilling and banging around
during construction, wasn't as round so the fit was not perfect. More
black paint on the right places hid the misalignment. The prop and
spinner were glued and they don't spin because I couldn't figure out how
they were supposed to (maybe they don't by design). The last thing glued
on was the rudder.
I recommend this kit despite its shortcomings. Its worst offenses are
the lack of rudder hinges, the incorrectly shaped air inlet, the lack of
gun sight and venturi tube, and of course, the fiddly exhaust ports and
pipes. The rudder and elevator hinges can be created with a scribing
tool and some putty without having to cut the control surfaces. The air
inlet can be left alone and you can claim you are building an early Type
10 (but then you have the wrong exhaust ports), or you can take it out
and glue the T-shaped box one side at the time using thin plastic card,
without having to drill a hole through it. The gun sight can be
approximated with plastic and a bit of clear sheet. The venturi can be
done as I did. And please, build the wheeled version for simplicity. The
exhaust ports, well, other than drilling, plugging and scratch building,
or buying the Airwaves resin set, there is no way around it.
The Eduard set is well done and works but it is expensive and hard to
use, their air inlet is wrong for a regular Type 10 and much of the
cockpit detail is out of sight, more so if you don't open the cockpit
doors.
If you have a little bit of space left between your last two huge twin
engine models that you are still paying for, this small fighter will
take almost no room between them, and it will be a unique machine in
your collection, perhaps more visually striking than those big, fat
bombers.
Click the thumbnails below
to view larger images:
Text, Images and Model Copyright © 2002 by
Jose R. Rodriguez
Page Created 24 September, 2002
Last Updated
04 June, 2007
Back to HyperScale Main Page
Back to Features Index |
 Home
| What's New |
Features |
Gallery |
Reviews |
Reference |
Forum |
Search
Home
| What's New |
Features |
Gallery |
Reviews |
Reference |
Forum |
Search