|
Lockheed Hudson Mk. III
by John C. Valo
 |
|
Lockheed Hudson
Mk. III |

Classic
Airframes' 1/48 scale Hudson Mk. III/IV is available online from
Squadron.com
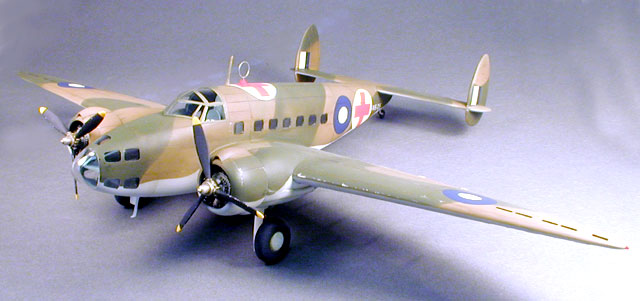
Classic Airframes' second release of the Hudson allows the
modeler to build any of the later versions of this aircraft. Parts
are provided for both Wright and Pratt & Whitney engines, with the
appropriate cowling and exhaust parts for both.
One thing that struck me upon dry-fitting the kit is just how
large an airplane the Hudson is - you get plenty of plastic for your
money.
The kit is standard Classic Airframes with nicely scribed plastic
parts, beautifully cast resin bits and injected clear parts. No
photoetch in this kit.
The kit is one of Classic Airframes' better efforts, and the fit
is quite good. Care needs to be taken to dry-fit the nacelle parts
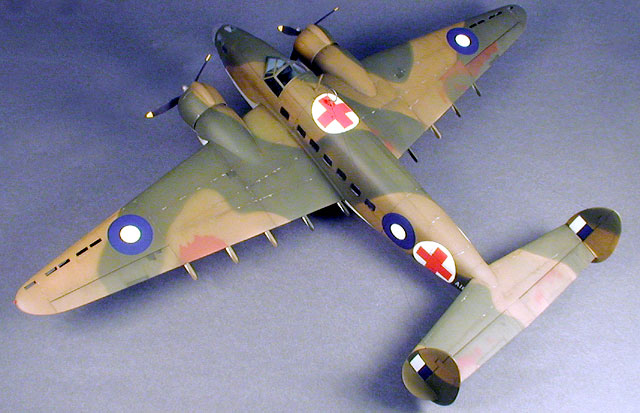
to the wing to avoid lots of filler later. The air ambulance version
I chose was fitted with a cover plate over the turret opening, a
part for which is provided in the kit. This particular part needed
some trimming to make a smooth transition to the fuselage. The
fin/rudder and stabilizer/elevator parts need some minimal sanding
to achieve a snug fit, and care must be taken when aligning the
assembly to make sure it is straight relative to the wing. Aside
from these points, the balance of assembly is straightforward.
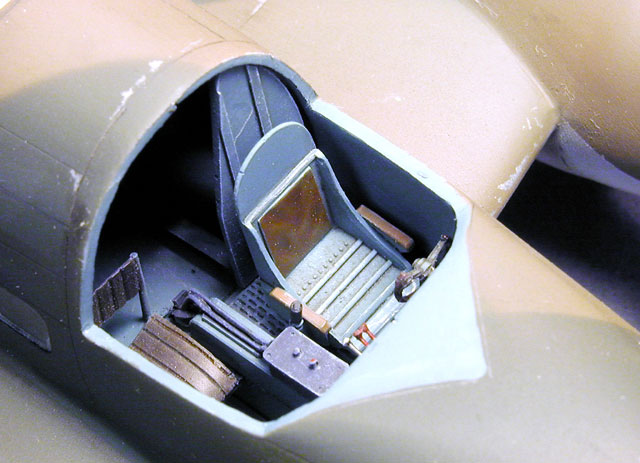
Resin parts are provided to detail the cockpit and bomb
aimer/navigator area in the nose. I left out all the bombsight
details as well as the nose guns, as my model was going to represent
a somewhat more pacific airplane.
Some speculation has been made as to whether or not the model needs
a wing spar. In my case, I elected to not build one, and the wing
joins are just fine - I can hold the model by one wingtip and
nothing has self-destructed yet. If I had intended to move the model
quite a bit (transporting to contests, etc.) I probably would have
built some stub spars for additional strength.
The clear nose and canopy parts are very well molded, and fit very
nicely. The side windows fit very well, but are a drag to install
after painting (as I did). I would definitely recommend installing
them before joining the fuselage halves!
The kit provides markings for two aircraft, but I had my eye on
one of the aircraft featured on Classic Airframes' aftermarket sheet
#48-003, an RAAF air ambulance.
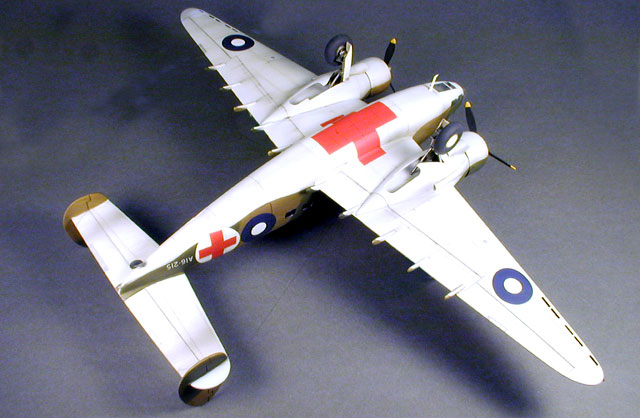
The painting guide suggests a Dark Earth and Dark Green over
White finish. Not too long ago Tom Cleaver shared some very
interesting information suggesting some Hudsons were finished in
Medium Green and Olive Drab equivalents. I bounced back and forth a
few times debating how I was going to paint the model and eventually
just went with Dark Earth/Dark Green, and it looks fine to me. I
used PollyScale acrylics for all the camouflage.
This is the first model I have ever painted masking the color
demarcation lines with ribbons of Blue Tack. After a bit of fiddling
with the technique, I found that the demarcation looks great for a
'British-style' paint job - tight, but with just a minimal amount of
fuzziness.
An illustration in Geoffrey Pentland's 'RAAF Camouflage and
Markings' shows this aircraft with large patches of Red primer
showing through the paint, so I ran with that and gave the model a
nice 'tatty' finish.
The Microscale-printed decals went on flawlessly.
One thing is for sure - this model sticks out in the display
case!
Overall, I give this kit high marks. It's not a Tamigawa kit - you
do have to dry-fit and fiddle with a few things - but with a little
care and patience, you can build a nice (and big) model of this
historically significant aircraft.
Click the thumbnails
below to view larger images:
Model, Images and Article Copyright © 2002 by
John C. Valo
Page Created 16 April 2002
Last updated
04 June 2007
Back to
HyperScale Main Page |  Home
| What's New |
Features |
Gallery |
Reviews |
Reference |
Forum |
Search
Home
| What's New |
Features |
Gallery |
Reviews |
Reference |
Forum |
Search
