Squadron.com
I was very surprised to see a dark blue aircraft with Canadian
Military markings whistle down the approach path to Vancouver
International airport last spring. As much as I’d like to think of
myself as a dyed in the wool Canuckophile, I wasn’t aware that we flew
any aircraft that looked like that.
The next week, my issue of Wings Magazine (issue 1, vol. 42- March/April
2001) arrived through the mail slot with a superb air to air cover shot
of the Raytheon Harvard II and a BAe Hawk, all dolled up in gloss
midnight blue paint and Canadian Armed Forces markings. Wow! So that’s
what that was coming into the airport! A full article, supported by
excellent photos, was inside the magazine, written by Mike Reyno
describing these new additions to the Canadian Armed Forces training
fleet.
Those two modeling projects were quickly added to my list of “things to
do”, if only I could find the kits! A little bit of research and
checking around yielded news that Italeri was releasing 1/72 kits of the
BAe Hawk series of aircraft so it was a matter of finding the right kit
to use. After some checking, the Italeri kit of the Hawk series 100 was
the right one to use. However- like any Canadian version of an aircraft
- some modifications would be necessary to create a more accurate model.
The next need was for some decals. A timely review of Mike Grant’s
limited run decals on one of the modelling websites led me to a source
of specific Canadian Hawk markings. This would save me having to do the
usual thing and cobble together a bunch of miscellaneous decals from my
stash of Canadians markings. Geez- this was coming together all too
easily!
By mid summer I was all equipped to start the model. I just had to
finish off the current project on the bench to make room!
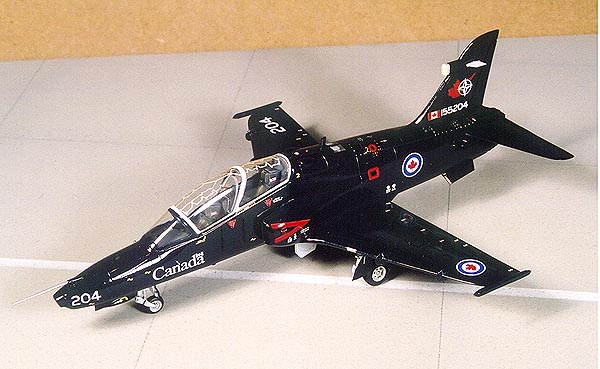
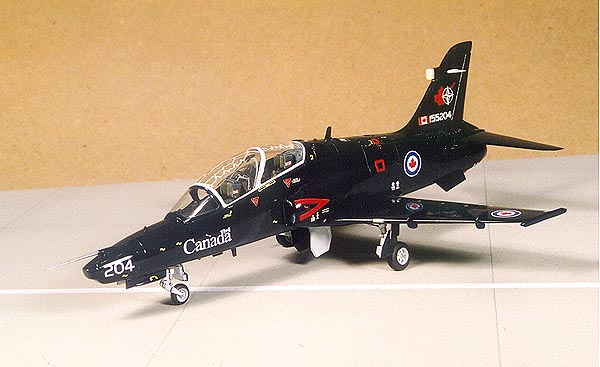
I chose to depict Hawk 204 - the subject of the clear photos in the
Wings magazine article. Intending a more or less straight from the box
project, I immediately started on the cockpit assembly and quickly got
it painted and detailed. Gunship grey was used for the overall colour,
using a wash of black, with some graphite highlighting and dry-brushing.
The seat cushions were painted olive drab, and the seat belts were
picked out with some Humbrol khaki. I added a small piece of stretched
sprue to each of the throttle quadrants and a small data plate decal to
the seat headrests.
The detonation cord pattern was molded into the inside of the canopy and
I carefully painted this with a fine paint brush, using a lightened
radome tan colour. All I can say is, there has to be a better way! As an
easy to add bit of detailing, I also glued in some rear-view mirrors to
the inside of the canopy frames to “busy things up”.
Before assembling the fuselage, it pays to check references and do a
little pre-planning. Some nose weight would be needed so I used some
folded up sections of old lead foil from wine bottles glued into the
nose.
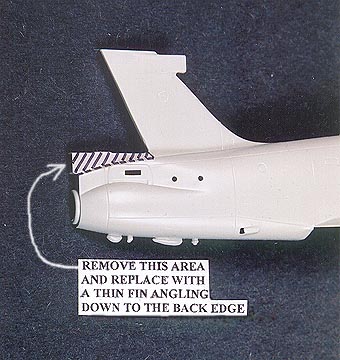 The
tail section was also going to need modification.
The
tail section was also going to need modification.
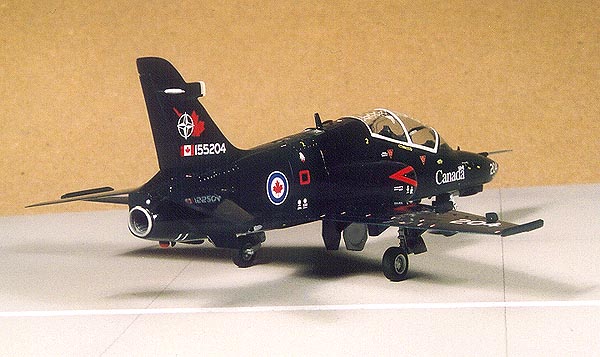
The Italeri kit is molded as a Hawk 115 configuration with the large
square fairing under the rudder, on top of the jet-pipe. This must be
removed, and a new tail fairing made up from sheet plastic and putty.
The Canadian version of the Hawk also has a small sensor sticking out
of the rear fuselage at the trailing edge of the starboard stabilator.
The kit pitot tube also needs modifying - cut off the bulbous end and
replace it with a short section of fine wire for a more realistic
appearance.
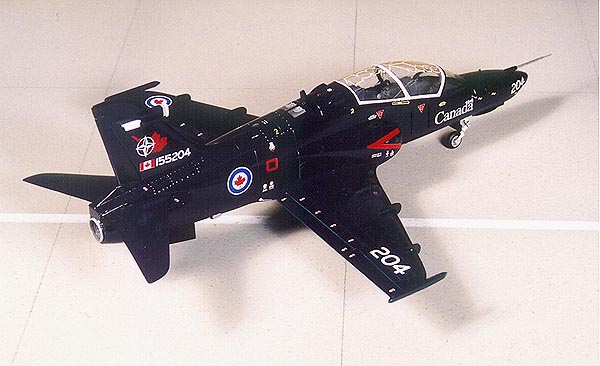
Once the rear fuselage was modified by removing the large square
fairing, the kit was built up quickly. Check references for the proper
size and locations of the wing fences - the Canadian Hawk had only two
per wing - a “large” one about mid-span, and a small one towards the
outer end of the wing.
There were no real assembly problems or bad seams to fill, and a little
test fitting of the wings and fuselage joint, and the jet intakes will
minimize any extra sanding and polishing.
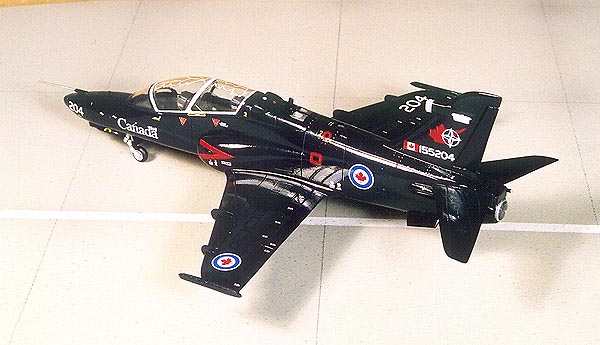
The model was ready to paint in a couple evenings, so the search for
some paint took place. There was no “out of the bottle” match to this
particular colour, so I used a mix of Humbrol #15 Dark Gloss Blue and
Model Master Gloss Black enamels. I used a ratio of about 1 part black
to 2 parts blue to get the dark midnight blue shade that the photos in
the magazine article seemed to show.
The paint was thinned with Testors Model Master Airbrush Thinner and
applied in three solid coats. I always apply the first coat as a light
mist, making a few passes to get a relatively even depth. Then, waiting
at least 10-15 minutes between coats, throw on the paint a bit thicker
each time till a good even, gloss finish is built up.
I let the model sit for a week before I masked off the light grey-white
areas of the canopy and the wheel wells. I left the Bare Metal Foil
canopy masking in place on the clear canopy and windscreen for the
duration of the painting exercise. In spite of what others find, I’ve
never had a problem with Bare Metal Foil adhesive left on the canopy.
Yes, there is usually some residue left after a month of painting and
waiting, but I find that it cleans off easily with some Bare Metal
Plastic Polish, or Turtle Wax, applied with a cotton swab. Anyway- I
used Testors Model Master Gloss White with a drop of Testors Chrome
Silver, to give it that metallic pearlescent appearance, for the wheel
wells, gear door inner faces, gear legs, and the canopy framing.
I let the white paint dry overnight before removing all the masking,
except for the canopy, which required protection until the final gloss
coat was sprayed onto the model. The odd dust mote that found its way
into the wet paint was rubbed out with some polishing cloths (LMG
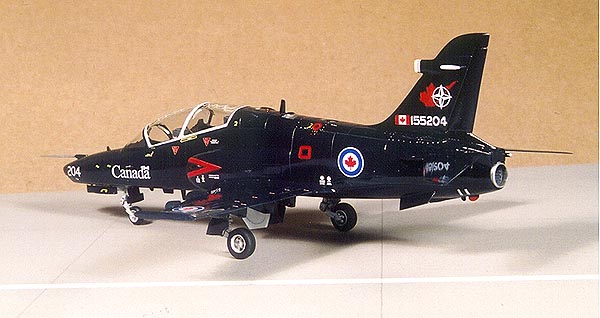
brand). The Mike Grant decals were carefully removed from their plastic
bag and checked for quality. Sharp, clear, deep saturated colours with
no sign of mis-registration-very nice looking decals. The decals are
printed on a solid carrier film, so each marking requires careful
cutting to trim close to the edge of the decal.
Using room temperature water, the decals were soaked and they went on
very easily. I used Solvaset straight from the bottle to make sure the
decals settled down and conformed to the surface details - especially
necessary for the wing decals that have to be applied over the small
vortex generators on the upper wing. The decals dried thin and clear
with no sign of silvering or other adverse reactions from the Solvaset.
The carrier film is very thin, but robust enough to take a bit of
handling during decal positioning.
A couple of evenings a week were spent applying all the decals, the
majority of which are small stenciling markings. I also used a pointed
toothpick dipped in silver paint to carefully apply small silver dots to
represent the fastener locations on the rear fuselage area. Letting the
decals dry hard for a week, I then prepared to spray on a clear gloss
coat to seal the decals in. I had some Tamiya clear gloss acrylic that
as been collecting dust on my modeling bench for the last three years,
and I mixed it about 50/50 with Tamiya acrylic thinner to insure it
would spray on “wet” and flow easily on the model’s surface as it dried.
While the gloss coat dried, I painted the wheels and tires and applied a
“dirty” wash of watercolours to the landing gear legs to bring out the
details. The landing gear and gear doors were glued onto the model with
Zap-A-Gap, and the last step was to brush some Testors Model Master
Chrome Silver onto the pitot tube and then paint the radome on the upper
leading edge of the fin.
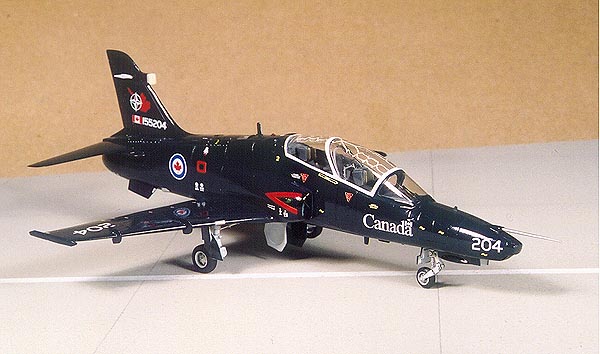
The finished model certainly looks handsome and bears up well to photos
of the actual aircraft. It was an enjoyable, quick build-up, with a very
easy colour scheme, making for a good “instant gratification” project.
 Home
| What's New |
Features |
Gallery |
Reviews |
Reference |
Forum |
Search
Home
| What's New |
Features |
Gallery |
Reviews |
Reference |
Forum |
Search