Squadron.com
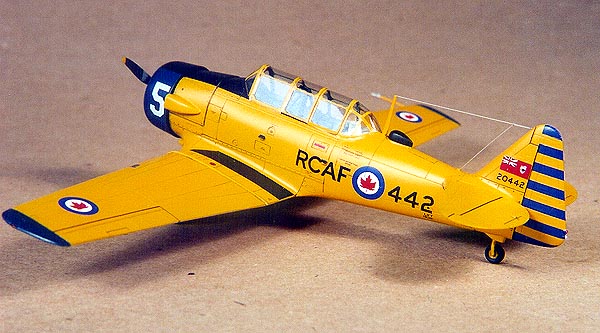
This is the 1/72 scale T-6 by Academy, kit no. FA162-3000
Every dyed-in the wool Canukophile has to have at least a dozen of
these wonderful little Academy T-6 kits on their shelves. This kit of
the popular primary trainer is a gem of a model that needs very little
effort to result in a fine looking replica. Upon opening the box, one is
greeted by a well molded set of light grey sprues containing a very
detailed selection of parts. The kit depicts a T-6 Texan with the early
style framed canopy, and as far as my references go, represents the
aircraft very accurately. As with any kit, there are minor detail
quibbles, but these are easily corrected by a modeller with basic
skills.
Modifications Required for
a Canadian Harvard
|
I’d socked away the Leading Edge decal sheet No. 72-.21 some time ago
with the intention of adding one of these specially marked RCAF Harvards
to my collection, and so the research began.
To summarize my findings, here is a checklist of what needs to be
done to the Academy kit to turn it into a Canadian Harvard MK 4.
-
New canopy with extended rear section
(Falcon Clear-Vax set #30)
-
Long exhaust pipe with cabin heater tube
-
Spade handles to control sticks
-
Remove navigation lamps on side of fin and
on upper surfaces of the wing tips
-
Add wing navigation lamps at tips of
wingtips
-
Add sheet plastic shelf and blind flying
hood to rear pilots’ position
-
Re-shape lower cowl air scoop
-
Cut-out in engine cowling for “Canadian
exhaust”
-
Fill and partially rescribe baggage door on
port fuselage side
-
Shave off the starboard elevator trim tab
actuator off the top of the slab, and replace it with a chip of plastic
on the bottom
-
Drill out the jacking holes on the lower
rear fuselage
-
The roll-over pylon bracing has a slightly
different strut arrangement than the T6 version
Other basic detailing issues that could be
addressed are:
-
Fill in gaps in wheelwells and add plumbing
details
-
Add lead foil seat belts
-
Drill out the air scoops
-
Add propellor hub details
-
Add engine detail – ignition wiring and oil
sump between the two lower cylinders
-
Box in landing lamp housings in wings and
add foil lamps
-
Replace kit pitot tube with a “stripped
wire” scratchbuilt piece.
Construction started as per the kit
instructions with the cockpit and interior parts. The interior parts and
inner fuselage areas were painted with an “eyeball’ mixed concoction of
interior grey-green with a touch of blue to replicate the actual
interior colours of RCAF Harvards from my thick stash of photos.
The rest of the model was built up quite quickly using Zap-A-Gap. There
were little to no seams or gaps to fill or rub down with more than a
quick pass with 600 grit sandpaper.
The engine, cowling and propellor were built and painted as separate
small assemblies, along with the wheels. I glued the landing gear into
the wings so they would be painted yellow with the rest of the model.
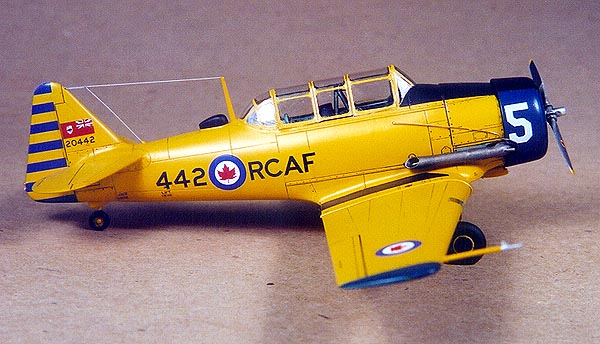
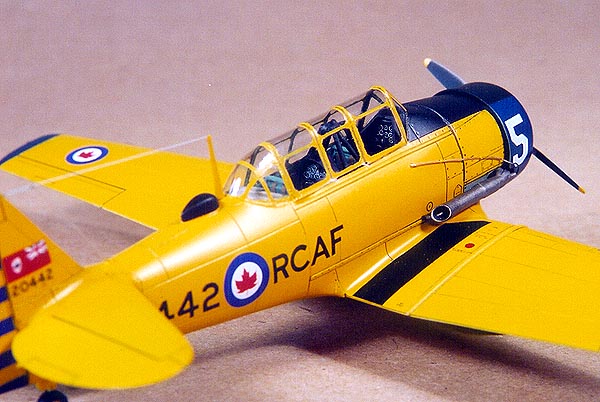
The canopy was the most challenging aspect of the whole model. I was not
aware of, or have access to the Falcon Clear-Vax kit No. 30 at the time,
which contained the necessary Harvard rear canopy section, as well as
the later T-6G canopy with the different canopy framing, so I elected to
make my own. I took the kit canopy and glued it to a base, upon which I
built up a rear canopy mold with Milliput and sheet plastic, using
drawings and photos to get it “close enough”. At this time the rear
canopy area on the fuselage was carved out and shaped to accommodate the
new, larger rear canopy section. I filled-in the kit canopy framing with
thickened grey paint, and polished it smooth.
After six tries with 0.015 “sheet butyrate and my home made vacuform,
slaving over a hot stove, I finally got two “good” copies of the new
Harvard canopies. With some careful cutting, trimming and test fitting,
the canopy was dipped in Future floor wax to stiffen it up and provide a
“water clear” appearance.
I glued the canopy on to the model by first taping it in place with a
few small, thin strips of masking tape, and applying Micro-Scale Kristal
Kleer all around the edges. When the glue was dry, the masking tape
strips were removed, and the un-glued areas were treated to more Kristal
Kleer, to seal the canopy onto the model. A moistened cotton swab was
rubbed along the glued seam to smooth out the Kristal Kleer and blend
the canopy into the edges of the model.
I chose to use thin strips of masking tape
to cover the canopy and create the framing system. I figured the sharply
cut edges of masking tape, once burnished down, would create some
decent, straight canopy frames. The results were less than I expected,
with paint bleeding under the edges, and the thick layer of yellow paint
leaving a rough edge in many places. Yellow paint is notoriously
transparent, and many coats were needed to achieve a solid, uniform
colour. I used XtraColour #X-11 RAF Trainer yellow enamel, as it looks
to me to be just the right match to the actual aircraft. I’d first
sprayed the interior grey-green colour onto the masked canopy, and then
applied the yellow, and more yellow, and than some more yellow, in order
to get a uniform depth of colour. Unfortunately, even though I’d run the
tip of a new #11 x-acto blade along all the masked edges to “break” the
paint along the frames, the result was not as good as I’d hoped. Note to
self - next time, use painted clear decal!
After the yellow paint was dry and cured (at least 2 weeks), I masked
and sprayed the antiglare panel with a mix of gloss black with a few
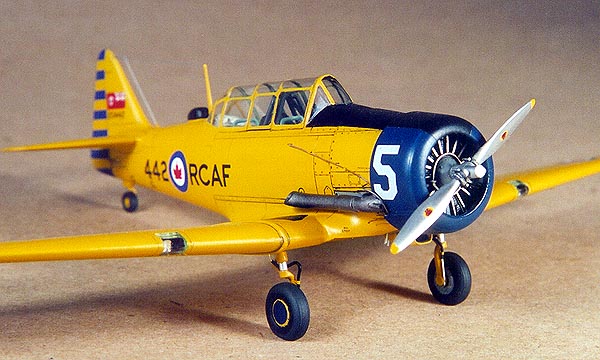
drops of Gunship Grey mixed into it, and then the decals were applied.
The Leading Edge decal sheet provides a plethora of stencilling and full
markings for a representative Goldilocks demonstration team Harvard.
Unfortunately there are only enough national markings and stencilling
for one aircraft. There are, however, enough serial numbers and cowl
numbers to make any of seven of the Goldilocks Harvards.
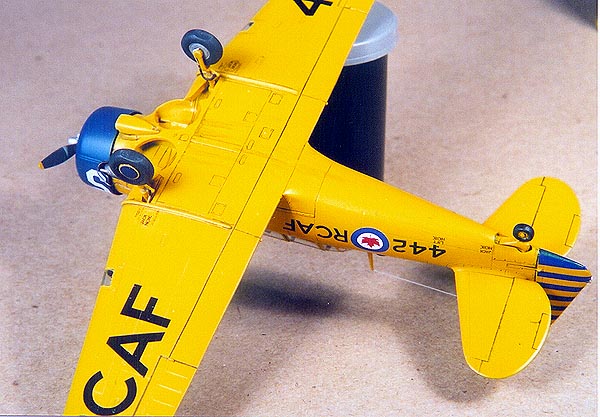
The wheels hubs were first painted yellow, over which a disk of blue
decal paper was applied, to result in the thin yellow outline at the hub
rims. All of the decals went onto the model without any trouble, but a
bit of test-fitting and trimming of the rudder stripes is needed to fit
them a bit better to the Academy model.
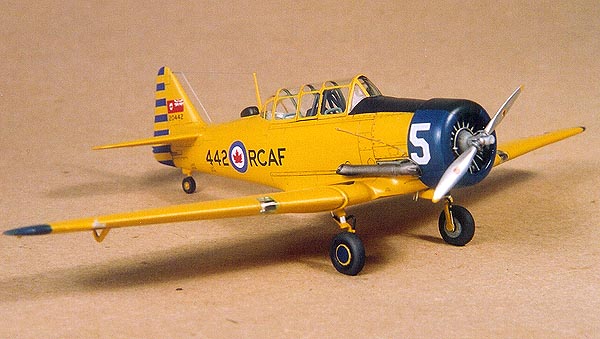
 The
last step was to spray on a mixture of Testors Dullcote/Glosscote to get
a semi-gloss sheen and to blend-in the decals. At this point it was time
to carefully remove the masking tape from the canopy.
The
last step was to spray on a mixture of Testors Dullcote/Glosscote to get
a semi-gloss sheen and to blend-in the decals. At this point it was time
to carefully remove the masking tape from the canopy.
The thick layers of yellow paint, plus the
overcoat, created a challenge to try to remove the masking without
chipping the framing lines. I cleaned up the framing as best as I could
and touched up some of the frames with yellow decal strips.
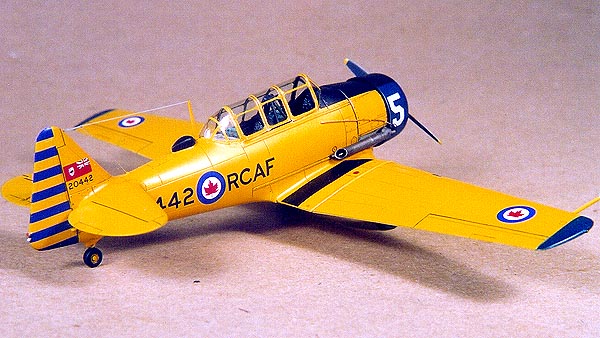
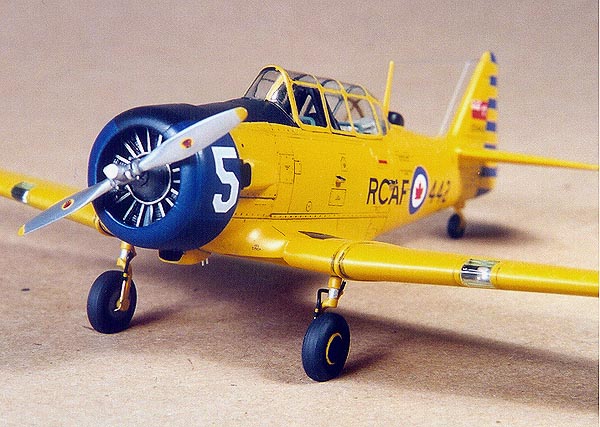
Final details included:
-
Long Canadian Harvard exhaust was built up
from heat formed Contrail brand styrene tube, detailed with smaller
tubing for the cabin heater tube. This was glued onto the re-shaped
exhaust stub from the kit exhaust manifold part. The exhaust pipe was
painted using Metalizer “Burnt Metal”, and buffed with a bit of graphite
powder, and highlited with some SNJ polishing powder applied with a
toothpick.
-
Pitot tube made from a section of wire,
with a short section of insulation stripped off to reveal the silver
wire. I also glued on a small triangle of plastic to replicate the
actual pitot tube appearance on the actual aircraft, and the whole tip
was painted with Testor’s Chrome enamel.
-
Water colour and chalk pastel weathering in
key areas where the Harvard was known to get a little grimy from time to
time.
-
Stretched sprue antenna wires.
-
Formed wire oil line along the forward,
starboard fuselage to simulate the airshow oil smoke injector pipe.
-
Brake lines added with sections of small
diameter wire.
-
Propellor was painted with Metalizer
Aluminum, and polished up with SNJ polishing powder. The Hamilton
Standard decals came from a set of IPMS Spruce Goose special edition
decal sheets that contained a variety of 1/72 scale propeller logo
markings.
This Canadian Harvard project was a nice
quick build-up, with the exception of dealing with the canopy. Needless
to say, I have ordered, and placed a number of Falcon Clear-Vax #30
canopy sets on my shelf, for future use!
And given the relatively straightforward
canopy framing, next time I will use painted clear decal film to finish
the canopy.
-
Harvard! The North American Trainers in
Canada, by D.C. Fletcher and D. MacPhail, copywrite 1990, published by
Turner Publishing/DCF Flying Books.
-
Website:
www.t-6.com Modelling the T-6 Trainer.
 Home
| What's New |
Features |
Gallery |
Reviews |
Reference |
Forum |
Search
Home
| What's New |
Features |
Gallery |
Reviews |
Reference |
Forum |
Search