|
Gekko Part Three
Painting and Weathering Tamiya's
Nakajima J1N1Gekko (Irving)
"Straight Out Of The
Box"
by
Gregg Cooper
|
|
|
Nakajima
J1N1 Gekko (Irving) |

Tamiya's
1/48 scale Gekko is available online from Squadron.com
Part 3 of this article has certainly taken
a while to finish! As you will see though, it is quite extensive. I
have tried to describe the exact sequence of painting carried out on
Gekko, and where possible explain why I have done something in a
particular way, and what products I have used to get the job done. My
painting techniques may be familiar to some, and completely out of the
ordinary to others, but certainly worth having a look.
Here are links to the first two parts of this
article:
Gekko Part 1 -
Interior
Gekko Part 2 -
Construction
First, a quick word on “Out-of-the-box” modeling:
The I.P.M.S. rules for OOB competition were
originally written so that the models can compete on equal footing,
disregarding of course the assembly and painting skills of the
builders. All things being equal, the finalists in a competition will
be cleanly built, straight, parallel, perpendicular, and symmetrical.
From there, extra efforts are recognized, such as drilling out gun
barrels and thinning parts to scale. Instruction sheets are usually
required to be present with the model in OOB competitions. Finally,
the quality of craftsmanship and the quality of the finish and decals
can be considered. In the end, if the judging was adequate, the
award-winning models represent the best craftsmanship, and the
best quality that is possible on that given table. For an
I.P.M.S. contest, quality and craftsmanship come before extra
detailing, which means that it is completely possible for an OOB model
to win an entire category. (!!) This may or may not sound correct to
some of you, but the point here is, that regardless of the extra
details, it’s how you assemble the model and paint the model that
counts.
Modeling OOB does not mean you are absolutely
roped into that set of rules. I strayed away from “the rules” in Part
2, and demonstrated how I made an antenna post from CA adhesive, a
modification that would probably disqualify the model for OOB
competition. Technically, the little antenna post was
scratch-built, and therefore a disqualification for OOB. On the
other hand, (he says, tongue firmly in cheek…) the little blob of
super glue on the wingtip looked just like an antenna post, so I left
it…Actually, I debated whether or not to include it in the article at
all, but in the end, I felt that the informative description of that
technique was worth relaying. I should have elaborated on this point
in Part 2. Let’s remember that (for most of us) modeling is for
the modeler first, and we should build to please ourselves.
This article was intended to demonstrate how to improve modeling
techniques, and demonstrate the fact that nice models can be built
without aftermarket goodies or extensive scratch building. I never
intended for this article to be a primer on winning OOB contests, &
only mention the I.P.M.S. rules to establish a guideline from which to
work. Use these tips for improving your basic modeling skills.
Please experiment with them, and develop your own techniques, and your
own opinion of what is appropriate for OOB modeling.
In the following paragraphs I am going to
describe my painting techniques. This is what works for me,
and I have written down these techniques as I do them. You may not
agree with the techniques I use or why I use them, and that is fine.
Not everyone likes a “weathered” finish, or shaded panel lines. I
will not go into the debate about pre-shading versus post-shading,
(actually I use both) nor will I say things like “it should be
this way, or that”. We all have our own opinions of which way a
finished model should look, and why.
 Have you ever heard this around a table
full of airplane models? Have you ever heard this around a table
full of airplane models?
“No airplane EVER looked like that in real
life!”
As far as I am concerned, these models of ours
are 3D art, and as we all know, beauty is in the eye of the beholder.
The only reason I paint my models the way I do,
is because I think they look interesting that way. I paint my models
in a manner that is faithful to my vision of what the reality
should be. It’s called imagination! I wasn’t there. I can’t
really tell you what it looked like. But I can study pictures, read
manuals, and interpret this information into my own vision of what it
should look like. A model that “grabs” you and retains your interest
long enough to get you to look closer has a successful paint job. The
model looks interesting. Just make darn sure that the model
can stand up to the close scrutiny.
I have been using the same basic painting concept
for more than fifteen years, but style, application, and substrate
have all changed since then, and will change again based upon
available paints and thinners, new ideas, or other whimsies.
 For the most part, I have been using Tamiya brand
acrylics for the exterior painting of my models since they were first
introduced in the early 80’s. Tamiya paints contain the finest-ground
pigmentation of color particles that I have experienced. When applied
correctly, Tamiya paints DO NOT show large individual spatters and are
capable of extremely fine airbrushed lines, and incredible special
effects. Tamiya XF series (flat) paints dry fast, and they dry hard.
I do not have to worry about picking up the model, or handling it for
long periods of time only to find that the warmth from my hands has
softened the paint and caused a fingerprint to appear. My free time
for modeling is very limited, so my choice of substrates and materials
has evolved into products and techniques that are quick, simple, easy
to use, and most importantly, yield good results consistently. I use
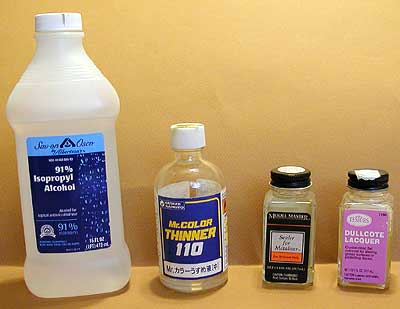
91% isopropyl alcohol as a base thinner, and Gunze’s Mr. Color Thinner
for special effects. I clean up with window cleaner and lacquer
thinner. Tamiya’s own thinner works well, but I prefer 91% isopropyl
for the base finish. It seems to dry faster, and holds pigment better
than Tamiya thinner. I can thin it more, and still maintain some
opacity, while getting extremely thin lines. For the most part, I have been using Tamiya brand
acrylics for the exterior painting of my models since they were first
introduced in the early 80’s. Tamiya paints contain the finest-ground
pigmentation of color particles that I have experienced. When applied
correctly, Tamiya paints DO NOT show large individual spatters and are
capable of extremely fine airbrushed lines, and incredible special
effects. Tamiya XF series (flat) paints dry fast, and they dry hard.
I do not have to worry about picking up the model, or handling it for
long periods of time only to find that the warmth from my hands has
softened the paint and caused a fingerprint to appear. My free time
for modeling is very limited, so my choice of substrates and materials
has evolved into products and techniques that are quick, simple, easy
to use, and most importantly, yield good results consistently. I use
91% isopropyl alcohol as a base thinner, and Gunze’s Mr. Color Thinner
for special effects. I clean up with window cleaner and lacquer
thinner. Tamiya’s own thinner works well, but I prefer 91% isopropyl
for the base finish. It seems to dry faster, and holds pigment better
than Tamiya thinner. I can thin it more, and still maintain some
opacity, while getting extremely thin lines.
I have been using a Paashe H model airbrush
forever it seems. Believe me, I have bought and/or used nearly every
major brand and type of airbrush. I keep going back to my old Paashe
H. This airbrush is extremely simple in construction and very easy to
use. Being made of metal, (except for the handle) makes it sturdy and
easy to clean. Having very few parts also helps in the cleaning
department. When using properly thinned paint and adjusting the air
pressure and airflow, this brush is capable of human hair sized
lines. And best of all for me, the single-action, externa- mix design
provides longer, smoother flow-outs before the fast-drying acrylics
start to mess things up. Dual-action internal-mix guns can clog
easier and need more attention when spraying acrylics.
I usually spray with a H-3 tip, but I also use an
H-1 as well. Another good point about the Paashe H is that is VERY
affordable. A complete set-up including extra tips, bottles, and a
hose can be had for under $50.00 U.S.
Because of this, I own several, and keep one
designated for clears only, while another is set-aside for metalizers.
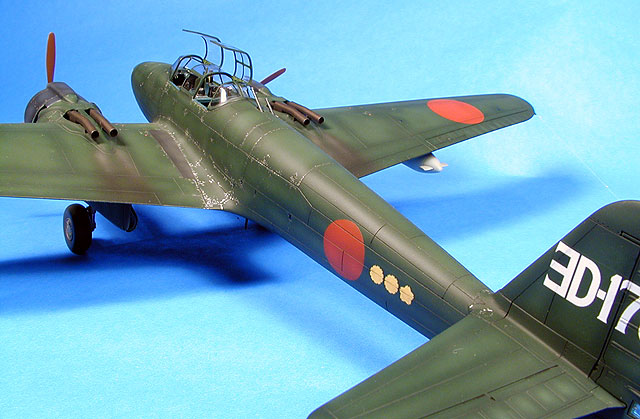
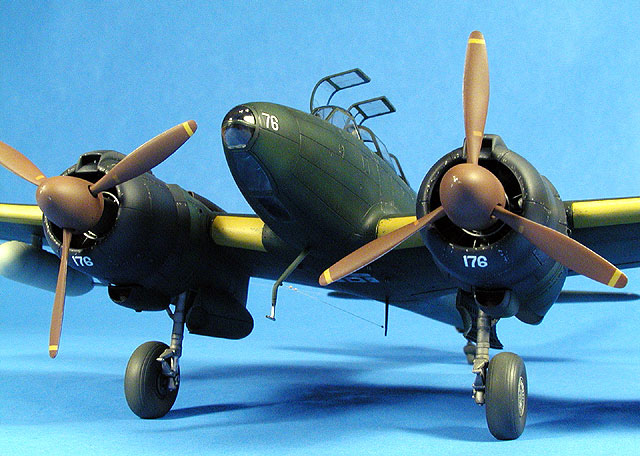
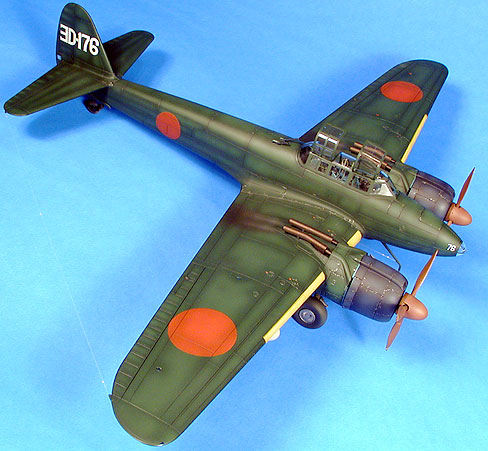
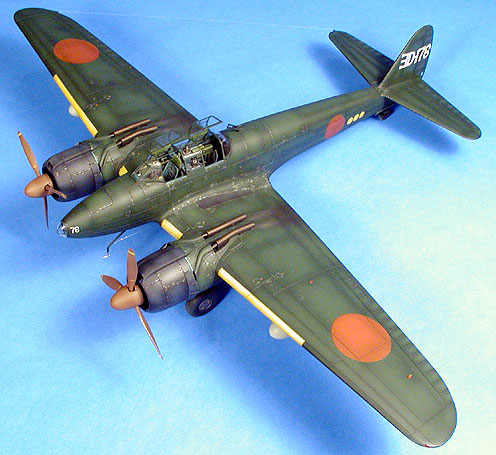
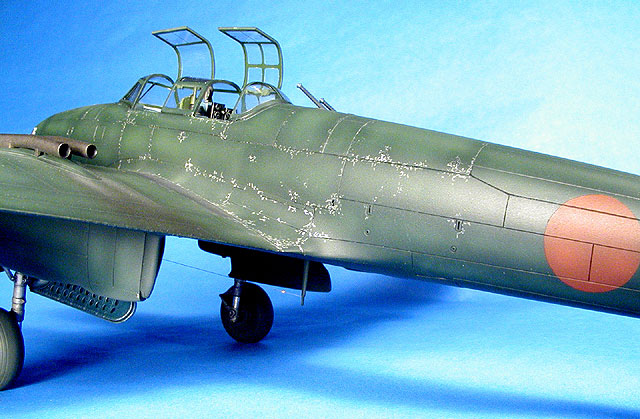
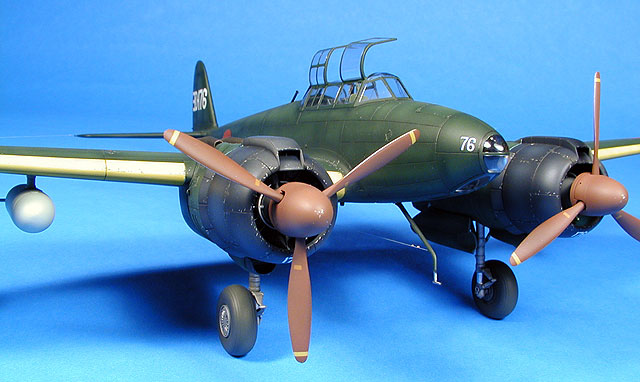
When studying pictures of Gekko, it becomes
apparent that these aircraft were well maintained. In fact, most of
them had quite a sheen to their paintjobs. Overall, the shade of
green is very dark. The black (or blue-black) cowlings appear
universally shiny, satin at the worst. Contrary to what has become
common thinking when modeling Japanese aircraft, there are very few
paint chips on these airplanes except in crew access areas and around
the gun bay. Of course, there are exceptions. The early version of
Gekko featured long exhaust stacks over the top of the wing as
included in the Tamiya kit. Most of the pictures that I studied
showed very little exhaust soot on the wing, and when it was there, it
was mostly located near the trailing edge, and very dark.
I decided
to model 3D-176 (the kit supplied markings) because there were two
photos of it that I was able to find. These photos showed slight
chips in common crew areas, and not-so-shiny paint. Another reason I
chose this aircraft was because the photos showed that the armament
configuration supplied in the kit was correct for this aircraft.
Surprisingly, the only photos I could turn up that showed early style
exhausts with only two upward firing cannon were the two aircraft
included on Tamiya’s decal sheet. There are however, LOTS of Gekkos
with three upward firing cannon.
I knew going into this project that a monotone
paintjob could be somewhat “boring”. My style of painting would help
things a little here. What I didn’t want was a model that looked like
I “spruced it up” because it WAS boring. A modeler could add lots of
paint chips, really fade the paint, heavy exhaust stains, etc. to add
a little interest. As much as possible, I like to capture the
“essence” of what that particular airplane possessed. I want the
finished model to be typical of the prototype and where it is
serving. So, I decided that if the real airplane was boring, then so
be it. I would build it as I interpreted the photos, with no extra
“spice”. I did make one concession though; the under wing tanks were
not fitted in the photos of the airplane I chose to build. I liked
the look of them though; so I included them, painted in light gray for
a nice contrast.
Most military aircraft from WW II have some sort
of camouflage applied to the airframe, usually consisting of more than
one color. A BF 109 for example, will usually have a light underside
color, and two upper surface colors, for a total of three colors in
the basic paint job. In that particular case, I would start with the
lighter of the three colors, and work to the darker. The reason for
this is because dark overspray is easier to blend than light
overspray. Naturally there are going to be exceptions, but working
from light to dark is a standard of mine. Any weathering or fading
effects that I wish to apply will be done to that color before
moving on to the next.
Gekko is all one color however, which made
deciding where to start a no-brainer. Many modelers will add white
too the base color to compensate for scale. Not me. I take a
slightly different approach. I paint the model as closely as possible
to true factory original specs. I will mix colors to exactly match
chips if I have them. I chose Tamiya’s XF 11 IJN Green as a base
color for Gekko. It had the dark green look I was after; not too
yellow. As I mentioned earlier, I used 91% isopropyl alcohol for
thinning the base coat of paint. I always thin my paint 50% for
starters, and see how it works on the model. I can add more paint or
thinner depending upon the results.
NEVER assume someone’s idea of a paint/thinner
mixture is good for you. There are WAY too many variables involved to
make a blanket statement about thinning paints. Just a few of these
variables include the type of airbrush, what pressure is being used,
temperature, humidity, and of course how experienced the user is with
the airbrush. One variable that is often overlooked is the paint
itself. I have experienced bottles of paint of the same color that
did not work anything like it’s twin. That is why I start with 50%
thinner and see what happens.
I use a higher air pressure than some would
expect, usually around 25 to 30 PSI. Sometimes I pump up to around 40
PSI for real close and tiny work. Again, like thinning, there is no
standard here. You must experiment and see what works for you. I
happen to like higher pressures.
At the end of Part 2, Gekko was primed, and all
of the fuselage openings were blanked off with Blu-Tac (poster
mounting putty) or spare glazing. Make double sure at this point that
all seams are filled, that the scribing is good, and that there are no
glitches anywhere. I use a strong light held at an oblique angle to
the model so that surface imperfections are more visible. You want to
take care of them NOW instead of later.
It is here, at this point, that some modelers
will apply a “pre-shading” effect consisting of black or dark gray
paint sprayed over the major panel lines of the airframe. The
airframe colors are then sprayed thinly over the “pre-shading” which
allows the dark colors to show through, creating a shaded appearance.
I don’t use this method. It is too unpredictable. A little too much
paint over it, and the effect disappears. Multi-colored paintjobs
just make the situation worse by increasing the chances of
obliterating the effect. The technique I use is both a “pre-shading”
and “post-shading” combination that is applied after the basic paint
color is sprayed down. By working on top of the base color, the
effects are more easily controlled to my own satisfaction. More on
this later.
Before I actually lay paint on the model, I look
for any troublesome areas. Sharp angles and perpendicular surfaces
tend to cause air vortices that will dry the paint before it touches
the model, creating a rough and pebbled finish. To alleviate this
problem, I spray these areas first. I apply the paint a little “wet”
and build up the color gradually. At 50% thinned, Tamiya paint will
be slightly transparent, and likes to be applied “wet”. Not like a
gloss paint job, but not dry either. Get close, move slower, and find
the balance between running the paint, and getting it on “wet”. This
is a professional painter’s greatest talent. It takes a very long
time and much experience to get it right, but once you achieve this
special little talent, your paint jobs will always go better.
I work one section of the airframe at a time,
like the top or bottom of one wing, left or right fuselage, horizontal
stabs, etc. After painting in the problem areas, I start to cover the
rest of the airframe (or the area pertaining to that particular color)
using the same “wet” application. It may take two or three coats
before a uniform finish is achieved. Gekko has a large airframe, and
painting it all one color took a surprisingly long time. If applied
correctly (for me) the finish of the model will be slightly eggshell;
just a notch up from dead flat, and consistent overall. Since there
are no other colors involved in painting the basic airframe of Gekko,
it is time to proceed to fading and/or weathering the model
NOTE: The paint is dry almost immediately, and I
literally waste no time going to each consecutive step of this
process. By the time I have flushed out the airbrush, it’s time to
paint again.
“Weathered” paintjobs are so controversial. I
have been painting my models with some sort of faded or weathered
paintjob for as long as I can remember. Actually, the term
“weathered” is a little misleading. I like to see something a little
more interesting than a clean, neat paintjob on a model. Not
necessarily “weathered”, but something different. Something creative
and well-planned. I want the model to attract attention; not hide in
plain sight. Most folks have paid compliments to my models, and some
have bashed them publicly, but I can say for sure that the models I
put on the table are attention-getters. They are interesting.
Some of the best modelers I know NEVER “weather” their models. They
don’t rely upon special effects at all other than superb building and
painting skills, and are consistent winners in contests. I don’t
relay on special effects either, but I DO enjoy looking at them.
I begin the “weathering” process by adding a
“fade” effect that is comprised of two steps. The fade effect is
applied to the entire airframe, including the underside.
What?
The UNDERSIDE?
Undersides don’t fade!
No, but they can be boring. Therefore I do apply
this effect to the underside, just not to the same extent. (More on
this later.) For now, just realize that the effect that I am
describing will be applied to ALL of the colors on a camouflage
paintjob. The location of the color (top of wing, bottom of wing,
etc.) decides how much of a fade effect will be applied. Furthermore,
each color on the model receives the fade effect before moving on to
the next color. Using the BF 109 again as an example, the underside
would be completely painted, and then faded first. Then the next
lighter color would be applied, faded, and so on until the model is
completely painted.
For Gekko, the effect will cover the entire
airframe, top and bottom. The degree of fade will be adjusted later
in the final step.
To start the “fade” effect, I add at least 50%
and as much as 75% white to the basic camouflage color I am working
on. The amount of white added depends upon how severe I wish the
final faded effect to be. Actually, the exact amount of white added
here is not all that important, because the last step of the process
will bring everything around to where I want it. For example, a
Mediterranean or Pacific paintjob would get more white than a European
paintjob. In Gekko’s case, I did not want a severe fade since the
aircraft was fairly well maintained and based on a large concrete
complex on home soil. The fade mix here received 50% white. Thinning
of the fade color begins at 50%, adjusted to suit, as per the basic
paintjob.
Now the fun starts. The center of every panel,
every hatch, every fairing, every control surface, and even between
the ribs in the simulated fabric is sprayed in the fade color. I
start in the center of a panel, and work the airbrush in a
circumferential pattern out towards the scribed panel lines. When a
narrow dark strip remains around the panel lines, I stop. When this
step was completed, Gekko resembled a patchwork quilt. YUCK! What I
have actually done here is reverse “pre-shading”, with lighter colors
instead of dark. The faded effect at this stage will look too pale,
way overdone, and totally unrealistic. You will hate it. No worries
though, because this step was only a beginning.
Curiously, Tamiya acrylic paints can be thinned
and sprayed with LACQUER THINNER. When I first discovered this weird
mix, I was using a medium grade, automotive lacquer thinner. The
lacquer thinner made the Tamiya Paints spray on like silk, and dry
with a semi-gloss sheen. Also, thinning with lacquer thinner turned
the Tamiya paints into a transparent coating, almost like a heavy
clear coat. The sprayed-out paint was very smooth, but it took
several coats to build up enough color for adequate coverage. I
successfully used this combo for several years, but the time it took
to get a final finish including all of the fading effects took FOREVER
because of the translucent quality. Also, the mixture required
constant agitation to keep it in substrate. So, I decided to try
Gunze’s Mr. Color Thinner, which is made for their line of Mr. Color
lacquer paints. The results were similar, but the degree of
translucency could be more easily compensated for. In addition, the
mixture stays in substrate very well. Most large hobby shops stock
Mr. Color Thinner, which was another big plus. BUT, even though I
really liked what could be done with this formula, I was still
spending too much time in the spray booth. Using 91% isopropyl
alcohol as a thinner for the base coat and the faded coat solved this
problem, but my good experiences with Mr. Color Thinner, paved the way
for the next step.
Now it is time to blend everything together, and
eliminate that patchwork quilt look. This next step could be called
“post-shading.” To begin, I go back to the original color for the
base coat. This time though I add Mr. Color Thinner to the base color.
The ratio is around 75% thinner, 25% paint, but like everything else
this ratio is variable depending upon taste, painting methods, and
what kind of final effect is desired. This color mix is applied kind
of like a “bomb” coat. I spray a pattern about ½” wide, and lay it on
wet. My objective is to completely cover the faded effect and blend
the two colors together. When applied, this transparent coating will
tint the faded paint back into the original hue. At the same time,
the blend coat reduces the contrast between the two colors. By going
over the area again, more blend, and even less contrast is achieved.
Getting the picture?
The really cool part about this method of fading
is that the finish can be worked over until only a slight fading is
present, more of a visual interest if desired and less of a weathered
paintjob. The choice is determined by how thin the blend coat is, and
how many coats are applied. Each color on the model is completed with
this entire process (base coat, fade coat, and blend coat) before
moving on to the next color. Obviously, a multi-colored aircraft can
be a little time consuming, but with practice, and the help of these
fast drying formulae it is entirely possible to paint that BF 109 in a
matter of hours. REMEMBER, these color coats dry almost immediately,
and I move to the next step right away.

So now at this point, Gekko has been painted with
a three-step paintjob that is not quite new looking, and not quite
faded either. I applied the blend coat just enough to balance between
too much and too little contrast; three wet coats was just right. Any
trim colors like theater markings or IFF markings, national insignias,
etc. can be applied either before (and masked) or after the base
colors are applied, but remember to fade and blend these colors to
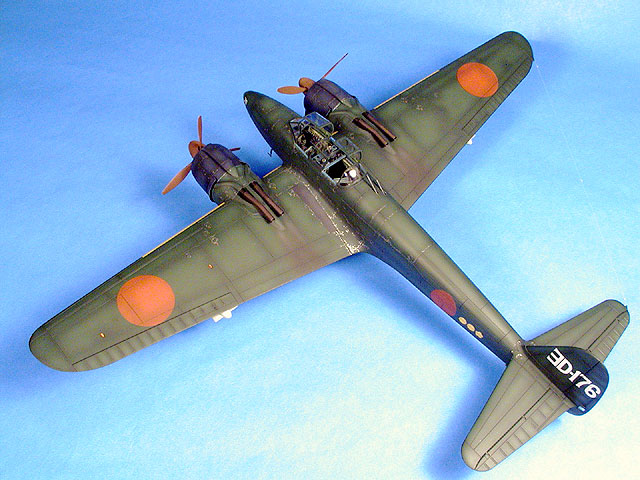
maintain continuity. I decided that I would paint the Hinomarus onto
this model, and apply the effects to them as well. I had a set of
Eduard masks and used them very successfully. I highly recommend
these vinyl masks! The cowlings were painted in a mix of black with
just a touch of blue, and faded to match the fuselage. Also, the
leading edges were masked and painted at this time. Any painting of
wheel wells and open areas should be complete by now as well. I chose
to mask and spray the wheel wells after painting the model. I used
the same techniques described in Part 1 to simulate natural metal and
Aotake in the wells, and on the leading edges of the engine nacelles.
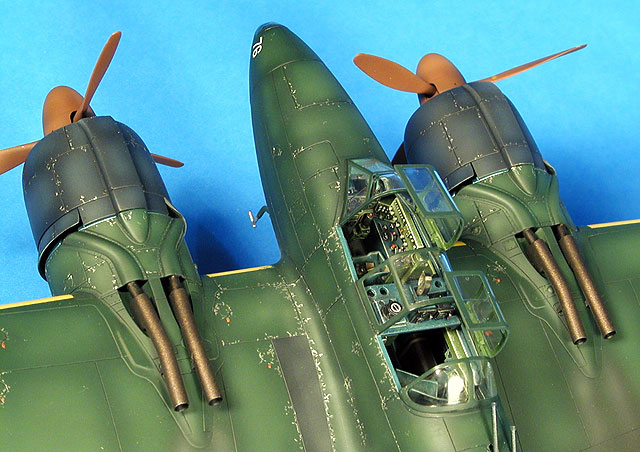
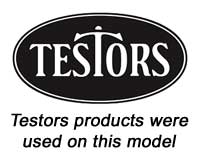
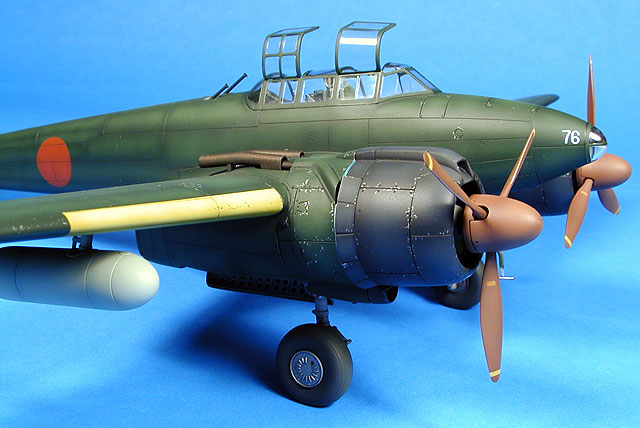
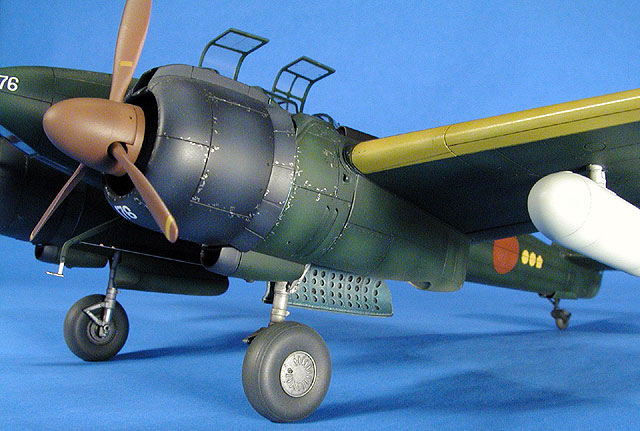
The engines were painted with Metalizer Magnesium, washed with
black and then drybrushed with silver. The crankcase covers were
painted gray, and washed with dark gray.
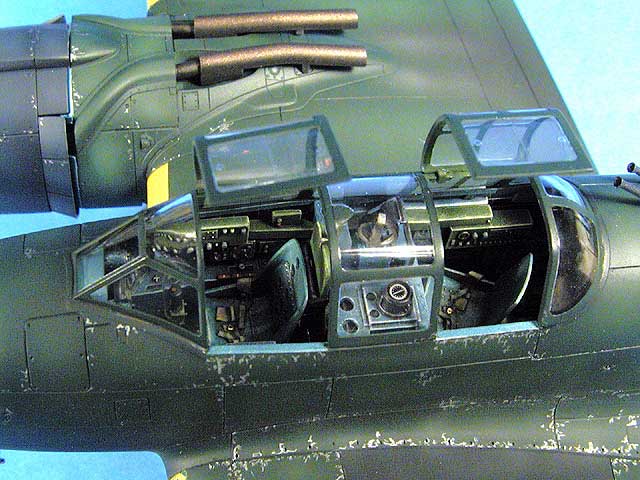
I don’t think anybody really likes painting
canopies. I hate painting canopies. Any shortcuts, or time I can
save painting canopies is OK with me. However, canopies are very
important to the overall quality of a finished model. I do use
shortcuts, but I make sure that quality does not suffer. It is
critical that the canopy is not marred in any way with stress cracks,
crazing or scratches. A lot of folks use Future floor finish as a
one-step fix-all for bad canopies. If that works for you, that’s
fine, and I urge anyone to give Future a try. For me, preventing
canopy boo-boos in the first place is the best idea. When I open a
kit for the first time, I always have a zip-lock baggie handy to put
the canopy into. When I remove a canopy from the sprue tree, I use
sharp flush-cut nippers and trim it well away from the canopy
surface. If the canopy surface is too close to the sprue, I may use a
hot knife to cut cleanly through the sprue. Whatever you use, it is
absolutely necessary to leave a high “nub” of trimmed off sprue on the
canopy part. DO NOT try to remove the part as close as possible to
the canopy. It is far better, far safer, to carefully file down the
nub until it is flush with the surface, and then wet-sand with
super-fine grit paper. I use a metal polish called Blue Magic to
polish the canopies clear. Blue Magic is creamy, not gritty, but it
works very fast, and like it’s name; magic. After polishing,
if there is just too much damage for whatever reason, THEN I may
resort to using Future. But for the most part, I do not use Future on
canopies.
Beside vinyl masks, I find Bare Metal Foil (BMF)
the easiest way to mask canopies. I use the standard shade of
aluminum, and burnish it down onto the canopy with a cotton swab.
Today’s kits usually have well defined canopy frames that show up with
no problems using BMF. Using a NEW #11 blade, the foil is cut with a
very light stroke, more like lightly dragging the blade next to the
frames. Use the frames themselves, or sometimes scribed lines for
guiding the blade. Don’t use pressure, just a steady hand. With only
a little practice, you will be surprised how easy this is. If the
canopy frames are not well defined, I use tape strips as substitutes
for the frames while masking with BMF. Apply the tape strips where
appropriate, cover the canopy part with BMF, and cut as usual. After
cutting, peel off the foil and tape strips, exposing the area to be
sprayed.
Taking a short cut, I prefer to paint the
insides of the frames by painting the interior color on the
outside, before painting the exterior color. Because it was
applied first, the interior color shows through when viewed from the
inside. Gekko had medium green canopy frames on the interior, so this
is the color that the canopies were sprayed first. The exterior color
is sprayed next, followed by any fading and blend coats, and then set
aside for the final finish to be applied later. DON’T forget to
weather the paint finish on the canopy frames to the same degree as
the surrounding fuselage, or it will not look right.
In order to prepare the model for decals, a
glossy finish is needed. Testors Sealer for Metalizer is a very good
product to use as a gloss finish, and as a sealer for the paintjob.
Remember, I like to move quickly, and this product pleases me to no
end. It dries fast, it’s clear, and it dries hard. I spray it on
straight-out-of-the-bottle in a nice even wet coat. Usually, I apply
only one coat. 30 minutes later (no joke) I can apply decals. Don’t
forget to gloss the canopies so that they receive the same coats of
paint as the rest of the model, and exhibit the same tonal qualities
in the end. Besides being decal ready at this point, the model is
also sealed and protected against any accidental damage that may
result from detailing and weathering still to come.
Out-of-the-box rules state that you may use
aftermarket decals on your model. This gives the OOB modeler a little
bit of freedom from the contents of the box. I think that aftermarket
decals have become such a staple in scale modeling that most of us
never even think about using kit-supplied decals. How many decal
sheets do you own? Me too.
Sometimes though, the kit manufacturers have
gotten it right, and picked a good subject for their own decals. Such
was the case with Gekko. The aircraft I wanted to model was one
included in the kit decals. Actually, this happens a lot when I build
models OOB, because more often than not, it’s a brand new kit I’m
building and there aren’t any decals available yet. If using kit
decals frightens you, then rest assured that there is a solution
to your dilemma. Mr. Mark Softer decal setting solution will make
your day. This is another great product that I use every time, and
with every decal. This stuff works a little differently than the
“Micro System” that uses two separate solutions; a wetting agent
underneath, and a solvent on top. You know how it goes. Apply the
decals and solvents, watch then wrinkle and crinkle, TRY not to touch
them, and go to bed because it will be hours before you can touch them
again.
Mr. Mark softer is a super simple one step
topical application. After wetting the decal area wet with a little
water, I slide the decal into place. A ¼ or ½ inch flat brush is used
to squeegee out the water from under the decal, and set it into
place. Now a little bit of Mr. Mark Softer is applied directly on to
the top of the decal. Gunze even includes an applicator brush in the
lid. Unlike other solvents that attack the decal immediately, Mr.
Mark Softer is a slow starter. At first, you will not notice anything
happening to the decal, then suddenly, it’s snuggled down. All the
way down. The underside wing roundel of Mk.I or Mk.V Spitfires is the
ultimate test of a decal solvent. Right smack in the middle of the
roundel is a HUGE exhaust vent for the gun heating system. It took
two applications of Mr. Mark Softer over a ten-minute period, but that
Aeromaster decal could not stand up to the pressure. Not even a
wrinkle in the decal, and perfectly snuggled down.
On Japanese kit decals, Mr. Mark Softer is
nothing less than a miracle worker. Hasegawa decals work great with
this stuff. Tamiya decals work great with this stuff. (By the way,
has anyone besides me noticed that Tamiya decals keep getting better
and better?) The tail markings on Gekko went on with out a hitch. I
will not hesitate to use Japanese kit decals with Mr. Mark Softer.
And best of all, if I needed to, I could shoot a flat coat over them
in as little time as one hour.
After the decals, I apply a wash to the panel
lines, making sure to include the panel lines located where the decals
are. Like faded paint jobs, highlighted panel lines are a matter of
opinion. I know several modelers that never do a thing to the scribed
lines on their models, and the models look great. Even so, I have
probably been asked more than anything else, how I “do” the panel
lines. Funny thing is, enhancing the panel lines is just about the
easiest thing to do on the model.
I use two different methods of applying a wash to
the panel lines depending upon the situation. I might use oil for the
wash or I might choose an acrylic wash instead. Choice of color for
the panel line wash is important. You can choose a darker version of
the base color, or even a lighter version, but dark gray is a pretty
safe choice. Gekko was so dark however; that I felt a black wash was
the only way to go. Ordinarily I will avoid black because it is too
dark, and unrealistic. Windsor & Newton oils were used for the wash
on this model. For thinning the oils I use Ronsonol brand lighter
fuel (naphtha). Lighter fuel carries the oils very well, and as usual
for my product choices, it is very quick drying, taking only
minutes to dry. Any cleaning up or touching up of the oils can be
safely done with clean lighter fuel. The lighter fuel is safe to use
on almost any paint or surface, and in fact, makes an excellent
cleaner. I have had good success with mineral spirits and Turpenoid
(synthetic turpentine) but I keep going back to lighter fuel.
There
is no formula I use to thin the oils. I simply add a little dab of
oil to a dime size drop of lighter fuel, and mix it up. The fuel
evaporates so quickly that you must constantly add more. Only
experience can tell you how thin to mix the wash. A small brush
filled with wash is applied to one end of a panel line, at a corner if
possible, and touched down again where the capillary action has
stopped. There will be some excess wash that has slopped out of the
panel lines. I use clean lighter fuel on a cotton swab to remove this
excess. I also used acrylic washes on this model in a few critical
areas. The yellow leading edge stripes, white tail markings, and Hinomarus received a very controlled acrylic wash of medium gray so
that I could maintain the boundaries of the color. Black in these
areas would have been too harsh.
The acrylic wash is a little different. I use
Polly Scale acrylics for these washes, but nearly any water-based
paint will work. Thin the paint with water, and slop it into the
panel lines. No need to be neat. Work only a small area; say about
half of a wing at a time. The acrylic will dry very quickly. When it
is, wipe off the sloppy excess with a cotton swab or soft cloth soaked
in window cleaner.
A very sharp drafting pencil can be effective to
use in the panel lines of a lighter colored model as well.
A thin coat of Metalizer Sealer is applied over
the decals now to reduce the possibility of the decal film being
visible.
The model, including those canopies, is now ready
for a final finish coat. I mentioned earlier that Gekkos were very
well maintained, and usually had a satin sheen to the paint. It is
well know that many WW II aircraft had satin finishes, and many were
routinely waxed for better performance. Even so, I still prefer a
flat finish on my models. The choice of finish sheen is yours of
course; I just think that they look better that way. I will vary the
flatness of some colors to make concessions to various sheens
in real life, such as the engine cowlings on Gekkos, which were a
rather shiny black or blue black.
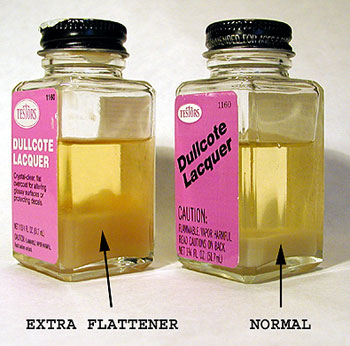 I have used Testors Dullcote for as long as I can
remember. I have used Testors Dullcote for as long as I can
remember.
It dries fast, dries hard, and can be varied from satin
finish to dead flat. Dullcote settles out in the bottle, leaving the
flattening agent in the bottom 1/3 of the bottle. To vary the sheen,
I will pour off the carrier agent in the top half of the bottle,
leaving more flattening agent, or add some of the carrier to another
bottle to increase the sheen.
I thin the Dullcote 50% with lacquer
thinner purchased from a home improvement center. Like the other
paint finishes on the model, the Dullcote is applied “wet” and left to
dry, which usually takes about 15 minutes.
Dullcote has two potential
drawbacks; it’s amber color, and occasional flecks of talc (used as a
flattening agent), which show up in the finish. I strain the Dullcote
before using it to prevent talc flecks. If any get through, a second
application of Dullcote will usually take care of them. Because the
cowlings have a greater degree of sheen than the rest of the airframe,
I mixed a little Dullcote with Metalizer Sealer and the results are
very satisfactory.
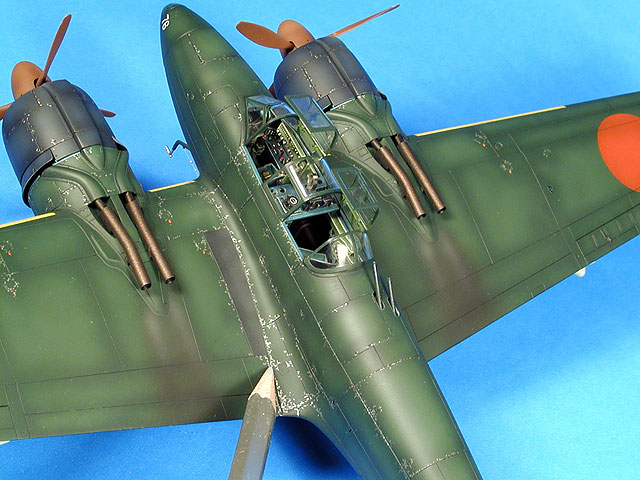
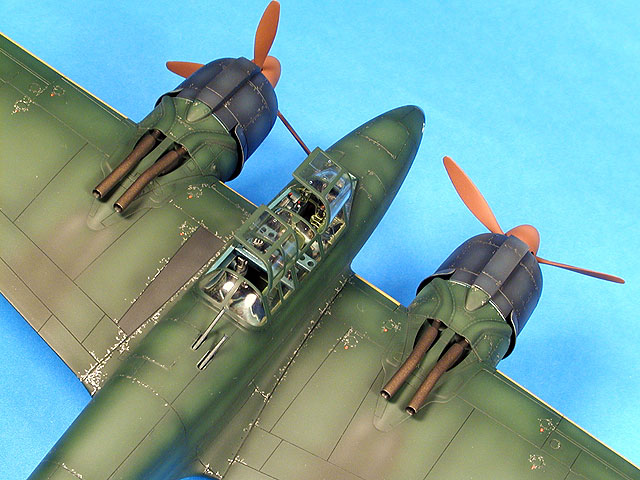
This is the point in assembly that I usually put
all the parts together. Engines, cowlings, landing gear, external
fuel tanks, armament, canopies, etc. are all brought together on the
airframe. The main tires and tail wheel were given flat spots with a
file, to simulate the ground contact between rubber and pavement. I
mentioned in Part 2 that I do not use cyanoacrylate adhesives for
major assembly, but this is the stage where I do use them. My brand
of choice is Zap-A-Gap, a medium viscosity glue that holds very well.
Cyanoacrylate adhesives do not have good shear strength, and the bond
will break with any sideways force. Therefore, I make sure that the
parts to be bonded have a positive location to adhere to such as a
hole or socket. I rarely use an accelerator, because it breaks down
the quality of the bond. I make double sure that the gear legs have
authentic alignment, and most of all are consistent to each other. I
make sure that each leg is lined up with the other one, and that each
leg has identical alignment with the wing or fuselage. At the same
time, I make sure that the wingtips and tail surfaces are situated
exactly alike from side to side. I use a mark on a card to measure
the exact position of each wingtip and adjust the gear legs until all
of this is perfect. This is not an easy task at all, and it is THE
most critical step when building models that are intended for
contests. (Remember this paragraph for a story at the end of this
article)
Navigation lights were faired in and polished
early in the build, and have been masked until the flat coat was
sprayed on. Now the masks can be removed. Tamiya’s wing tip lights
are clear, and need a coating of translucent blue-green on the right,
and translucent red on t he left. I use Tamiya clears for this,
brushed on wet and left to dry. The layers of paint that have built
up around the masks, serves as a boundary for the clear colors, and
effectively works as a dam between the paint on the wings. A handy
tip! The nav lights on the tail were clear inserts, and masked
previously as well. Again, the paint layers serve as a boundary for
Future this time, in order to enhance clarity. Other navigation and
formation lights on the wings were painted in with Tamiya clears over
a silver base.
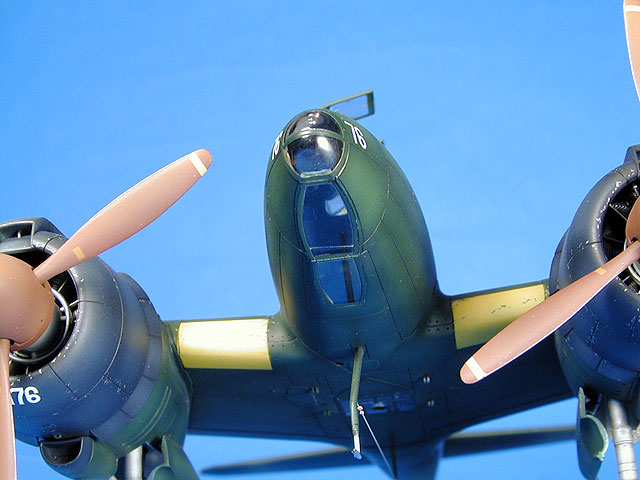
Gekko’s canopy was the last major part assembled
onto the model. I use Microscale’s Micro Kristal Klear, a glue
similar to Elmer’s white glue, to attach canopies. A small bead all
around the mating surface of the canopy is all that is needed. After
placing the canopy, a tiny bead of adhesive should flow out of the
joint. If there is not a good flow out in an area, I will apply some
Kristal Klear to the outside of the joint. After 15 minutes or so,
the Kristal Klear is beginning to set up. Kristal Klear differs from
white glue in that it can be re-solved with water, and gradually
eroded down to a flush surface. I use a water soaked cotton swab
wiped around the canopy joint until the joint is clean. This method
will usually result in a perfect joint that can be washed to match the
rest of the panel lines. If necessary, a little Dull Cote may be
airbrushed carefully around the joint. The Paashe H is more than
capable of this without masking the canopy. Just be careful and spray
away from the clear areas. I should note that the glazing under the
nose virtually snapped into place and did not need adhesive.
When the model is on it’s gear, is when I decide
exactly what additional weathering is needed. I can look at it from
all angles, visualize dust patterns form the wheels, exhaust patterns,
paint damage, etc. I wanted Gekko’s exhaust to be an attention
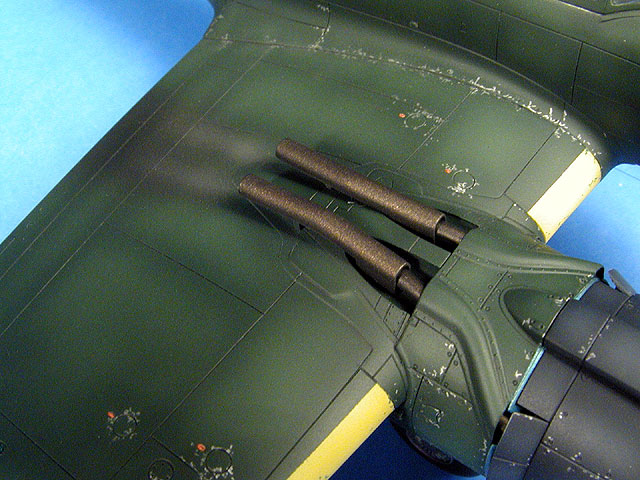
grabber, but not overdone. The exhaust stacks were painted with
Metalizer Burnt Iron, and then Dullcoted. For the stains, I
airbrushed a very thin black mixture where photos told me they should
be. Gekko’s stains did not start directly at the mouths of the
stacks. They tended to collect aft of the cord of the wing, and widen
out from there. The color was airbrushed on slowly and carefully,
gradually, building up the color. The lighter streak in the middle is
a tan color that I added for interest sake. Underneath, some buff-colored
dust was airbrushed around the gear, and back along the tire tracks,
and onto the undersides of the horizontal stabs. Likewise, I
airbrushed some dust around the crew entry areas.
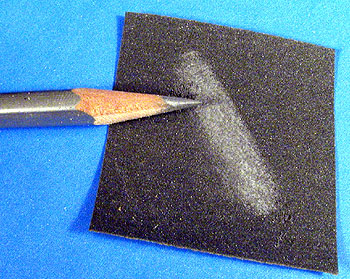
The paint chips on this model were done with a
Berol Prismacolor silver pencil. I use a piece of sandpaper to keep
the point sharp, and then kind of tap the pencil along in a random
pattern. I tried hard to keep the chips in small areas, and limited
to heavily used parts of the airframe, including the armament hatch in
the fuselage spine. I followed photos very closely here, and I think
the effect is typical of the prototype. In the yellow IFF markings on
the wing leading edges, I used a dark green colored Berol pencil to
add a few chips as well.
Click
the thumbnails below to view larger images:
A little more Dullcote over the additional
weathering finishes the Gekko’s painting. An antenna wire made from
stretched sprue added to the belly and to the wingtip and insulators
made from drops of Kristal Klear, finishes the details.
Gekko took a long time to get to this stage,
about 100 hours or so over two months time.
While I am assembling a model, especially an
out-of-the-box model, I keep very thorough notes as to what I modified
on the kit. I will mark these notes in red ink on the instruction
sheet as I go. Since the instruction sheet is usually required to
accompany an out-of-the-box project, this is a handy way to inform
judges what you modified, and how you did it. There is no need to
cheat, or try to hide anything you have done. If the judges feel that
the model does not qualify for OOB, then fine. It will automatically
become part of the originating category, and compete there. For me,
it’s not about the trophies. While I do enjoy competitions, it is far
more important to me to finish something that I am pleased with, and
have enjoyed building. Hopefully, somehow, the model was a bit
challenging along the way. (Have to keep skills sharp!) If the model
pleases others, well then, that is just a bonus!
There is a humorous post-script to this story
that involves the assembly techniques that I talked about in Part2.
I took the model to several local shows and it
was well received, was well rewarded, but failed to place 1st
on a number of occasions. The models that beat it were excellent
models, but I had to know, so I asked the judges where I went wrong.
(By the way, unless you ask, you will probably never know…so ask the
judges!) Remember all of the measuring and making sure that the wings
were straight, and everything was parallel and perpendicular, and how
important it is to judging the finished model? One trick that judges
use to check a model for correct alignment is to stand in front of the
model, and look at the horizontal stabilizer. The judge visually
compares the horizontal stabs to the wings, by watching the tips of
the stabs, and gradually lowering his vision until the stab tips touch
the upper wing surface in his vision. If each stab tip touches the
wing at the same time, the alignment is correct from a construction
point of view. If they do not touch at the same time, then something
is wrong somewhere. My Gekko was ever so slightly off on one tip.
When measured, each wing tip was exactly the same distance from the
table, as were the horizontal stab tips. The gear was perfectly
aligned. But when viewed head-on, there was indeed a tiny gap showing
when the alignment trick was used. What the heck?
Optical illusion? After considering this for a
while, I came to the conclusion that the wing in question was slightly
warped at the nacelle joint. Assembled carefully, measured, measured
again, and the warp doesn’t show up until the bitter end. Ever see
Charlie Brown comics when our hero Chuck is mad? The dialog bubble is
filled with scribbles. My dialog bubble was filled with scribbles.
It would not have been so bad if the model
weren’t the star of a three-part article on building models
out-of-the-box that placed high emphasis on alignment and careful
building techniques. Now I just laugh at the irony. Actually it
really is pretty funny, and makes an excellent point to end this
article on. The Gekko now resides in Oregon, USA and belongs to my
good buddy, and fellow Hyperscaler Chuck Zellmer.
All photos in this article were taken with an
Olympus C-2100 Ultra Zoom 2.1 MP digital camera. The camera was set
to macro mode, and manual exposure. With the camera set to F8, the
smallest aperture, exposure times varied between 1/5 and 1/30 of a
second. Lighting was two halogen spots, and overhead room lighting.
Click
the thumbnails below to view larger images:
Model, Images and Text Copyright © 2002 by
Gregg Cooper
Page Created 05 March, 2002
Last Updated
04 June, 2007
Back to HyperScale Main
Page
Back to Features
Index
|
 Home
| What's New |
Features |
Gallery |
Reviews |
Reference |
Forum |
Search
Home
| What's New |
Features |
Gallery |
Reviews |
Reference |
Forum |
Search