|
|
|
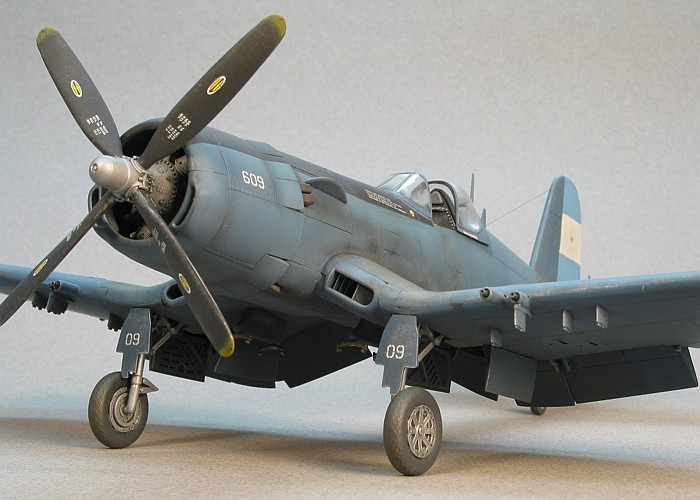
Vought F4U-5N Corsair |

Hasegawa's 1/48 scale F4U-5N is
available online from Squadron.com
Some time ago, I built a
Salvadoran FG-1 Corsair because I liked the mottled jungle
camouflage that I saw on a model boxtop artwork. In that artwork, the
Salvadoran Corsair is being attacked by a Honduran Corsair, depicting an
aerial conflict that occured during the "Soccer War" (as it is known in
the US). I wanted to build the Honduran aircraft at some point to go
with my completed Salvadoran machine, but lacked the documentation and
decals to do it.
Aztec Modeling came to my rescue with decal sheet 48-012. Not only
does the sheet provide several Honduran F4U Corsairs, but one of them is a
Corsair credited with shooting down two Salvadoran Corsairs in aerial combat.
How could I not build a model of the exact Honduran Corsair that shot down my
already completed Salvadoran Corsair model? All I needed was a kit to start
building.
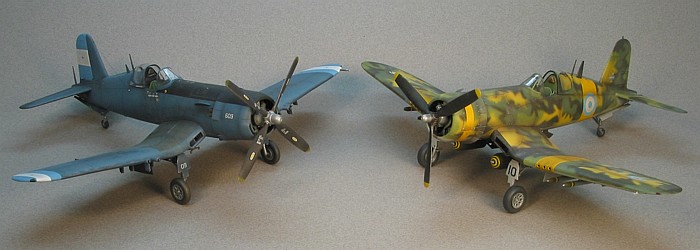
The picture here shows both my models, the victor and victim of the only
Corsair verses Corsair aerial dogfight in history. While I have never read an
account of the actual fight, I have to think it was rather short. In fact, the
victim may not have even seen it coming until it was too late.
Hasegawa's 1/48 Scale
F4U-5N
|
Things I had read about the Academy F4U-5N Corsair put me in no hurry
to rush out and buy one for this project. When Hasegawa announced their
plans to release an F4U-5N Corsair, I held my breath, crossed my fingers, and
hoped they would get it right. They did not disappoint me. The model built for
this posting is the Hasegawa kit.
This kit is not up the standards set by the Tamiya Corsair kits, and
it is not even up to the standards set by some other recent Hasegawa
releases, but it is not a bad kit. It has a few issues with its fit. I found the
fuselage halves, after assembly, are about .030" too narrow for the engine
cowling and wing. I added a .030" styrene spacer between the fuselage halves at
the base of the engine cowling to correct the problem. It was good I dry fitted
the model as the fix to this would have been quite time consuming after the
fuselage was glued solid.
Another fuselage issue is a mysterious ridge running around the nose area,
just behind the high point of the wing. This ridge is caused by Hasegawa
having an insert piece in the mold to provide a new nose area on their F4U-7 and
AU-1 Corsair kits. The issue is that the insert does not align well in the mold
and leaves a substantial ridge running around the nose. As the ridge does not
line up with any panel lines, it needs to be leveled and smoothed. I gently
carved the ridge off with a sharp X-acto knife and sanded the area smooth
with 600 grit sand paper. It is still visible when the light hits it right, but
I was not going to get any more crazy about trying to fix it.
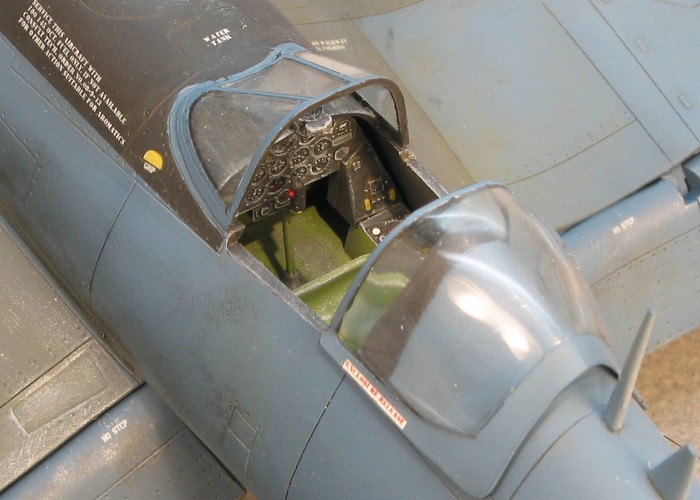
The cockpit is quite simplistic in its construction, having only six pieces.
It is nicely molded, though, with engraved instrument faces and raised details
on the side consoles. With a little careful painting, the cockpit builds up into
a nice looking representation of the F4U-5N Corsair's cockpit. Of course, some
after market resin will greatly improve the cockpit, and Hasegawa is
apparently banking on it by not providing much extra detailing in the cockpit.
No one had released any replacement cockpits when I started building this kit,
so my model has a carefully painted out-of-the-box interior.
Hasegawa took the cheap approach to the engine, too. While they do
provide a separate piece for the engine crankcase, both cylinder banks are
molded as one single piece with raised details. While not as nice as the engine
in the Hasegawa P-47 kit, this representation is adequate for the limited
view you get looking into the cowl from the front.
One error of the kit involves the thickness of the main wheels. They are the
thinner type found on earlier Corsair versions. The F4U-5/5N and AU-1 had a
thicker wheel to help support heavier gross weights. I chose to ignore this
problem in the kit. I considered splitting the tires down the center and adding
a spacer to make them thicker, but decided in the end to let it go. I was not
looking to compete in Nationals with the model. Wheels are wheels, and they do
not look that bad on the finished model.
The model molds all the wing flaps separately. They look pretty much like
Tamiya's flaps. The wings are correct for an F4U-5/5N in that no fabric
covered areas are molded on the outboard wings or flaps. When assembled, the
trailing edges of the wings are a bit thicker than I would have liked, but once
they are painted they are passable.
The cannon fairings fit into holes in the leading edge of the wing. The holes
in the wing are big enough to fit both fairing into one hole (almost). I
attached the fairings as best I could, then applied liberal amounts of super
glue to fill the cracks that ran around the fairings. The same problem exists
for the wing pitot mast on the left wing. While neither of these issues were
hard to fix, they were annoying. Hasegawa could have done better to make
the holes the right size to fit the insert pieces.
The kit provides alternate pieces to build either an F4U-5 or F4U-5N. The
Honduran Corsairs were a mixed bag of F4U-5 and F4U-5N aircraft (with a few
F4U-4s thrown in for good measure). According to the instruction sheet for the
decals I was using, the Corsair I wanted to build was an F4U-5N.
The F4U-5/5N is armed with 20mm cannons in the wings. The F4U-5N came from
the factory with flash suppressors on the cannon barrels (being a night
fighter). Hasegawa provides the flash suppressed cannon barrels in the
kit. I made an assumption that the flash suppressors were removed on the
Honduran aircraft as they never flew at night. Hence, I substituted the standard
barrels (kit parts Q12) for the flash suppressed barrels (kit parts Q10/Q11).
This cannon barrel modification, along with the deletion of the radar pod on
the right wing, are the only two things I changed to make the F5U-5N into the
day fighter that the Honduran Air Force used it for. I left the flash suppressed
engine exhaust stubs intact. The kit also provides the non-suppressed stubs, but
I figured the Hondurans would not have gone to the trouble to change these. I
also attached the small flame hiding strakes above the engine exhausts on the
fuselage sides. I figured that these hurt nothing, so the Hondurans would again
not have gone to the trouble to remove them.
I originally had no photographic evidence for these assumption, but they
seemed to make sense (at least to me). After I was finished with construction of
the model and mostly finished painting, a friend showed me a picture (in color,
no less) of the exact Corsair sitting on a Honduran air strip. The picture
showed that my assumptions were indeed correct. The picture is found in the
Osprey Gunfighters book. This is one of the nine-inch square-format
softcover books, ISBN#0-85045-723-8. The picture is from high and behind of the
aircraft sitting on the flight line of a grass strip.
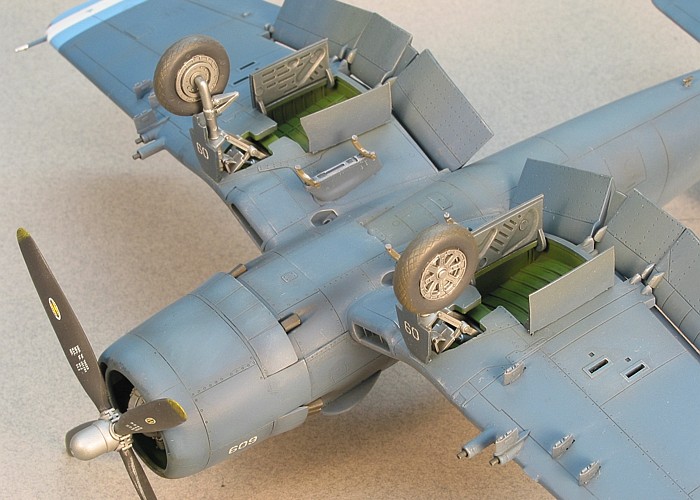
The kit landing gear builds up nicely and attaches into the wheel wells with
strong, positively aligned mounting points. I chose to paint the landing gear in
steel metalizer, in spite of the fact that the practice in the US on late
Corsairs was to paint the landing gear the same color as the aircraft -- Dark
Sea Blue. I did similar to the wheel wells, painting these Chromate Green
instead of blue. I figured that thirty-plus years after these aircraft were
built, after an undetermined number of repairs and re-builds, who knows what
color these areas were. The steel and green colors added some variation to the
aircraft where the blue would have done nothing to enhance them or add interest.
Since the picture I had did not show the landing gear, I felt I could exercise
some artistic license. I'll accept whatever ridicule this painting detail earns
me...
One improvement in the Hasegawa kit over the Tamiya Corsair kit
is the fact that weapons are included. The kit provides ten underwing rockets
(although the F4U-5/5N only uses eight), two 500lb bombs, and two external fuel
tanks. All the external stored are very nicely molded. The aircraft likely was
clean (with no ordnance) when it downed the Salvadoran Corsair during the Soccer
War. But, since I applied the kills on the side of the aircraft, the model
represents this aircraft at some point after the Corsair killing mission. I
considered adding weapons to the model as I like the look of a loaded Corsair.
In the end, I chose to ignore the weapons and leave the model empty. This is
likely the way it was while sitting runway strip alert during the "Soccer War".
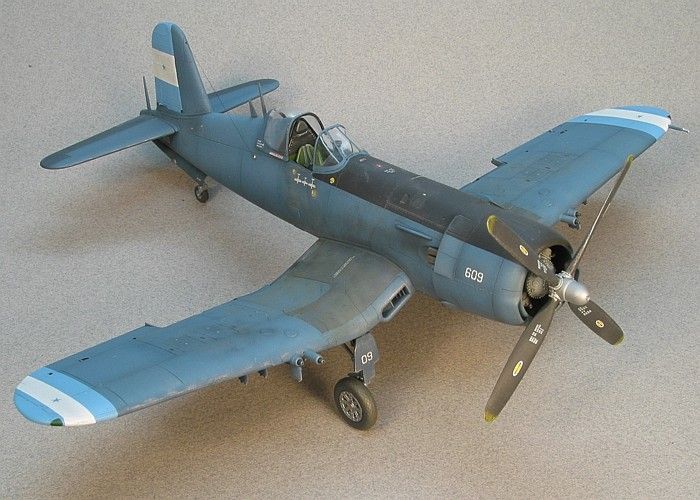
My model depicts the F4U-5N Corsair flown by Major Fernando Soto Henriquez at
some point following the 17 July 1969 mission where he shot down two Salvadoran
Corsairs. Major Soto had previously in the same day gotten a kill on a
Salvadoran Mustang, also while flying this same Corsair.
 I
used all Testors Model Master paints on the model. Honduras maintained
the overall Dark Sea Blue (F.S.15042) camouflage in which the aircraft were
delivered. All they did was add their own national insignia in the form of light
blue and white trim on the wings and tail. Different from most US Corsairs, they
also added a flat black anti-glare panel in front of the cockpit windscreen, all
the way to the front of the engine cowl. This is clearly present in the picture
I had.
I
used all Testors Model Master paints on the model. Honduras maintained
the overall Dark Sea Blue (F.S.15042) camouflage in which the aircraft were
delivered. All they did was add their own national insignia in the form of light
blue and white trim on the wings and tail. Different from most US Corsairs, they
also added a flat black anti-glare panel in front of the cockpit windscreen, all
the way to the front of the engine cowl. This is clearly present in the picture
I had.
Early research I did stated the camouflage colors held up remarkably well and
the blue was pretty much as intense during the "Soccer War" as when the aircraft
were new. To that end, I painted the model in Dark Sea Blue with a touch of
white added to enhance scale-effect. The model was quite dark after I painted
it.
I had just finished painting the major camouflage and national insignia when
my friend showed me the picture that I mentioned above of this Corsair. Other
items visible in the picture with the Corsair indicate it is a vintage photo
from around the early 1970's, close to the "Soccer War" period. The aircraft in
the picture is significantly faded from the Dark Sea Blue I had just finished
painting. Further, the colors of the national insignia provided in the decals
were also much too dark and rich.
I decided the only real fix for the model was to repaint it. Merely adding
white to the dark Sea Blue did not accomplish what I needed, though. This mixing
brings out the green quality of the Dark Sea Blue far to well. Instead, I mixed
a little Insignia Blue (F.S.35044) with Aggressor Blue (F.S.35109) to come up
with the base faded blue I wanted. Adding Dark Ghost Gray (F.S.36320) lightened
this base color for use on the upper surfaces of the aircraft. I also chose a
much lighter blue shade for the national insignia, custom mixing a color to
match the color present in the picture. I'm lucky my friend showed me the
picture when he did. These color issues would have annoyed me on the completed
model every time I looked at it.
The picture also confirmed that the anti-glare panel was indeed black. Some
sources list this as Flat Sea Blue. Aditionally, the picture confirmed what the
Aztec instructions mentioned regarding some fresh paint touch-ups on the
elevators. I mixed up some not-so-light blue to apply on these. The inner wing
sections had a large anti-skid gray area painted on them. I used European Gray
(F.S.36081) for this and dusted it with some of the base blue color to help it
to blend in better.
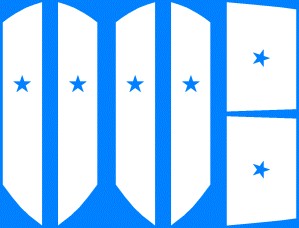
One change I made to the decals provided by Aztec was with the
Honduran national insignia. They provide the wingtip and rudder decals as large
blue and white decals. I was concerned that these decals would not completely
cover the areas in question, leaving the wing and tail edges in dark blue (the
base color on the model under the decal). I decided to make my own decals of
only the white portions of these markings. That way I could paint the light blue
on the model, including the wing and tail edges, then apply the white decals to
complete the markings. I could touch up the edges in white paint to fix any
places the decals did not quite reach and not have to come up with a matching
paint for the light blue decals.
The image to the right shows my custom artwork for the decals (reduced in
size to save space). I also changed the background color to make the white
portions more visible.
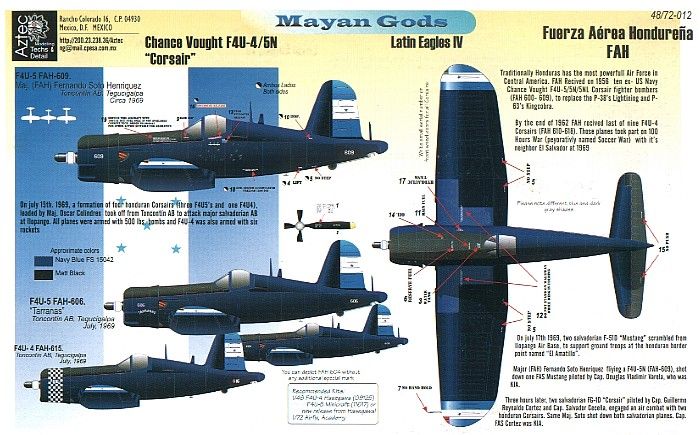
According to the Aztec decal instructions, the silhouettes of all
three kills were painted onto both sides of the aircraft. Other sources claim
the silloettes were only on the entry (right) side. I decided to only place the
kill marks on the right side.
The aircraft had data markings. They differed from what the Aztec
instructions showed and provided. I ammended their instructions to conform to
some of what I saw in the picture. I did maintain some of the data markings
provided by Aztec, even though they were not in the picture, and applied
them because I wanted them.
For weathering, I used my typical style of thinned down enamel paint washes
and air brush shading. The engine exhaust staining that is so prevalent on most
late Corsairs was not really present on the Corsair in the picture, Hence, I
kept the exhaust stain to a minimum. I finished the weathering with some dry
brushing to pop out the surface details. For a more complete discussion of what
I do to weather my models, see my posting on
"Weathering
Aircraft".
This model makes a nice addition to my growing "Postwar Warriors" collection.
It builds easily and accurately captures the look and stance of the late model
Corsair. I can see myself building another of these kits, someday, although I
will probably opt for getting the AU-1 version of the kit.
|
Additional
Images and Project Summary
|
Click the
thumbnails below to view images full-sized.
Click the "Back" arrow on your browser to return to this page.
|
|
|
Project
Statistics
|
|
Completion
Date:
|
7 March, 2002 |
|
Total Building
Time:
|
32.0 |
|
Research:
|
0.9 |
|
Construction:
|
8.2 |
|
Painting
(includes creation and printing of custom decals):
|
17.2 |
|
Decals /
Markings (includes creating and printing custom decals):
|
5.1 |
|
Extra Detailing /
Conversion:
|
0.6 |
|
Model, Description and Images Copyright ©
2002 by David Aungst
Page Created 25 March, 2002 Home
| What's New |
Features |
Gallery |
Reviews |
Reference |
Forum |
Search
Home
| What's New |
Features |
Gallery |
Reviews |
Reference |
Forum |
Search


