|
Vought F4U-1A Corsair
by
Mikhail Putnikov
 |
|
F4U-1A Corsair |

Tamiya's 1/48
scale F4U-1A Corsair is available online from Squadron.com
The F4U Corsair is a favorite subject for modelers. When Tamiya
started production of their new 1/48 scale Corsair kits it generated a new
height of modeling activity. Several great models and building reviews have been
presented here on HyperScale . Now I have decided to join in the Hyperscale
Corsair Club.
Without any doubts Tamiya produces the best Corsair model on the market. The few
goofs are rather minor and relatively easy to correct. I just want to call you
attention to my experience and some details of this model project. Taking this
opportunity I would like to thank Mike Reeves, Stephane Wrobel and all my
friends who helped me.
OK! Letĺs start!
Exhausts
The first area that really needs improvement is the exhaust
ports. I canĺt accept the flat exhaust pipes so I replicated them from fine
metal tube. In the picture (photo 1.1) new openings on the underside of the
forward fuselage are clearly seen.
The vent door of the engine compartment cooling was thinned and
catapult hooks were installed (note, on the picture model with the plastic mold
on hooks). Additionally, I slightly improved the wing root intake openings,
installed new vanes of carburetor and intercooler intake. Nothing serious, but
the wing root intakes are a really important element of construction and you
canĺt ignore that.
Engine
I next paid my attention to the R 2800 engine. Tamiya has
provided a good-looking radial engine. I intended just to add wires and new push
pods but then I decided to replace the kit plastic parts with the AIRES engine
resin set.
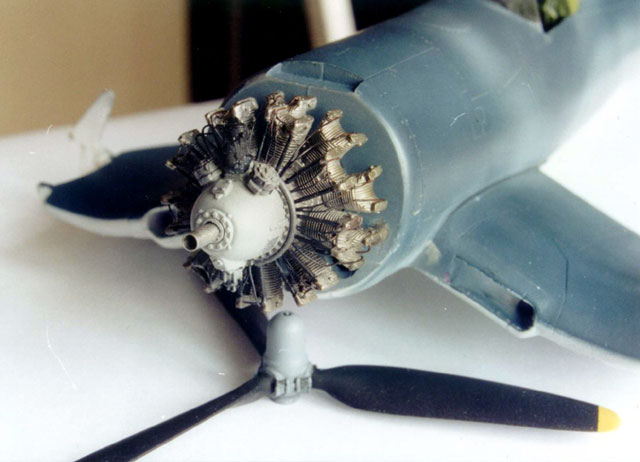
Adapting the rear part of AIRES engine took me some time but it
was worth the effort.
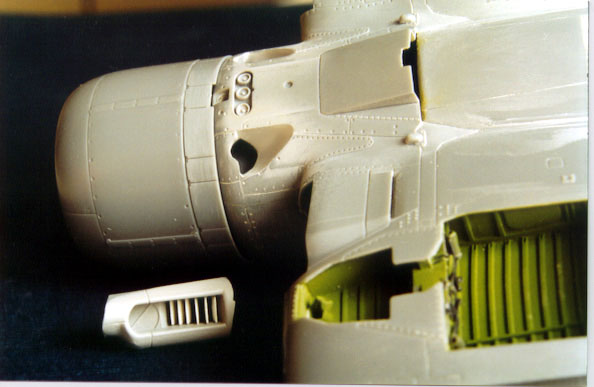
Cockpit
Next was the cockpit area. The kit cockpit was pretty good ľ in
fact, one of the best cockpits I've ever seen. The main features of floorless
cockpit are correctly represented. Unfortunately, injected plastic technology
has some limits and it would be impossible to mold everything from plastic. That
isn't a problem for an average modeller (not infected by Advanced Modeling
syndrome) but when you get AIRES cockpit set you can't help yourself. It's just
incomparable. It provides in resin, a lower cockpit tub, two sidewall pieces,
front and back bulkheads, a seat, control stick and other details as well as a
photo etch fret for the instrument panel, seatbelts, and canopy interior parts
which include the interior frame mirrors and latch handles. Deep in my mind I
realize that many of cockpit improvements are hardly visible on the assembled
model but I like detailing and do that for pleasure.
Returning to the Corsair cockpit, lots of variations of cockpit coloring seem to
be possible. I used an USN WWII Aircraft Interiors article by William Reece as
the reference and that allowed me to avoid long discussions concerning the
Corsair interior paints. According to this article on the F4U-1A, the cockpit
should be FS 34151 Interior Green and all other areas Zinc Chromate Yellow FS
33481 (Salmon on the early aircraft). That doesn't contradict other references
and my personal point of view. The process of painting, weathering, detailing
and installing of cockpit didnĺt cause any problems. That is the usual sort of
things. The only disappointing thing was that I painted an oxygen bottle Light
Blue like on Soviet aircraft. On the USN aircraft it should be Yellow. "He that
never climbs never falls"ů
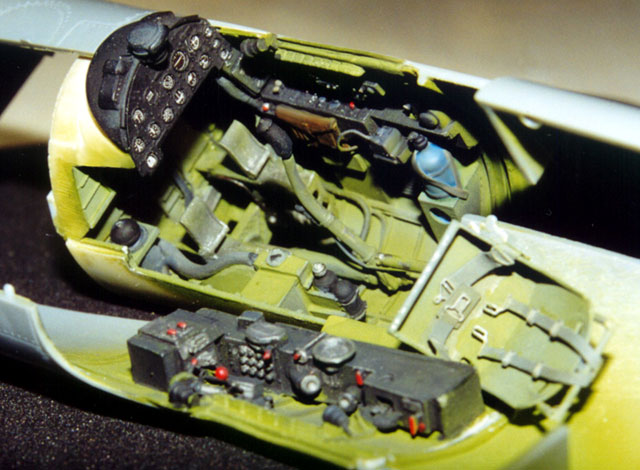
(note, the photo flash has caused the changing of colors on this
picture, they look too bright)
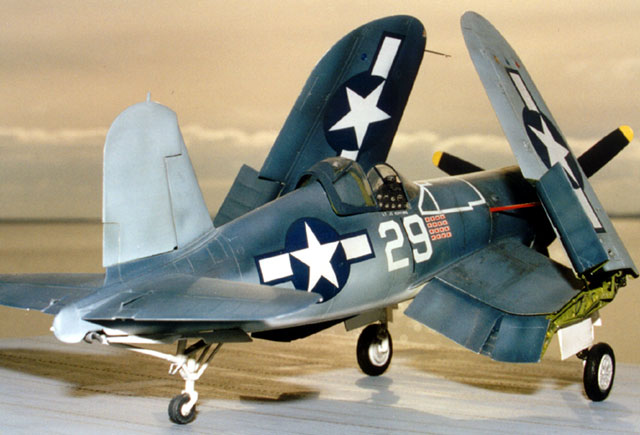
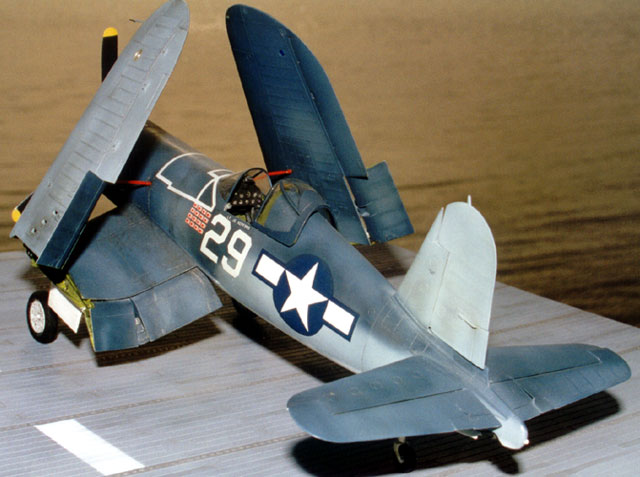
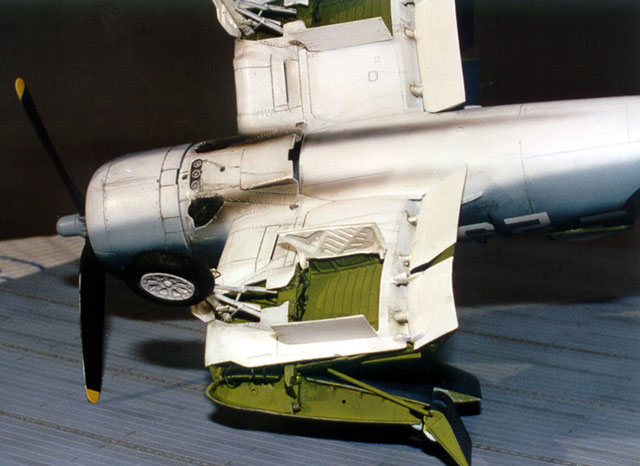
Once the cockpit was completed, the fuselage halves were glued together. There
are two options available as the wings are assembled. I built the folded
position with extra detailing of the center and outer wing sections. Molded on
plastic detailing was cut off and then I replicated the scratch build flap
control rods, hinge pin pulling strut, flap strut and control lever and some
other parts. I can't say that I was absolutely satisfied with the results but in
my opinion new wing folding mechanism looks more realistic than the plastic one.
I don't want to tire you with the description of installation AIRES wheel bays
or how I separated control surfaces, installed new trim actuators and navigation
lights. That is too boring and have been discussed thoroughly a hundred times.
It would be better to draw your attention to the landing gear detailing.
Landing Gear
The Corsair had a remarkably complex main gear assembly.
Unfortunately Tamiya offered slightly simplified landing gear. After
installation AIRES resin wheel bays the best solution was to make the new turned
metal gear struts. New H-shaped drag links (stretched Evergreen profile) with
rods, scratch build hydraulic cylinders, torque arms and brake lines have been
added. The rear undercarriage has been detailed with the Eduard Items. This
significantly enhanced this overly simple part of the kit.
The rest of the kit went together very well, with an excellent fit.
Before painting I checked my references and chose the most
famous - Ira Cassius Kepford's ôIkeö F4U-1A Corsair (serial number 55995). In
his five months of combat duty, Ira Kepford scored a total 16 confirmed kills
and one unconfirmed. Color profiles and drawings of this particular Corsair from
various sources contradict each other. Fortunately, Iĺve managed to find two
good quality pictures that allowed me to get a fix on the following interesting
details.
-
the aircraft looks worn and faded
(exposure to the sun often left the upper surfaces a faded medium blue with no
distinction between the Sea Blue and Intermediate Blue colors)
-
areas around the fuselage national
insignia has dark spots (old style of national insignia with Red border might
have been overpainted)
-
Sea Blue paint near the fuselage fuel
tank was washed off and Intermediate Blue paint is clearly visible.
-
the badly flaked paint at the wing
root leading edge (this is characteristic of the Corsair frequently seen in the
wartime photos of the Corsair aircraft)
-
wing national insignia placed on the
on wing tip line (very often Corsairs had portwing national insignia placed
close to the pitot tube line)
-
spinner and hub of the propeller were
painted (in my opinion it was Intermediate Blue paint but some sources suggested
that it should be Red)
-
Hamilton Standard propeller 13'-1"
(3,99 m) diameter typical of VF-17 was installed
-
the "whip" aerial, on the spine, just
behind the cockpit was installed
Armed with the above notes I made my own mixture from the Tamiya
AS (Blue, White and Black) paints for creating fresh, faded and very faded
Insignia Blue paints and two shades of Intermediate Blue paint. I used the
FS595B color samples and lightened all paint colors with the Light Gray paint
for achieving the appropriate "scale effect".
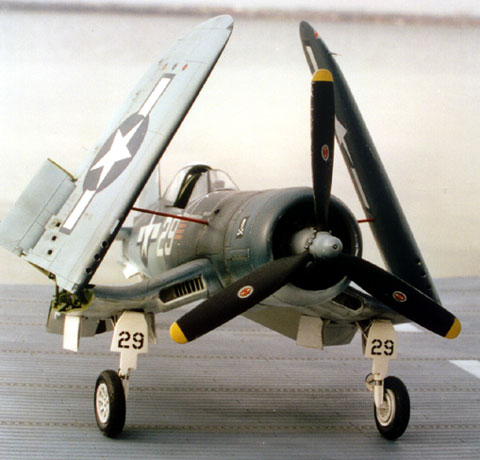
Weathering technology was usual. As usual, at this stage I tried
to achieve the best compromise between used looking appearance of real aircraft
and model accuracy. I believe model should look a bit "clear", shadow better.
Hard exhaust stains, chipped paint and rust shouldnĺt spoil an overall
impression of the model.
"The biggest artist point in weathering is knowing when to stop
-- how much is too much" and every modeller has his own opinion on this matter.
-
F4U Corsair In Action by Jim Sullivan
Squadron Signal Publicatons #29
-
F4U Corsair Part 1. In Detail and
Scale by Bert Kinzey Squadron Signal Publicatons
-
Vought F4U Corsair Aero Detail #25
-
F4U Corsair AJ Press
Model, Images and
Article Copyright ę 2002 by Mikhail Putnikov
Page Created 15 January, 2002
Last updated 04 June, 2007
Back to HyperScale Main Page
Back to Features Page |
 Home
| What's New |
Features |
Gallery |
Reviews |
Reference |
Forum |
Search
Home
| What's New |
Features |
Gallery |
Reviews |
Reference |
Forum |
Search