|
Vought F4U-1A Corsair
by
Anthony Manzoli
photographs by Pieter Stroethoff
 |
|
Vought F4U-1A Corsair |

Tamiya's 1/48 scale F4U-1A Corsair
is available online from Squadron.com
Originating in a 1938 Navy spec, when the need to replace the F2A and F4F could
already be foreseen, the Vought Corsair was designed around an engine that also
didn't exist yet: the Pratt & Whitney R-2800 Double Wasp, a monster 18 cylinder
double radial, eventually capable of 2250 horsepower.
During the Corsair's development, corporate reorganizations brought the Vought
company into Vought-Sikorsky and then Chance Vought, all part of United
Aircraft, along with Pratt & Whitney and Hamilton Standard.
The huge engine dictated much of the plane's design. Such a power plant needed a
comparably big propeller to absorb all that horsepower. Thus the 13' 4" diameter
Hamilton Standard prop, the largest fittest to a fighter at that time. The
Corsair's fuselage had to be high in the air, to give the prop clearance, But
ordinary, straight wings at that height would have implied long (and weak)
landing gear. The distinctive bent wings were developed to permit a reasonably
short undercarriage.

The XF4U first flew in May 1940, and in October flew faster than 400 MPH, a
record for a production fighter. A major re-design pushed the cockpit back 32
inches, which resulted in poor forward vision for the pilot, at least on
take-off and landing. Development continued into 1942, when Vought delivered the
first production F4U-1 to the Navy, which didn't like what it saw, especially
when compared to the easier-handling, and very capable F6F Hellcat. The F4U had
dangerous stall behavior, had tendency to yaw suddenly when landing, and, worst
off all, bounced when it hit the deck. For use on carriers, these problems
caused the Navy to insist that they be fixed, while it went ahead equipping with
the Hellcat.
But the Marines, operating from land bases in the Solomons, needed capable new
fighters to replace their aging F4F Wildcats. By late 1942, the first USMC
squadron, VMF-124, took delivery of the Corsair F4U-1. In early 1943, they began
to see combat, and were a huge success - with speed, maneuverability, firepower,
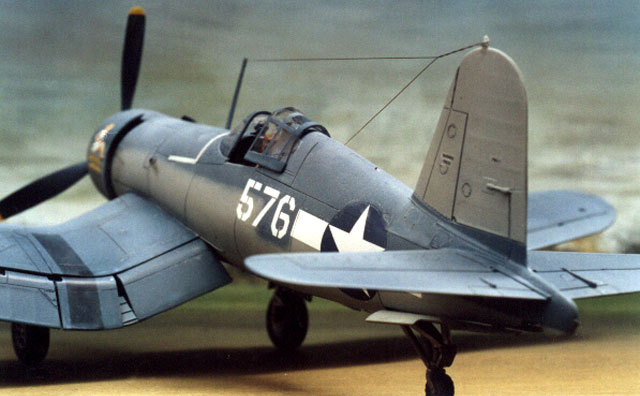
and ability to absorb battle damage. By the summer of 1943, most of the Marine
fighting squadrons had transitioned to the F4U-1, the first operational model,
fitted with a distinctive "birdcage" canopy, as shown in the detail of a plane
flown by Ed Olander (number 576). Boyington's squadron, VMF-214, switched over
to Corsairs before they started their September 1943 combat tour.
Based on combat experience, Vought improved the next version, the F4U-1A:
I chose to build my Corsair out of the box, complete with the pilot figure only
adding brake lines, spark plug wires and the Aeromaster decals.
I started with the cockpit, constructing it as per instructions and painting it
with interior green and then picking out the details using the reference colors.
At this point I also went ahead and painted everything that would be listed as
interior green. I chose to apply the dash decal rather then hand paint the
instrument panel. With lots of solvent the decal nestled down right into all the
gauges.
Once the cockpit was completed I began the tedious work of the engine. I wanted
to have a go at adding all the spark plug wires to the radial engine, so using
fine fuse wire and CA glue I began gluing in place each strand of wired. It
eventually was finished after almost two weeks of on and off cutting and gluing
sessions. The engine looks pretty convincing with all the wires in place and a
nice wash and dry brushing.

With the cockpit and the engine in place I was able to glue together the
fuselage halves. Little work was necessary on the join lines, only a buffing pad
was used for the seam.
Once the fuselage was together I began work on the wings. The wings go together
quite well considering they are in 4 pieces. With a bit of patience and super
glue, I was able to get the wings to fit together with minimal filling. The next
step was constructing the flaps and gluing them in place. With everything glued
together, the wings are quite heavy compared to most other kits and when they
were glued into the fuselage, I used a bit of tape to hold them in place.
With the wings and the fuselage together the next step was to work on the
landing gear. I chose to add brake lines and followed some reference photos for
placement of these. With the landing gear ready for painting, and the final
steps of the construction completed, I decided to start with the painting.
|
Painting, Weathering
and Decals |
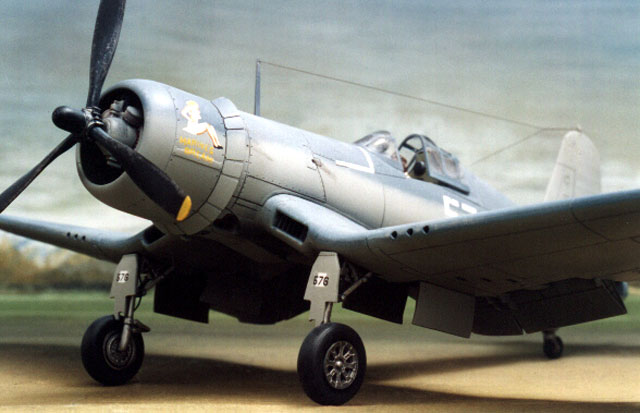
I chose to finish my Corsair in a paint scheme of the F4U called "Marines Dream"
of VMF-214, Munda, October 1943. This was piloted by 1st Lt. Edwin L. Olander
who had five confirmed kills and another four probables.
The Aeromaster sheet calls for Blue Gray/ Light Gray with a Light Gray tail. I
am not sure if this paint scheme is completely accurate, but I thought it was
interesting enough to do. I started by preshading all the panel lines with flat
black. When the panel lines were dry to touch, I painted the Light Grey first
and then carefully masked it off and painted the Blue Gray. The kit was allowed
to dry for 24 hours and I went ahead and added the panel lines using a sharpened
No. 2 pencil. Lead appears a bit shiny but after the matte coat goes on this
will disappear. The next step would be a few light coats of Johnson's Shine
Magic. When the clear coat was dry, the decals were applied, using Microsol and
Microset.
The plane was again left to dry sit over night and the following day a few coats
of Shine Magic were again applied to seal the decals in and protect them from
the final matte coat, which was a combination of Tamiya Flat Base and Shine
Magic. I find this combination works great.
Final construction included adding the painted landing gear and wheels, tail
wheel, antennae and antennae wire which is made from invisible thread and the
canopy which was masked and painted. I used Tamiya lens paints for the landing
lights and navigation lights. I also chipped the paint along the wings and walk
ways with silver pencil.
I really enjoyed the kit even though it took me some time to complete it. It was
a change of pace for me since I had been focusing mainly on Luftwaffe fighters.
If you have any question or comments please email me at
amanzoli@optushome.com.au
References: The Black Sheep: The Definitive Account of VMF-214 in World War II,
by Bruce Gamble
Model and
Article Copyright © 2002 by Anthony Manzoli
Images Copyright © 2002 by Pieter Stroethoff
Page Created 22 March 2002
Last updated 04 June 2007
Back to HyperScale Main Page
Back to Features Page |
 Home
| What's New |
Features |
Gallery |
Reviews |
Reference |
Forum |
Search
Home
| What's New |
Features |
Gallery |
Reviews |
Reference |
Forum |
Search