|
F-16D
Barak
(Peace Marble II)
by Robert Woodbury
 |
|
F-16D
Barak
(Peace Marble II) |

HyperScale is proudly supported by
Squadron.com
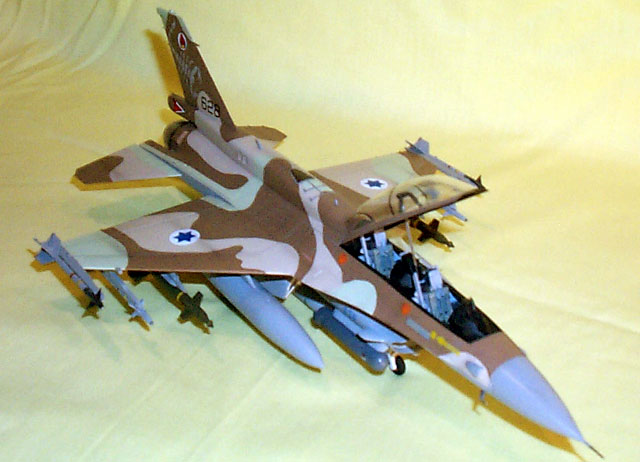
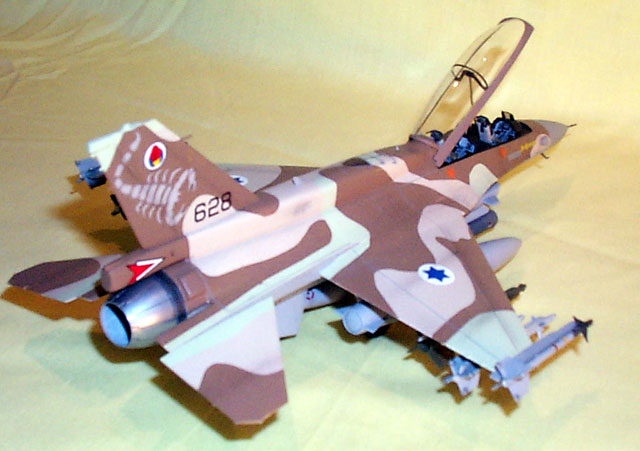
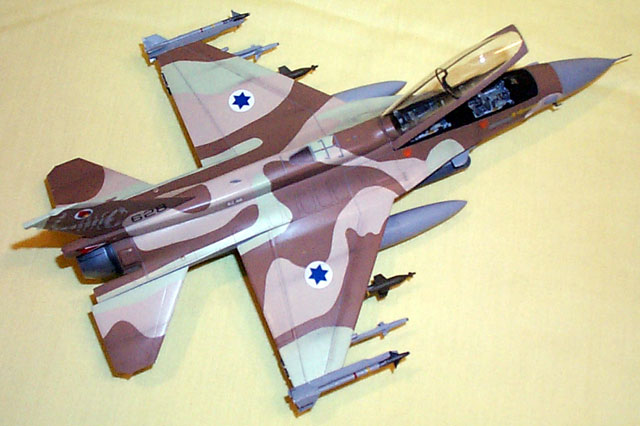
I have to admit to being something of an F-16 nut. Ever since I first
saw this model of an F-16 with the enlarged spine I wanted to build one. With the
culmination of several years of work, this F-16D now has pride of place on my
display shelf.
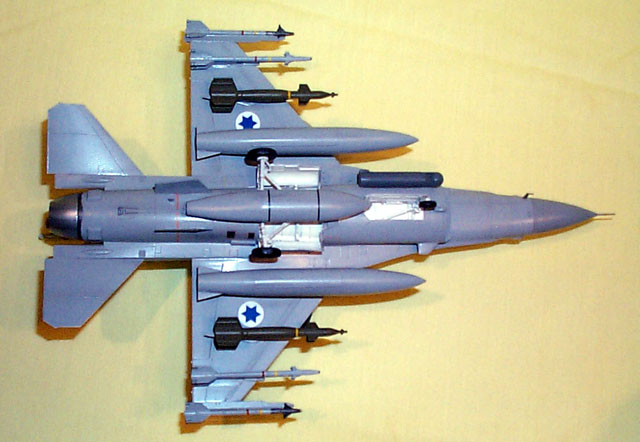
The kit itself actually started life as the Hasegawa 1/48 F-16B (originally
I’d intended this to become the J-79 powered F-16B, but that’s another story),
the enlarged spine, wide-mouth intake (MCID) and other parts which are all
illustrated below, were originally produced by Airwaves. Today, similar parts
are available from Eagle Designs. Additionally I decided to add the Eagle
Designs Litening Pod which is fitted to Block 40 F-16D’s (6xx series) of the IDF.
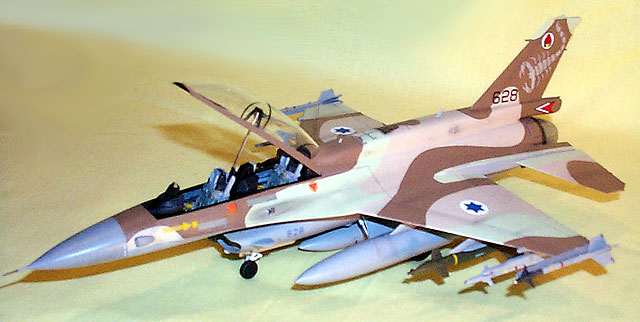
While the kit itself has been spoken about in the past by many other modellers,
there are some problems of fit when it comes to integrating the Airwaves parts.
The fit of the enlarged spine is something of a challenge. I eventually found
the best course of action, after having glued the fuselage halves together, was
to then fit the spine. This was best achieved using an adhesive such as
Araldite. A significant amount of stressing of the fuselage and spine are
required to get anything like a close fit. Once the adhesive has cured putty
will be needed to clean up the join between the two parts and at the join close
to the cockpit area.
Speaking of the cockpit area a number of additional details were added, such as
resin ejector seats, cockpit side walls and a HUD repeater for the backseat
driver. I also added the ejection seat launch rails and replaced the canopy
hydraulic rod (plastic) with one from a large bore medical needle (real metal).
After the drama of fitting the enlarged spine to the fuselage, the resin intake
fits quite well and only minimal work to the rear join between intake and
fuselage will be needed. The intake is a nice addition to the kit as the kit
intake (whilst not the wide-mouth version) suffers from having some noticeable
interior join lines.
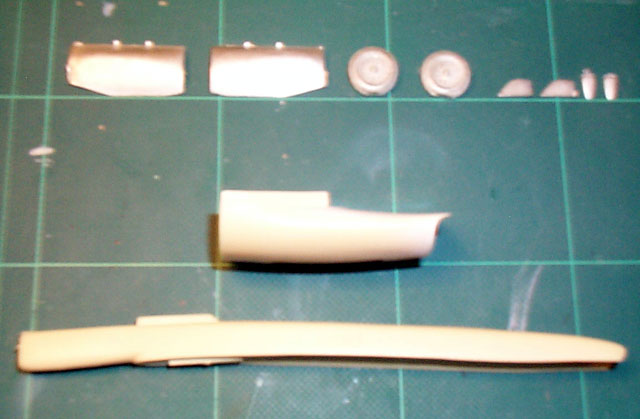
In addition to the parts included in the airwaves kit, I found that I had to
produce some fairly noticeable additions. Largest of these are 4 square boxes
located around the rear of the fuselage. It’s difficult at best to judge just
how large these are, mine are possibly over scale.
Another part that will be
required is a single inlet/exhaust located under the wing/fuselage area. The
final part is an additional radar warning receiver located on the bottom lip of
the intake, this part should also be mounted on a rectangle of thin plastic
card.
These are all of the basic construction additions required to bring the kit up
to something like correct. Those with a sharp eye will also notice that I’ve
used a closed afterburner iris. This was taken from the Hasegawa F-14D kit and
fits perfectly.
The next step of painting was pretty straight forward, but lengthy. I decided
that I’d give Parafilm a try to help with demarcating the edge of the colours.
Basically, I’d never painted such a complex camouflage scheme before. The trick
with Parafilm is to stretch the film almost to breaking point and then applying
to model surface, it’s not adhesive as tapes are but has a slight tack to it.
The first steps were to paint the metallic areas and cover with Parafilm. Next
went on the underside colour and then the light brown of the upper-surface. Not
forgetting to paint and mask the radome as well. After allowing the paint to dry
I applied the Parafilm to the areas adjacent to where the light green would be
applied next. Pull the masks away when finished, before the paint has dried.
After drying, the dark brown was applied using Parafilm masks. This does give a
hard edge to the colours but I was very happy with the result. I finish up with
a coat of varnish.
There is only one option available when it comes to decals. Some time back
Aeromaster produced, and later reprinted, a set of markings for Israeli F-16C’s
and D’s, 48-093. This sheet included some very interesting scorpion markings.
One slight problem though is the size. The scorpions are way over scale. My only
solution was to photocopy the sheet and reduce it by about 25%- you’ll need to
use your judgment for this. I then used this to make a masking template to
spray-paint the light brown of the camouflage colour on to clear decal film.
These could then be applied as normal decals. I had to paint some 8 scorpions
before I found two that I liked. It’s a long process but worth the effort.
The rest of the construction, weathering and finish process followed normally.
So, there you have it. A five year modelling exercise. And now I have a set
of Two Bobs decals with the USAF VISTA F-16D calling me.
References
Thanks to Tomas Antonsen for help in researching this model.
Valuable web references are
-
the Three-Four-Nine web site (http://www.f-16.net)
-
And unofficial IAF web site
http://www.geocities.com/CapeCanaveral/5415
-
World Airpower Journal
-
Various issues of Aviation Week and Space
Technology
-
Issues of Koku-Fan magazine
-
Fine Scale Modeller, December 1995
-
Scale Aircraft Modelling, Volume 23 Number 2.
Click
the thumbnails below to view larger images:
Model, Images and
Article Copyright © 2002 by Robert
Woodbury
Page Created 29 August 2002
Last updated 04 June 2007
Back to HyperScale Main Page
Back to Features Page |
 Home
| What's New |
Features |
Gallery |
Reviews |
Reference |
Forum |
Search
Home
| What's New |
Features |
Gallery |
Reviews |
Reference |
Forum |
Search