|
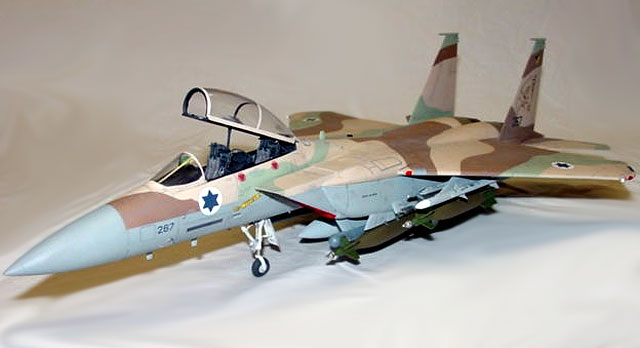
F-15I Ra’am
by Albert Moore
|

|
|
F-15I Ra’am |
Converting Revell’s F-15E Strike
Eagle
into an Israeli Air Force F-15I Ra’am

Revell's 1/48
scale F-15E Strike Eagle
is available online from Squadron.com
Boeing’s (formerly McDonnell Douglas) F-15E Strike Eagle entered
service with the IDF/Heyl Ha’Avir (Israeli Air Force) in January
of 1998 and was designated the F-15I Ra’am (Thunder).
The F-15E Strike Eagle is the ground attack variant of the F-15 air
superiority fighter, capable of attacking targets day or night, and in
all weather conditions. The F-15I serves alongside the F-15C, which has
seen considerable combat since introduction into the Heyl Ha’Avir in
1976.
Though externally the Ra’am looks similar to its USAF counterpart,
there are some differences, mainly in the electronic countermeasures
gear and the exhaust nozzles. I’ll cover the other key differences as we
go along.
The kit used for this conversion is the Pro-Modeler (Revell) F-15E
Strike Eagle in 1/48 scale. There are other 1/48 scale Strike Eagles on
the market, but this is by far the most accurate kit available. You
could also use Revell’s regular offering, though there are no air to
ground weapons.
The bombs provided in the Pro-Modeler kit are four GBU-10 Paveway II
LGBs (laser-guided bomb) and two GBU-15 LGBs. For air-to-air missiles,
there are four AIM-9 sidewinders, and two AIM-120 AMRAAMs (Advanced
Medium Range Air to Air Missile). You also get two 610 gallon fuel tanks
and a data link pod for the GBU-15s.
To convert the Strike Eagle into an Israeli Ra’am, a Cutting Edge
Modelworks 1/48 F-15I resin conversion set will be needed. The set
comprises of nine parts, all cast in gray resin and are absolutely
flawless.
Here is how the conversion was completed:
-
On the right side of the forward
fuselage, there is a circular vent located below and behind the WSO’s
cockpit. The Ra’am does not have this vent, so it needs to be filled
in and blended into the fuselage.
-
The UHF (Ultra High Frequency) blade
antenna (found on the bottom, behind the radome) needs to be moved one
blade width forward from its original location.
-
On the bottom, just ahead of the titanium
engine fairings on the port side, are two access panels that need to
be filled in, then a new panel scribed below the panel that was next
to the CFT (conformal fuel tank).
-
The Ra’am utilizes extra chaff/flare
dispensers mounted in the bottom side of the tail booms. These are
included in the Cutting Edge set. Remove the lower tail booms from the
fuselage bottom (Pt 2) and replace with the resin parts. Use styrene
strips to reinforce the joint.
-
 The
Ra’am has a counterbalance on the port vertical stabilizer instead of
the AN/ALQ-128 EWWS (Electronic Warfare Warning System) antenna found
on USAF Strike Eagles. Remove the EWWS antenna from the port vertical
stabilizer The
Ra’am has a counterbalance on the port vertical stabilizer instead of
the AN/ALQ-128 EWWS (Electronic Warfare Warning System) antenna found
on USAF Strike Eagles. Remove the EWWS antenna from the port vertical
stabilizer
(Pt 8) and replace with the resin counterbalance found in the
conversion set.
-
The Ra’am uses two AN/ALQ-135B band 3
antennas, one mounted vertically (starboard side) and one horizontally
(port side). These are located on the end of the tail booms. They are
distinguished by their chiseled ends, unlike the original AN/ALQ-135
antenna, which is round and located on the port tail boom of USAF
Eagles. The kit has the starboard side antenna molded in place
already, so remove the port antenna and replace with the resin
antenna, again making sure it is mounted horizontally.
-
Israeli Eagles have a round GPS antenna
mounted to the right of the speed brake. Again this is provided in the
conversion set. Scribe an access panel, remove the antenna from its
pour stub, and glue into place.
-
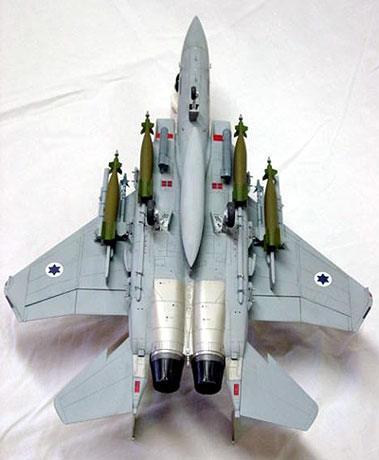
Unlike USAF Eagles, the Ra’am still use
engine actuator covers (turkey feathers) on their afterburner cans.
The U.S. Air Force removed them because of cost and nozzle
maintenance, though curiously, USAF F-16s still have their actuator
covers installed. Remove the rear three rings from the kit exhaust
nozzles (Pt 16) so only the most forward ring remains. Remove the
resin exhaust nozzles form their pour stubs and sand flush. Test fit
the nozzles until satisfied with the fit and appearance. Use super
glue to adhere the resin parts to the styrene, my personal favorite is
Zap-a-Gap glue. As a side note, the F-15J (produced in Japan under
license from Boeing) also has turkey feathers on their afterburner
cans.
-
Israeli Strike Eagles and some USAF
Eagles based in Europe use CFT air scoops. These scoops provide extra
cooling to the engines. The scoops are provided in the kit (Pts 197,
198 port and 97, 98 starboard). Drill out the locating holes, found
inside the conformal fuel tanks, and install the scoops once the model
has been painted, decaled, and weathered.
-
The Ra’am uses a different forward CFT
pylon. These have a straight leading edge instead of the angled edge
found on USAF Eagles. These are included in the Cutting Edge set.
Simply substitute the resin parts for the kit parts.
-
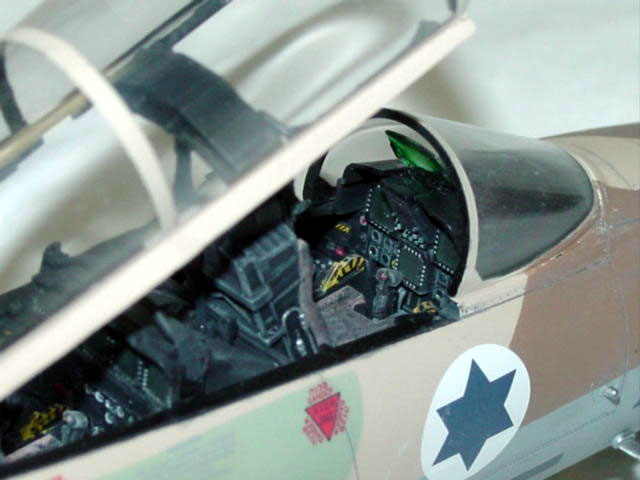
The Ra’am has a black cockpit, instead of
Dark Gull Gray (FS 36231). I used Model Master Interior Black with a
little white added to give scale effect.
One big difference is the paint scheme. USAF Eagles are finished in
overall FS 36118 Gunship Gray, designed for low visibility in low
lighting conditions.
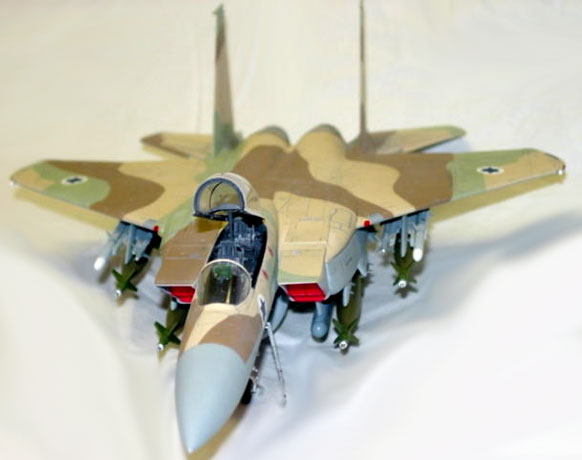
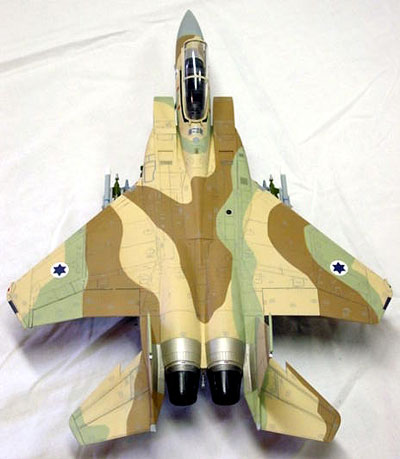
The F-15I is camouflaged in FS 33531 Sand, FS 30219 Dark Tan, and FS
34424 Sky Green over FS 36375 Light Ghost Gray, to help blend it into
its desert environment. I used Model Master Paints for the Sand and Dark
Tan. Sky Green is Tamiya (XF-21) acrylic paint. Model Master FS 36375
Light Ghost Gray was used on the bottom.
The F-15’s lower aft fuselage is made of titanium. This area is left
in a natural metal finish, as paint would flake off due to the high
engine heat. There are plenty of metalizers on the market, so it’s a
matter of preference. I used Tamiya Titanium, though next time I’ll use
Testors Polished Aluminum. The afterburner cans were painted Model
Master Semi-gloss black.
And now for the grand finale - applying the decals!
The sheet I chose is from Isradecals (IAF-18). This is perhaps the
most comprehensive sheet available as it includes every data stencil and
access panel number found on the Ra’am. Also included is a 16 page
booklet containing decal placement guides, paint guide, aircraft
information, and recommendations for what kits to use. There are options
for two Ra’ams, an aircraft with the Manat-Flying Test Unit (#201) and
aircraft serving with Patishim (Hammers) Squadron. I chose the latter,
particularly aircraft #267, as it is the only aircraft of the Hammers
Squadron with the eagle head design gracing the vertical stabilizers.
What is interesting is #267 had the eagle heads finished in FS 30219
Dark Tan, to blend it in with the camouflage. Sometime in mid-2001, the
right side eagle was painted over in black. The decal sheet offers both
options. Aside from the desert camouflage, some of the stenciling is in
Hebrew, definitely giving the model more of an Israeli flair. The decals
took about 25 hours to apply over a three day period, good thing I was
on vacation that week.
Well there you have it. As you can see, this isn’t a hard conversion.
Applying the complex desert camouflage and the decals was the most
difficult and time consuming aspect of the project.
After seeing pictures of the F-15I Ra’am on the internet, I wanted to
add it to my collection. It was a nice change from the Gunship Gray
Strike Eagles used by the USAF.
Thanks to Revell, Cutting Edge Modelworks, and Isradecals, I now have
one of Israel’s most formidable aircraft gracing my shelf.
Click
the thumbnails below to view larger images:
Model, Images and Text Copyright © 2002 by
Albert Moore
Page Created 07 June, 2002
Last Updated 04 June, 2007
Back to HyperScale
Main Page
Back to Features Index
|
 Home
| What's New |
Features |
Gallery |
Reviews |
Reference |
Forum |
Search
Home
| What's New |
Features |
Gallery |
Reviews |
Reference |
Forum |
Search