|
Macchi C.202 Folgore
by Werner Scheibling
|

|
|
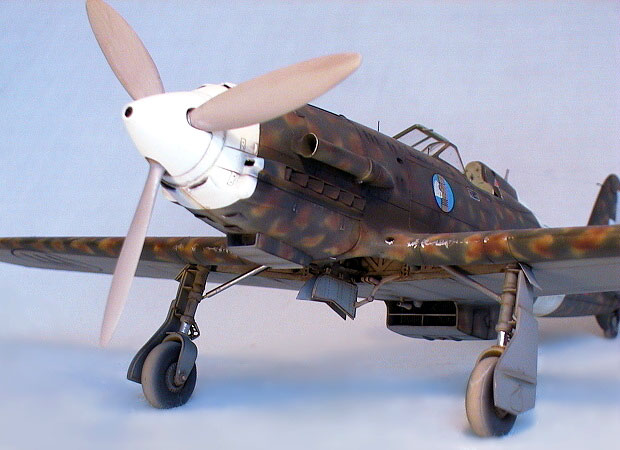
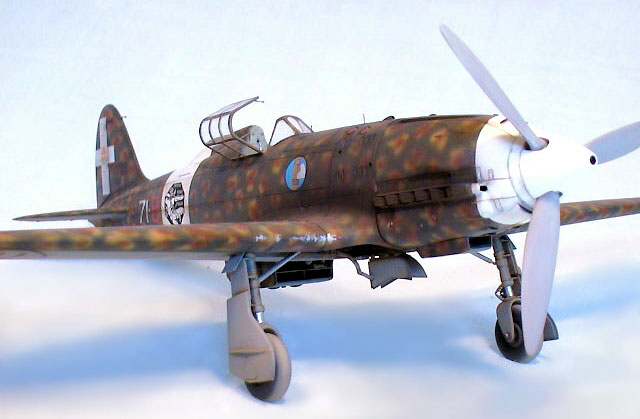
Aer. Macchi C.202 serie 1,
'71-8'
Regia Aeronautica, 1o Stormo C.T., 17o Gruppo, 71a Squadriglia,
November/December 1941, Martubah, Libya |

HyperScale is proudly supported by
Squadron.com
This is one of Hasegawa's all time favourite kits,
the 1/48th scale Macchi C.202, which will thankfully be available again
in Europe by the time you read this feature article in HyperScale (late
autumn 2002).
Hasegawa can certainly count on me buying a couple more.
Before I could get my hands on this kit, I had to do some serious
international online shopping, which also shines a (dim) light onto the
plastic modelling scene here in Southern Germany.
The ingredients were collected in the USA (Hasegawa and Jaguar kits),
England (LIFECOLOR paints) and Italy (Sky Models decals). I managed to
actually buy the chalk pastels in a proper German shop though.
This is also the time to say 'thank you' to some fellow modellers who
helped me bring this project to a successful end: Rob Hart from San
Diego who provided the Jaguar resin set, Pete Chalmers who was able to
solve the mystery of the Italian seat harness and my friend Ron van
Donkelaar from Holland who found a rare colour photo of a Folgore in
early style continental camouflage on the Internet.
I started this kit with some leisurely modelling
fun in mind. It turned into a five-months-project which has to be blamed
on
-
the Aero-Detail book with
its unhealthy wealth of detail information and
-
me for trying to
replicate all these details in my model.
My kit was moulded in Hasegawa's typical mid-grey
polystyrene, which this time seemed to be a bit on the very hard side. A
packet of scalpel blades was turned into blunt scrap in no time (does
styrene harden over the years?).
Panel lines and fuselage details, like fasteners, louvres etc., would
have profited from a slightly bolder approach by the tool maker. In
particular the movable control surfaces and main cowling panel lines
needed some rescribing.
Originally I wanted to do a late model Folgore with
typical green-over-sand mottle but then I stumbled on an excellent war
time photo of '71-8' on the Internet that gave my project its final
spin. For this I had to convert my Macchi into a very early 'serie 1'.
The cleverest way would of course have been to use Hasegawa's (now)
pretty unavailable 'Cavallino Rampante' kit no. JT 39, which represents
an early C.202 with appropriate horizontal tail surfaces and unfiltered
supercharger air intake. I didn't feel like spending obscene amounts of
money on eBay again, so I decided to scratch-build the necessary
modifications.
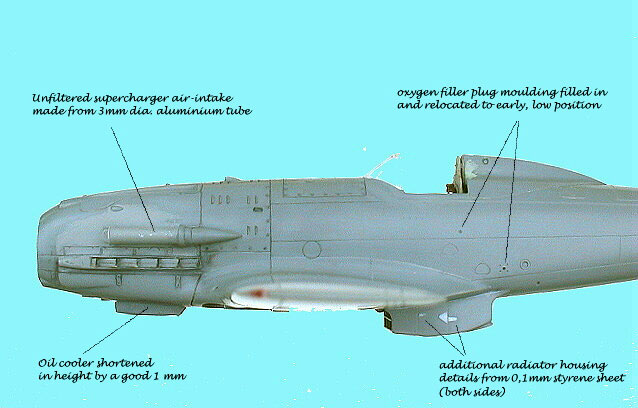
-
The straight, unfiltered
supercharger air intake was cut from a section of 3mm aluminium tube (RC
model accessory). The intake opening was carefully widened with the
conical end of a paint brush and the tube was grafted into the cowling
with Milliput white epoxy putty.
-
'Serie 1' Folgores were equipped with horizontal
stabilizers (and wings) taken straight from its predecessor, the C.200
Saetta. This meant filling and re-scribing the stabilizer/elevator hinge
line according to scale plans in Aero Detail and Ali D'Italia.
Another tricky part to fit was the upper cowling
section that includes the gun troughs. This part follows an S- curved
panel line and has to be carefully sanded and dry fitted to make it sit
as it should. My sample needed even more sanding and rescribing after
the glue had set over night.
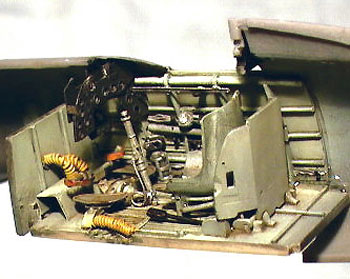
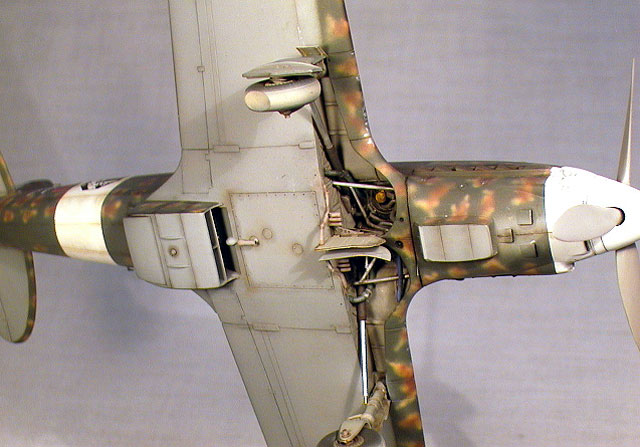
Jaguar's resin update set is an old acquaintance of early Cooper Details
fame, highly popular with modellers ever since it first appeared and
luckily now on the market again. The set offers an extremely accurate
cockpit interior, two rows of realistic exhaust stacks and a resin plug
that depicts the visible chaos of engine plumbing in the middle of the
wheel well in a very realistic way.
My sample was moulded in – these days - old-fashioned pale yellow,
rather brittle resin that had to be handled with utmost care. The
exhaust stacks are very nicely depicted with a weld seam along the
middle and hollow outlets. Unfortunately Jaguar's resin casting process
doesn't seem to be completely up to date, as three single exhaust stacks
were missing their hollow outlets and reworking them was nearly
impossible. In the meantime I have bought two more sets and both display
this same annoying defect.
The set wisely offers two seat options. One with moulded-on harness and
one without. The provided harness looks very convincing but is
unfortunately pretty fictitious. Several well known photos of preserved
Macchis hint at what the harness once looked like but not a single
harness seems to be complete. I called for help on the 'Italian Air
Force Discussion Group'-site and Pete Chalmers was friendly enough to
share his set of sketches (from the RCR PE-set instruction sheet) with
me. Thanks again, Pete!
 Oh
what a complex construction of leather, buckles and even metal chains
(!) the Italians used to prevent their pilots from falling out of the
cockpit… the system reminded me a bit of these incredibly complicated
devices that fill a whole room with cog-wheels and drive-belts and
finally produce a nicely peeled apple. Anyway, I decided not to order
the RCR PE-set, but to construct my own harness. I did this using Tamiya
masking tape for the leather parts, refined with buckles from some
surplus EDUARD PE-belts. The metal chains were replicated with
intertwined strains of 0,1mm copper wire. Oh
what a complex construction of leather, buckles and even metal chains
(!) the Italians used to prevent their pilots from falling out of the
cockpit… the system reminded me a bit of these incredibly complicated
devices that fill a whole room with cog-wheels and drive-belts and
finally produce a nicely peeled apple. Anyway, I decided not to order
the RCR PE-set, but to construct my own harness. I did this using Tamiya
masking tape for the leather parts, refined with buckles from some
surplus EDUARD PE-belts. The metal chains were replicated with
intertwined strains of 0,1mm copper wire.
I added some missing features to the resin cockpit side walls, most
noticeably the prominent rudder actuating rod that runs the whole length
of the right hand cockpit side.
Various additional cockpit details like instrument panel and rudder kick
plates were taken from the excellent EDUARD PE set.
Connoisseurs will now remark that early Folgores were not equipped with
the angular pilot's back armour that you see in my pictures. True. I
have to admit, that my decision to steer away from a 'serie VI' fell
after the fuselage was irrevocably glued together. I decided to live
with this little inaccuracy as it is hardly noticeable in the finished
model.
Click
the thumbnails below to view larger images:
From this point the build got trickier, as I now
started to tamper with the kit's confusing panel lines.
Hasegawa designed the C.202/205 kit family to offer the whole range from
early Folgore to late model Veltro with a minimum of extra parts
involved.
If you build this kit out-of-the-box you'll end up with a C.202 that
sports all panel lines, louvres and access hatches that you would
normally find on a late model C.205 Veltro. To avoid causing the average
modeller unnecessary confusion, Hasegawa decided not to mention
this subject in the instructions and leave the slightly more
investigative modeller alone with his references. This is how I spent
many evenings during the last five months, comparing photos with various
line drawings and vice versa.
In short: To build a halfway accurate 'serie 1' Folgore, a lot of panel
lines, especially on the wings, have to be filled and some have to be
rescribed. Access hatches and filler caps have to be relocated and
cowling bulges have to be removed. Most of these moulded details apply
only to C.205 Veltros, especially the armament access panels on the
upper wing surfaces.
For clearer understanding I have taken the
following pictures which illustrate the necessary modifications.
Click
the thumbnails below to view larger images:
Unfortunately I managed to forget deleting the two storage hatches on
both sides of the top fuselage. They suddenly jumped at me visually
after I had airbrushed the whole camo scheme and the white fuselage
band. Please ignore them when you look at my pictures.
 My
last venture into scratch-building was involuntarily triggered when I
thought I had nearly finished this model. I tried to remove some
ungainly seam lines and ejector pin marks from the undercarriage legs in
a way that involved a power tool and insufficient thinking on my side
(why does Hasegawa always have to design undercarriage legs with ejector
pin marks??) My
last venture into scratch-building was involuntarily triggered when I
thought I had nearly finished this model. I tried to remove some
ungainly seam lines and ejector pin marks from the undercarriage legs in
a way that involved a power tool and insufficient thinking on my side
(why does Hasegawa always have to design undercarriage legs with ejector
pin marks??)
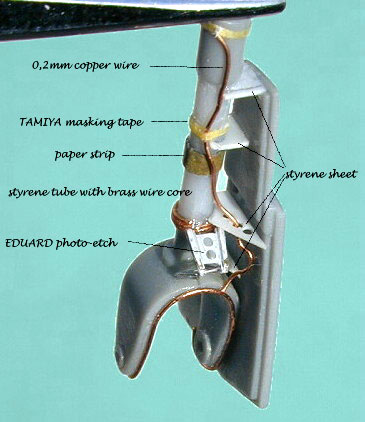
In a split second the right u/c leg was turned into an ugly clump of
deformed plastic.
I had no other choice but to fix this mess by reconstructing the middle
sections of the u/c legs with styrene tube, stiffened with brass wire
and superglue. And it meant replacing all the landing gear cover
attachment points with scale sections of thin styrene sheet. Brake lines
from 0,2mm copper wire and oleo leg scissors from EDUARD's PE-set
completed this sub-assembly.
While we're talking about the undercarriage I
shouldn't forget to mention the tail wheel. This section is trickier
than it might seem, as the one-size-fits-all method (there are two
different C.202 tail wheel styles and the retractable C.205 option)
leads to an inaccurate compromise. Using the early style tail-wheel as
it is would make your Folgore look like a Bf 109 K with the long tail
wheel strut. Luckily the Ali D'Italia monograph publishes a reproduction
of an original factory line drawing. So I managed to attach the tail
wheel at a halfway correct angle. This involved removing the upper half
of the tail-wheel leg, replacing it with stiff brass wire, drilling a
new, forward angled attachment point in the fuselage and widening the
tail wheel well with a motor tool to make space for the oleo leg
scissors. This sort of engineering by Hasegawa did not convince me at
all.
Apart from these little complications the kit went
together well without nasty surprises.
Finally the wing tip position lights were replicated with cut offs from
a clear styrene sprue. Before I glued these sections to the wings I
drilled a 0,5mm hole into each one and filled it with dark red (left)
and dark blue (right) paint. Careful sanding and polishing with Tamiya
polishing compound produced near perfect results.
As this was my first attempt at a Regia Aeronautica
subject since those nostalgic days back in the seventies (I vividly
remember Airfix's Fiat G.50, Frog's C.202 and the ESCI decal sheet), I
had to dig into Italian camouflage schemes and their appropriate
colours. After checking whatever I could find on the web and evaluating
my assortment of publications, I felt more confused than assured. Many
long evenings later I now feel safe enough to make the following
statements, which should please not be taken as the ultimate gospel:
These very early Folgores were - like the C.200
Saetta - painted in a 'Continental' camouflage scheme, matching their
appearance to the lush green landscape found in Northern Italy.
In November 1941 the Italian army stood close to being wiped off North
African ground and the crack 1° and
4° stormi with their brand new
Folgores were hurriedly rushed into combat against the advancing British
forces in Libya. So all aeroplanes kept their dark camouflage scheme and
some couldn't even be refitted with vital air intake sand filters (like
71-8).
What did this camouflage scheme look like? The upper surfaces were
painted in a not too dark shade of olive green (verde mimetico 1 or 3),
the lower surfaces in a rather light neutral grey (grigio mimetico). The
monotonous green coat of paint was broken up with mottles in one kind of
three possible sand yellows (giallo mimetico 1, 2 or 3). Every single
sand yellow patch was partly oversprayed with a contrasting patch of
reddish brown (marrone mimetico 2). The mottle patches were clearly
confined in outline but had soft feathered edges. When I realized the
full extent of this airbrushing challenge my model had crossed the point
of no return and it just had to work somehow.
I spent one whole Saturday afternoon in the bathroom (where I do my
airbrushing) just tying to find the best possible paint/thinner/air
pressure ratio combination. I tried samples of Tamiya, Gunze Sangyo,
Aeromaster/Polly Scale and LIFECOLOR acrylics, all sorts of
water/alcohol mixtures - but nothing worked. In the end I treated myself
to a combined Christmas/Birthday present and invested in an Iwata
Eclipse HP-BS which I had thoroughly tested at my local airbrush
dealer's. Suddenly all problems were solved.
I achieved the best results with LIFECOLOR acrylics thinned with a few
drops each of distilled water and Tamiya acrylic thinner per cup. Air
pressure was down to ~0,5 bar/~10psi. The secret was not to thin the
paint down too much or otherwise it would just run off in ugly 'spider's
legs' when it hit the surface.
I used the following acrylics to finish my Folgore:
-
verde mimetico LIFECOLOR
UA106 'AerMacchi green', lightened slightly.
-
giallo mimetico:
LIFECOLOR UA081 'RLM 79 Sandbraun'+ ~30% plain yellow
-
marrone mimetico:
LIFECOLOR LC17 'brown'
-
grigio mimetico: a
build-up of several thin coats of Aeromaster shades, from dark to light:
Russian dark
-
grey – RLM 75 – US Light
Gull Grey
These days I accentuate
all panel lines after decaling with dry pastel dust in dark brown / dark
grey / black shades, depending on the background colour. The dust is
carefully applied with a pointy size '0' brush, and the surplus removed
with a very soft wide brush. This treatment is repeated until the
desired shadow intensity is achieved. Afterwards I seal everything in
with PollyScale Flat Clear.
Panel lines where oil or
other fluids were likely to seep through on the real plane were
accentuated with dark artist oils strongly diluted in white spirit, run
into the panel line from the tip of a fine brush.
I had heard a lot of favourable comments about Sky Models Decals. When I
saw that the C.202 sheet contained the necessary squadron codes for my
model I ordered it straight away. The printing quality and colour
density is outstanding. The carrier film is ultra thin and reacts very
well to Aeromaster or Microscale softening solutions. I've also never
seen such a wealth of different options on one single decal sheet. I
would call this new generation of decals printed by Cartograf in Italy
an even match for the best we know from the USA.
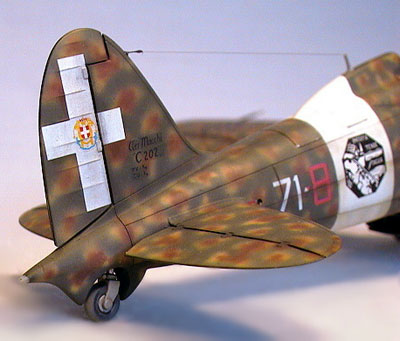 Apparently
it can't all be sunshine though. When I examined the decal sheet closer
I noticed that all squadron codes, numbers and stormo insignias are
reproduced with utter fidelity to the original design. In pure contrast
to this precision the wing insignias are noticeably too big in diameter,
the fuselage fasces are oversimplified misrepresentations and the House
of Savoy's coat of arms for the vertical tail surfaces is out of
proportion. Did the graphic designer have a bad hair day when he/she was
dealing with the national insignias? This annoying inaccuracy ruins what
would otherwise be a 10 out of 10 rating for this decal sheet. Apparently
it can't all be sunshine though. When I examined the decal sheet closer
I noticed that all squadron codes, numbers and stormo insignias are
reproduced with utter fidelity to the original design. In pure contrast
to this precision the wing insignias are noticeably too big in diameter,
the fuselage fasces are oversimplified misrepresentations and the House
of Savoy's coat of arms for the vertical tail surfaces is out of
proportion. Did the graphic designer have a bad hair day when he/she was
dealing with the national insignias? This annoying inaccuracy ruins what
would otherwise be a 10 out of 10 rating for this decal sheet.
I replaced the mentioned items with insignias from an old Superscale
sheet which are a lot closer to reality. And a final word of warning for
those amongst you who also have the 1995 issue of this kit somewhere
waiting on the shelf. Even though the original Hasegawa decal sheet was
printed by Cartograf and looks tempting - avoid it at all costs. The
carrier film is stiff, ignores even strong decal softeners and silvers
like mad. A clear case for the dustbin.
I wouldn't apply the
usual 'Tamigawa' comment to this particular kit. It is without doubt of
high engineering quality and accurate outline but does have its
unobvious pitfalls. And it insists on being assembled with care and
attention.
If you're after a real
airbrushing challenge, then the Folgore is the right kit for you.
I enjoyed building it so much that my next project will be another Regia
Aeronautica classic.
-
Hasegawa 1/48 kit # JT32,
Macchi C.202 Folgore (late model),
-
Jaguar resin detail set #
64801 for Hasegawa Macchi C. 202
(cockpit, wheel bay, exhausts; this is the ex-Cooper Details set,
designed by Roy Sutherland)
-
Eduard photo-etch detail
set # 48163 for Hasegawa
-
Eduard Express Mask #
XF119 for Hasegawa
-
Sky Models Decals #
48-015, Macchi MC 202, 1/48
plus single items from
-
Super Scale Decals
#48-659, Macchi C.202 Folgore, 1/48
-
Aero Detail 15, Macchi
C.200/202/205 by Carmine Di Napoli,
Raffaele Mancini et al., published by Dai Nippon Kaiga Co. Ltd,
Tokyo/Japan, 1995,
ISBN: 4-499-22651-1
-
Ali D'Italia No. 2, Aer.
Macchi C.202 by Giorgio Apostolo,
published by La Bancarella Aeronautica, Torino/Italy, 1995
-
Macchi C.202 in Action
No.41 by Roberto Gentilli and Luigi Gorena,
Squadron/Signal Publications, Carrollton/Texas/USA, 1980,
ISBN: 0-89747-100-8
-
The Macchi C.202 by
Gianni Cattaneo,
Profile Publications No. 28, Leatherhead, Surrey, England, 1968 (o.o.p.)
-
Macchi C.202, by Janusz
Ledwoch
AERO, Technika Lotnicza Nr. 2, Poland, 1991
-
Macchi's Magnificent
Lightning – The C.202, by Richard Caruana
Scale Aviation Modeller International Vol. 5 Issue 4, April 1999
-
Pilot's Perspective –
Macchi C.202 Folgore, by Anthony Oliver
Scale Aviation Modeller International Vol. 5 Issue 7, July 1999
And last but not least
I'd like to list (plainly judging from Maurizio's outstanding modelling
skills) the following two books, even though I haven't yet managed to
find a copy of either of them:
Click the thumbnails below to view larger
images:
Model, Images and Text Copyright © 2002 by
Werner Scheibling
Page Created 26 November, 2002
Last Updated 04 June, 2007
Back to HyperScale
Main Page
Back to
Features Index
|
 Home
| What's New |
Features |
Gallery |
Reviews |
Reference |
Forum |
Search
Home
| What's New |
Features |
Gallery |
Reviews |
Reference |
Forum |
Search


