|
"Bolts From The Blue"
Part One - Republic P-47D
by
Stan
Pearce
 |
|
Republic P-47D Thunderbolt |

available online from Squadron.com
As the fuel was added the big Pratt and Whitney R-2800 slowly
groaned to life. A puff of blue black smoke, a deafening roar and a steady
throbbing filled the cockpit. The first time he felt that throbbing back in the
States, he felt out of control, like riding on a tiger’s back. Now he was the
tiger and the vibration was comforting, making him feel as he and this beast had
become one.
He worked confidently through his checklist - fuel selectors
to mains, booster pump on, mixture rich for this June day, prop full forward on
that big Hamilton-Standard. When the oil temperature stabilized, he increased
manifold pressure slowly, then exercised the prop lever, the groaning growing
steadily louder as the increased pitch beats the air into submission. Three
times he does this and because of the 3 other Thunderbolts doing the same nearby
a small dust storm arises. He is reminded of the Oklahoman dust devils he saw as
a kid back home. So much has changed since then…
And so much had changed in the two week. What a sight, flying over that invasion
fleet, hitting ground targets inland. 80,000 men in all those boats. How lucky
he felt to have not been down there in the dirt with all the carnage. An awesome
show of Allied power. At one point, late in the afternoon, while witnessing from
12,000 feet high (not too low for those gunners were jumpy) the Battleship Texas
lobbing shells ashore found him thinking victory would soon be at hand. How
different it was since his first mission over occupied Europe, when he saw FW
190’s mauling a crippled B-17 like wolves on a sheep. The Fortress had ripped in
half at the wing root, spilling out bombs, men and material as it fell away in
its death spiral. There was nothing he could have done, for with his fuel status
if he had given aid, he would have ditched in the channel that cold grey
November day of 1943. Not a good proposition on any day. Still he felt the hurt…
Yes it was different world now, as he had not seen an enemy plane in almost 3
weeks, except the ones they had found like sitting ducks on the ground.
Dangerous work indeed with all the AAA around, but all things considered he’d
rather just keep smashing the Huns on the ground, before they ever had a chance
to look at the big friends, let alone fire a shot at them.
As always, as he closed the canopy, a quick check beneath his throat mike to
make sure his St. Christopher was still in place. Not an official part of the
checklist, but a part he never forgot to do on every mission. He wondered what
Father Morgan back home would say, if he saw what he did to that Jerry troop
column he caught in an open field yesterday. That one guy threw his arms in the
air as he looked upward at him. Damn it, why’d he have to go and do that! Well,
this was a no quarter war, and he was certainly giving no quarter today as his
flight was going low level hunting for anything that moved in the rear.
As he locked the canopy his eyes scanned toward the command
shack looking for the green flare…
The above is a fictional account, written to begin part one of a three part
series, “Bolts from the Blue” on the building of three Thunderbolts. Part I
deals with P-47D Razorback, Part II deals with the P-47D bubble top, and Part
III finishes with the building of a Pacific P-47N of Le Shima.
|
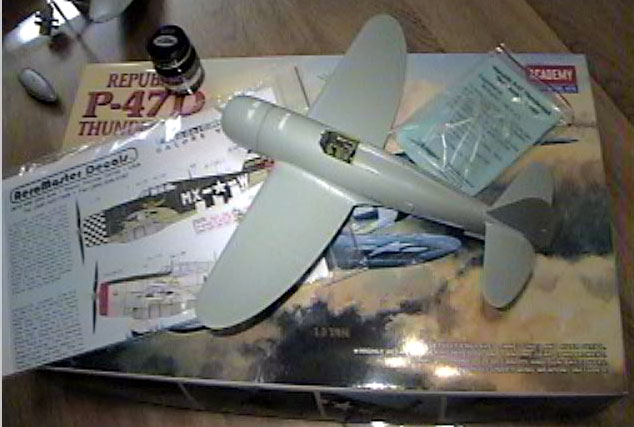
Arii/Otaki 1/48 Scale
P-47D Thunderbolt |
The kit is the old Otaki/Arii kit from years ago. Why build that
one? Well a couple of years ago when I built this, it was the only Razorback
game in town with recessed panel lines, and the Monogram kit was nowhere to be
found. I got it cheap, and it looked OK in the box, so I figured, what the heck.
Of course just as I finished it, Hasegawa released a plethora of P-47’s (bet
that has never happened to you!) Even so, for the money it’s not a bad kit for
its day, and I think it holds up well with a few additions and TLC.
Kit Weaknesses
-
Cockpit very primitive and sparse on
detail
-
It includes three mishapen excuses for
wheels. What the heck is that tailwheel thingy provided anyway?
-
Decals not worthy of the trash bin
Kit Highlights
-
Nice restrained engraved details
-
Correct machine gun layout for the 47
-
Excellent fit and ease of assembly
A no brainer here. I did away with the kit cockpit, and added
the True Details resin interior. It is made for the Academy D bubble top, but I
found if fit no problem. I don’t think it is completely accurate, mainly because
I used the rear bulkhead, but at the time I was just getting into the world of
aftermarket and HyperScale! But overall it looks OK and I’m sure purist could
fix it right up.
Other than that straightforward building with a few sink holes
here and there, but overall very little putty needed on this kit. The kit wheels
were discarded, and I cobbed the extra set from my Academy bubble top (noticing
later that they were nine spokes for the P-47N version.) As chance would have
it, this was noticed shortly after supergluing the wheels on….I elected to press
on, as the struts are very weak, needing the strength of the gear door to
support the aircraft. The tailwheel was also confiscated (PartII deals with
scatching a new tailwheel for the academy kit).
The airframe and parts were built as sub assemblies, with the
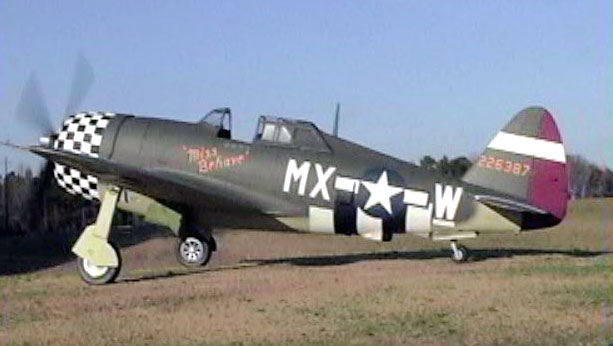
gear, cowling, engine and such added after painting.
The finish is Testors ModelMaster enamels, followed by an oil/turpentine wash -
well not really a wash but more of using a small brush and thin oil paint, a
light touch letting capillary action flow the paint into the panel line. Any
excess is wiped rearward with the relative airflow, adding some tones to the
panels. A light touch is crucial, as even though the turpentine is slow to act,
it will loosen the base coat after some time. Place a post-it note here and
there, a drop of oil paint on it and streak rearward for oil stains.
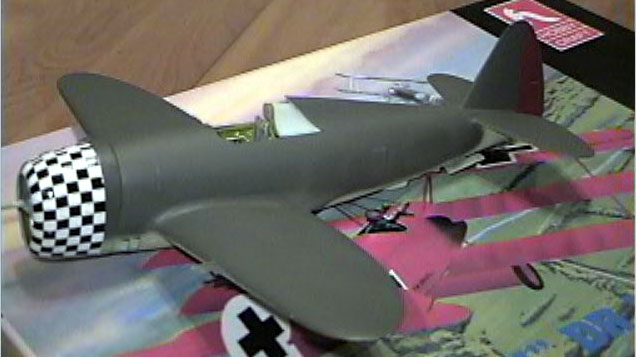
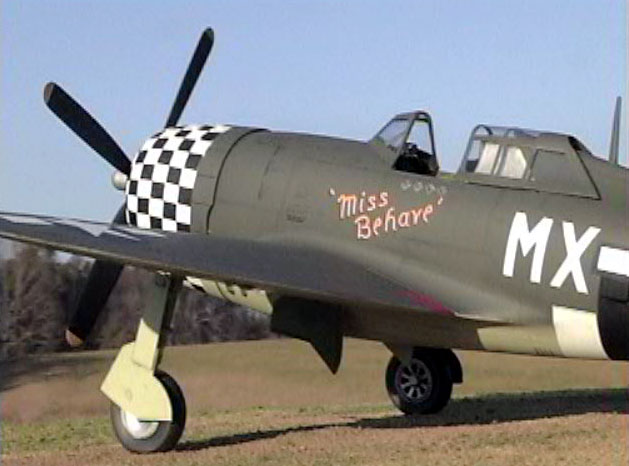
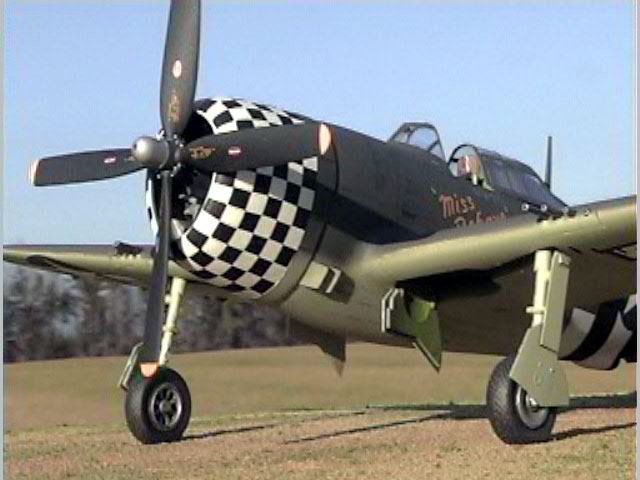
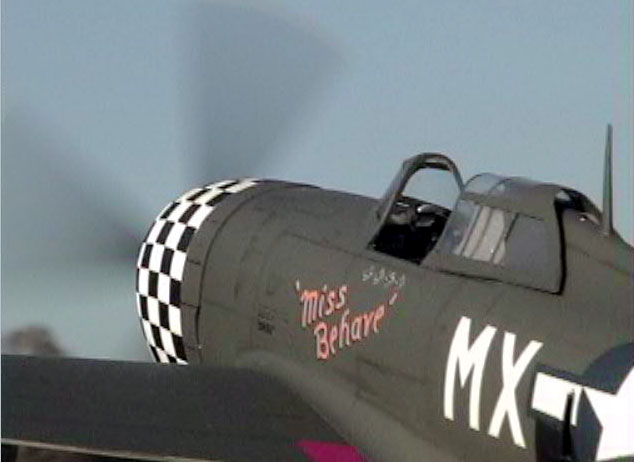
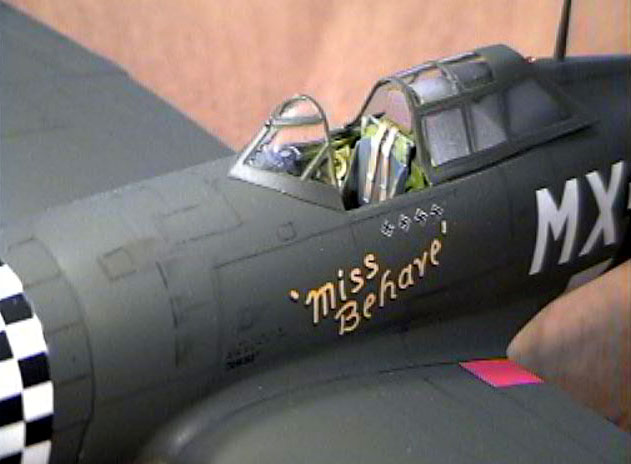
The decals are Aeromaster’s and went down nicely with Micro-Sol.
The cowl checkers looked tricky, but proved very easy. After painting the cowl
white the decals were added in 2 big pieces. Three coats of Micro-Sol and a very
few light passes with a new razor and presto-you can’t tell they’re not painted
on. Just be sure to do one side and let it dry before doing the other, or it
could get messy with the decals floating and wrinkling. One small problem was
the national insignia on top of the invasion stripes. The star was not opaque
enough and you could see the stripes beneath. I considered masking the star, but
thinking about the invasion stripe decal and the insignia made me consider
otherwise. I had the old testor/hawk P-47 I wasn’t going to build, and after
checking found the decals were a perfect match. I used a new razor to cut the
white parts out and solved the translucent decal problem.
The final finish is Testor’s Dullcoat, providing a nice flat
finish.
The gear, engine, and cowl assemblies were added with super
glue.
The sliding portion of the canopy was replaced with a Squadron
Vacuform, while the kit’s forward windscreen was separated with a razor saw. The
Squadron canopy was designed for the Monogram kit and the windscreen doesn’t
fit. The kit canopy is nicely molded and sufficiently clear, but a little too
thick to allow display in the open position. The framework was masked with
scotch transparent tape, then the frames cut out with a new #11 blade. I find
this works very well and is quick if the tape has some tackiness removed by
pressing it on your palm a few times. First it is sprayed a dark interior green,
then the RAF green for the exterior color. Then all is glued in place with a dab
of 5 min epoxy which dries transparent and disappears with a touch of dull coat
from a small brush.
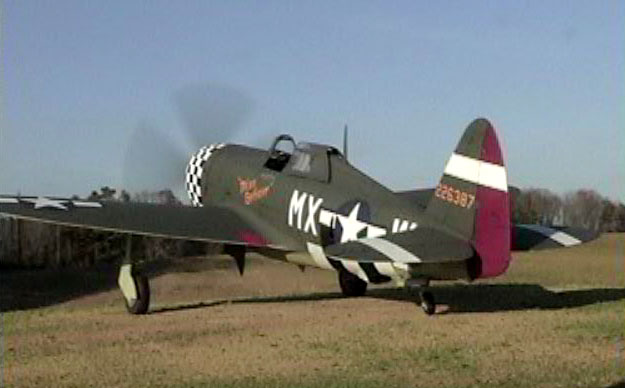
Small bits of tin foil were glued to the main gear oleos, and
secured with a drop of CYA. MV products railroad lenses were added for
anti-collision lights. I traded the Curtis –Electric toothpick prop to a friend
to get the correct Hamilton-Standard from his Monogram kit. With the drilling
out of the machine gun blast tubes and addition of the aerial mast the kit was
pretty much finished.
Apologies for the picture quality, but they are taken with a
Cam-corder and are not quit up to snuff by today’s standard….But Christmas is
soon!
Part II to follow.
Click the thumbnails below to view
larger images:
Model, Images and
Article Copyright © 2002 by Stan Pearce
Page Created 05 February, 2002
Last updated 04 June 2007
Back to HyperScale Main Page
Back to Features Page |
 Home
| What's New |
Features |
Gallery |
Reviews |
Reference |
Forum |
Search
Home
| What's New |
Features |
Gallery |
Reviews |
Reference |
Forum |
Search