|
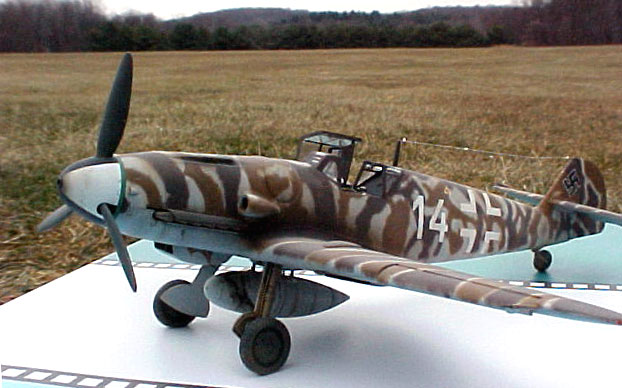
Messerschmitt Bf 109G-8
by
Floyd S. Werner Jr.
 |
|
Messerschmitt Bf 109G-8 |

Fujimi's 1/48
scale Messerschmitt Bf 109G-10/R2 is available online from
Squadron.com
In 1997 David Wadman and Hikoki
Publishing company released a wonderful book entitled “Aufklarer-Luftwaffe
Reconnaissance Aircraft & Units- 1935-1945”. While searching through the photo
filled pages I was struck by one aircraft in particular, on pages 214 and 215
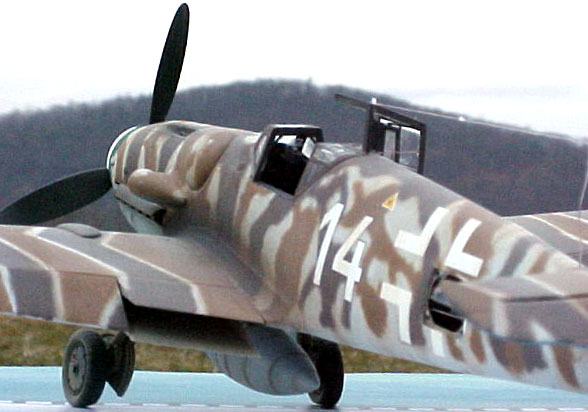
there was a Bf-109G-8 (maybe G-6) belonging to Hauptmann Emmerstorfer that had a
strange zigzag paint scheme. While the zigzag pattern was unique, the aircraft
did not seem to me to use RLM 74 and 75. Now I know that Dave has been answering
questions on this aircraft for quite some time. He used the Discussion Boards of
Hyperscale and 12 O’clock High. I’ve been copying every correspondence on this
aircraft that I was aware of so that when I wanted to build it I would have an
expert’s opinion. What Dave found out was that the aircraft was painted in Dark
Brown, no RLM number just Dark Brown. The ground crew could not remember if it
was different colors of Dark Brown or not. So with this information or lack
there of I started my model.
People have asked why use the Fujimi kit when Hasegawa has such a beautiful kit?
Well I’ll tell you, I built it because I had already spent the money. I bought
the kit while on vacation in Spain. I couldn’t speak Spanish and the shop owner
couldn’t speak English, but I had brought some model photos along and that broke
the barrier. He showed me what I was after and the Photo Recon bird came home
with me. It beats some shellfish or other junk that I won’t want. I like to hunt
out model shops in foreign countries and unfamiliar cities.
Enough has been written about the shortcomings of the Fujimi kit, but let me
refresh you a little bit. When the kit came out I was awe inspired until I
started to build one. There was the over engineering to deal with. I hate to
fill seams and holes. The flaps couldn’t have been based on anything real. They
are supposed to be the same size to articulate up and down. The Fujimi has the
top one being smaller than the bottom. The other thing that I remembered as I
was finishing the kit was that the canopy doesn’t fit. The middle section is too
short.
I decided to use the photo recon kit because it had a section of clear parts
that would be surgically implanted in the tail section for the G-10/R2 and I
wanted to see if it would fit. Because I wanted to build a G-8 it was the same
thing as the G-10 except for the nose section and tail. I brought this kit with
me while moving from Texas to Missouri, but my new airline career was thwarted
by September 11. Anyway, after settling down temporarily in NJ I started the
kit. I had planned the conversion before leaving, but I made a mistake by
bringing the wrong forward cowlings. Milton Bell and Morris Duet both came to my
rescue. Milton sent the cowlings and Morris sent another entire kit. Thank God
they did, I needed both. I screwed up the wheel well on the first kit.
|
Details |
|
Fujimi Bf 109G-10/R2 “Photo
Recon” Kit # 48012
Aftermarket Accessories
Used:
-
Cooper Detail (now Jaguar)
cockpit set
-
True Detail wheels
-
Eduard 48 110 Photo etch
set
-
Verlinden Detail Set for
the Bf-109E
-
Fine Molds AC-18 1 German
Aircraft Seatbelts Set 1
-
Cutting Edge CEC48154
Luftwaffe 300 Litre Drop Tank
-
Cutting Edge CED48068
Luftwaffe Recon A/C Decals
-
Period Miniatures #2068
1920’s Gas Pump
|
Let me tell you that I love Cooper
Details (now Jaguar) interiors. The fit is perfect and they look very
convincing. I added the additional boxes, wiring, and the lower panel on the
instrument panel for the photo recon bird. This is enough to make a G-8, but I
wanted something that would make this aircraft a G-8 without having to lift it
up to see the photo recon windows.
A quick review of the Cutting Edge drop tank would be in order. I liked the set
a lot but it is not perfect. There were some sink marks and there is some work
required in the area of the pour gate. These are relatively easy repairs though,
just a little filler, sanding and rescribing.
What I did like was that the sway
braces for the tank looked very realistic. The Eduard set provided the band for
the tank. The only modification needed for this was that the hole in the rack
had to be opened up, very simple and effective.
I added the two feed and vent lines
for the tank but they are hardly noticeable. I would recommend the ETC rack and
tank, as it is very nice. I would like to see the other types of tanks available
and capable of fitting this rack.
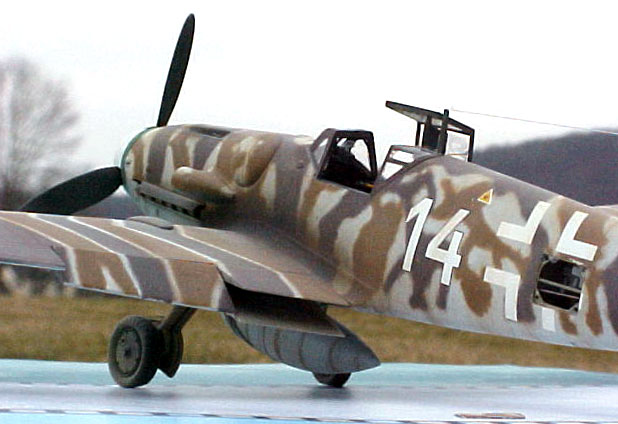
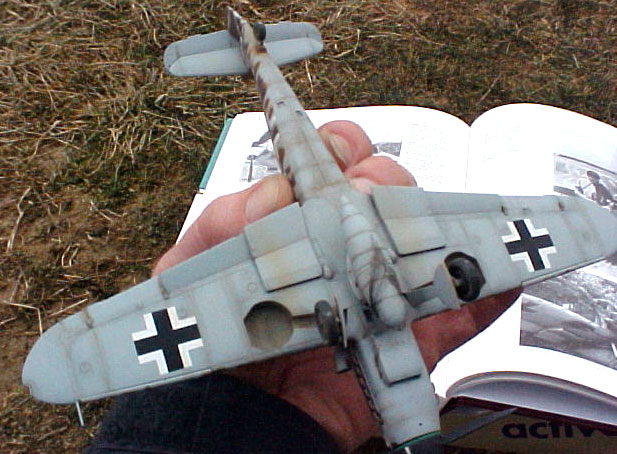
The thing that I thought would set the G-8 from the other G-6 aircraft in my
collection would be the camera equipment. So I decided to open the rear access
and scratchbuild the cameras. This all proved rather easy after raiding the
Verlinden set. The Verlinden set donated the access hatch, the radio sets, the
formers and longerons. The fit of the set was perfect for the Fujimi kit.
The thing that needed to be built was the cameras themselves. A quick trip to
the model railroad section and hours of searching the detail sets revealed that
1920 gas pumps actually look like the camera lens area for a Rb32/7x9 camera.
The body of the camera was built with styrene. The mounts for the lenses were
actually easy. I drilled straight through the fuselage halves to ensure the
camera supports were straight and aligned. The wires for the cameras were added
and the whole area was painted RLM 02 with a dry brush of White artist oil. I
was careful to make sure that the cameras actually pointed out of the windows on
the bottom of the airplane, it is so cool.
Construction of the aircraft was straightforward with nothing to mention except
the fit of the wings to fuselage was not the greatest. I did have to use a tail
assembly from a G-6 kit. One thing that I did do was to burnish the bulges in
the wheel well from the Eduard set. This provides vertical relief, which is more
realistic. Even if you don’t burnish the wheel well inserts they don’t fit real
well. Like I said I ruined one set of wings before getting it right.
First off, prove me wrong!
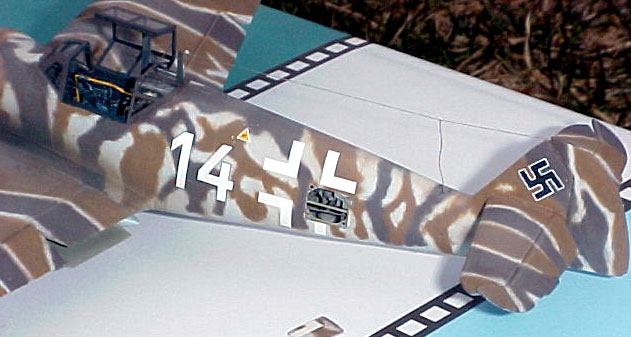
OK, with that out of my system, I
looked at the photos that I had and determined that there were in fact two
shades of brown and a gray even lighter than RLM 76. Now this contradicts Dave
Wadman’s conclusions and totally differs from Cutting Edge’s conclusions. Aren’t
Luftwaffe colors a blast? There was a model in “Replic” a while back that was
wonderful with RLM 79, but I thought it was incorrect. So I started looking for
my appropriate colors. At first I thought that the Germans might have used paint
supplies from the Italians or Vichy French but didn’t like the hues of any of
those colors. I use hues and tonal qualities to determine my colors and finally
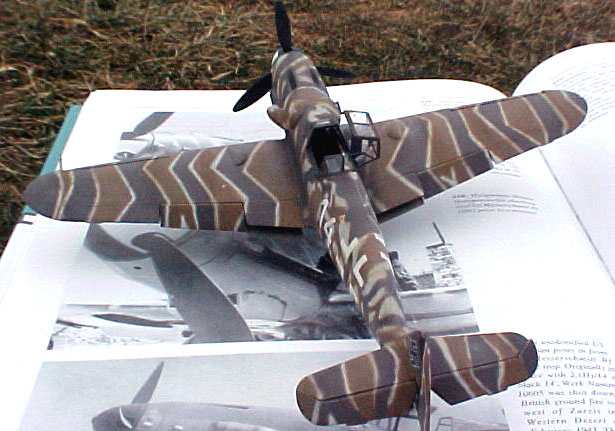
I decided what I thought looked good. I based my colors on a color photo from
Prien’s book “Messerschmitt Bf109 F, G, & K” on page 207 to determine my shades
of brown. This showed a crashed airplane from 6./JG51that is definitely dark
browns. The aircraft was from the same theater of operations.
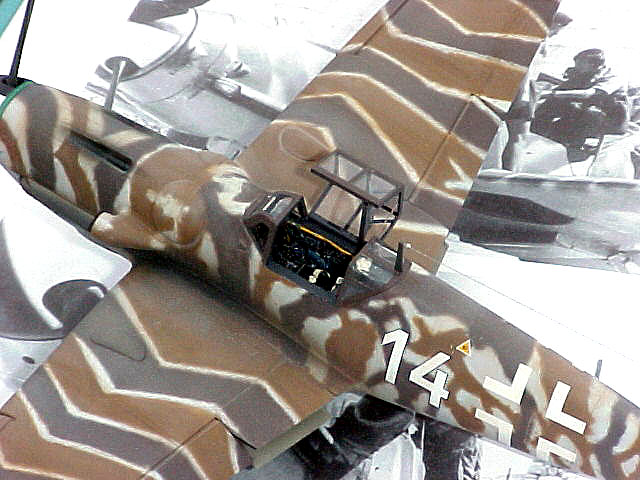
The paint scheme did start out normally with pre-shading and the application of
Model Master Acrylic RLM 76 to the bottom. Now came the out of the normal part
of the model. After looking at the photos and the instructions from Cutting Edge
I realized that the Cutting Edge instructions were just wrong. The fuselage
camouflage (one side only) is fairly accurate. The wings were nothing like I the
instructions, so I blew up some plans and drew the correct camo (IMHO). I
started the camouflage with Model Master Acrylic RLM 77 overall. I drew the
camouflage scheme very lightly with a pencil so I had something to follow. A
quick word about Model Master Acrylic, they are opaque, have a very fine grain
and spray nicely. These contrast with my normal Polly-S which dries transparent
(which can be nice if that is what you are looking for) and grainy, but dries
too quick. Both paints seem to catch the Luftwaffe colors correctly, if there is
a correct. I will continue to use both as necessary. I prefer the Polly-S, but
like the Model Master Acrylic paint range and availability.
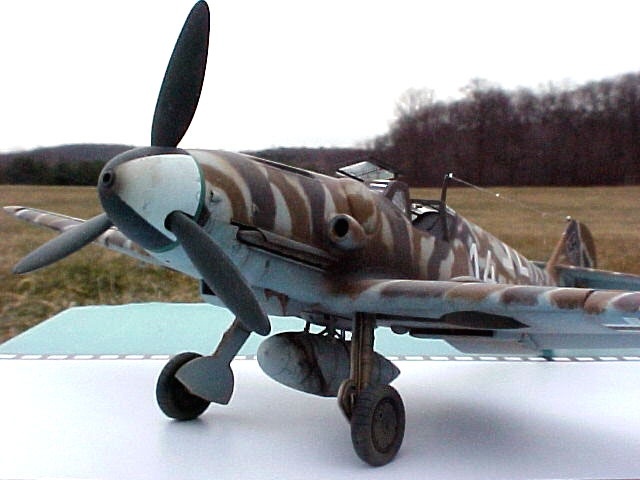
I started the camouflage with the lighter color of brown, Humbrol 29. This was
applied VERY carefully with a Tamiya airbrush, but the airbrush wasn’t the
reason for fine lines (it didn’t hurt). Tamiya’s Bob Ohler passed down the
secret to fine lines to me, so don't tell anybody. He told me to remove the end
of the airbrush, the tip not the whole assembly. This allows you to get
extremely close and get a really tight line. The reason this works is the air
doesn’t cause any burbles, it dissipates the airflow evenly with no blowback
into the tip. It works on the same principle as the crown tip. You can get
really close to the aircraft but you have to be careful not to hit the tip on
the kit, I did and ruined one needle. You have to lower your air pressure when
using this method, but not too low as to cause splatter. The key is to practice,
practice and practice some more. Using the same method apply the Dark Brown,
Humbrol 98 (maybe 86?).
Multiple coats of Future prepped the model for the decals. The Cutting Edge
decals are great. The best thing about Emmerstorfer’s machine is that the
camouflage was field applied and it covered all the stenciling. So decalling is
done quickly. The decals are covered with Future and then with Polly-S Flat.
Weathering was completed with an overspray of Polly-S Dust, Dark Tan and Black
exhaust streaks, pastels, silver pencils, and Burnt Umber artist oils. The
streaks were done with black and burnt sienna artist oils.
The Hasegawa kit would have been easier, but for someone who already spent the
money this exercise in scrathbuilding and painting was very challenging and
rewarding. I now have a colorful G-8 for my collection. I don’t know if I would
do it again, I do know I won’t use the Fujimi kit if I do. I may have to sell my
remaining Fujimi kits now, any takers? Didn’t think so. It is time to bring on
the Bf-109G-4/R3 with it’s underwing drop tanks.
-
“Aufklarer-Luftwaffe
Reconnaissance Aircraft & Units- 1935-1945”, David Wadman, John Bradley,
and Barry Ketley, ISBN 0-9519899-8-7
-
“Messerschmitt Bf109 F, G & K
Series”, Jochen Prien and Peter Rodeike. ISBN 0-88740-424-3
-
“Messerschmitt Bf-109 G”
Mushroom Model Magazine Vol 1, Robert Peczkowski, ISBN 83-88006-84-3
-
“Aero Detail 5 Messerschmitt
Bf109G”, Shigeru Nohara, ISBN 4-499-20589-1
-
“Model Art #290-Messerschmitt
Bf-109G/K Augsburg Eagle”, Unknown ISBN
-
“Militaria in detail
#5-Messerschmitt Bf 109 G in detail”, ISBN 83-7219-091-7
Click the thumbnails below to view
larger images:
Model, Images and
Article Copyright © 2002 by Floyd
Werner
Page Created 12 February 2002
Last updated 04 June 2007
Back to HyperScale Main Page
Back to Features Page |
 Home
| What's New |
Features |
Gallery |
Reviews |
Reference |
Forum |
Search
Home
| What's New |
Features |
Gallery |
Reviews |
Reference |
Forum |
Search