|
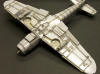
Messerschmitt Bf 109G-6
by Brett
Green
|
 |
|
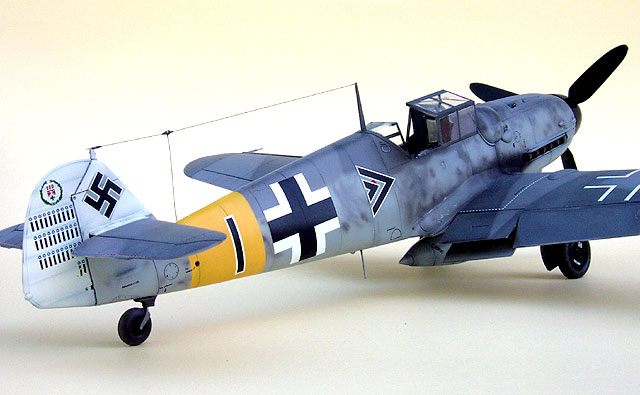
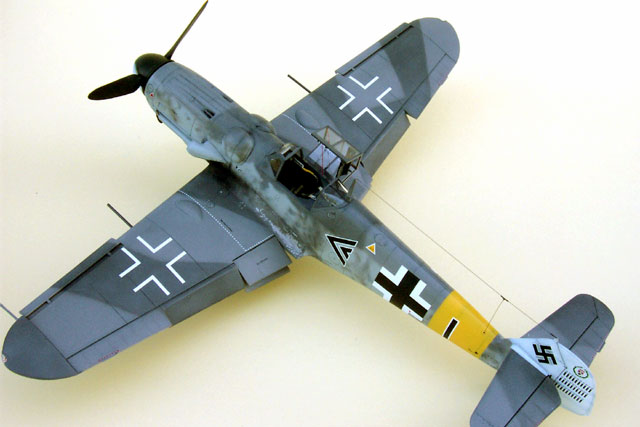
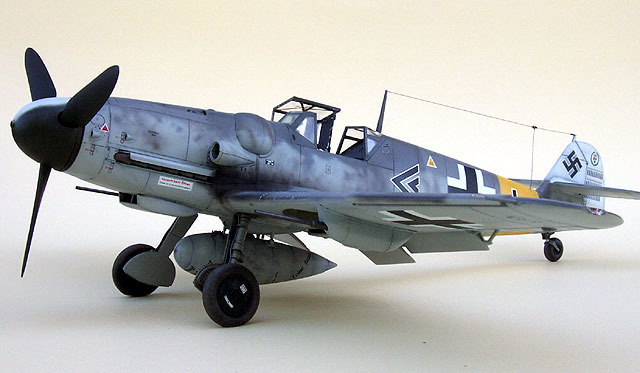
Messerschmitt Bf 109G-6
Anton Hackl, Gruppenkommandeur, III/JG 11 |

Hasegawa's 1/32 scale Bf 109G-6 is available online at
Squadron
I built a few 1/32 scale kits soon after I returned to modelling in the mid
1980s. One of these kits was Revell's ancient Messerschmitt Bf
109G-6.
I was initially inspired to build this model by the colour profile of Anton Hackl's Bf
109G-6 on page 102-103 of "Planes of the Luftwaffe Fighter
Aces - Vol. 1". My
inexperience at the time left me blissfully unaware of the shortcomings of
the Revell kit, but I always knew that I wanted to
return to this subject.
Many years after my first effort had been dispatched to the garbage
bin, I started collecting information and resources to build a
recognisable Gustav from Revell's 1/32 scale kit. I was overjoyed that Hasegawa saved me from this potentially torturous
project by announcing their 1/32 scale Messerschmitt Bf 109G-6 late in
2001. When Eagle Strike released their 1/32 scale markings for Anton
Hackl's Bf 109G-6, it seemed that I had a modelling date with
destiny.
I could finally have another crack at this very attractive
Gustav.
|
Hasegawa's
Bf 109G-6 in 1/32 Scale |
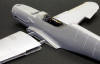
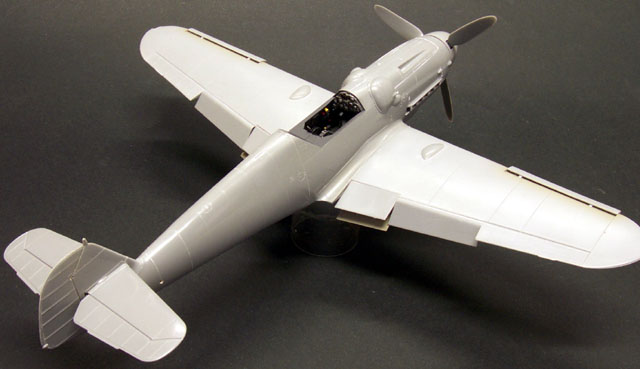
Hasegawa's 1/32 scale Messerschmitt Bf 109G-6 is an admirable representation of the most produced fighter aircraft in
history. The model is accurate, displays state-of-the-art surface
features, offers alternate armament, dropped slats and flaps and much
more.
Unlike recent 1/32 scale releases from other manufacturers, Hasegawa's
Gustav is entirely conventional in its presentation - you will only find
plastic in the box. The parts breakdown is no more complex than a 1/48
scale fighter aircraft model. The kit comprises 107 parts in grey styrene,
11 parts in clear and 4 polythene caps.
The relative simplicity and reasonable price of Hasegawa's 1/32 scale
Bf 109G-6 makes it appropriate for beginner modellers, but its accuracy
and potential for extra detail will ensure its popularity with plastic
connoisseurs too.
Furthermore, Hasegawa has made a genuine effort to correct some of the
shortcomings of their 1/48 scale Bf 109s with their new 1/32 scale Gustav.
A more detailed examination of the model "in the box" may be seen by following
this link to my FirstLook Review
Cockpit
|
Summary
of
Modelling Resources The
following accessories were used to complete Hasegawa's 1/32 scale Bf
109G-6: |
-
Gunze
paints:
H70 RLM 02 Grey; H417 RLM 76 Light Blue; H69 RLM 75 Grey Violet;
H68 RLM 74 Grey
Green; Gunze H65 RLM 70 Black Green; H94 Clear Green; H90 Clear
Red; H20 Flat Clear.
-
Tamiya
paints:
X-18 Semi Gloss Black; XF-1 Flat Black; XF-2 Flat White; XF-3 Flat
Yellow; X-7 Red; X-21 Flat Base; XF-57 Buff; X-11Chrome Silver.
-
Testors
Metalizer paints - Burnt Metal; Gunmetal
-
Rustall
-
Eagle Strike Decals:
32038 - Augsburg's Flyers Part IV
-
EagleCals
Decals: EC32-36 (for national markings and stencils)
-
Aeromaster
Decals: 48-460 - Augsburg Eagles Part X
-
Cements,
Fillers and Finishing Products:
Testors Cement; Tamiya Extra Thin Liquid Cement; Selleys Super
Glue; ZIP Kicker CA Accelerator; Squadron White Putty; Gunze Mr
Surfacer 500; Gunze Mr Rubbing Compound; Tamiya Masking Tape (6mm
and 10mm); Tamiya Abrasive Paper (400-1000 grit); disposable nail
files.
|
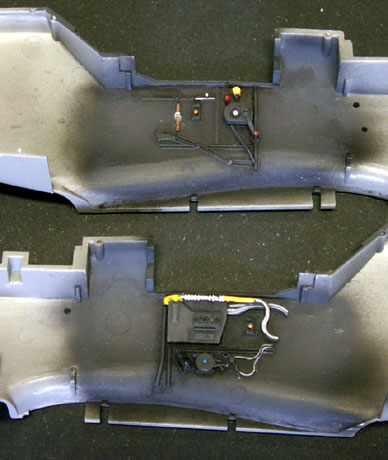
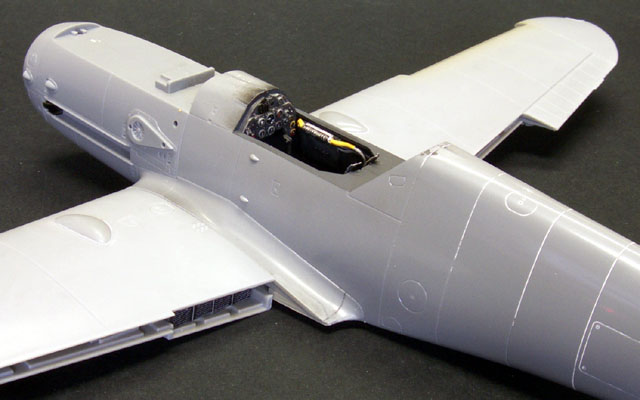
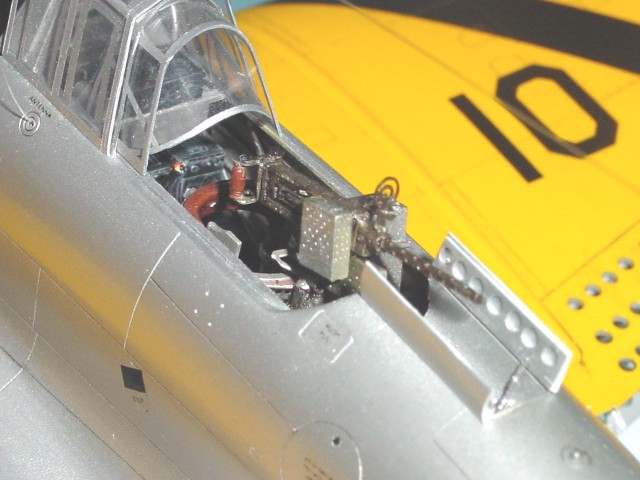
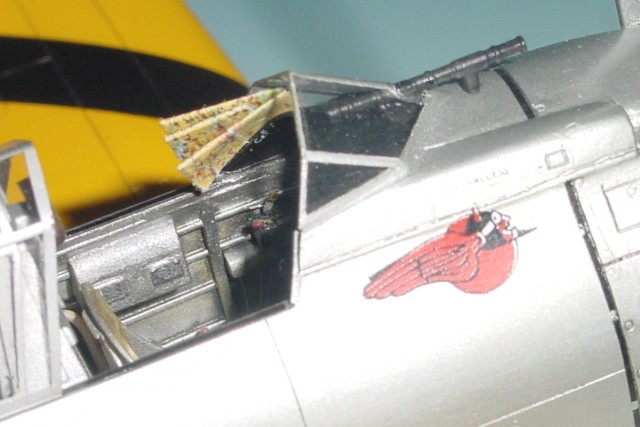
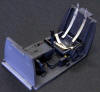
Hasegawa's 1/32 scale front office looks a little bland in the box, but the
19 parts depict all of the key details in the real cockpit.
The oxygen regulator, auxiliary instruments and throttles are supplied
as separate parts. The seat pan is also provided separately. The seat back
was not usually installed in these later 109s, and the kit reflects this
configuration. A six-piece pilot is included but I decided not to use him.
The omission of a harness would be very obvious in this large scale, so
I "borrowed" a set of buckles and mounts from Hasegawa's 1/32
scale Fw 190D-9. These were added to straps cut from foil-backed paper.
Click the thumbnails below
to
view larger images:
|
|
|
|
Cockpit tub with paper harnesses and rudder foorstraps in place.
|
|
|
|
Cockpit tub after painting.
|
|
|
The remaining cockpit components were assembled and painted after the
harness was glued to the seat pan and rear bulkhead.
The instrument panel is a single plastic part with raised detail. A
decal is supplied as an alternative to painting. I decided to combine
these options by punching out individual instruments and applying the
decals to each dial. This was time consuming but the results looked
promising.
However, impatience was my undoing. I applied a coat of MicroSol to each of the decals to help them conform to the uneven surface. After brushing on
the solvent, I decided to speed the task by lightly pressing the
instrument decals onto the dial detail. Imagine my horror when I found 5
wrinkled, ruined instrument decals on my fingertip. I really should have
known better, but impatience has a way of causing temporary amnesia!
I stripped off the remaining decals and painted the details on the
dials instead. A few thin coats of Future were painted on top of the
instruments to depict lenses.
Click the thumbnails below
to view larger images:
Fuselage
The fuselage is supplied in four main parts to simplify
tooling for the tall-tail variants - two forward fuselage halves and two
halves for the rear fuselage/tail section. Each fuselage section was taped and
clamped separately. When I was satisfied that everything was perfectly
aligned, I
flowed Tamiya Liquid Cement along the outside of the join lines. This
ultra-thin adhesive is drawn into the minute gap and provides a very
strong bond. The use of liquid cement also minimizes the risk of excess
glue being squeezed out from between plastic parts.
Two filler ports on the starboard fuselage are not applicable to the Bf
109G-6, so I covered the engraved ovals with Super Glue. A spot of ZIP
Kicker Accelerator instantly cured the cement. The resulting lump was sanded
first with a coarse sanding stick, then with 400 grit and 1000 grit
abrasive paper, and finally polished using Mr Rubbing Compound.
The port fuselage side includes two "pips" below the cockpit.
These are the mounts for an umbrella that was sometimes used in tropical
environs. The instructions make no mention of removing these
"pips", but they were not installed on most Gustavs so check
your references carefully. The "pips" were not installed on
Hackl's aircraft so they were sliced off with a sharp knife.
When the fuselage components were thoroughly set, the large tongue on
the tail assembly was inserted in the main fuselage section. The fit was good
but there was still potential for slight movement, so I spent a few
minutes ensuring that the tail was aligned from all angles before
committing the parts to glue.
Inspection of the fuselage revealed hairline join marks on the
centreline of the upper breech cover, the upper front nose, and the lower
cowling. These are the exact areas I always have problems with Hasegawa's
1/48 scale kits too. The minor flaws were quickly covered with Mr Surfacer
and sanded when dry. The panel lines on the rear fuselage spine and
underside looked good, but I lightly scribed both to ensure consistency.
The vertical panel line at fuselage station 7 (where the fuselage
components meet) did not require any filler. Even so, the whole mid-rear
fuselage was sanded and polished to eliminate any tiny steps or other
irregularities.
Hasegawa supply a horseshoe oil tank as a mounting base for the
propeller shaft. This circular part locks securely in the forward fuselage
with a twist. The fit is so good that I considered not applying glue, but
in the end I did brush some liquid cement onto the mounting arms when the
part was in place.
The instrument panel was now installed from below. The cockpit tub was
inserted straight afterwards.
The lower centre section of the wing is supplied as a separate piece. A plastic
wing spar is glued to the top of this part, and then sandwiched under the
cockpit and wing root. The result is a very sturdy support for the wings
that sets dihedral to the correct angle. Don't forget to drill out the
locating holes for the drop tank rack before the spar is glued to the
centre wing section.
I added a short length of brass rod to the middle of the
oil cooler housing intake. Hasegawa has moulded location indentations for this strut, but do not supply the part (or mention it in the
instructions).
Optional top cowls are supplied. One has a pressed-style gun trough and
the other has the insert style. This is another area that has caused me
problems with the 1/48 scale Gustav and I had similar issues with this model.
Each side of the part displayed a tiny "step", and the front of
the part rode high. I sanded the top-front of the part before gluing it on
the fuselage. With the top cowl in place, I then sanded along the side of
the part to eliminate the step.
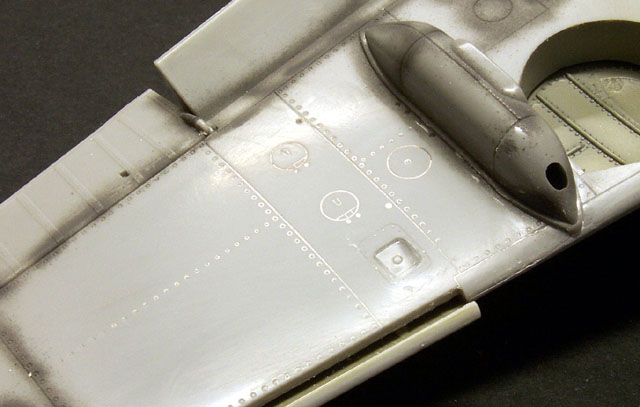
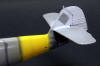
The remaining details for the fuselage include the gun bulges,
supercharger intake and exhausts.
Hackl's aircraft is usually listed as a Messerschmitt Bf 109G-5, but it
does not feature the vertical head armour and desiccant capsules in the
canopy. It is more likely that this was really a G-6 with the G-5
"bulge" installed. This was a fairly common variation. I
therefore used the starboard side bulge with the additional blister for
the compressor. The small scoop on this bulge was hollowed out with the
tip of a hobby knife blade.
I drilled out the end of each exhaust
stack using a dental burr in my Dremel motor tool. The muzzles of the cowl
guns were also hollowed out.
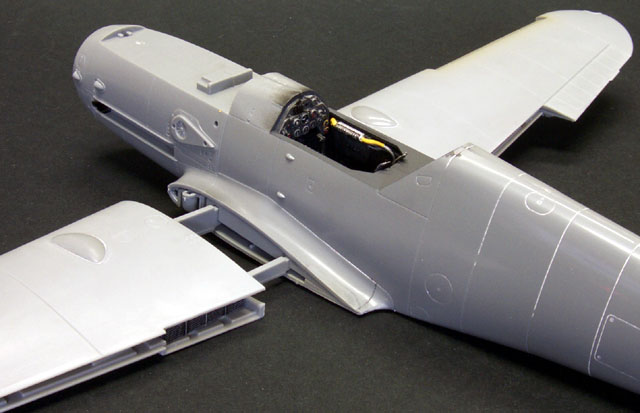
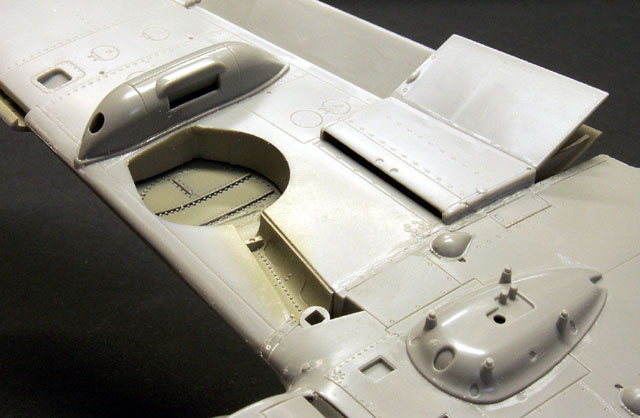
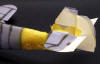
Wings
Wings were prepared by drilling holes for the upper wing bulges. To
their credit, Hasegawa has moulded a concave bulge on the inside surface
of the upper wing to correspond with the top wing bulges. The locating
holes for the bulges intrude into the upper wing. I filled these with
Squadron White Putty. The concave surface and surrounding raised detail
make it difficult to sand the putty smooth, so I simply wiped the excess
from the hole and painted the wheel well. The upper wing bulges were then added. A thin line of Mr Surfacer was painted
around the edge of each bulge to blend in the parts.
The lower wing is
apparently a generic part to be shared with Bf 109F kits. This is
suggested by the circular opening for the wheel well - a feature of the Bf
109F and early G. The openings were squared-off with a sharp hobby knife. I painted the radiator faces black,
then highlighted the raised detail with a silver pencil. The wing halves
were then clamped and glued.
The assembled wings were slid onto the wing spars. The fit at the upper
wing root was totally free of gaps and the dihedral looked perfect. I had
a slight gap at the lower wing join, but this was quickly dealt with using
Mr Surfacer. With the wings sitting solidly in place, I simply brushed
liquid cement along the join lines to make the bond permanent.
Click the thumbnails below
to view larger images:
|
|
|
|
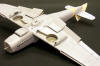
The wings and fuselage are assembled separately. Note the prominent wing spars
|
|
|
|
The wings are slid onto the spars. Dihedral is positively set.
|
|
|
|
The join at the wing root is almost flawless. The parts are not glued in this picture, but the fit is solid and gap free.
|
|
|
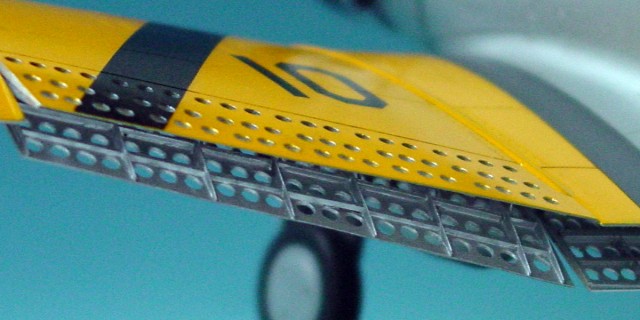
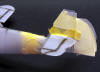
Flaps and slats are secured with the aid of tabs. These pre-set the
amount of "droop" on the parts, although the enterprising
modeller may slice off the tabs and reposition the parts to taste. I was
happy with the kit configuration, so I locked the flaps in place with
superglue, and improved the bond with liquid glue.
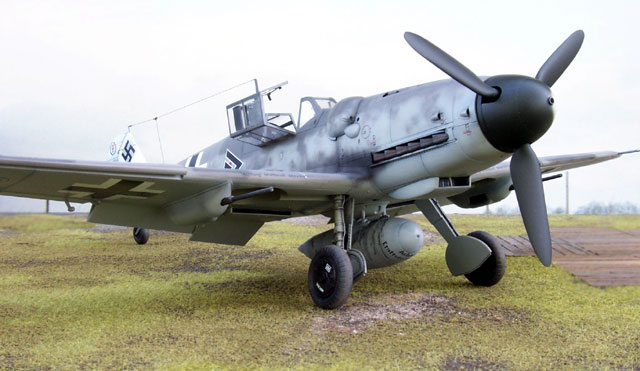
My model was destined to depict an early production Bf 109G-6. This
particular aircraft did not have a Morane mast under the wing, so I filled
and sanded the insulator and surrounding panel on the lower wing.
Click the thumbnails below
to view larger images:
|
|

|
|
The Morane mast was not present on Hackl's Bf 109. The clear base and surrounding panel lines were filled with super glue...
|
|
|
|
...and sanded smooth. A coat of dark grey was sprayed over the top to highlight any imperfections.
|
|
|
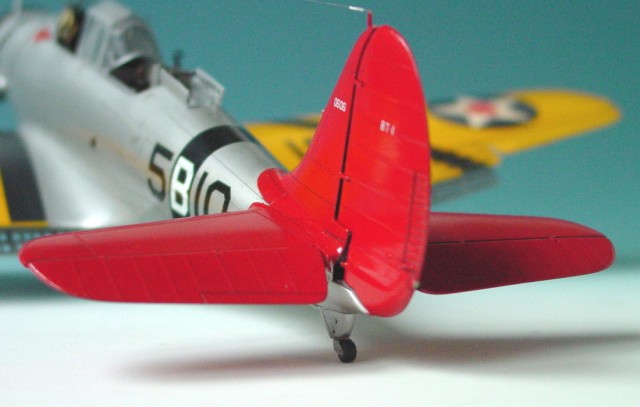
The horizontal tail surfaces were added to the fin. Trim tabs need to
be pruned shorter for this kit. Pay attention to the instructions because
it is easy to overlook this detail.
The tail parts display the same positive engineering as the wings. The
location tab of each part is "keyed" so that they lock in place where they
meet inside the fin. This "key" sets the tail at a 90 degree angle to the
fin. The result is effortless alignment of the wings, fuselage and tail
surfaces.
Finishing
Touches
|
Summary
of
Additional Work Hasegawa's
1/32 scale Bf 109G-6 is quite complete straight from the box, but I
did undertake the following additional minor work: |
-
Added
seat harness from paper and buckles from Hasegawa 1/32 Fw 190D-9
-
Drilled
out machine gun and cannon barrels
-
Drilled
out exhaust stacks
-
Drilled
out scoop on compressor bulge
-
Added
FuG 25 IFF antenna under fuselage
-
Filled
and smoothed base for unused Morane antenna
-
Added
support strut for oil cooler air intake
-
Added
canopy release lever and cable; dive angle indicators and sliding
window knobs to canopy
-
Removed the mounting
"pips" for the tropical umbrella below the cockpit
|
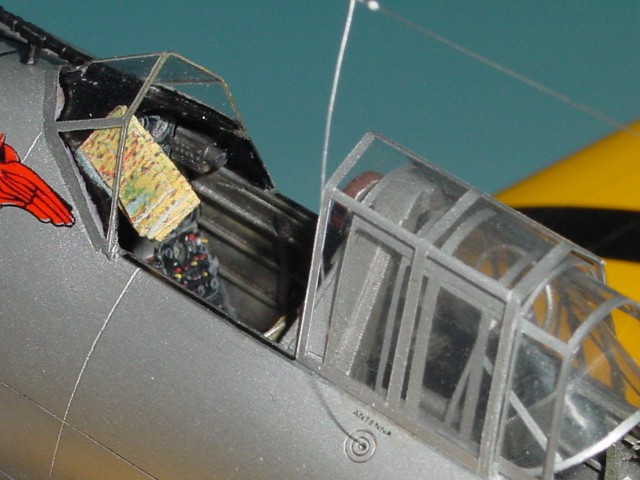
The canopy parts are crystal clear straight from the box.
Click the thumbnails below
to
view larger images:
The rear canopy sat a little high on my model, so I sanded the bottom
of the part. This cured the height problem but effectively pushed the
clear part slightly forward, narrowing the
gap between the windscreen and the rear canopy. In fact, the gap was now
marginally too small to accommodate the main canopy. Fortunately, my canopy
would be posed open, but some careful planning will be
necessary if a closed canopy is on the agenda.
I added some extra detail to the hinged canopy section. Short lengths
of plastic strip were glued to the sides of the Galland Panzer armour to
represent mounting arms. A canopy release lever was built using scrap
styrene sheet and rod. Stretched sprue was used for the canopy release
wire and for the diagonal red dive angle indicator lines. Knobs
for the glass sliding section were punched from clear acetate and secured
with a drop of Future.
For some reason, the locating point for the under-fuselage
FuG 25 IFF antenna is indicated but the mast itself is not supplied. I
drilled the hole with a pin vice, then cut a length of steel rod and
secured it with super glue.
The propeller assembly, undercarriage, tailwheel and other small
details were all added per instructions.
Paint
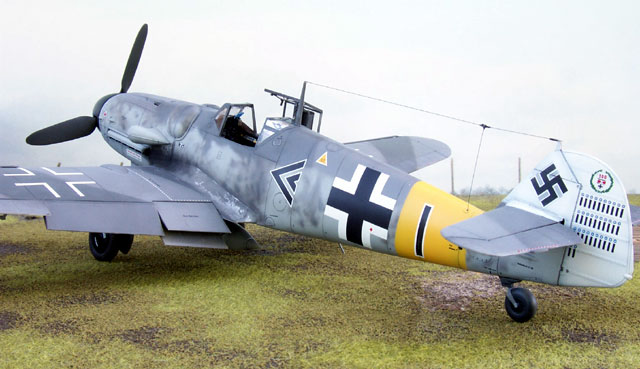
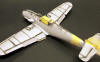
My Gustav was destined to wear the markings of Anton Hackl, with the
yellow Reich Defence Band (RVD) of JG 11 and a white tail. Gunze acrylic
paints were used except where otherwise noted, and my airbrush is a
Testors Aztek A470.
Painting commenced by spraying panel lines with Tamiya Flat Black.
Next, the vertical fin was painted RLM 76 Light Blue. A diamond shape
corresponding to the position of the swastika was masked off, then the
fuselage band and tail were painted yellow and white respectively. I mixed
my own shade of RLM 04 Yellow. I like the Gunze colour, but it seems to
take forever to dry so I blended a few spots of red and some white with
Tamiya's acrylic Flat Yellow. When dry, the tail and fuselage band were
carefully masked and an overall coat of Gunze RLM 76 was applied.
Click the thumbnails below
to view larger images:
|
|
|
|
As is my usual practice, the paintjob starts by painting the panel lines black.
|
|
|
|
Next, the yellow and white for the Reich Defence Band (RV Band or RVD) and the tail are applied. Note the diamond masked for the swastika decal
|
|
|
|
The RVD and the tail are now masked...
|
|
|
|
...and the fuselage gets a coat of RLM 76 Light Blue.
|
|
|
Upper surface camouflage comprised RLM 74 and 75 Greys in a hard-edged
pattern on the wings, and a heavy irregular mottle on the fuselage sides.
I sprayed the RLM 75 Grey-Violet sections first. The Gunze RLM 74 seemed
too dark, so I lightened the colour with a generous dollop of Grey-Violet.
The upper-wing camouflage pattern was masked with self-adhesive Post It
notes. I sprayed RLM 74 lightly up to the edge of the Post It note,
then removed the mask before
retracing the outline of the camouflage pattern freehand with the
airbrush. This maintains the hard edge but provides a slight overspray
effect.
Click the thumbnails below
to view larger images:
|
|
|
|
The lower surfaces are painted RLM 76...
|
|
|
|
...and the upper fuselage gets the treatment too.
|
|
|
|
Fuselage camouflage is underway. The mottling and paint on the spine is applied freehand.
|
|
|
|
The "splinter" pattern on the wings is painted with the assistance of self-adhesive "Post It" notes.
|
|
|
The camouflage mottle was sprayed freehand. I carefully
followed the camouflage pattern observed in the photograph on page
69 of "Planes of the Luftwaffe Fighter
Aces Vol. 1" by Bernd Barbas.
Decals
I finished painting the model before the Eagle Strike decals for
Hackl's aircraft arrived, so I used EagleCals' national markings and
stencils from a different decal sheet while I was waiting. I usually only
apply the bigger stencil markings in 1/48 scale, but I used all of the
applicable stencils for this project. EagleCal's stencil decals were
crisp and legible. In this large scale, they look very
convincing on the model too - not too dominant as is sometimes the case in
smaller scales.
Eagle Strike decals (sheet number 32038 - "Augsburg's Flyers Part IV") were used for the tail markings and lower wing
crosses. The victory markings are very impressive. Each of the victory
bars for British aircraft is topped by a tiny red, white and blue roundel. I
needed to use a magnifying glass to align the red decal for the roundel
centres, but the effort is well worthwhile.
I was surprised to find that the double chevron decal looked huge on
the model. Checking my reference photo confirmed that the chevron marking
was proportionally correct, but too large by about one third.
One third? That got me thinking. I also owned the Aeromaster sheet
covering the same aircraft in 1/48 scale. 1/32 scale is one third larger
than 1/48 scale, so if the same basic artwork had been used for the
smaller scale decal sheet I might avoid the chore of hand-painting these
markings. Sure enough, the 1/48 scale decal was an almost perfect match
for my interpretation of an accurate 1/32 scale chevron.
All the decals settled down nicely with the application of MicroSet and
MicroSol.
Weathering
and Final Assembly
A light wash of thinned black oil paint subtly highlighted the panel
lines. The port-side wingwalk was "chipped" using Tamiya silver
enamel paint in a wedge-shaped pattern noted in my reference
photo. I painted the exhaust stacks with Testors Metalizer Burnt
Metal, then brushed Rustall onto the stacks to take the "new metal" sheen
from the paint.
|
|

|
|
Wheels were masked using circles cut out of self-adhesive "Post-It Notes" using an Olfa Circle Cutter.
|
|
|
|
The entire model was sealed with an overall coat of Gunze Flat Clear.
However, I was disturbed to see that this top coat had bestowed a cloudy
finish to the colours and markings. I carefully but firmly
polished the model with a slightly damp, soft cloth to restore the
original shades.
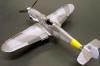
Hackl's aircraft was reasonably clean except for a short, black exhaust
stain. I sprayed this stain with a mix of Tamiya Flat Black and Flat Base.
The main wheels were first sprayed Semi-Gloss Black. The hubs were
masked and the tyres painted a grey-brown-black mix. I was not satisfied
with this weathering of the tyres, so I added a light dusting of pastel
chalk.
The wingtip "light globes" were painted Clear Red and Clear Green over
a base coat of white. The transparent lenses were secured with white glue.
The formation lights looks very
authentic after this treatment.
Finally, gun barrels, pitot tube and the tall antenna mast were glued
to the model; and the aerial wire was added using smoke-coloured invisible
mending thread (monofilament).
Hasegawa's 1/32 scale Messerschmitt Bf 109G-6 was very satisfying to
assemble and looks great when it is finished. It was also a surprisingly
quick build. Basic construction took no more than 12 hours, painting and
decals another 15 hours, and 4 more hours to add the finishing touches.
I enjoyed the kit so much that I ordered two more even before I had
finished building this one. The inevitable avalanche of after-market
decals and accessories has already started. This will add even more
choices for a large-scale Bf 109G-6.
Hasegawa has already announced a 1/32 scale Messerschmitt Bf 109G-14 to
be released in the coming months.
I hope that they apply the same
straightforward engineering, accuracy, terrific detail and affordable
price tag to more WWII subjects in 1/32 scale.
Text, Images and Model Copyright © 2001 by
Brett Green
Page Created 27 December, 2001
Last Updated
04 June, 2007
Back to HyperScale Main Page
Back to Features Index |
 Home
| What's New |
Features |
Gallery |
Reviews |
Reference |
Forum |
Search
Home
| What's New |
Features |
Gallery |
Reviews |
Reference |
Forum |
Search