|
Messerschmitt Bf
109G-3
by
Floyd S. Werner Jr.
|
|
|
Messerschmitt Bf 109G-3 |

HyperScale is proudly supported by
Squadron.com
The history of the Messerschmitt Bf 109 is
legendary and will not be covered here.
What will be covered is a little known, and
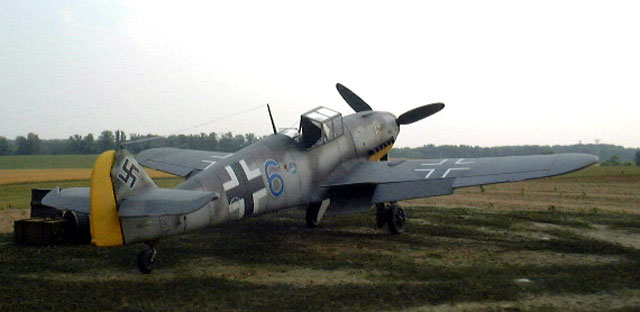
even lesser photographed, variant - the Bf 109G-3. In January 1943 a
small block of 50 aircraft were built by Messerschmitt at Regensburg to
be employed in the high altitude Staffeln of JG 2, JG 11 and JG 26. The
G-3 was developed alongside the G-4, as a pressurized variant.
Actual construction of the G-3 happened after the
G-4 was already in production. The G-3 incorporated all the changes of
the G-4 including larger main (660x160) and tail wheel (350x135). The
larger wheel size necessitated corresponding bumps on the wings to allow
for retraction. The larger wheels retained the early style of wheel
spoke set up. It would not be until the later G-5/6 that the flat
covered wheels would be introduced. The larger tail wheel forced the
wheel to become non-retractable. The silica gel tablets in the
windscreen and the pressurization armor plate behind the pilots’ head
were retained from the G-1, as was the most noticeable feature, an air
scoop on the left engine cowling for the pressurization system. The
armament was the same as the G-4with two MG17s over the engine and a
20mm cannon firing through the spinner.
Here is a summary of the Bf 109G-3 characteristics:
-
Larger main
wheels
-
Larger tail
wheel
-
Wing bumps
-
Pressurized
cockpit, including silica gel pellets
-
Air scoop on
left engine cowling, above the supercharger intake
-
Antenna lead-in for the FuG 16Z, between stations 7
and 8
This is often my favorite part of building a model,
but not this time! The only book that really covers the G-3 in any kind
of detail is the Prien/Rodieke book, “Messerschmitt Bf-109F, G, K”
published by Schiffer. See the bibliography at the end of the article.
This book offers four photos - two of JG2 and two of NAG3. Hardly the
vast amount of information that is normally associated with the 109.
The book also has a line drawing that seems to be
the best representation of the G-3. There are other sources that claim
to be G-3s but they either miss the air scoop or the silica gel pellets.
I welcome any further photos.
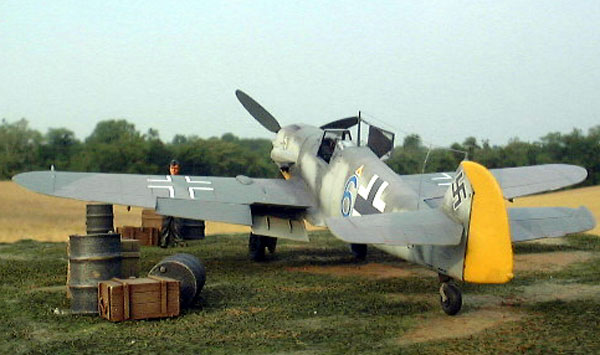
I decided to build one of the aircraft from the
book. It is a long distance shot of “Blue 6” from 11/JG2 in January
1943. It also came to my attention that not much is written about JG2 on
the Channel Front.
I had the special edition from Hasegawa for
“Hartmann G-4”, Kit number 09303. This included a resin forward cowling
plug and the larger wheel with the basic G-6 kit offering. This sounded
good knowing the quality of the Hasegawa’s G-6 but it was not everything
it could have been. The decals for Hartmann’s “White 2” machine and a
JG53 G-4 were included.
Lots has been written about the G-6 kit, including myself, so I will
refrain from laboring over the basic construction. Instead I will focus
on the other things that made this kit unique.

As with most kits I started with a cockpit, but which one? MDC/Adeco’s
is the best, Jaguar/Cooper Detail is a very close second, then there are
countless others.
I have never used the True Details interior but
seeing they offered a G-1/G-4 interior I thought I would try it. I’m
always open to new ideas and products. The cockpit is a little gem,
especially when you consider the price of under $4.00US. There are
drawbacks however. The construction of the set is beautiful and when you
build it up outside the aircraft it looks great. I thought the
instruments were a little too deep but they were easy to paint and look
convincing when done. I did use some Eduard trim wheels and mount but
other than that it was built as True Details intended, with the
exception of repositioning the stick forward. The drawback comes when
you install the cockpit into the fuselage. The seatbelts are molded on
the seatback, while this is nicely done it isn’t correct. The attachment
points for the shoulder harness should be on the back deck area of the
cockpit but with the True Details set they sit too low. Now to a 109
nut, such as myself, it will drive you crazy, but in the interest of
reviewing the set I learned to live with it. For the average builder the
set is fine and at the price it is a good investment. The interior is
also nice for an inexperienced modeler to get his hands on resin and
practice techniques.
I painted mine with Polly-S RLM 66, and then washed
the area with black artist oils. I then dry brushed with RLM 02, then
some Testor’s Metalizer Titanium and Aluminum. Finally I used some
titanium white artist oils. The cockpit looked really good.

Now before I could put this cockpit in the fuselage I had to assemble
it. No problems were encountered with the fuselage halves, but the resin
plug was not the same story. The plug was way too much trouble for such
an easy part. The plug was .050 too short front to back and .040 too
tall top to bottom. It sounded so easy to just plug the back with
styrene and sand down the bottom, but let me tell you it was no such
easy matter. First off the sanding down made the insert too shallow and
I had to fill in a lot on the side of the cowlings, of course all the
detail was lost. The front to back seemed easy too with some plastic
filling the gap in the back (.040) and a small one in the front (.010).
Oh no, that would have been too easy. The superglue I used as filler
chipped when I had to rescribe the panel lines and I eventually had to
take it all out and replace it with epoxy putty. This scribed better
finally after a week of working on the cowling alone I was happy with
the results. Because I was making the G-3 I needed to add the air scoop
to the left cowling. I drilled a hole through and bent a piece of metal
tubing for this. I tried this method on my Hobbycraft G-1 and was very
happy with it. The G-3 didn’t come out as good but it is passable.
Some other modifications that had to be made involved filling some panel
lines. These included the square air vents on both sides of the cockpit
and the oval panel on the left side by the tail wheel. The vents for the
canopy had to be removed also.
The wings were pretty straightforward except that in the wheel well
there are holes for the kidney shaped bumps. I glued these on the top
wing and then I used my Dremel tool and started to hollow out the bumps
very carefully. This is not for the faint of heart. I built up the
internal structure with some styrene. Once I was happy with the shape of
the bumps I very lightly added some liquid glue to the opening to smooth
out any sanding imperfections. I also added Bare Metal Foil wheel well
liners (wouldn’t the new Cutting Edge material make such great
liners..HINT HINT) after I added some styrene to the wheel well openings
on the bottom wing to bring the well closer to filling the gap. I used a
Part photo etch part) to add the holes in the wheel well. Once they were
glued in I hollowed out the holes. It looks good and I will do it again
in the future. Some extra parts were added to make the up locks. I used
parts from an Eduard K model set for the radiator and intakes. Some
weighted fishing line and some True Detail Wheels rounded out (no pun
intended) the landing gear and wings.
Painting
 I
used EZ Masks for the canopy as these make the task so much easier. I
decided to try Model Master Acryl paints. I was happy with the colors
themselves. I did have a problem of a sheet of paint pulling up on one
wing. I fixed it by sanding it back to the panel line and then
repainting. You can’t even tell with this technique but it could have
been a pain if it wasn’t easy to get to. I
used EZ Masks for the canopy as these make the task so much easier. I
decided to try Model Master Acryl paints. I was happy with the colors
themselves. I did have a problem of a sheet of paint pulling up on one
wing. I fixed it by sanding it back to the panel line and then
repainting. You can’t even tell with this technique but it could have
been a pain if it wasn’t easy to get to.
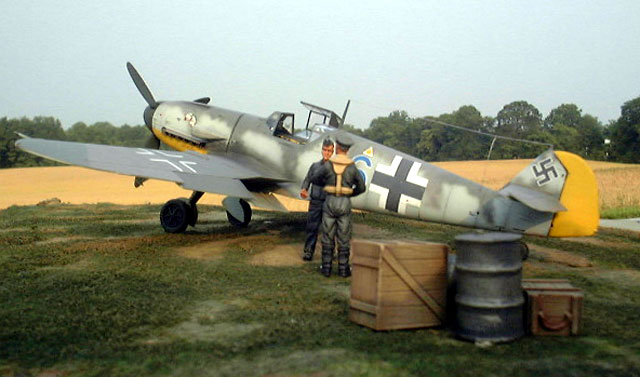
Typical of mid war 109s I painted the model with
RLM74/75/76. I must admit at first I was leery of the RLM 74 Grey-Green
in the bottle, as it didn’t look anything like a green, but when applied
and dried it looked accurate. There were also yellow tail and lower
cowlings. A quick coat of Future and it was off to decal.
Decals
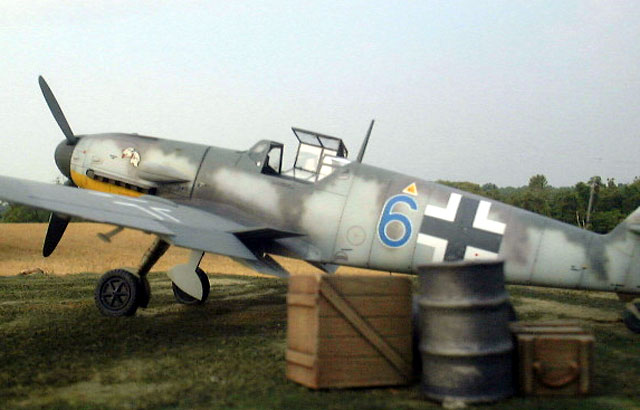
I wanted to represent an aircraft from 11./JG 2,
which happen to be the only aircraft that I had a complete photo of.
11./JG 2 utilized the I/JG 2 emblem of the Bonzo dog when they were
formed in March of 1943. This little emblem would add character to an
otherwise “normal” mid war paint scheme.
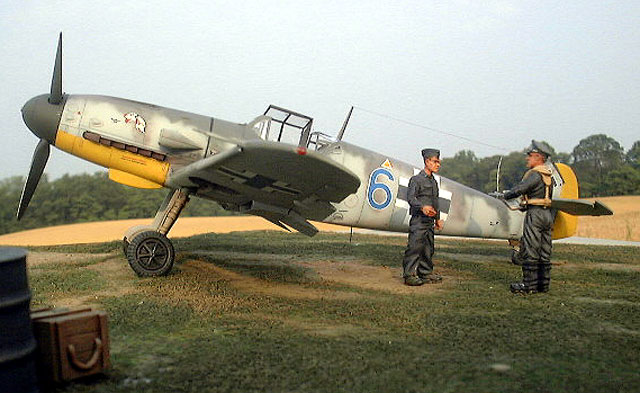
I have a lot of decals and I went through most of them with this
aircraft. The Bonzo dog emblem came from a Hasegawa E-3 kit, the Blue 6
and the “scale color” crosses came from Cutting Edge, the detail
stencils came from Kommanduer, Eagle Editions and Aeromaster. They all
reacted well with Mr. Mark Softener. There are a lot of stencils on this
aircraft as it looks to be in a factory paint scheme, except for the
yellow areas, with no field-applied markings other than the dog and
aircraft number.
What caused me great distress was whether or not the wing crosses should
be filled in.
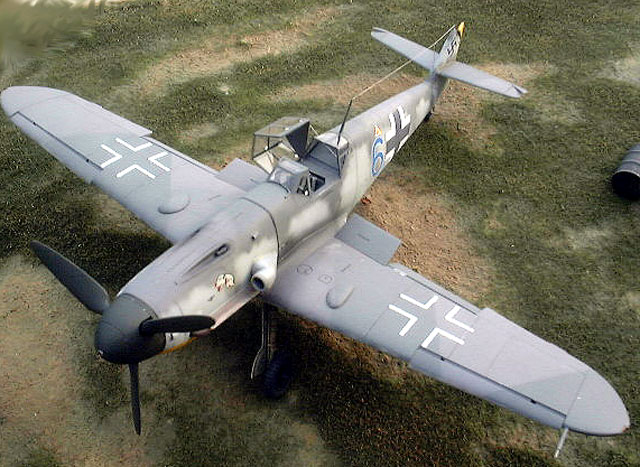
I had some photos of some G-2s at the factory with
simplified wing crosses and normal (black and white) fuselage crosses.
Then I also had photos of G-4s with normal wing crosses and some
simplified, most showed normal fuselage crosses. The only photo I had of
a G-3 wing was a NAG machine with black centers. I thought it would be
interesting to show the transition of the markings so I settled on
normal fuselage markings as per the photo of my machine and the wings
carried simplified. Prove me wrong, there I said it and I feel better.
Besides it will be easier to fill in with black than to cover it if I’m
wrong.
The Hasegawa Bf 109G-4 is not for the beginner
because of the resin’s poor fit. However, the kit itself is superb. The
casting of the parts, other than the undersized everything, was
great.
I would like to see the aftermarket companies, such
as MDC/Adeco, Verlinden or Squadron, do a resin insert allowing other
G-3/4 aircraft to be built. They were lots of G-4s and there are plenty
of paint schemes, including the wing drop tank versions that you can do
with Verlinden’s underwing set. I would like to have a quality casting
of this insert.
The kit was fun and looks real nice in the
collection.
The Moskit exhausts look great but should have been
installed early in the construction as opposed to the end like I did.
The decals from Cutting Edge were great and looked
very convincing. I especially like the blue colored numbers. As for the
“scale” color crosses, I’m neither hot nor cold on them. They look nice
but I won’t go out of my way to use them again.
The True Details cockpit set is a good value for
the money but I would use either Adeco or Jaguar/Cooper Details interior
next time. The True Detail wheels are typical quality and add to the
look. Modelers often overlook the pressurized aircraft, but they fit an
essential part of the 109 mystique. It would be nice to see aftermarket
conversions for these versions.
My advice to you is, buy a Hasegawa Bf-109 (any version) and build it,
you won’t be sorry. Remember modeling is fun!
-
(The best book ever
written on the 109, IMHO) Messerschmitt Bf-109 F, G, & K, Prien &
Rodeike, Schiffer Publications, ISBN 0-88740-424-3, Copyright 1993
-
Model Art No 290,
Messerschmitt Bf-109G/K Augsburg Eagle,
-
Lock on No 28
Messerschmitt Bf-109G-2, Verlinden, Copyright 1997
-
Monographie Lotnicze 43
Messerschmitt Me-109 cz.2 (now available in English), Robert Michulec,
AJ Press, ISBN 83-86209-66-X
Summary of
Aftermarket Items:
Model, Images and Text Copyright © 2002 by
Floyd S. Werner Jr.
Page Created 06 October, 2002
Last Updated 04 June, 2007
Back to HyperScale
Main Page
Back to
Features Index
|
 Home
| What's New |
Features |
Gallery |
Reviews |
Reference |
Forum |
Search
Home
| What's New |
Features |
Gallery |
Reviews |
Reference |
Forum |
Search