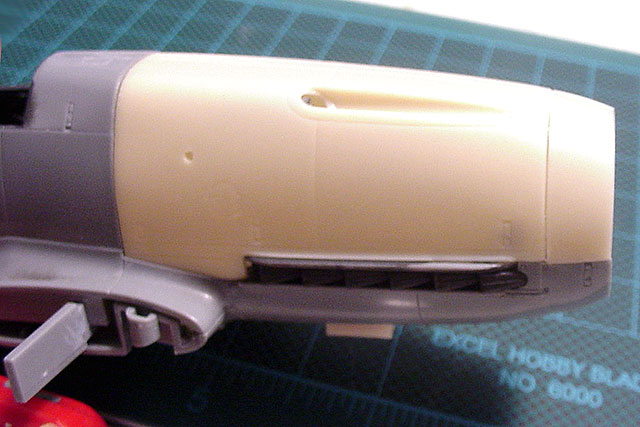
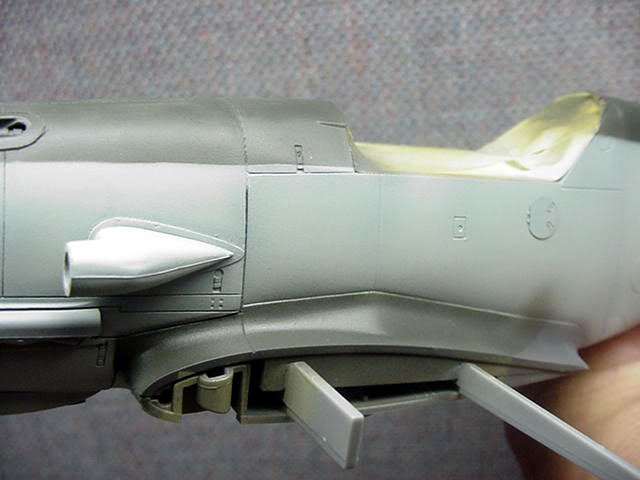
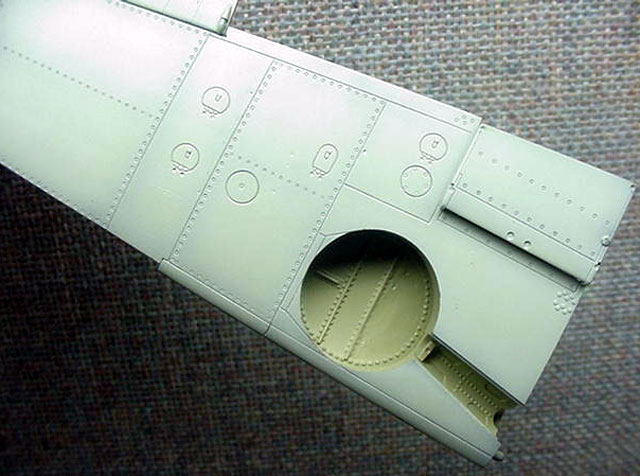
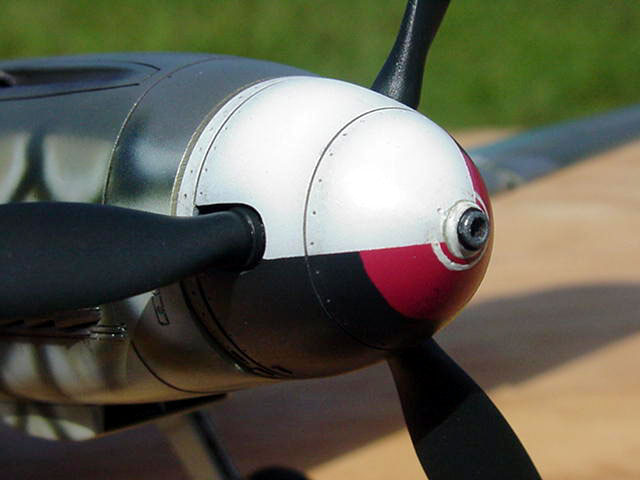
Cowl and Supercharger Intake
The portion of the cowl above the exhaust stacks needs to be removed back to
the vertical panel line that represents the trailing edge of the cowl. To
facilitate this cut I found it helpful to saw through from the inside to
separate the top shelves of the exhaust stack inserts beforehand. The Aires
instructions indicate a straight horizontal line for the shaded area to be cut
away, but this is not advised. Compare carefully the lower edge of the Aires
cowl and the uneven features of the kit panel line as it angles down from the
firewall, comes up behind the exhaust, moves forward across the top of the
exhaust framework, then zigzags over the small square panel ahead of the exhaust
cutout and up across the bottom of the oil reservoir cover. These are features
you will want to preserve.
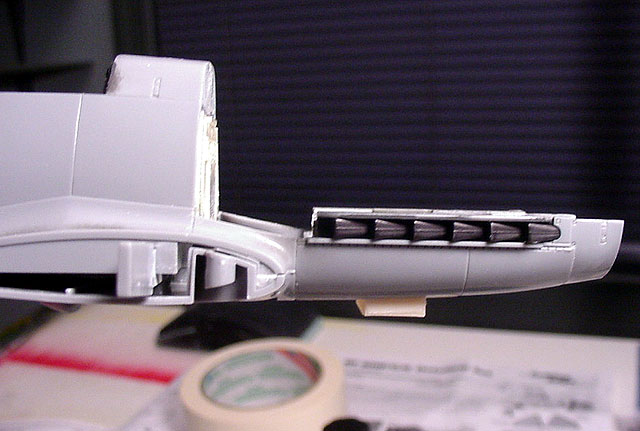
The lower front of the Aires cowl was a couple millimeters narrower than the
corresponding surface of the kit, so I placed a piece of sprue in it to act as a
spreader bar. The fairing for the oil cooler intake and oil cooler insert
dropped right in to replace their kit counterparts without any modification.
The supercharger intake and tropical filter are engineered as single pieces,
fit easily, and there are resin and photoetch metal parts included for the
filter support. The versions supplied in the Aires set look accurate for an F-4.
I wanted a non-tropical F-2, so I first glued a 4mm long section of Evergreen
styrene tubing into the bore of the intake, then sanded the outside down to the
straighter, narrower shape and filed out the tubing until I was happy with the
narrower bore. The weld seam on the outer edge of the intake was restored by
gluing a piece of synthetic salon hair along the side, fairing it in with a bead
of CA glue.
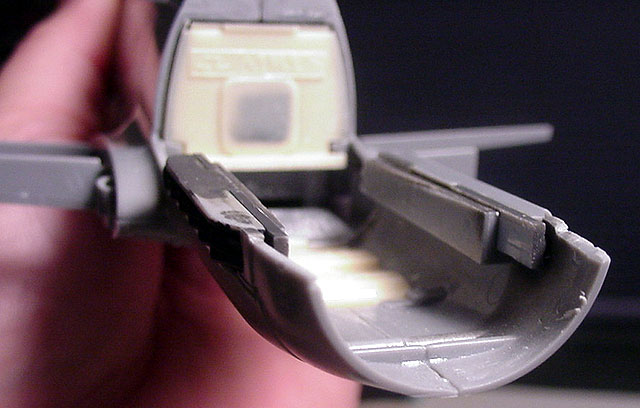
Although the Aires set includes the small slender scoop that many Friedrichs
and early Gustavs had behind the hole for the starter crank, the instructions do
not mention it. I used it on my model because a starboard side photo of another
plane from the same flight shows the feature; the scoop is not evident in some
of the photos that I have seen of other Friedrichs.
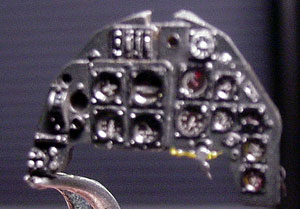
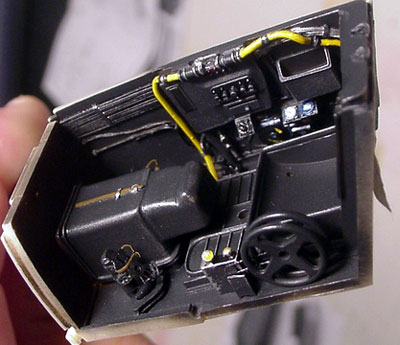
Cockpit and Canopy
The cockpit sidewalls and corresponding fuselage halves require some
thinning, but the Aires cockpit tub has notches for alignment with the forks in
the Hasegawa fuselage halves. I found this arrangement very helpful in
test-fitting the cockpit tub.
 In
order to achieve a good fit for the instrument panel I found it was necessary to
cut away the kit backing from the fuselage halves and thin the coaming over the
panel against which the forward edge of the windscreen is to rest. It is also
recommended that the resin back piece provided for the Aires instrument panel be
sanded to thin it down some. In
order to achieve a good fit for the instrument panel I found it was necessary to
cut away the kit backing from the fuselage halves and thin the coaming over the
panel against which the forward edge of the windscreen is to rest. It is also
recommended that the resin back piece provided for the Aires instrument panel be
sanded to thin it down some.
Cockpit lamps are provided and the Aires set indicates that these should be
glued into holes in the sidewall upper edges. It is my impression that they
would be in the wrong position and that the lamps should be glued to the inner
windscreen trim at the bottom. The flap selector wheels seem to be represented
better by the Hasegawa parts than the Aires photoetch metal replacements, so I
used the former.
The Falcon canopies have nicely formed external features, are quite stout and
easy to work with; I used thin styrene strip to build framing on the inside
since I wanted the canopy open. Modelers must check their reference photos to
determine which type of head armor to install in the aircraft they want to
portray. The curved type is provided in the Hasegawa kit, but early Friedrichs
often had the simple flat variety. I simply cut the bottom of the curved piece
off and glued it to the main armor piece, then faired it in to form the
truncated pyrimid shape of the early flat armor.
Wings
Moving onto the wings, the spent cartridge ejection chutes must be filled in
on the bottom of the fuselage between the wheel wells. The Hasegawa kit also has
seven attachment points on each lower wing half intended for Rutsatz
weapons packages that require filling.
I attached the kit mounting piece for the FuG 16ZY Morane mast, put CA glue
around the edges and faired it in.
Fuselage
On the port and starboard sides of the cockpit section there are rectangular
features to represent cockpit vents that require filling. Moving aft, on the
fuselage spine there are oval access covers, one on the left and two on the
right, that should be filled in. The attachment points for both the whip antenna
(on the starboard fuselage underside) and the vertical leg of the wire aerial
(just in front of the vertical stabilizer on the port side) must be filled in.
The large oval inspection panel on the fuselage under the left horizontal
stabilizer should be filled in. The tailwheel bay must be cut out to restore
it’s shape and the panel line and rivets around it should be filled in as I
believe they are there to represent the coaming found on the Gustavs. I
neglected to fill in some of these features before painting and had to deal with
the task of filling and sanding them back out. That was one lesson in research
and preparation that I hope I never have to repeat!
Tailwheel
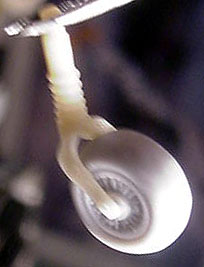 If
the Aires set has a toad in it, it has to be the single-piece tailwheel. The set
includes only the larger retractable tailwheel used on some of the F-4s, F-4/z,
and early Gustavs. To its credit, however, the tailwheel leg fits very
well into the kit attachment points. If
the Aires set has a toad in it, it has to be the single-piece tailwheel. The set
includes only the larger retractable tailwheel used on some of the F-4s, F-4/z,
and early Gustavs. To its credit, however, the tailwheel leg fits very
well into the kit attachment points.
In order to gain some semblance of an F-2 tailwheel I first carefully removed
the molded in wheel from the yoke by sawing, drilling, and sanding. Then I
sanded down a tailwheel from the Cutting Edge G-6 detail set until it
approximated the smaller diameter of the F-2 variety.
It is still a bit wide, and I could have sliced it down the center, thinned
the halves and glued them back together, but then my yoke would be too wide for
a sound fit and I didn’t want to go there! The main wheels provided by Aires are
exquisite, but I don’t recommend drilling them out- I shortened the pins on the
Hasegawa gear legs instead to avoid risking damage to the outer wheel hub
details.
If the one so desires, I believe that a convincing Bf109F-4/z or F-4z/Trop could
be easily made by using the kit supercharger intake, propeller blades, oil
cooler pieces, and the Aires tailwheel.
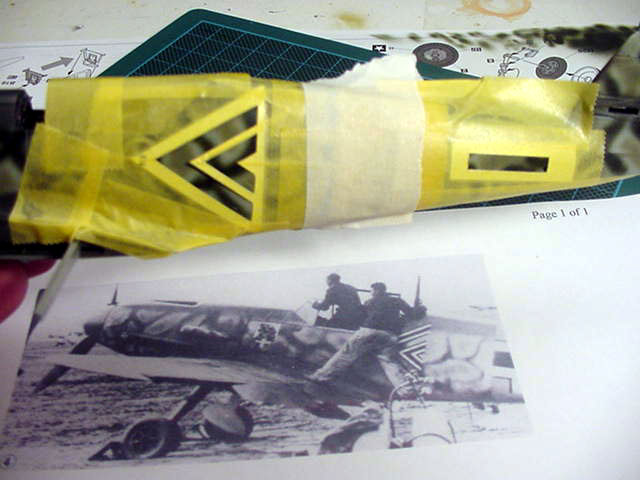
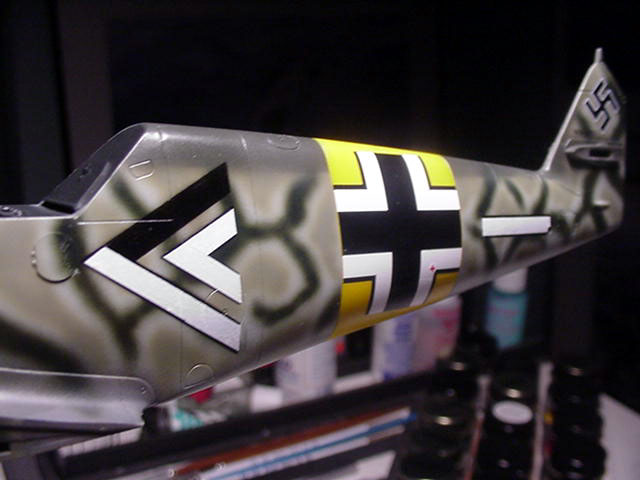
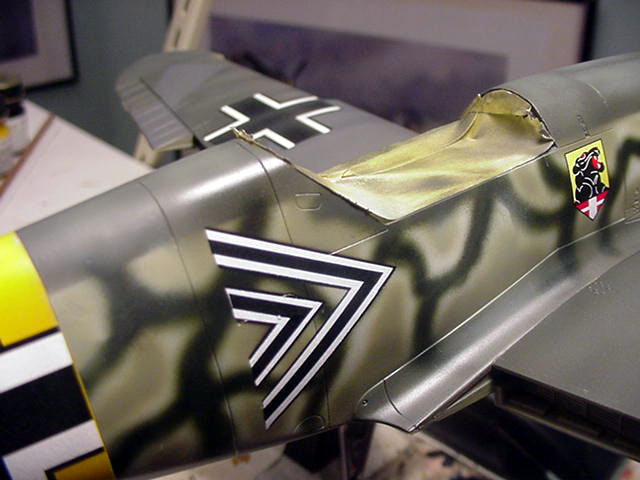
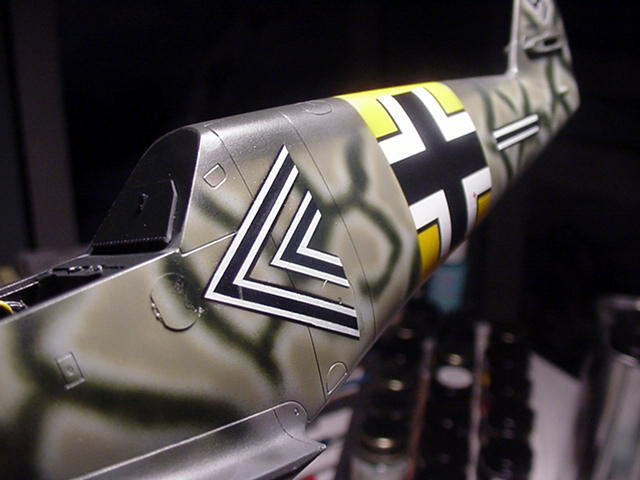
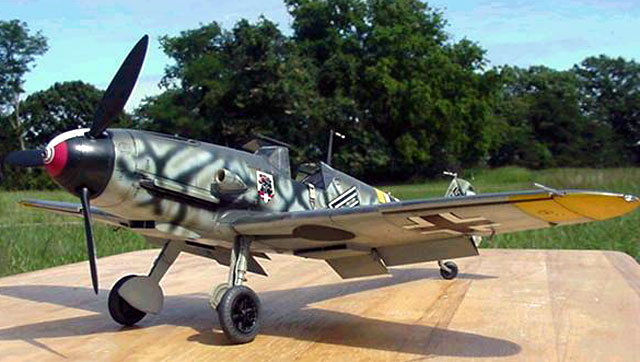
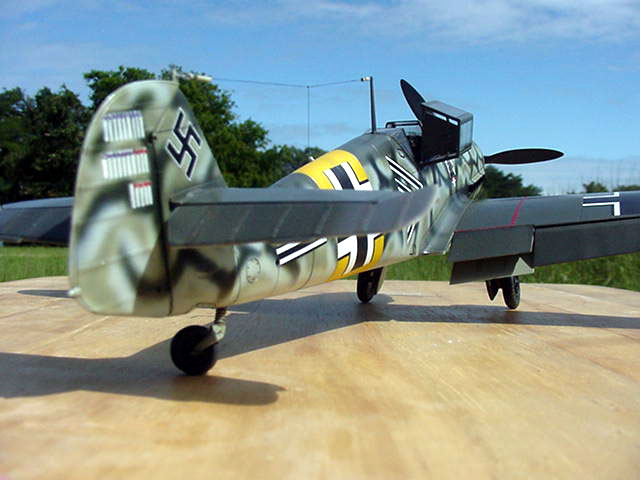
 I
used photos along with the excellent profile painted by Jerry Crandall as a
basis for the markings of the Kommandeur II/JG54 machine, W. Nr. 4773,
flown by Dietrich Hrabak in the summer of 1941. I used Mike Grant’s decals for
the Lion of Aspern badges, work number, and certain stencils. The badges have
the correct design for the lions, but the yellow upper field should be painted
out in white. As far as I know, there are no Gruppenstab markings
available for this machine in 1/32nd scale, so I made tape stencils to paint in
the outer black trim, then applied white and black decal strips (cut from some
surplus invasion stripes I had handy) to fill in the chevrons and bars. Stencils
from Tamiya tape were also used to paint the white victory marks and red
wingwalks. Insignia were cannabilized from an Eagle Strike set. I
used photos along with the excellent profile painted by Jerry Crandall as a
basis for the markings of the Kommandeur II/JG54 machine, W. Nr. 4773,
flown by Dietrich Hrabak in the summer of 1941. I used Mike Grant’s decals for
the Lion of Aspern badges, work number, and certain stencils. The badges have
the correct design for the lions, but the yellow upper field should be painted
out in white. As far as I know, there are no Gruppenstab markings
available for this machine in 1/32nd scale, so I made tape stencils to paint in
the outer black trim, then applied white and black decal strips (cut from some
surplus invasion stripes I had handy) to fill in the chevrons and bars. Stencils
from Tamiya tape were also used to paint the white victory marks and red
wingwalks. Insignia were cannabilized from an Eagle Strike set.
Click
the thumbnails below to view larger images:
Paints used for the camouflage colors are RLM 02/74/75/76 and 70
from the out of production Floquil enamel line.
This was my first kit conversion, and although it was not as ambitious as,
say, making an Ilya Muromets bomber from leftover Nieuport and Eindekker parts,
it was the perfect challenge to push my modeling techniques up a notch. I would
recommend the Aires set to anyone who loves the Friedrich enough to do a bit of
extra work to get there.
Many thanks go out to the forumites on the 109 Lair and here on
HyperScale for the encouragement, constructive advice, and corrective input they
provided in the course of this project.
Click
the thumbnails below to view larger images:
Model, Images and
Article Copyright © 2002 by Erik
Whipple
Page Created 21 September 2002
Last updated 04 June 2007
Back to HyperScale Main Page
Back to Features Page |
 Home
| What's New |
Features |
Gallery |
Reviews |
Reference |
Forum |
Search
Home
| What's New |
Features |
Gallery |
Reviews |
Reference |
Forum |
Search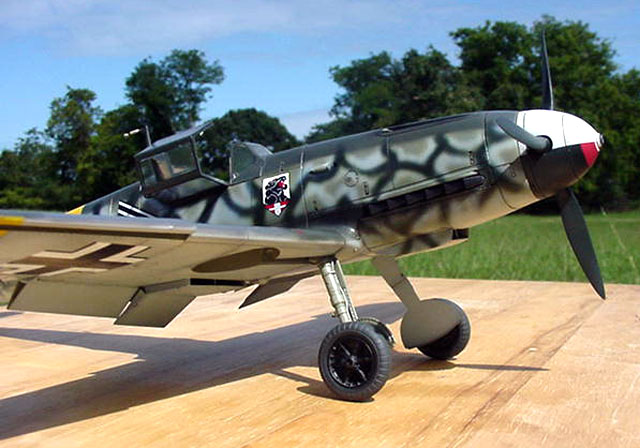

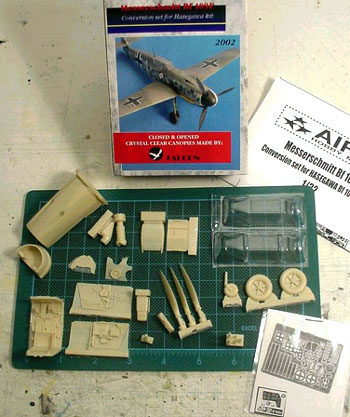 The
following is a summary of the steps required to complete this conversion.
The
following is a summary of the steps required to complete this conversion.