|
Messerschmitt Bf 109B
by Jose Rodriguez
 |
|
Messerschmitt Bf 109B |

Hobbycraft's 1/48
scale Messerschmitt Bf 109B
is available online from Squadron.com for less than USD$10!
The Messerchmitt Bf 109B series or Berta was built at the Bayerische
Flugzeugwerke facilities in Ausburg-Haunstetten. It was equipped with the Jumo
210Da engine.
Construction of the first batch of B-1s started in the late autumn of 1936 and
the first aircraft rolled off the plant in February of 1937.
The first batch of B-1s arrived in Spain in April 1937 where they replaced the
obsolete Heinkel He 51B.
The Bf 109B-1 series was considered an interim production model and fewer
than 30 aircraft were built before the B-2 series took over. The main difference
between both series was that in lieu of the fixed-pitch wooden Schwarz propeller
of the B-1, the B-2 used a variable-pitch two-bladed Hamilton metal prop
manufactured under license by VDM. The kit offers both props as an option but
the propeller is not specified for the aircraft shown in the assembly guide, so
is up to you.
Again, the first batch of B-2Æs ended up in Spain. The B-2 was the last Berta
built before the C series got started.
HobbycraftÆs
Messerschmitt Bf 109B - S
u m m a r y
|
| Catalogue Number and
Description: |
HC1566 from Hobbycraft Canada |
| Scale: |
1/48 |
| Price: |
Less than
USD$10 from Squadron.com |
| Contents and Media: |
Light gray injected plastic parts,
one-piece canopy and one decal sheet for two aircraft. |
| Review Type: |
FullBuild |
| Advantages: |
It's the only Berta out there; good
fit; nicely engraved panel lines; good cockpit detail. |
| Disadvantages: |
Sparse detail in some areas;
erroneous panel lines. |
| Recommendation: |
Recommended to all modelers thanks
to its easy build. Experienced modelers will also find a good platform on
which to practice their scratch building skills. |
While it is true that every kit manufacturer makes a variant of Willy
Messerschmitt æs brainchild, only Hobbycraft offers the early versions, the B
and the C.
These kits are not state of the art but they do have recessed panel lines, a
decent cockpit and the potential to be good kits with aftermarket parts and some
work on the part of the modeler. Anyway, who wants to be one more on the crowd
and built another late series Bf 109? That would be too easy!
The aftermarket parts that I bought were:
-
SquadronÆs vacuum formed canopy (part #9535)
-
Hi-Tech Bf 109 B/C resin cockpit.
-
True Details bulged tires in resin (part
TD48003),
-
True Details seat (part #48410), and
-
Aero Master decals sheet 48-458, Spanish Civil
War part I.
Of these parts I only used the True Detail tires and the Aero Master decals. The
Hi-Tech resin cockpit was not much better than the kitÆs. The Squadron canopy
was not worth the trouble of cutting from the mold when I decided to build my
Berta with a closed canopy as the kitÆs canopy is a good fit and is very clear.
I tried to stick the True Details seat in the cockpit after the fuselage had
been glued together and it turned out to be too wide so I used the kitÆs seat. I
think I will be using the unused parts on a future C series.
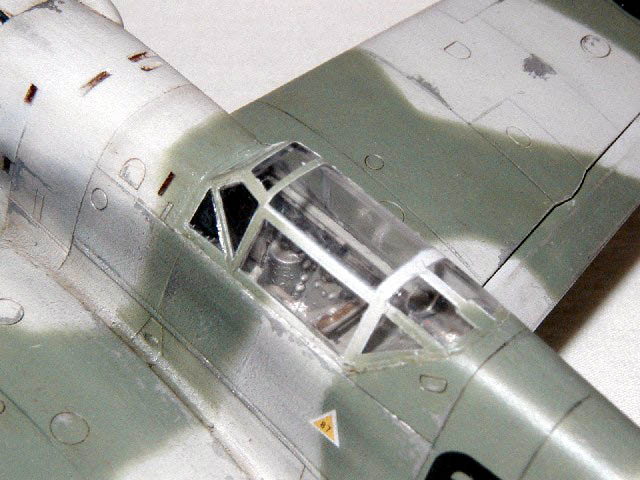
The cockpit was completed straight from the box, painted in RLM 02 gray,
stained with chalk pastels diluted in soapy water and dry brushed. Good enough
for me. I scribed the vertical panel on the canopy side that simulates the
partition of the sliding glass. The fit of the parts is good.
Using SquadronÆs Messerschmitt Bf109 In Action Part I as a reference, you will
notice that some of the panel lines in the kit donÆt quite match the close up
photographs. You can either close the faulty lines and scribe new ones or leave
it alone. I opted for the second option because I build for pleasure, not to
torture myself. I fixed the location and shape of the inspection hole at the
front of the horizontal stabilizer. This aperture is on the vertical fin and the
one in the kit is too big and too way forward. I closed the factory hole and
opened a new one with a 11 blade to better match the excellent close up pictures
in the Squadron book.
I scratchbuilt a few new and replacement items.
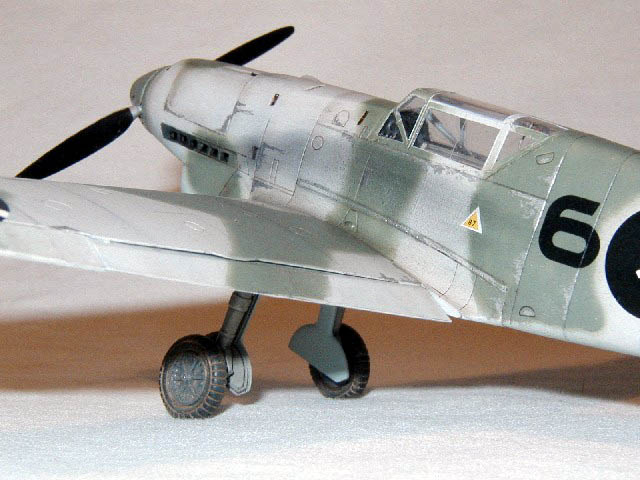
The chin radiator has no surface detail so I scribed texture and added
diagonal and vertical braces. You can see through the oil radiator so I stuck a
painted piece of tissue paper inside to simulate radiator body.
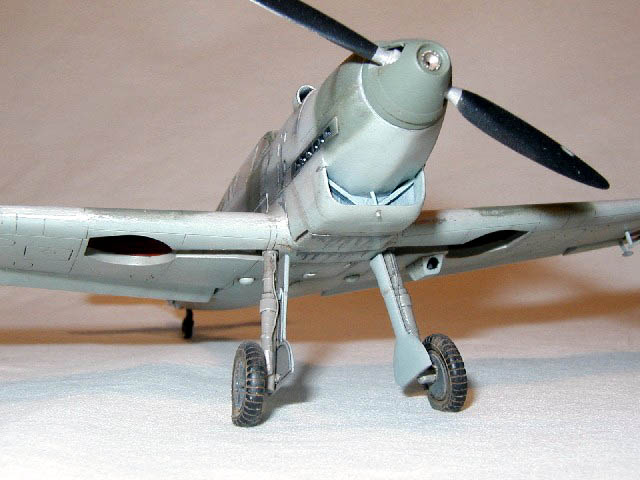
The tail wheel is an early version so it needs a torsion brace. I made mine
out of beer can aluminum. I added the control cables to rudder and rudder horns.
The hydraulic brake lines were made out of electric wire. The air scoop over the
cowling was carved out with a number 11 blade. All control surfaces were cut and
repositioned.
Construction was easy and required a minimum of putty. The horizontal tail plane
braces presented me with the biggest construction challenge. They did not quite
fit into the predrilled holes. I had to fill the holes and redrill a new set.
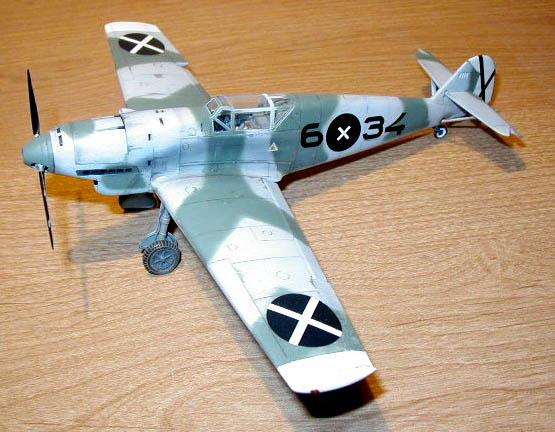
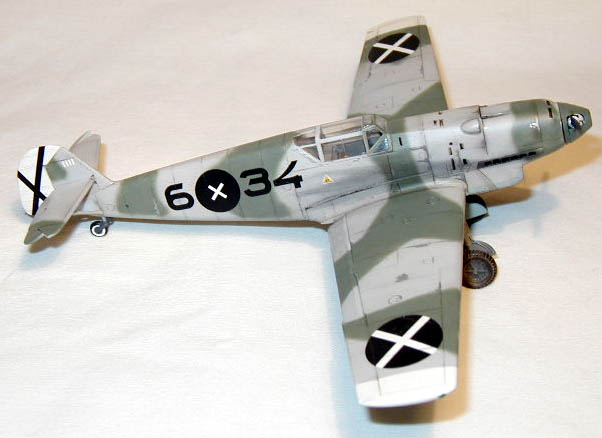
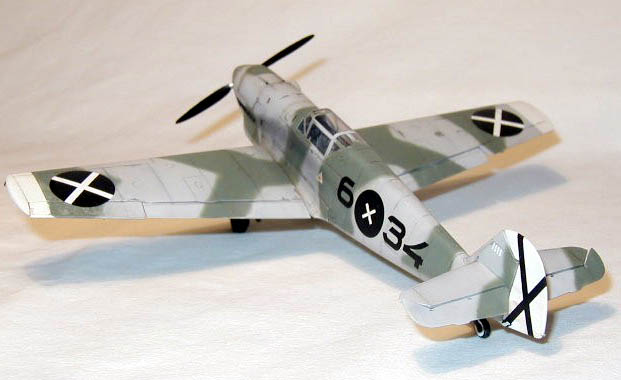
The kit decal sheet offers the option of a German machine, 6./JG 132, circa
1937 or a Legion Condor machine, 1938. I used AeroMasterÆs Bf 109B option for
Oblt. Erich WoitkeÆs machine of 1./J.88.
The paint scheme is RLM 62 Dunkelgrun over RLM 63 Hellgrau with RLM 65 Hellblau
undersurfaces. Aero Master calls for a bare aluminum prop but photographs show
props painted black so I opted for the latest.
All paints were Model Master enamels. I waited 24 hours between color
applications and then another 24 hours before applying a coat of Future floor
wax. The decals went next and without a flaw (they were AeroMaster, remember?).
After 24 hours I washed off the decal residue and applied a coat of furniture
varnish. I used semi-gloss Polyurethane made by Minwax. This sealed the decals
and paint job from the oil wash that came after 48 hours. I used burnt umber for
the oil wash, and wiped model clean with a rag slightly soaked in turpentine.
Next came the fun part of chipping and pastel chalks along the panel lines. I
added some more oil stains picked from the bottom of my brush jar cleaner and
weathering was done. After another 24 hours I applied the last coat of Model
Master semi gloss clear lacquer finish.
For less than ten bucks you cannot beat this kit. It is fun to build and you
get the chance to exercise all those modeling skills that have been suppressed
from building too many Tamigawa late series 109Æs!
Click the thumbnails below to view
larger images:
Model, Images and
Article Copyright ® 2002 by Jose
Rodriguez
Page Created 17 February 2002
Last updated 04 June 2007
Back to HyperScale Main Page
Back to Features Page |
 Home
| What's New |
Features |
Gallery |
Reviews |
Reference |
Forum |
Search
Home
| What's New |
Features |
Gallery |
Reviews |
Reference |
Forum |
Search