|
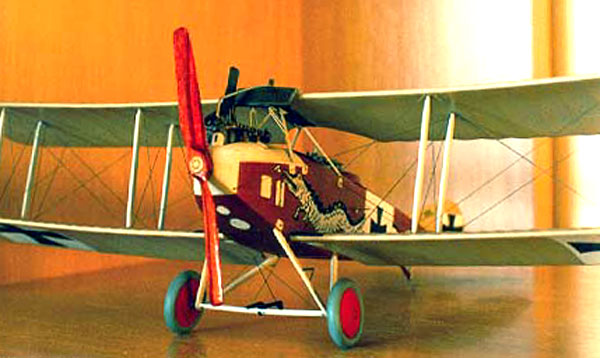
Albatros C.III
by Robert Woodbury
 |
|
Albatros C.III |

HyperScale is proudly supported by
Squadron.com
Taming the Dragodile…
Eduard's Albatros C.III in a/48 scale is one kit I have had on the
construction table for some time- it's been one of those on again, off again
affairs for about two years.
I basically followed the construction sheet, starting with the photo-etched
cockpit and white-metal engine. The engine goes together easily- no comment to
make here, the real secret though is to put in the effort painting it, I've
received more comments about the engine than almost the rest of the aircraft!
Next the cockpit, it goes together easily, no surprises but as usual with early
Eduard kits the completed cockpit doesn't fit- it's too wide for the fuselage
halves. I really didn't have much of a solution to this problem, other than to
squeeze it in place and glue the fuselage halves together (of course, now that
construction is complete, you can hardly see all that work!). The fuselage
halves were glued using epoxy glue, I wasn't satisfied that I'd get the strength
I wanted from either CA or plastic cement.
With the engine and cockpit in place and fuselage halves together I moved on to
the tail surfaces. Earlier, I'd made the required cuts in to the fuselage for
the flying surfaces, I'd also decided to cut off the rudder for a slightly
different look. The tail surfaces were then simply glued in place in place.
Next-up were the wings.
As usual with Eduard kits, mounting locations are little more than dimples on
the fuselage. This required a bit of drilling in to the fuselage. With the drill
still in hand I decided to tackle the wing strut and rigging locations. Mounting
points for the struts in the upper and lower wings were only partially drilled,
this saved any hassle with having to fill what remained. Next, using a no. 80
drill I drilled all of the holes that would later be required for the rigging.
The locations in the upper wing were only partially drilled through, whilst
those in the lower wings were drilled all of the way through.
With all of the drilling completed I turned my attention to painting. Not much
in the way of choice here- wood fuselage and fabric covered flying surfaces.
Prior to painting on the wood finish I painted the cowl area a very light grey
and then masked the area off using "post-it notes". For the wood finish I chose
Boxcar Red (a slightly red brown) from Floquils railway range, the paint was
lightened slightly using SP Armour Yellow (again a Floquil colour) in the ratio
of 3:1.
I then started on the "fabric" surfaces. These were painted using Xtracolours
A4KU Kuwaiti Desert Sand, slightly lightened with RFC Doped Linen in a roughly
3:1 ratio (remember when mixing any of these colours mix enough for touch-up
jobs at the end).
Once dry (I let it dry for 24 hours) I streaked the fuselage surface using a 3/8
chisel brush with the softest bristles I could find. I wanted the wood grain
effect to be very subtle. I dipped the brush in to the Boxcar Red paint and then
removed most of the adhering paint on to paper. The brush was then gently
streaked across the surface, giving me just the effect I wanted. Next the wings
received a similar treatment. I wanted the rib detail to be visible, so I
dry-brushed the surface with the Kuwaiti Desert Sand.
Lower Wings and Struts
With the painting complete and having turned my lower wing sections in to
Swiss cheese I glued them in place, again opting for the strength of epoxy over
the hassle of a 10 hour cure time. Using a flat surface, I placed a little
weight on the fuselage and put 5mm spacers under each wingtip. After letting the
epoxy harden I began on the undercarriage, no hassles here. Just be sure to get
all of the angles right. At this point I opted not to attach the wheels. Next I
attached the struts. Working one wing at a time I ensured that each strut was
perpendicular to a flat working surface.
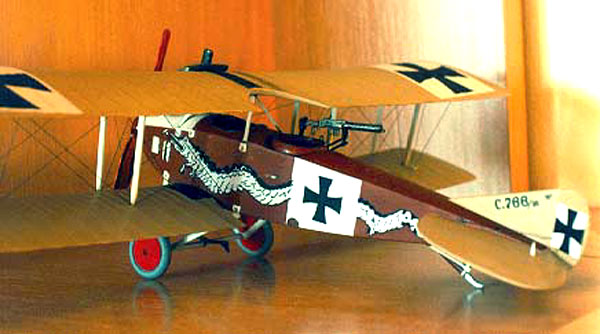
Decals
With most of the major construction complete it was time to start on adding
some decals. I'd decided to add the "dragodile" creatures of Bohme/Lademacher
Albatros C.III C.766/16. Using the Corel Draw outlines prepared by Joey
Valenciano (joeyval@philonline.com.ph) and previously available on
http://pease1.sr.unh.edu/Images/Valenciano/, I prepared a sheet of clear
decal film by first spraying it with Testors Modelmaster Semi-Gloss varnish. I
then taped the sheet to a piece of paper to feed through a laser printer. The
results were very good and the sheet sealed with a coat of varnish.
I then airbrushed the undetailed outlines gloss white as recommended. A SHARP
scalpel blade was then used to trim the design free of the surrounding film.
First placing the national insignia on the fuselage I then proceeded to place
the tail sections of the crocodile and dragon. Next, on went the forward section
of the croc. and finally the forward section of the dragon and horror- it's too
big! Using Bob Pearsons profile as a guide it appears that this section has been
over scaled. The legs stretch past the bottom of the fuselage and the head ends
up on the engine vents. The only solution was to trim the wet decal, again using
that sharp blade, a few careful cuts resulted in shortened legs and neck. The
same treatment would need to be applied to the detailed portion of the decal
which went on next. I decided to cut the decal between the neck scales- the
result is a dragon with only one neck scale, but now it would fit. With the
white portions of the decals having dried overnight I placed the detail portions
of the decals on top. The result is one white dragon and one white crocodile.
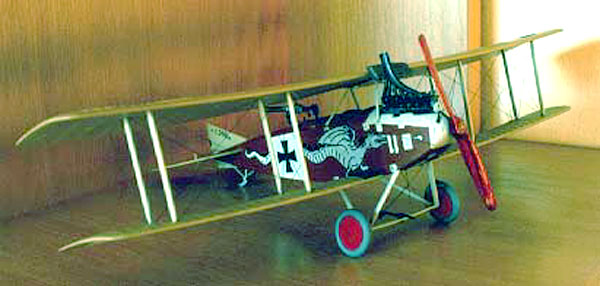
Top Wing
With the fuselage markings out of the way it was time to add the top wing. At
this stage I discovered that the locating holes for all of the struts were
located outboard by a matter of about 2 to 3 mm. Just enough that the struts
were slightly bent but not enough to warrant all the work required to relocate
the holes. (in fact, now that construction is complete the bend is not
noticeable.) The locating holes for the cabane struts were also incorrect, but
these did require a little filler and some repainting. A little epoxy in each
locating hole and the wing was set in position.
Once the wing had set I tackled the cabane struts. These are provided by Eduard
as two single piece etchings. I found it easiest to cut them all in to single
pieces. Glue the lower portion in place- use a slower setting supper glue, then
carefully locate the top of the strut against the wing and glue. At this point I
also glued all of the struts and control horns around the tail section.
Rigging and Finishing Touches
With all of the struts in place I moved on to the rigging. This was
accomplished using invisible thread. I coloured the thread by running about 3m
through a cloth with a little metallic paint on it. I then trimmed lengths of
the thread and glued one end in place with super glue. I allowed the glue to set
for a few minutes then fed the free end through the hole I had drilled earlier.
Hanging a peg on this free end and with gravity doing the rest a tiny drop of
super glue was used to secure this end. Once set the remaining thread was
trimmed off and any dags of glue carefully trimmed away. This procedure was
repeated for all rigging wires, the whole job was completed in about 5 hours.
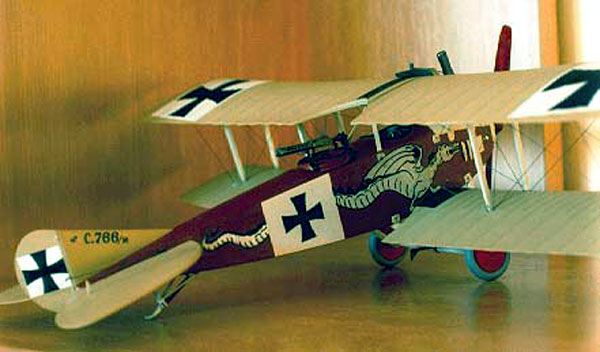
Now that all of the construction was out of the way it was time to finish
applying the rest of the decals, basically the national insignia and serial
numbers. A final coat of flat varnish was applied and model weathered using
pastel chalks. A light dusting of dark brown and black at various strategic
locations was sufficient.
The final steps involved fixing the wheels, adding the gun ring and gun, the
forward gun and exhaust stack and fixing the windshield and smaller instruments.
In summary, the construction was fairly straight forward. The Albatros C.III
was the second Eduard kit that I've built and my second WWI subject. A very
pleasing and interesting addition to my collection.
Model, Images and
Article Copyright © 2002 by Robert
Woodbury
Page Created 11 October 2002
Last updated 04 June 2007
Back to HyperScale Main Page
Back to Features Page |
 Home
| What's New |
Features |
Gallery |
Reviews |
Reference |
Forum |
Search
Home
| What's New |
Features |
Gallery |
Reviews |
Reference |
Forum |
Search