|
AH-64A Apache
by Albert Moore
|

|
|
AH-64A Apache |

Hasegawa's 1/48
scale AH-64A Apache is available online from Squadron.com
Without a doubt, the McDonnell Douglas (now Boeing) AH-64 Apache has
proven its self to be one the most lethal helicopters in service today.
Flying with the United States Army since the mid 1980’s, the Apache also
serves in Israel, Greece, Egypt, Denmark, and recently Singapore.
Westland is producing the Longbow Apache (under license from Boeing) for
the British Army.
The U.S. Army upgraded to the AH-64D Longbow Apache, with its
distinct rotor mounted fire control radar, improved avionics, and
asymmetrical enlarged sponsons in 1998, extending the Apache’s service
life well into the 21st century.
Hasegawa's 1/48
Scale Apache
|
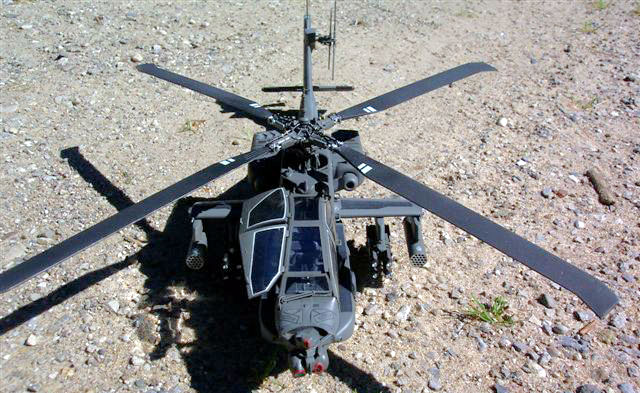
Hot on the heels of the recently released Longbow Apache, Hasegawa
has issued the AH-64A Apache in 1/48 scale.
The kit contains 278 parts, and is molded in medium gray styrene. The
fuselage is well molded, has recessed panel lines and raised rivets. One
feature unique to both kits is they contain vinyl grommets that you
insert into the main rotor mount, tail rotor, chain gun mount and the
TADS Targeting assembly. This allows the rotors and chain gun to be
mounted after painting, and removal for transportation to shows and
contests.
The clear parts for the canopy are packaged separately and are
distortion free. Also included on the clear sprue are the lenses for the
navigation lights, the ALQ-144 IR Jammer, and seeker heads for the
Hellfire missiles.
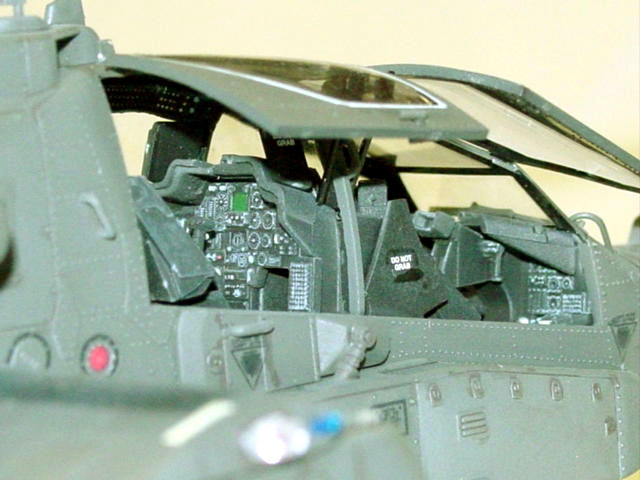
Assembly starts with the cockpit and main rotor mount. The cockpit is
well molded and features four separate side consoles, each containing
raised knobs, switches, and buttons. The instrument panels have raised
details as well, which make painting and detailing a breeze. Prior to
painting, the main cockpit assembly and other interior tidbits were
mounted on toothpicks using good ole’ blue fun tack to hold them in
place.
 All
interior parts were painted Model Master interior black with 20% white
added for scale effect. I also painted the Hellfire missiles and the
rotor blades as these are also black. All
interior parts were painted Model Master interior black with 20% white
added for scale effect. I also painted the Hellfire missiles and the
rotor blades as these are also black.
While the interior parts were drying, the main rotor mount was
assembled and painted Model Master FS 34031 Army Helo Drab. The
instrument panels and side consoles were detail painted with medium gray
for the knobs, silver for the switches, and light gray for the buttons.
The instrument panels were drybrushed with white, then future floor wax
was added to simulate glass over the gauges. I took the black and again,
added white to lighten it, then drybrushed over the entire cockpit to
add some depth.
With the detail painting complete, the rudder pedals were installed
and painted, the collective and cyclic controls added, and the
instrument panels glued in place. The seats were painted and added to
the cockpit as well. One criticism I have is the seats are devoid of
texture and are missing the lap belts.
After the instrument shrouds were installed, it was time to glue the
main rotor mount and cockpit into the right fuselage half. Make sure the
rotor mount is level and the vinyl grommet for the tail rotor is in
place before joining the fuselage halves. The fuselage was assembled and
the seam sanded out then polished with a 3-way nail buffer. Take care
when sanding the seam on the bottom so you don’t lose a lot of the
raised rivets.
It is imperative the landing gear are attached prior to installing
the sponsons and bottom fuselage plate, as this allows you make sure the
struts are level and the model sits right. The wings were added next,
followed by the sponsons, and the bottom fuselage plate. As is the case
with the tail rotor, a vinyl grommet was installed for the chain gun
mount prior to gluing the bottom plate to the fuselage. The engines were
put together, then glued to the fuselage.
The stabilator, tail wheel, and TADS system were assembled and
installed. Speaking of the TADS, I tinted the targeting lenses with
pearl powders to simulate the violet refective coating found on most
modern optics. With the fuselage complete, I turned my attention to the
canopy.
The canopy was masked off with bare metal foil, painted black first
(interior color), then Army Helo Drab. I added as many of the exterior
parts that were possible (grab handles, various bumps and lumps, etc.)
then it was time to hit the paint booth.
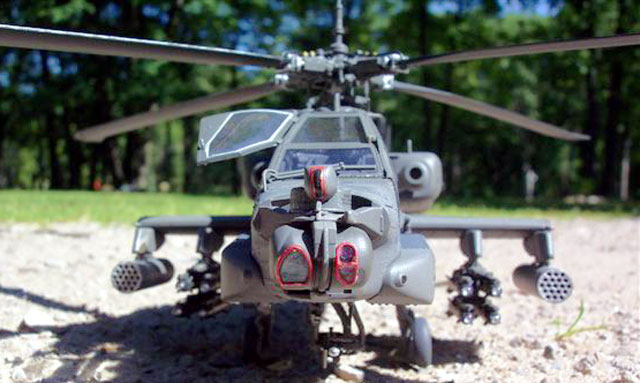
Like most U.S. Army helicopters, the Apache is finished in FS 34031,
a dark greenish-grey drab color. Designed to make the Apache hard to
locate in low lighting conditions, it has some radar absorbing
properties as well.
Model Master Army Helo Drab was applied straight from the jar for a
base coat. After a day of drying, I applied more Army Helo Drab, but
with white added for highlight. I sprayed the leading edges of the wings
and forward facing surfaces, as well as the top of the helicopter and in
between the rows of rivets. The result was a worn, faded, but not abused
finish. After the paint dried, it was time to prepare the model for
decal application.
Two to three coats of Future floor wax were sprayed on the model,
then allowed to dry. While the gloss coat was drying, I detail painted
the rotors and 30mm chain gun. The decals are well printed, and respond
to setting solutions. I like using the Micro-Scale system as these
setting solutions aren’t as harsh as other solvents, but are still
effective. I used black decal film to simulate the non-skid material on
the walkways.
The decals were also applied to the missles and FFAR pods. I used a
dark thinner wash to accentuate the panel lines and various vents. After
going over the decals to make sure they had comformed to the model,
I sprayed several thin coats of Testors Acryl Dull coat to produce a
smooth, flat finish. The blast shield, canopy, and navigation lights
were added with Micro Krystal Kleer thinned with a little water. The
rotors were installed, the FFAR pods and missile racks were hung on the
stub wings and with that, the model was completed.
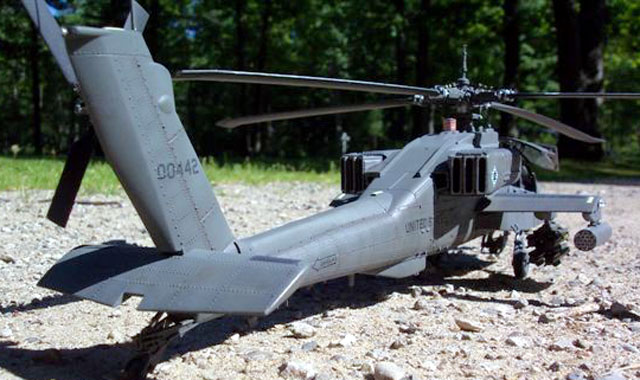
The Apache is a machine only its mother could love and Hasegawa has
done an outstanding job capturing its ungainly lines.
This kit is hands down the best 1/48 scale Apache on the market,
though the MSRP of $38.00 dollars may put some modelers off. The price
is justified though as this kit is well engineered, has excellent
detail, and builds into a fine replica.
The parts count and small pieces may give beginners some trouble, but
experienced builders will have no problems adding the premiere attack
helicopter of the world to their modern aviation collection.
Click
the thumbnails below to view larger images:
Model, Images and Text Copyright © 2002 by
Albert Moore
Page Created 20 October, 2002
Last Updated 04 June, 2007
Back to HyperScale
Main Page
Back to Features Index
|
 Home
| What's New |
Features |
Gallery |
Reviews |
Reference |
Forum |
Search
Home
| What's New |
Features |
Gallery |
Reviews |
Reference |
Forum |
Search