|
Douglas AD-5 Skyraider
by
Eli Raphael
 |
|
Douglas AD-5
Skyraider |

HyperScale is proudly supported by
Squadron.com
Ever since the Matchbox 1/48 scale kit of the AD-5 became
available, I wanted to build my favourite Skyraider version.
However, I delayed starting the project due to several factors
including the poor cockpit, thick canopies and lack of surface
detail.
Then things started to look brighter. Cobra Company. came out with a
complete cockpit set. Later I found and read Thomas Cleaver's
article on how he mated the Tamiya wings and centre section to the
Matchbox kit.
That did it! The IPMS/Mexico Nationals were due soon and wanted
to do it for this special occasion.
The first doubt that erupted was when my good friend Fotios Rouch
sent drawings that showed what could be carried on the huge aft
compartment. I opted for the stretcher version, but that meant that
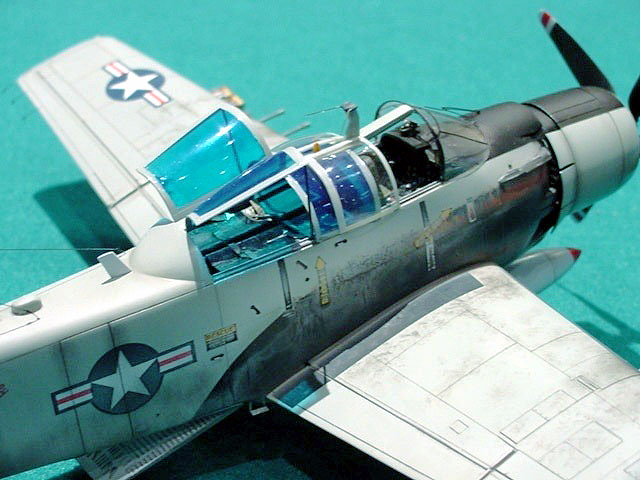
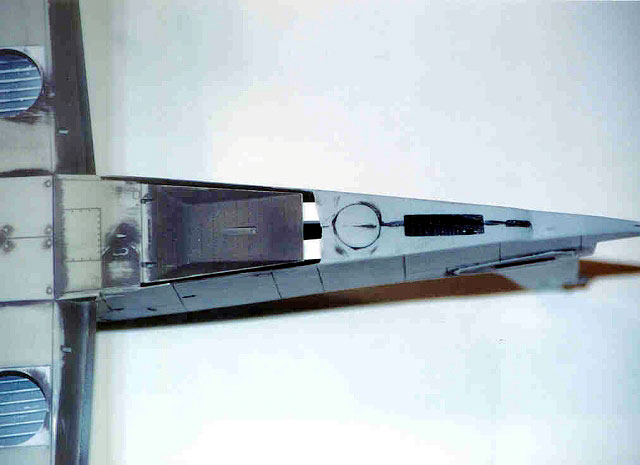
I had to open the aft canopies in order to show the inside.
Matchbox's canopies are so thick that it wouldn't look scale-wise
correct. I thanked him for the drawings and decided on leaving the
canopies closed. He suggested that if I wanted to show them opened,
Squadron had the AD-5 vaccuformed canopies available! That did it
for me, I got several sets from them, so I could cut them up.
The second doubt erupted then, which version. Navy or USAF?
I have a photo of an USAF AD-5 flying along side a Jolly Green
Giant HH-53 during the Vietnam War from the 602nd SOS. Matchbox'
decals were not that good and Aeromaster's set was long gone from
production. Fortunately I found a modeler that didn't want the USAF
version that I liked.
Thanks to Dana Bell, he mentioned that the correct FS colour for
that AD-5 was 36473 and not 36440 as stated in the decal
instructions. He also mentioned that they didn't have white lower
and upper control surfaces, even though they were acquired from the
Navy. And to complete the information, that " As a rule of thumb, if
the A-1 is in overall grey and has the larger size national
insignia, the "USAF" marking would be above the right wing and below
the left wing. When the smaller, fifteen-inch insignia was
introduced, the "USAF" markings were usually eliminated. There are,
of course, always exceptions".
Armed with this information, I decided to tackle the project.
As the photos show, the cuts were made using a jeweller's
hacksaw. I decided to first fit the Cobra's cockpit into the
Matchbox's fuselage. Before closing it, the Tamiya's aft wheel well
was chose instead and glued in place, taking care to widen the "M"
opening. (From here on "M" is referred as Matchbox and "T" as
Tamiya).
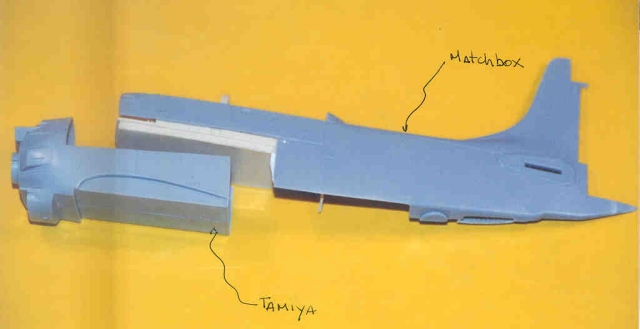
The front "T" fuselage had already been glued together. When "M"
&"T" fuselages were dry it was time to couple them making sure
everything was aligned. Thick plastic strips were used to reinforce
the joint and CA glue was chose instead to glue the fuselages
together.
The "T" wings were the next step. AD-5s had a circular wheel well
cover. Using thin sheet stock, it was glued in place and the tires
were laid on top tracing their outline. Taking care of not damaging
the sheet plastic, the circular openings were carved out.
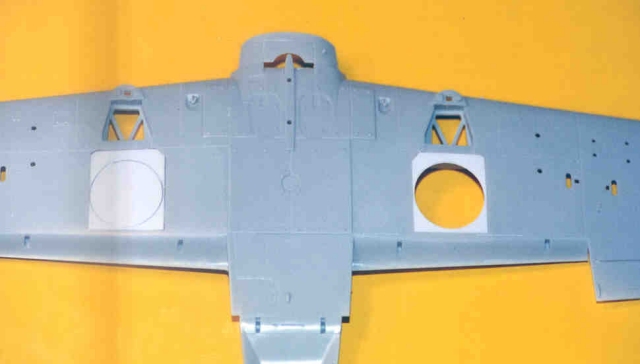
Having done that, the glued wing halves were "presented" to the
"T" front fuselage. The "M" speed brake well was interfering with
the much more detailed "T" offering, so it was "hacked" away. The
result, as seen on the photo, was a big gap that had to be filled
with plastic stock reinforced from inside.
My AD-5 didn't carry the round antenna found on the "M" lower
fuselage. Now I could sand away and leave everything flush and
smooth.
Having done that, my attention turned to the upper fuselage.
The first thing I noticed was that the "M" spine comes without the
oval shaped inlet used for the aft environmental control system.
After reviewing several photos, and having determined the area where
the opening was to be, my trustworthy dental handpiece was used.
Since I was working in that area, the holes for the antennas and
static boon were drilled out.
The "T" horizontal stabilisers' glue tabs were narrowed so they
could be placed even with the rudder's leading edge.
The upper "M" elliptical antenna was left in place.
Next, we move to the front fuselage, where things started to look
bleak. Two things had to be done in this section. First, match the
"T" air intake and second, start adjusting the front canopy.
Well, in order to do the first part, a lot, and I mean, a lot of "T"
plastic has to be removed to make the intake fit as per the actual
photos. I had to place a plastic "roof" so that the epoxy putty used
wouldn't cave in on me once the sanding started.
After the putty was still malleable, the front canopy was
presented and the necessary trimmings were carried out. Let me tell
you that I was very tempted to throw the kit into the wall!
The putty kept sticking to my dental tools; even though I kept
dipping them in water. The intake moved in one way and the canopy in
another!
But eventually time came to shape the putty and the indentation
for the front canopy remained in place. The Cobra's instrument panel
is wider than the "M" opening, so a lot of sanding and test fit had
to be done before cementing it into place.
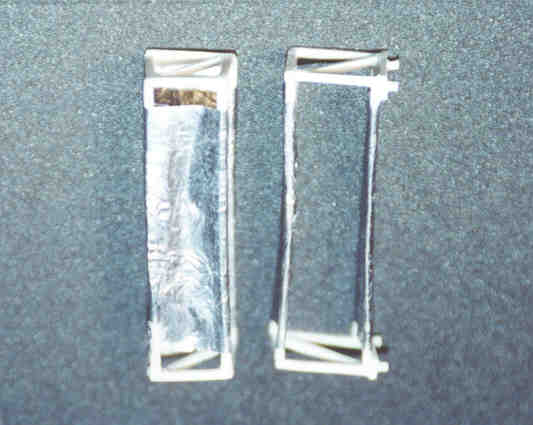
The stretchers were next done, using rectangular plastic strip and
lead dental X-ray foils for the canvas. (BTW, when you next go to
your dental visit, ask your dentist not to throw the lead foil used
on the X-ray film. They come in 2 sizes and some are textured.
Excellent for seat belts, tarps, etc.) Buckles came from an Eduard
PE set.
Time came to start smoothing and re-engraving. When done, black
acrylic was sprayed to check for blemishes and to start shading
panel lines. A few retouches had to be done on the speed brake area
with CA glue and accelerator.
|
Painting,
Markings and Finishing Touches |
When satisfied, Model Master's FS 36473 was shaken up from it's
long sleep and thoroughly applied with my trustworthy Paasche H
airbrush. Leading wing edges were Alclad II steel sprayed.
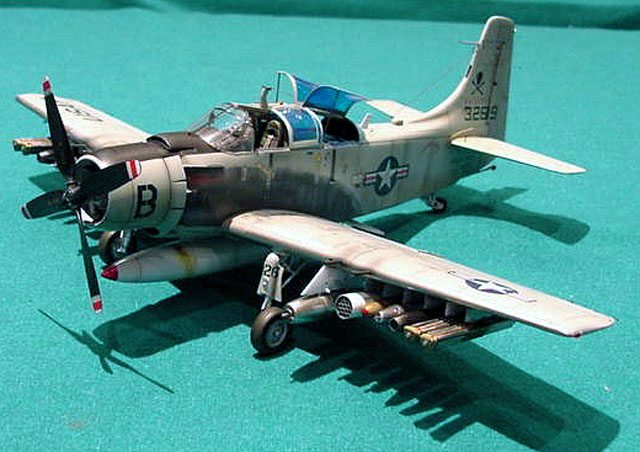
Time again to decide what type of armament was going to be used.
'Cause let me tell you, an unarmed 'Raider is like seeing a
de-fanged viper!
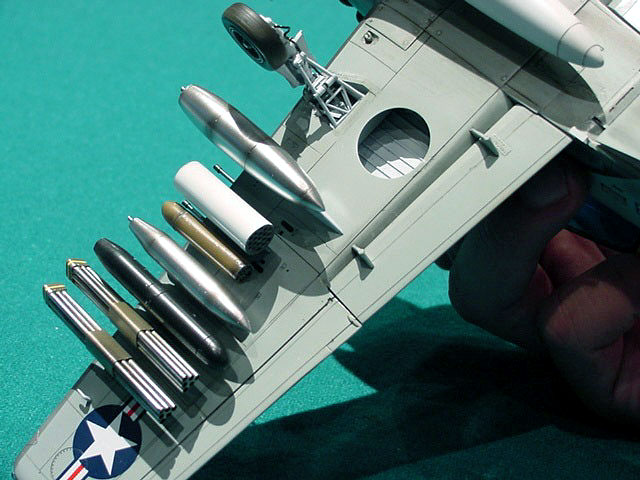
Fortunately I had saved for this special occasion an old KMC A-1 H/J
weapons set that included and decided to place:
-
2 LAU-3A rocket launchers
-
4 CBU-14A/A cluster bomb units
-
2 SUU-11A/A minigun pods
-
2 BLU-10 napalm canisters
-
2 Mk-77 Mod 2 napalm bombs
They were wire-secured to the "T" 's pylons, thus avoiding
knocking them at any moment.
Main landing gears were detailed and the "M" forward wheel doors
were used and decided, even though it's impossible to determine if
my sample had them, landing lights.
The dreaded time was close at hand! Cutting, painting and attaching
the vaccuformed canopies. The cutting was easy.

Next came the painting part. Since the AD-5 had the aft canopies
blue tinted glass to reduce sunlight exposure, it was easy to assume
that a light clear acrylic blue mist was going to do it. Wrong!
These canopies are not made of clear polystyrene and thus the clear
blue paint just didn't want to stay in place. A lot of little " blue
islands" formed spoiling the appearance. Luckily I had an extra pair
just in case. I decided to first coat them with Future and after
several days, again sprayed the clear blue. Holy remedy!
After a week's long drying time, it was time to attach them using
CA glue.
Antennas and static discharges were replicated with black nylon
thread. The kit's propeller was replaced with a Cutting Edge sample
and for exhausts, a set from Moskit was employed. "T"'s arrestor
hook was used instead of the original one. Several diameters of
hypodermic needles were necessary to do the gun barrels, landing
gear oleos and static boom. The flaps were set in the elevated
position that is correct for parked Skyraiders.
And for the final touch, the windshield wiper was cannibalised
from the Eduard AH-64 Apache PE set.
After everything was in place, the final touches were done with
several pastels' shades. A seal with Testor's Dullcoat was all that
was needed to avoid smudging them.
So here you have it. An AD-5 Skyraider that took some time and
effort to finish but eventually worth it!
I wish to thank several individuals who helped with this project.
First and foremost to Fotios Rouch, that without his guidance and
encouragement, I would have never started. Hats off, filarako!
Next comes Tom Cleaver, who paved the way.
And last but certainly not least, to Guillermo Díaz de León,
photographer extraordinaire.
Eli Raphael
www.aircraftresourcecenter.com/albatros
Click the thumbnails below
to view larger images:
[photogallery/photo4832/real.htm]
Model,
Images and Article Copyright © 2002 by
Eli Raphael
Page
Created 16 November 2002
Last updated
04 June 2007
Back to HyperScale Main
Page
Back to Features
Page |  Home
| What's New |
Features |
Gallery |
Reviews |
Reference |
Forum |
Search
Home
| What's New |
Features |
Gallery |
Reviews |
Reference |
Forum |
Search