|
A-10A Thunderbolt
II
"A Tale of Two Hogs"
by David W.
Aungst

Trumpeter's 1/32
scale A-10A is
available online from
Squadron.com
In March of 2002, a model club member approached me at a club meeting to see if I would be interested in finishing some prototype models for a collector's toy company. This company is releasing a series of 1/48th scale and 1/100th scale die cast metal aircraft models. They need prototype models painted into specific camouflages and markings so that they can send the models to their production facility in Asia to be mass-produced. I thought this sounded like an interesting proposition and agreed to do a couple (to start). With as much fun as they turned out to be, I ended up doing many more.
The projects came in two flavors -- one used die-cast metal kits provided to me by the toy company, the other used commercially available plastic kits. The two A-10s that this posting discusses are the former of these flavors and used metal kits.
These A-10 projects were the epitome of "painting projects". The construction of the models was extremely quick. No addressing of the seams was needed (or wanted). I just threw them together, painted them, and decaled them. Since these are some of the more fun tasks in modeling (to me), how could I not enjoy this? The requirement for quick turn-around times (typically two weeks per model) was the only real down side. This required me to keep my attentions on the projects to complete them inside the alotted window.
I was paid quite well for my time and effort (IMHO), but a friend that does this sort of thing for a living told me the toy company was getting off cheap by getting me to do this for the small amount (in his opinion) that I was paid. I was happy with the pay, and I am not trying to make a living at it, so it was fine by me. Keeping to the two-week deadlines turned out to be not too bad. The A-10A "Warthogs" were the first subjects I built for the toy company.
The kits for these A-10s were simple. There were five major airframe components molded in heavy metal. It had a look and feel like white metal. These components were a one-piece fuselage, a one-piece wing (from tip to tip), a one-piece horizontal tail, and two one-piece vertical tails. Combined together, these pieces weighed in at almost five pounds. Try holding that in one hand for a couple hours while you airbrush a complex camouflage onto it...
Onto the basic metal airframe were attached assorted plastic detail pieces. One rather large "detail" was the piece making up the engine nacelles. The nacelles were 100% plastic. All the weapons pylons, weapons, wheel well doors, and cockpit were plastic. There were assorted antennae around the airframe that were all plastic, too. Obviously, also, the HUD glass and canopy were plastic. The only metal detail parts were the landing gear legs. Considering the weight of the completed model, these would have to be metal. The wheels, though, were plastic and got rubber/vinyl tires applied to them.
The major airframe pieces all attached to each other with small machine screws. The detail pieces were all super-glued into place. I was instructed that I could not modify any pieces for accuracy, nor should I worry about filling any of the seams. They said I should just build and finish the models, so that was all I did.
For finishing the models, I was instructed to not weather them. It would be OK to use flat paints, but they were to remain un-weathered and clean.
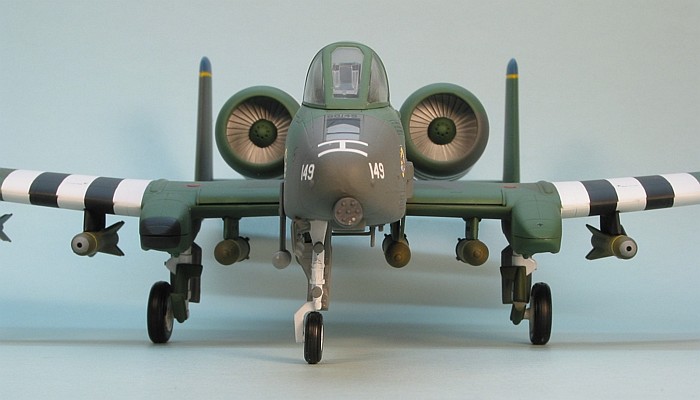
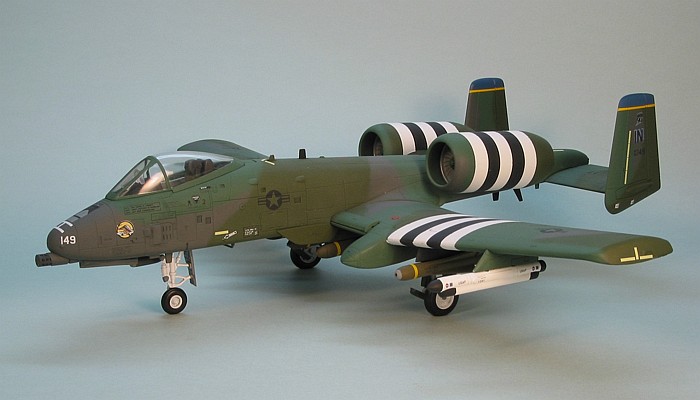
The choice of weapons was limited to only the items provided by the manufacture. This included two AIM-9L Sidewinder missiles on a dual launcher, two AGM-65 Maverick missiles with no launch rails, four Mk.20 Rockeye cluster bombs, one not-so-acurrate ALQ-119 ECM pod, and two completely bogus external fuel tanks. I was instructed to attach weapons appropriate for the versions I was building. I immediately discarded the fuel tanks and used the other items as needed.
Comparing the metal kits to some commercial plastic kit showed that the toy comapny had used the Tamiya A-10 kit as a starting point for there masters. Hence, all the inaccuracies of the Tamiya kit were faithfully reproduced in the metal kit. This included the somewhat too boxy wheel sponsons and engine nacelle details.

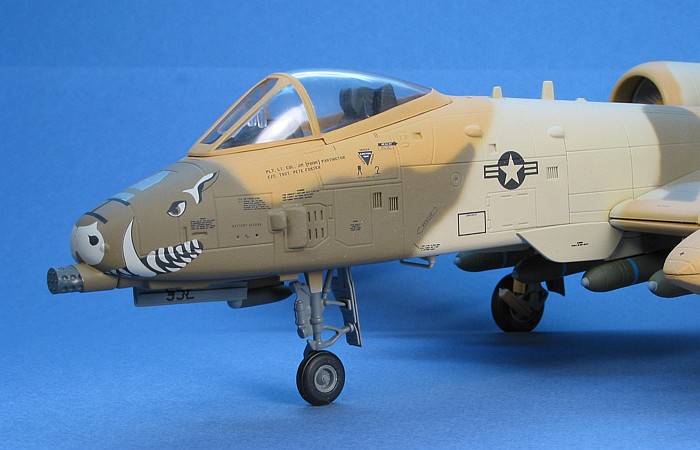
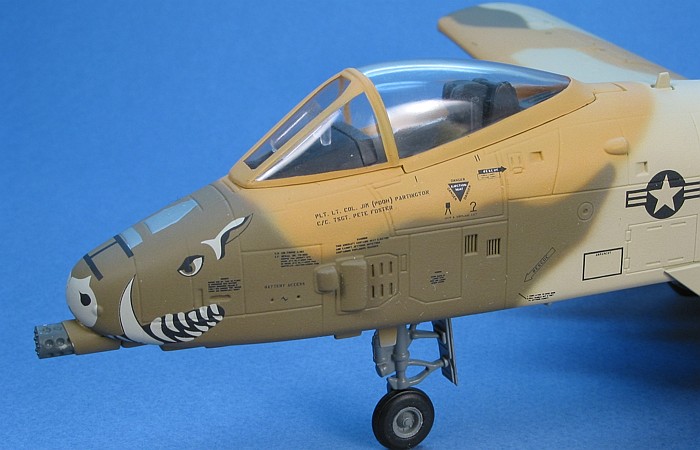
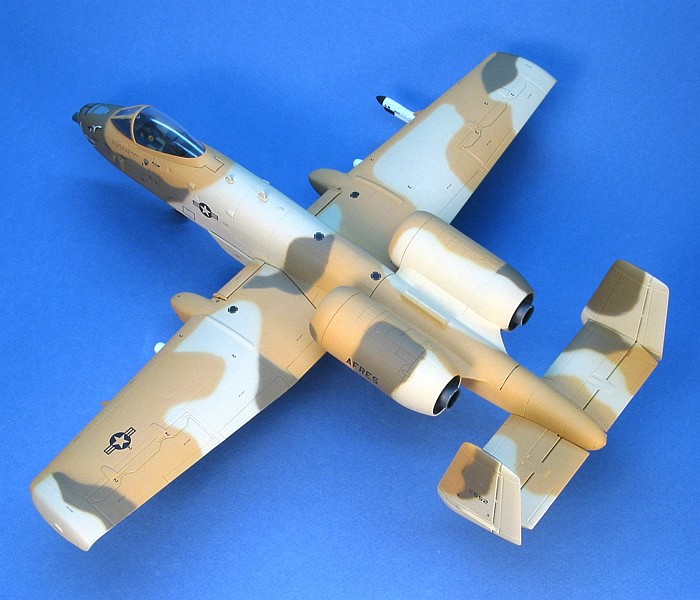
Affectionately referred to as "Peanut", this one-of-a-kind camouflage was applied to an Air Force Reserve aircraft from 47th TFS / 917th TFG located at Barksdale AFB in Louisiana as a test camouflage for the A-10. The thought was to develope a desert caouflage for the aircraft for use in Operation Desert Shield/Storm. The camouflage was not adopted and the unit was instructed to repaint the aircraft before it was deployed to the Gulf.
The camouflage colors on this aircraft proved to be quite a challenge. When Dana Bell visited the unit and pictured this aircraft, they told him the Federal Standard numbers of the colors. Dana relays these colors as F.S.33303 (lightest shade), F.S.33245 (medium shade), and F.S.30105 (darkest shade). I trust Dana to record the numbers he was told, however, these colors do not match any colors in any pictures I have ever seen of this aircraft. Also, none of these are available in any paint lines, so I was going to have to start mixing paints to match these colors.
Superscale released a decal sheet including this aircraft, and they provide a different set of numbers -- F.S.23617 (lightest shade), F.S.30257 (medium shade), and F.S.30118 (darkest shade). Looking at the pictures, these choices are a better. But, since two of these colors are still not readily available, I was still going to have to do some custom mixes.
I realize that all the pictures I have are likely to have been through between three and six photographic reproduction processes. Each reproduction process can change the colors in the picture. Likewise, the weather and lighting conditions on the day the pictures were taken would also impact the colors seen. Not withstanding, I could not believe any lighting or processing could effect the colors as much as what I saw, hence I decided to go out and mix colors that looked like those in the picutres and forget the "official" F.S. numbers cited from the above two sources.
My thinking was simple -- most anyone that has seen this aircraft has seen it in pictures. By matching the colors in the pictures instead of using the stated Federal Standard numbers, most people would consider that I "got it right", even if I am really way off on the true colors of the real aircraft. Flawed in my reasoning or not, I used this line of thinking to justify ignoring the FS numbers of the colors.
Using Testors Model Master enamel paints, I experimented for four nights.
After over a dozen test paint mixes, I finally had what I felt were matching
colors. The custom mixed colors use the following ratios:
|
Light Biege
- 10 parts Radome Tan
(F.S.33613)
- 1 parts Field Drab
(F.S.30118)
|
Orange-Tan
- 40 parts Tan Special
(F.S.20400)
- 10 parts Insignia Yellow
(F.S.33538)
- 3 parts Field Drab
(F.S.30118)
- 2 parts International Orange
(F.S.12197)
|
Medium Brown
- 4 parts Field Drab
(F.S.30118)
- 1 parts Radome Tan
(F.S.33613)
|
After completing the model, I considered my colors to be pretty close to what I saw in the pictures. I decided to amuse myself and see what colors in my F.S. fan chart came closest to my custom mixed colors. I looked up the matches without paying attention to either Dana Bell's or SuperScale recommendations. I found the colors to be F.S.23617, F.S.33245, and F.S.30118. These numbers sounded familiar. To my surprise, I had picked the SuperScale color choices. Maybe they knew something nobody else did? Or, maybe someone on the SuperScale research staff had done the same thing I did with custom mixed paints. At this point, who knows? I have bad-mouthed SuperScale research in the past, but they seem to have done good on this one item.
I used a TwoBobs decal sheet for the markings. As Dana Bell assisted TwoBobs with research, the camouflage diagrams name Dana's F.S. numbers for the camouflage colors. I was concerned about the color of the tusks and teeth on the TwoBobs sheet, though. By following Dana's color information (which they did), the mouth would be the wrong color. Indeed, the color of the decals on the decal paper looked too dark and too green. I decided to use them anyway. To my surprise (sorry TwoBobs), they looked great after they were applied to the nose of the model. And, with a healthy dose of Solv-a-Set, even the hog-nose decal was made to conform to the compound curves of the aircraft nose.
For weapons, I chose to leave off the Sidewinder missiles. Since this aircraft never saw actual combat in this camouflage, I painted up the Rockeyes and Mavericks as practise rounds using blue ID bands.
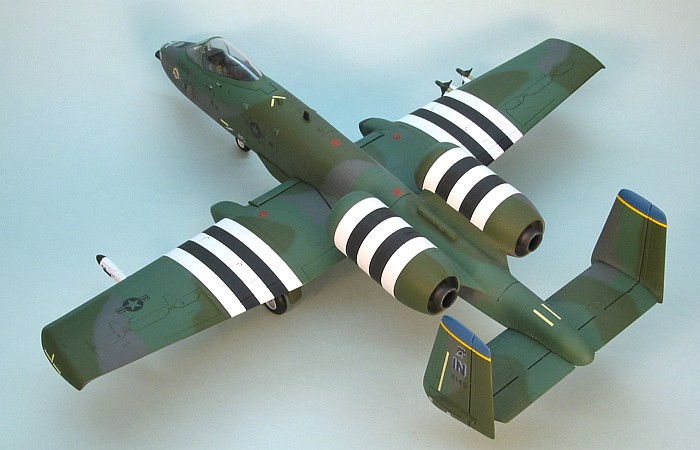
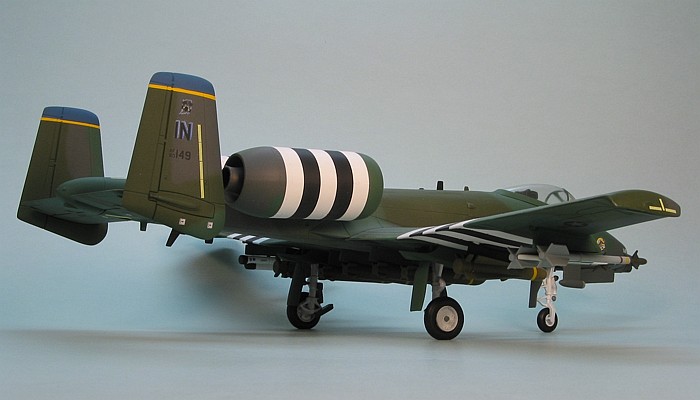
50th Anniversary Scheme for the
Invasion of Normandy ("D-Day")
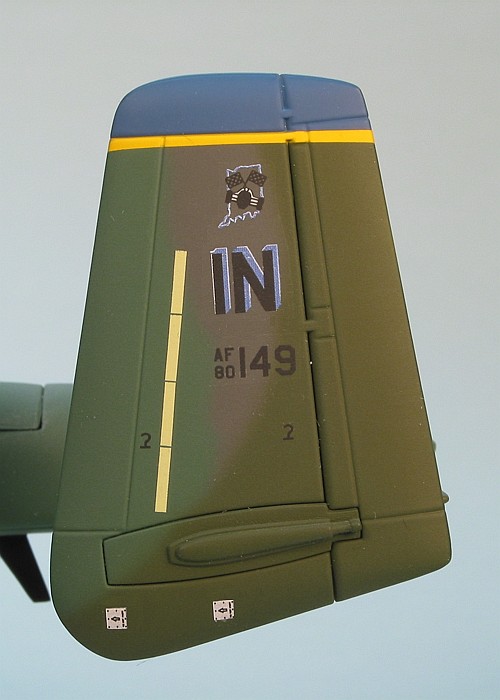
This was a specialty scheme painted on a single Air Force Reserve aircraft from the 45th FS / 930th OG located at Grissom AFB in Indiana. The stripes commemorated the 50th anniversary of the "D-Day" invasions of Normandy in World War II.
The camouflage is all Testors Model Master enamel paints. The aircraft is painted in the standard European scheme for the A-10 using European Green (F.S.34092), Medium Green (F.S.34102), and European Gray (F.S.36081). I cut these colors with flat white in a 5:1 ratio for scale effect. The black and white stripes were masked and painted prior to applying the camouflage.
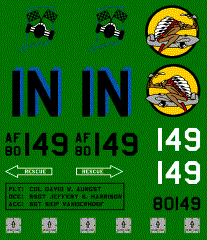
The major unit markings are custom printed decals I created on my PC and printed on my ALPS MD-5000 printer. The image to the right shows my original artwork for the decals (reduced in size to save space). I derived these from a 1/32nd scale Cutting Edge decal sheet. Cutting Edge had some notable errors in their decals, though, so I corrected these in my final artwork. The two main errors were on the tail where the Indiana state outline should be blue (Cutting Edge used black) and the shadowing on the "IN" tail code should also be blue (Cutting Edge used gray). One other item was the nose number. It needed to be white, but Cutting Edge printed it in black.
One omission on the Cutting Edge sheet involved the pilot's name block. I created one in my artwork. Since I could not read the names in the pictures I had, I used my own name for the pilot and two of my friends' names for the maintenance crew. It is a nice way to covertly "sign" the model. The legal department of the toy company was not fond of this detail, though. Since the real names could not be determined, the final product will have no name block on it.
Most of the data markings are from SuperScale. I pieced them together from different sheets to get all the markings I needed for this aircraft. No manufacture seems to know all the formation tape lights that are on an A-10. It required most all the tape light decals from two different SuperScale sheets to complete this model.
I was under strict orders that I could not modify any pieces of the kit. As this aircraft is a LASTE modified aircraft, this left me with a decission to see if I should try to represent the LASTE modifications. The tape lights were no issue, of course I would apply them. But what of the antennae on the lower tails? I decided to create some decals for these and applied the decals in the proper locations. While not a correct three-dimensional representation, they did at least acknowledge the existence of the antennae.
For weapons, I chose to make live rounds (since I had practise rounds on the other A-10). I did opt to use the Sidewinder missiles and otherwise maintained the same weapons loading as the previous A-10.
|
Project
Statistics
|
|
Completion
Date:
|
4 April, 2002 |
|
Total Building
Time:
|
29.5 |
|
Research:
|
0.0 |
|
Construction:
|
4.5 |
|
Painting
|
12.9 |
|
Decals /
Markings (includes creating and printing custom decals):
|
12.1 |
|
Extra Detailing /
Conversion:
|
0.0 |
Every model has a moment somewhere in construction where you realize you messed up on something. For this model, that moment occured just after I thought I was done. I was finished (supposedly) and had started taking the pictures you see here when it hit me like a bolt of lightning. I had somehow managed to miss applying the national insignia to the right fuselage. There I was with a finished and flat coated model, in need of applying one more rather prominent decal -- OUCH!
I chose to carefully apply the decal over the flat coat. The decal promptly silvered from edge to edge. So, I got out a new X-acto blade and ever-so-lightly sliced a few hash marks through the decal diagonally from left to right. I then re-applied more Solv-a-set and was relieved to watch all the silvering go away. A quick swipe with a paint brush full of flat finish blended my error into the model so that no one would be any the wiser.
These prototype models have been a blast to build. I really get into "painting
projects" and these two A-10s were perfect in that respect. If only more model
projects could be so much fun to build from start to finish.
Model, Description and Images Copyright ©
2002 by David Aungst
Page Created 22 July, 2002
Last Updated 04 June, 2007
Back to HyperScale
Main Page
Back to Features Index
|  Home
| What's New |
Features |
Gallery |
Reviews |
Reference |
Forum |
Search
Home
| What's New |
Features |
Gallery |
Reviews |
Reference |
Forum |
Search