|
How
To Apply Foil to an Aircraft Model
by
Bucky Sheftall
|
|
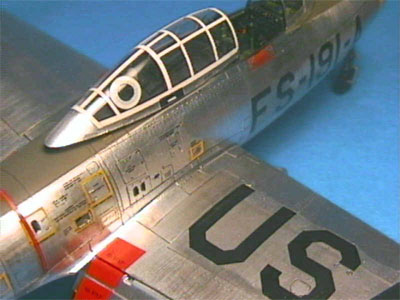
Republic
F-84 Thunderjet |
1.
The Answer to our NMF Dreams? |
Finding the
ultimate natural metal finish (NMF) technique has always been something of a
Grail Quest for The Hobby, perhaps akin to what discovering a cure for the
common cold is for medicine, developing a Grand Unified Field theory is for
physics or, until 1998 at least, belting more than 60 home runs in a season was
for baseball. Accordingly, false hopes have been raised many more times than
most modelers would like to remember. We have been teased and tempted over the
years by various products claiming to simulate NMF, mostly coming in paint
bottles, that never quite seemed to deliver as advertised. No matter how good
the results were, shiny paint is, after all, shiny paint and not aluminum, so
there was always that “close but no cigar” quality to even the best of
them.
 Then,
of course, there have always been the countless “sure-fire” homespun
techniques for NMF that have made the gossip and BBS rounds over the years (“ya
gotta use organic sumac lacquer, mirror powder and yearling deerskin buffing
leather, but only during a full moon”, “dust it with Crisco and graphite,
then microwave the sucker”, “Electroplate”! Electroplate!”, etc., etc.).
Whatever the gimmick or trick, however, a real drop-dead, knock-your-socks-off
absolutely convincing NMF technique always seemed an unrealizable dream. Always,
that is, until recent years, now that a small but ever burgeoning number of
Fanatic Foil Freaks (FFFs) are working feverishly and diligently towards making
the dream a reality. Then,
of course, there have always been the countless “sure-fire” homespun
techniques for NMF that have made the gossip and BBS rounds over the years (“ya
gotta use organic sumac lacquer, mirror powder and yearling deerskin buffing
leather, but only during a full moon”, “dust it with Crisco and graphite,
then microwave the sucker”, “Electroplate”! Electroplate!”, etc., etc.).
Whatever the gimmick or trick, however, a real drop-dead, knock-your-socks-off
absolutely convincing NMF technique always seemed an unrealizable dream. Always,
that is, until recent years, now that a small but ever burgeoning number of
Fanatic Foil Freaks (FFFs) are working feverishly and diligently towards making
the dream a reality.
The
real kicker is that the answer to our prayers had never been farther away than
the nearest kitchen cabinet all along. With a little help from a two-buck bottle
of Microscale Foil Adhesive, all you need is a roll of cheap (the cheaper the
better – I’ll get into this later) aluminum kitchen wrap, a little practice
and a whole lotta patience to have show-stopping NMF aircraft models that will
dazzle friends and family alike. As a fellow FFF on another website has so
eloquently put it, “it looks like metal because it IS metal”. Well, that
says it all. Nothing looks more like aluminum than aluminum. Accept no
substitutes, folks.
OK.
That’s the good news. The bad news is that the technique is rather difficult,
always chancy and often exasperating. But then, when did that combination of
factors ever keep us from building models, right?
Cheap
aluminum kitchen or cooking foil, mirror-finished on one side, dull on the
other. You DO NOT want the good quality Reynolds Wrap kind of stuff Mom used on
those Christmas fruit cakes. No, that stuff is practically armor plate compared
with the aluminum foil I am using (Toyo Arumi – a product of resource-starved
Japanese manufacture), which has a thickness of 8 microns (less than most
painted surfaces). It is so flimsy it will rip if you look at it funny. Moral of
the story: cheaper quality is better because it is thinner, and the thinner the
foil you use, the better definition you are going to get to bring out all those
good rivets, panel lines, etc.
-
Flat
artist’s brushes about 1/2 inch in width. The quality issue is paradoxical
here, because while you want the brush to be supple enough not to leave
trench-deep brushstrokes in the adhesive backing, you must also steel
yourself to the sad fact that once you use one of these brushes in this
operation, you can never quite get all of the adhesive out of it, rendering
it fairly useless for other painting applications. Pliancy returns whenever
the brush is soaked in alcohol and/or used for more gluing, but it will
always dry to resemble something like a scale scuba flipper or rubber
spatula afterwards.
-
 Microscale
Metal Foil Adhesive. Follow the instructions on the back of the bottle TO
THE LETTER! That should be explanation enough. The glue seems to be
acrylic-based, as its smell and color is similar to white woodworking glue.
It is water-thinnable, although I have tended not to exploit this property,
as I have encountered a lot of beading-up problems enough as is with the
surfaces I’ve been working with, and I think that thinning the glue would
only exacerbate this. But then again, my experience is still pretty shallow
with the material, and there is a lot more experimentation that needs to be
done. It seems likely that brushstrokes – which are often visible under
the foil after application to the model in the technique I am using now –
would be greatly reduced with thinner glue. In any case, the matter bears
looking into further. Microscale
Metal Foil Adhesive. Follow the instructions on the back of the bottle TO
THE LETTER! That should be explanation enough. The glue seems to be
acrylic-based, as its smell and color is similar to white woodworking glue.
It is water-thinnable, although I have tended not to exploit this property,
as I have encountered a lot of beading-up problems enough as is with the
surfaces I’ve been working with, and I think that thinning the glue would
only exacerbate this. But then again, my experience is still pretty shallow
with the material, and there is a lot more experimentation that needs to be
done. It seems likely that brushstrokes – which are often visible under
the foil after application to the model in the technique I am using now –
would be greatly reduced with thinner glue. In any case, the matter bears
looking into further.
-
Rubbing
alcohol. This is used to clean (as best as possible, that is) brushes and to
clean up dried patches of glue from botched model surfaces before
re-foiling.
-
Furniture
finishers fine-grit steel wool. Use the densest, thinnest strand wool you
can get. This is used not only in repair and botched surface clean up
operations, but also to apply the all-important finishing touch “patina”
of fine scratches over the foil surface to give your model a realistic NMF
sheen. After all, you want your plane to look like it is made out of
aviation Duralmin, not recycled funhouse mirror.
-
Cotton
swabs and round toothpicks. These are used in applying and burnishing foil.
The sharp tip of the toothpick is used to “revive” rivets and panel
lines after the foil goes on and the wrinkles have been rubbed out (often an
inexact science – but you have to learn to live with that).
-
A
plentiful supply of NEW single-edged razor blades and/or modeling/design
knife blades. Working with foil requires blades as sharp as possible.
Unfortunately, the foil also makes short shrift of any blade that comes into
contact with it, meaning that the half-life of your blade will be measured
in minutes. Literally. I went through about twenty razors and maybe half as
many design knife blades building the F-84.
-
And
last but not least, the “Three Ps” of foiling: patience, perseverance
and prayer. A little luck doesn’t hurt, either.
As Shep Paine
once put it, a metallic scheme is the most unforgiving surface type you can
model. Every mote of dust, every finger swipe, every hesitant brushstroke – in
short, every mistake you make with it will stand out as clearly and gaudily on
the finished product as cheap lipstick on a filling station bathroom mirror.
Although much more forgiving (if at least a bit more readily repairable) than
painted metallic schemes, foiling is still no exception to this rule, so keeping
the old adage about “an ounce of prevention” in mind and taking a few
prudent preparatory steps will save much heartache later on. First of all, it is
crucial that your work area be as dust-free as possible. A tall order, perhaps,
for a modeler, but a little preventive vacuuming or at least a peremptory
sweep-up or damp cloth wiping of your table certainly can’t hurt.
Addressing
the foil (“Hello, foil”…”To the moon, Norton, to the moon!”) is a
matter of careful and mutual respect between man and material. Cut a workable
amount of foil from the roll (i.e., just a little more than you need for the
area you will cover), taking care not to foul either your piece or the remainder
on the roll with small wrinkles. Big wrinkles can be rubbed out, but the small,
tight ones can not. If a piece gets wrinkled like this, it is unusable.
 Lay
the foil dull side up (the matte finish provides “bite” for the glue, thus
minimizing beading) on a disposable, smooth, dust-free (sorry to be repetitive,
but I can’t emphasize this enough) surface. I’ve found dry cleaners’
shirt-backing cardboard to work nicely. Dip your brush about a quarter-inch into
the glue, then, making sure to keep your brushstrokes parallel (they’ll be
slightly visible after the foil goes on, so orient them to look like stress
lines or “grain” in the metal structure), start from one end of the foil
piece and brush evenly and quickly over to the other side, covering everything
in one pass. If either puddles or dry patches appear at this stage, you can (and
should) give them a quick stab or two with the glue brush, but you should do
this carefully, because as a rule of thumb, it is best not to go over the same
spot twice. The reason for this is that, much like uncured paint, the glue-wet
brush will re-liquidize spots from the previous coating, lifting them up and off
the surface as the brush passes over. These will then dry into little but very
inconveniently three-dimensional rubber cement booger-like motes that are
impossible to remove. If this happens, you will have to trash the piece, cut out
another and start all over again. Lay
the foil dull side up (the matte finish provides “bite” for the glue, thus
minimizing beading) on a disposable, smooth, dust-free (sorry to be repetitive,
but I can’t emphasize this enough) surface. I’ve found dry cleaners’
shirt-backing cardboard to work nicely. Dip your brush about a quarter-inch into
the glue, then, making sure to keep your brushstrokes parallel (they’ll be
slightly visible after the foil goes on, so orient them to look like stress
lines or “grain” in the metal structure), start from one end of the foil
piece and brush evenly and quickly over to the other side, covering everything
in one pass. If either puddles or dry patches appear at this stage, you can (and
should) give them a quick stab or two with the glue brush, but you should do
this carefully, because as a rule of thumb, it is best not to go over the same
spot twice. The reason for this is that, much like uncured paint, the glue-wet
brush will re-liquidize spots from the previous coating, lifting them up and off
the surface as the brush passes over. These will then dry into little but very
inconveniently three-dimensional rubber cement booger-like motes that are
impossible to remove. If this happens, you will have to trash the piece, cut out
another and start all over again.
If all has gone
well, you now wait until the whitish-milky glue has dried to a dull Scotch
tape-like sheen. I like to use my incandescent desk lamp as a dryer to speed
this process up. If you wish to do so, make sure you’ve dusted the lampshade
recently. If not, you’ll get a nice little sprinkling on your glued foil when
you adjust the light over the work area.
Once
the pressure sensitive glue has dried, the foil is ready to be applied. Choose a
single point near the center of the area to be foiled, and aim center-of-mass of
your foil piece to touch there and ONLY there. From this single, central point,
begin burnishing out towards the edges, being careful not to make any more
wrinkles than you absolutely have to. After you have finished burnishing and
find, to your horror, that there are nasty little air blister bubbles in the
foil, just lance’em! Make a feathery light cut along the bubble from end to
end, with just enough pressure to cut the foil but NOT the plastic underneath.
Burnish over this with the edge of a toothpick, pushing along the same direction
as the cut, and it will all but disappear.
Before beginning
any foiling, you should study the layout and structural scheme of your model to
determine the order in which you will foil. In general terms, when working with
aircraft, I have found it best to foil fuselage, wings, stabilizers and (if
present) drop tanks separately before assembly.
Foiling each
distinct airframe component like this keeps your foil pieces small and
manageable, reducing hassle in the event of “disaster” requiring re-foiling
and also helping to prevent wrinkles and spindles by avoiding abrupt angles
(wing joints, etc.) in the surfaces to be foiled.
The
particular machine I chose to model is 1LT Dolphin Overton’s fighter bomber
stationed at Taegu, Republic of Korea in 1951. Lieutenant Overton was a 1949
graduate of West Point who was commissioned in the new Air Force and later went
on to ace status in F-86 Sabres. Aeromaster produces fine quality decals (AM
48-408 and stencil set AM 148-025) for modeling this aircraft.
|
 As
goes without saying for anything recent from the House of Tamiya, the
model itself went together without a hitch. Fit was flawless everywhere.
In addition, the lack of irregularly curved surfaces makes this airframe a
good starting project for the beginning foiler, with the only notable
exception being the wingtip and fuselage drop tanks, which are shaped like
something out of a calculus textbook and present a MAJOR foiling
challenge. As
goes without saying for anything recent from the House of Tamiya, the
model itself went together without a hitch. Fit was flawless everywhere.
In addition, the lack of irregularly curved surfaces makes this airframe a
good starting project for the beginning foiler, with the only notable
exception being the wingtip and fuselage drop tanks, which are shaped like
something out of a calculus textbook and present a MAJOR foiling
challenge.
|
 The
best advice I can give for working with these is to keep your foil
sections small, manageable and parallel, because joints in the foil on
these curved surfaces are rather conspicuous, so it’s best to make them
look like they are supposed to be there. Liberal uses of parallel steel
wool strokes will help a lot in masking the joints. If done well, this can
render them almost (emphasis on “almost”) invisible (PIC 3), not only
in the fuel tank construction but in foiling any area on the aircraft. The
best advice I can give for working with these is to keep your foil
sections small, manageable and parallel, because joints in the foil on
these curved surfaces are rather conspicuous, so it’s best to make them
look like they are supposed to be there. Liberal uses of parallel steel
wool strokes will help a lot in masking the joints. If done well, this can
render them almost (emphasis on “almost”) invisible (PIC 3), not only
in the fuel tank construction but in foiling any area on the aircraft. |
| Eduard etched parts were
used in this model. One nice feature of this set is that it provides you
with an early-type speed brake panel, which you will need if you are
modeling a Korean Conflict-era aircraft. The “swiss cheese” speed
brake panel provided by Tamiya is for mid-50s, post-Korea Thunderjets
(opposite chronology appears in Squadron/Signal’s “F-84 Thunderjet In
Action”, proving that it sometimes pays to be wary of your sources!).
|
 OD
anti-glare, yellow trim, cockpit green and yellow zinc chromate are all
done in Model Master acrylics. Now that we are on the subject of paint,
one somewhat unfortunate characteristic about foil is that it takes to
most paints like Teflon takes to scrambled eggs. I found this out, to my
chagrin, when my entire OD anti-glare panel lifted off in one clean,
contiguous piece along with the masking tape I was peeling off. After a
few moments of dire panic, cooler sentiments prevailed and I reached for
my trusty bottle of floor wax. Subsequent experimentation revealed that
this was the only medium compatible with the foil to any kind of
dependable degree, but that at least TWO rather heavy-handedly applied
coats of this were needed before paint could go on and stick. For some
reason, however, decals went straight on the bare foil without any peeling
or any other problems. OD
anti-glare, yellow trim, cockpit green and yellow zinc chromate are all
done in Model Master acrylics. Now that we are on the subject of paint,
one somewhat unfortunate characteristic about foil is that it takes to
most paints like Teflon takes to scrambled eggs. I found this out, to my
chagrin, when my entire OD anti-glare panel lifted off in one clean,
contiguous piece along with the masking tape I was peeling off. After a
few moments of dire panic, cooler sentiments prevailed and I reached for
my trusty bottle of floor wax. Subsequent experimentation revealed that
this was the only medium compatible with the foil to any kind of
dependable degree, but that at least TWO rather heavy-handedly applied
coats of this were needed before paint could go on and stick. For some
reason, however, decals went straight on the bare foil without any peeling
or any other problems. |
 The
fundamental weakness inherent in foiling is the simple, physical fact that
you are trying to cover three-dimensional, often irregularly curved
surfaces with an inherently inflexible two-dimensional medium. The most
obvious and commonly occurring consequence of this dynamic is, yes, you
guessed it, wrinkles. I should re-emphasize this by saying that, more than
just commonly occurring, wrinkles are downright unavoidable in foiling.
Now, you can either let that fact break your heart and give up the whole
project, or you can push on and face up to those wrinkles (ha-ha) using
any – or any combination of – the following options: The
fundamental weakness inherent in foiling is the simple, physical fact that
you are trying to cover three-dimensional, often irregularly curved
surfaces with an inherently inflexible two-dimensional medium. The most
obvious and commonly occurring consequence of this dynamic is, yes, you
guessed it, wrinkles. I should re-emphasize this by saying that, more than
just commonly occurring, wrinkles are downright unavoidable in foiling.
Now, you can either let that fact break your heart and give up the whole
project, or you can push on and face up to those wrinkles (ha-ha) using
any – or any combination of – the following options:
|
-
Ignore them.
-
Go over them again and again
with a cotton swab or other tool and try to burnish them away.
-
Sand them into oblivion with a
silicon disc, etc., then lay small foil panels over the areas where the foil
has been removed.
-
Cut out the affected area, then
foil over it.
-
Consult a good plastic surgeon
(ha-ha)
 Before
I forget, I should note here that there are two basic schools of thought
regarding foil jointing. One (and perhaps the dominant) school holds that the
best results are to be had by foiling along the panel lines, i.e., laying each
panel with a separate piece of foil, then cutting away the excess. The major
plus for this process is that does it away with the need for overlapping foil
joints. The downside of this is that the foil edges are delicate, and when you
go back to blacken the panel lines later on, you will inevitable curl up some of
these edges, sometimes requiring major repair. Also, this process involves
freehand blade cutting directly on top of the plastic. I don’t care how good
of a brain surgeon you may be, there is just no way that you are going to leave
those panel lines the way you found them after you have gone over them with an
X-acto knife. The damage may be minimal, but it is there, and if your
personality is anything like mine, it will bother you later on just knowing that
it is there, and will catch your eye every time. Before
I forget, I should note here that there are two basic schools of thought
regarding foil jointing. One (and perhaps the dominant) school holds that the
best results are to be had by foiling along the panel lines, i.e., laying each
panel with a separate piece of foil, then cutting away the excess. The major
plus for this process is that does it away with the need for overlapping foil
joints. The downside of this is that the foil edges are delicate, and when you
go back to blacken the panel lines later on, you will inevitable curl up some of
these edges, sometimes requiring major repair. Also, this process involves
freehand blade cutting directly on top of the plastic. I don’t care how good
of a brain surgeon you may be, there is just no way that you are going to leave
those panel lines the way you found them after you have gone over them with an
X-acto knife. The damage may be minimal, but it is there, and if your
personality is anything like mine, it will bother you later on just knowing that
it is there, and will catch your eye every time.
The
method I prefer is to live with joints in peaceful co-existence (thus nicely
preserving the integrity of my panel lines). In other words, I try to cover as
much surface with one piece as I can while keeping the size manageable and
deliberately avoiding laying the edges along panel lines. Despite its thinness,
foil is amazingly tough and resilient under abrasives, and I use this quality of
the material to maximum advantage in employing abrasives and buffing agents to
hide joints.
In
any case, experiment with an old model to find a technique that works for you.
|
 On
a related and final note, dealing with sharp edges like trailing wing
edges and control surfaces presents another choice of technique. One
technique, which is the easier but, as I have discovered, far less
satisfactory of the two is to simply foil out to the end of the edge and
just trim away the excess. This may look fine for a while, but after even
the slightest handling, the edges are in dire danger of curling up. If
that starts to happen, all you can do is to keep mashing them down or to
keep cutting away, hoping that the process will eventually stop before
you’ve denuded the entire aircraft. On
a related and final note, dealing with sharp edges like trailing wing
edges and control surfaces presents another choice of technique. One
technique, which is the easier but, as I have discovered, far less
satisfactory of the two is to simply foil out to the end of the edge and
just trim away the excess. This may look fine for a while, but after even
the slightest handling, the edges are in dire danger of curling up. If
that starts to happen, all you can do is to keep mashing them down or to
keep cutting away, hoping that the process will eventually stop before
you’ve denuded the entire aircraft.
An
overlapping technique is by far more effective in producing durable and
convincing edges. Foil the upper surfaces clean over the top and around to
the bottom, where you can joint in a fairly inconspicuous spot under the
aircraft. A little touch up with your trusty sanding tools and some elbow
grease with the steel wool again and you’re in business. |
 Foiling,
obviously, is not for everyone. The average modeler, with an average
patience limit, would be better off sticking to the trusty airbrush and
investing in a bottle of SnJ (which is supposed to be excellent, I
understand). For this author and the slowly, slowly burgeoning ranks of
FFFs, however, nothing looks more like aluminum than aluminum, and even
with its significant flaws, foiling can not be bested in simulating
Duralmin NMFs in scale aircraft modeling. Let the results speak for
themselves: Foiling,
obviously, is not for everyone. The average modeler, with an average
patience limit, would be better off sticking to the trusty airbrush and
investing in a bottle of SnJ (which is supposed to be excellent, I
understand). For this author and the slowly, slowly burgeoning ranks of
FFFs, however, nothing looks more like aluminum than aluminum, and even
with its significant flaws, foiling can not be bested in simulating
Duralmin NMFs in scale aircraft modeling. Let the results speak for
themselves: |
Click the
thumbnails below to view images full-sized.
Click the "Back" arrow on your browser to return to this page.


Visit
Bucky's Website at
www.geocities.com/TimesSquare/Alley/6207
-
Tamiya
1/48 F-84G Thunderjet
-
Aeromaster
decal sets “Thunderjets Over Korea, Pt.II” AM 48-808
-
And
“F-84 Stencil Set” AM 148-025
-
Eduard
photoetched parts set #48257for TAM F-84G Thunderjet
-
Microscale
Foil Adhesive
-
Toyo
Arumi aluminum foil
Model, Text and Images Copyright ©
2000 by Bucky Sheftall
Page Created 05 April, 2000
Last Updated 26 July, 2007
Back to HyperScale Main Page
Back to Reference
Index |
 Home
| What's New |
Features |
Gallery |
Reviews |
Reference |
Forum |
Search
Home
| What's New |
Features |
Gallery |
Reviews |
Reference |
Forum |
Search


