Tamiya's 1/48 scale
P-38G Lightning
Part Three - Painting and Weathering

by John Miller
S
u m m a r y : |
Description and Item No.: |
Tamiya Kit No. 61120 - Lockheed P-38G Lightning |
Price and Availability: |
£49.99 plus shipping available online from Hannants
and hobby retailers online and worldwide |
Scale: |
1/48 |
Review Type: |
First Look |
Advantages: |
The kit is beautifully engineered with fine, crisply executed inscribing, abundant detail, and exemplary fit between all of the major components.. |
Disadvantages: |
The build instructions should be studied closely prior to committing with glue. The affixing of some main gear parts that make handling the model difficult are suggested early in the proposed build sequence. These assemblies can be left off until later making for a more enjoyable build. |

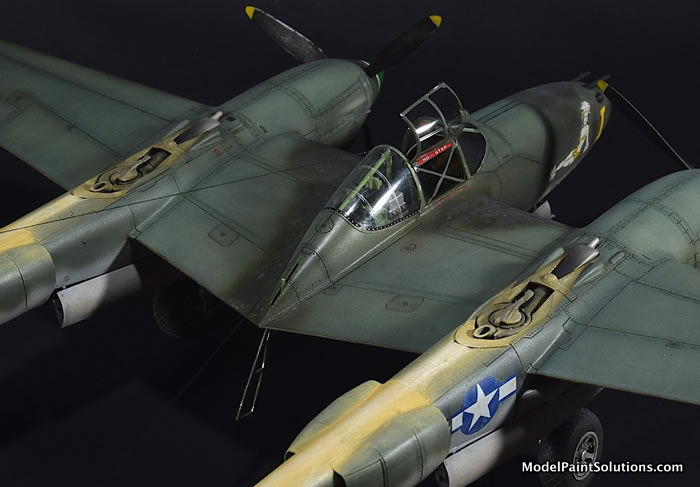
In Part II of this build the model was in White primer, shot with Mission Aluminum, and given a protective coat of Mission Clear Primer in preparation for “paint chipping.” Before getting to the next painting steps however, let’s review some of the particular features of scheme that will be applied.
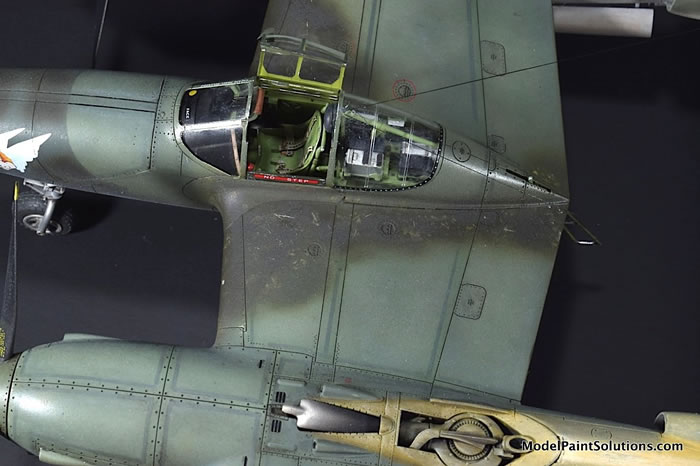
One of the notable features of P-38’s sent to the Pacific Theater by sea were the residual marks in the form of dark stripes left on the airframe panels by the weatherization process used to protect the engines, cockpit, and other components from salt water and the elements. A well known picture of Richard Bong sitting in his P-38 is provided at the bottom of the P-38 Wiki page and shows these thin, dark, rough, stripes running parallel to rivet lines and panels around the cockpit to good effect.
Wiki ref: https://en.wikipedia.org/wiki/Lockheed_P-38_Lightning.
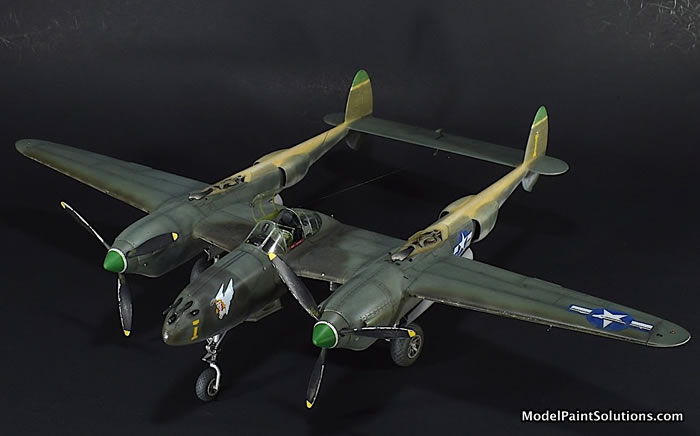
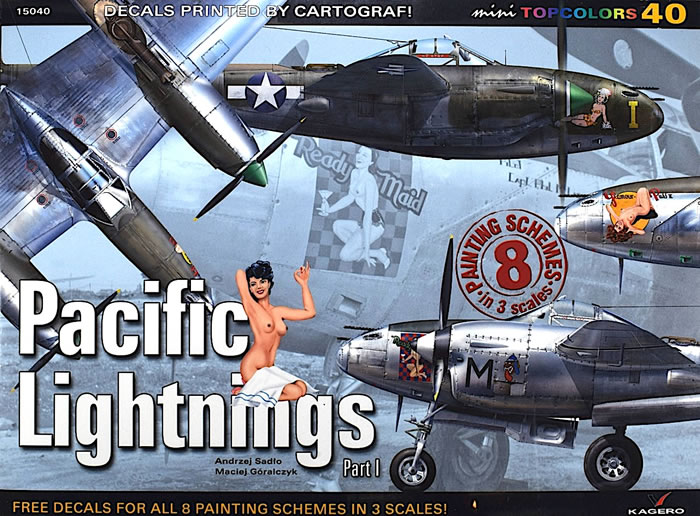
I never noticed these weatherization marks until they were brought to my attention by Mike M.; friend and member of IPMS Seattle. Being an excellent modeler, a retired Boeing engineer, and a pilot, Mike has a good eye for airframe weathering. As I was mulling over this aspect of the scheme I came upon pictures of “Windy City Ruthie” flown by Lt. Kenneth G. Ladd (KIA 10/14/44, 12 kills) and was taken with the overall weathered appearance of the plane, the presence of nose art on both sides of the prow, and prominent weatherization marks. Lieutenant Ladd flew “Ruthie” while serving with the 80th FS/8th FG, in Dobodura, New Guinea, 1943. Fortunately, Ladd’s P-38 is one of the aircraft detailed in “Pacific Lightnings Part I” by Andrej Sadto, and Maciej Goralczyk (Kagero Book and Decals, #15040). (Kagero 1)
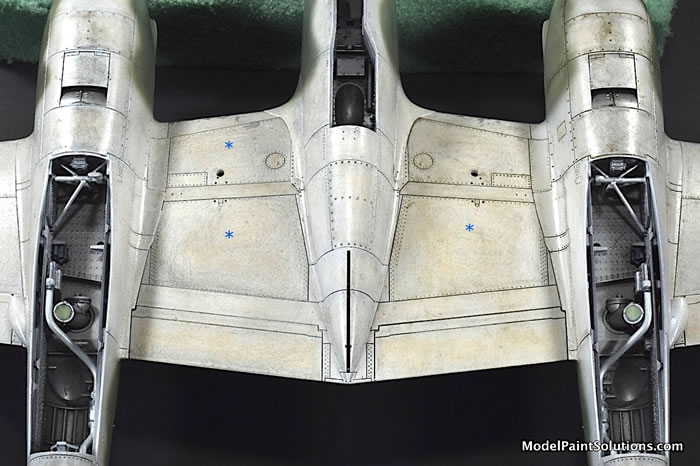
In addition to a fair amount of wear, the artist’s rendition of the aircraft provided in the Kagero publication clearly shows the residual marks left by the weatherizition process, especially on the dorsal cowls. These are denoted by the asterisks in the accompanying zoomed picture of the book cover (Kagero 2). The remarkably detailed art work combined with the beautiful decals by Cartograf sealed the deal; “Ruthie” it would be.
In addition, while perusing pics of P-38’s serving in the Pacific Theater of Operations, I was struck with the appearance of multiple aircraft with high wear areas that had been over-painted (usually with a slightly different colored paint) and became intrigued with the thought of replicating the look of worn areas following a recent paint-over. Since “Ruthies” scheme was the result of multiple paint-overs around the nose art, the thought of the crew touching up worn areas at the same time seemed reasonable. And with that, scheming on the scheme began…
Replicating Weatherization Marks:
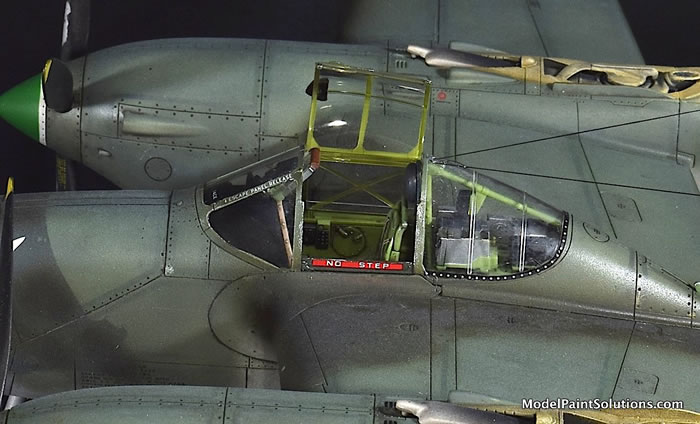
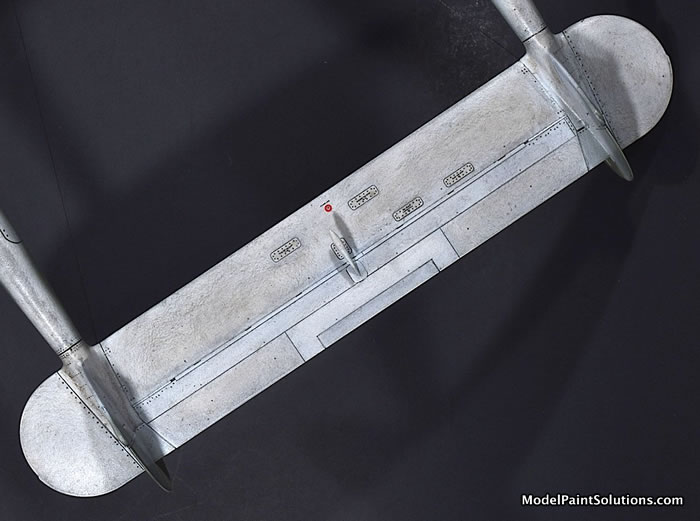
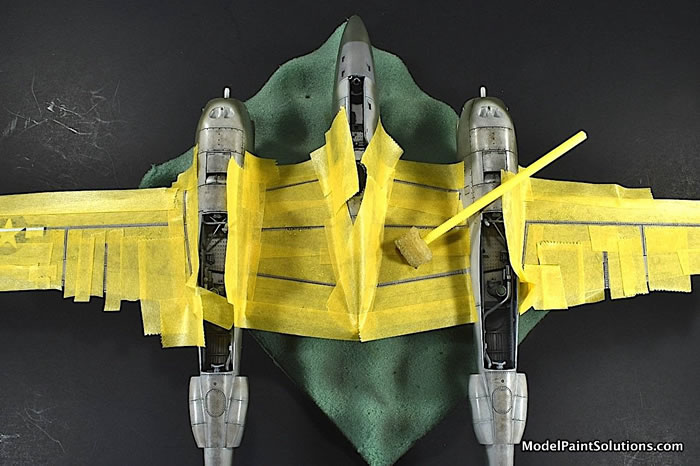
After the worn areas that were previously shot aluminum were dry, the areas on the cowls and center section destined to have weatherization marks were shot with Mission Slate Grey diluted for fine-line spraying and applied with an H-S Evolution fitted with a 0.20mm tip.
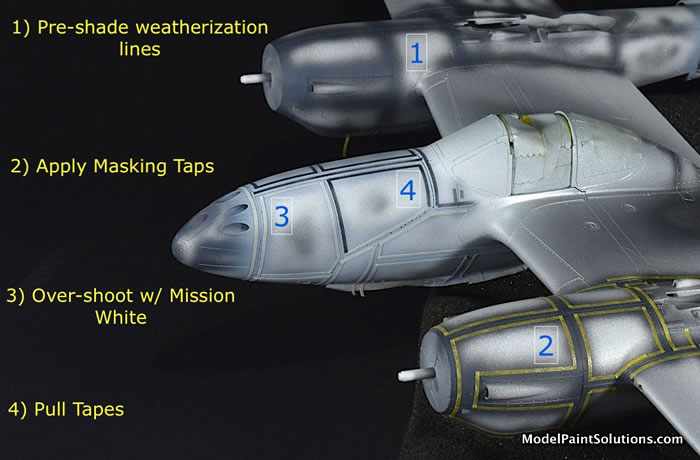
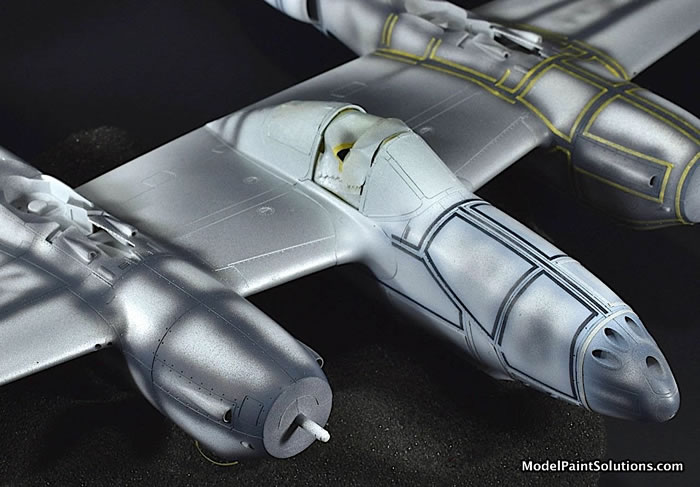
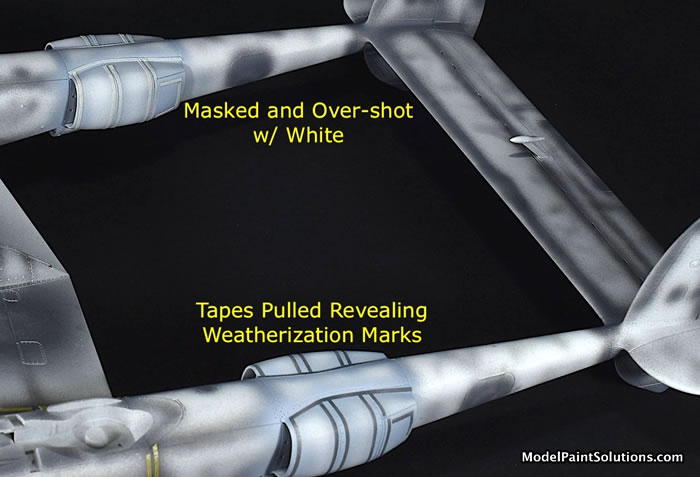
When the Slate Grey was dry, strips of 1mm wide Aizu Masking Tape were placed where the weatherization marks were to be. Once masked, all the weatherization marks were over-shot with Mission White and the tapes pulled. This process was repeated following panels and rivet lines along the tail booms and empennage.
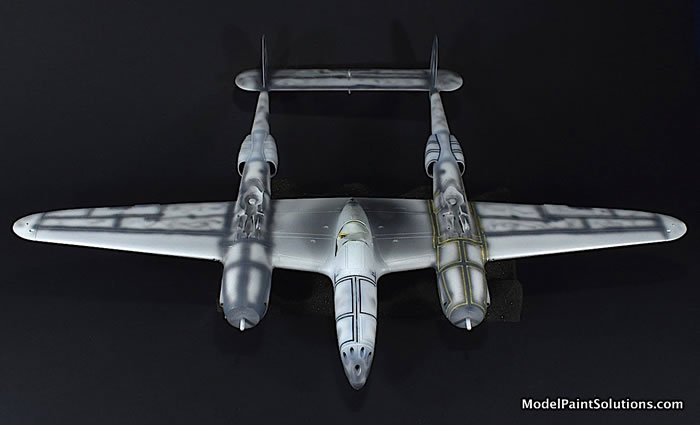
Since the center section was already shot aluminum in preparation for chipping, weatherization marks in this area were masked off and shot with Mission Slate Grey.
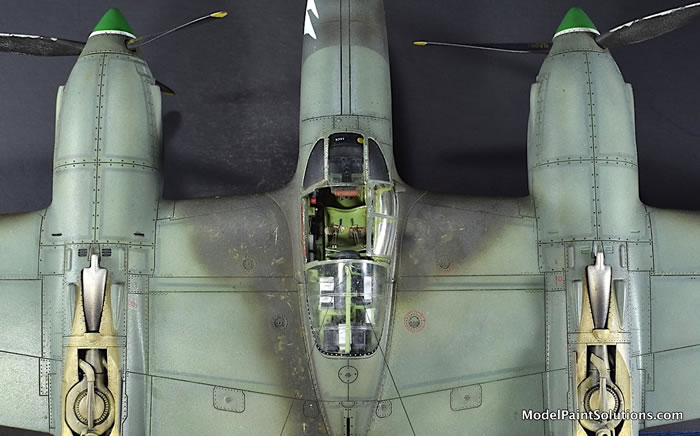
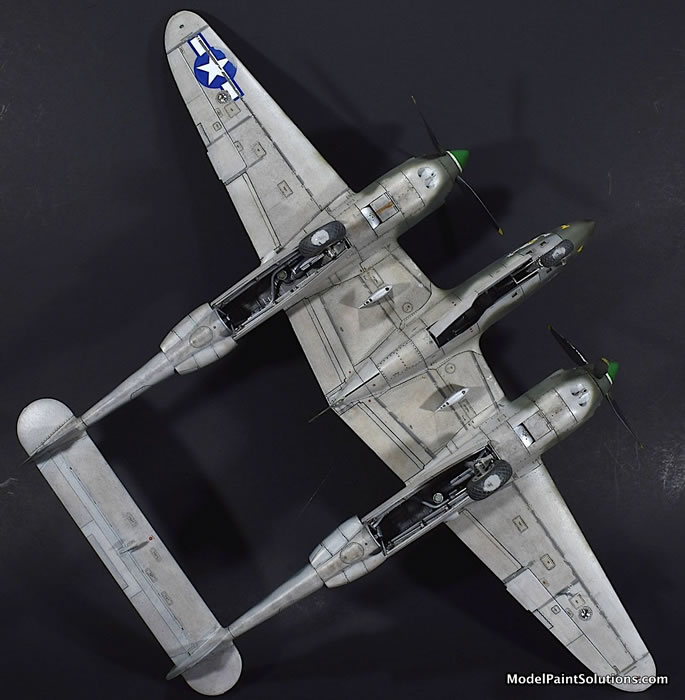
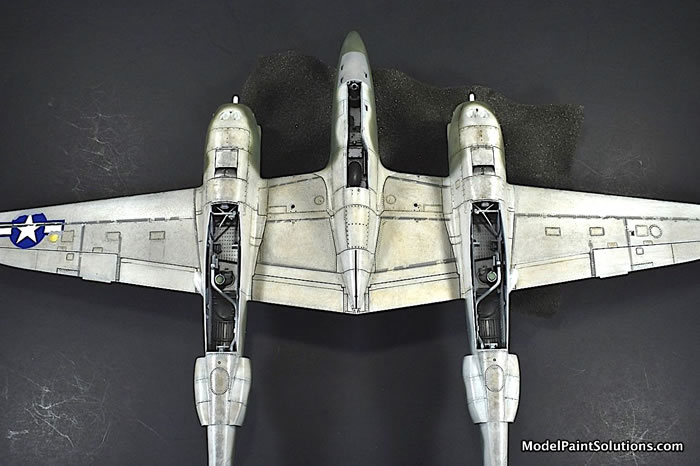
With the weatherization marks painted on the dorsal aspect of the model, I set about painting the belly and lower portions of the tail booms and center section Mission Neutral Grey lightened with ~5% White. We’ll get to painting weatherization marks on the belly and under the wings a little later. I usually dilute Mission paints with Mission Thinner and Clear Primer but wanted more of the egg-shell finish that Mission is known for on the lower portions of the model so the Neutral Grey was diluted with Mission Thinner and Polymix instead. This was applied as a dry followed by a wet/fill coat at ~12psi with an H-S Evolution fitted with a 0.40mm tip. When this was dry, a small ventral panel just aft of the nose was masked off and painted the same Neutral Grey with a few drops of Mission Black added for a different hue. The egg-shell finish is more easily appreciated following a wash with rendered oils (below).
When the Neutral Grey was dry it was time for the Olive Drab uppers. Fortunately, I had read Tom Cleaver’s article on Modeling Madness wherein he gives his take on painting early P-38’s based on documentation of the colors worn by the P-38 Glacier Girl (recovered after 50+ years in ice) and another P-38F also recovered from the Greenland icecap. Apparently Glacier Girl was painted in a green-base, pre-war, Olive Drab which is matched closest by RAF Dark Green. Fascinating!
Okay then; out came the Mission RAF Dark Green to which was added Mission White (~5%) and a few drops of Mission Olive Drab (MMP-024). Test shots of the resulting color looked good to my eye so a large volume (20ml) was prepared both for spraying the primary color and for possible post-shading with darkened/lightened versions. Prior to shooting any green paint however, the aluminum areas on the fuselage center section and leading edges of the wings had to be prepared for “chipping.” And for that I relied on an oldie but a goodie: soap.
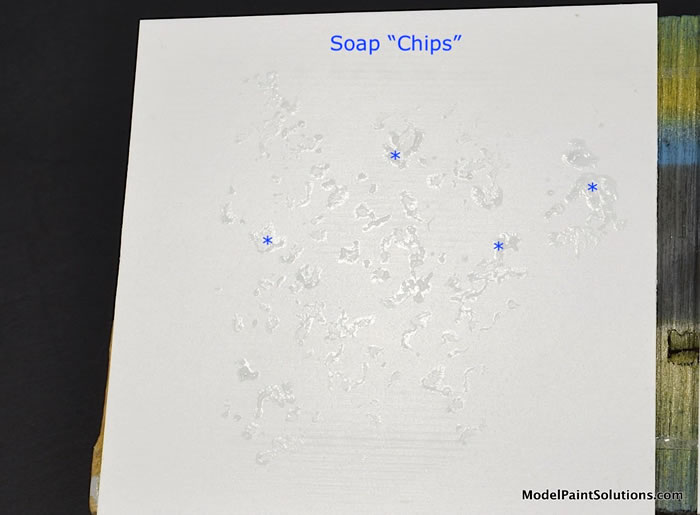
Chipping with Soap:

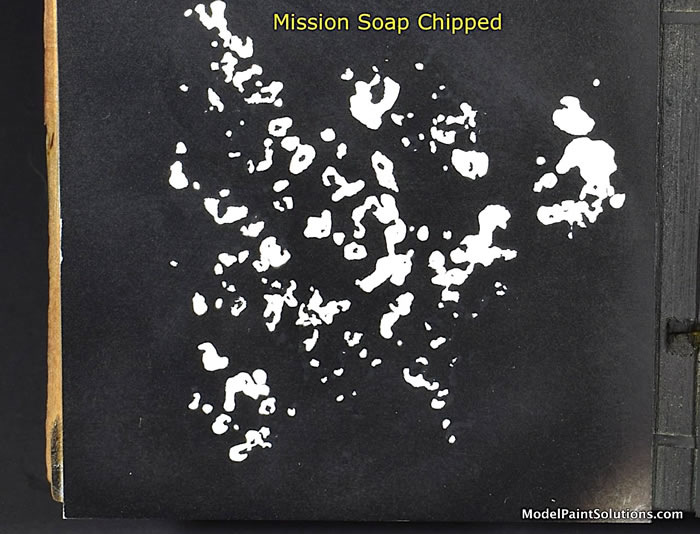
A quick an easy way to prepare a finished surface for chipping is to apply soap (or more accurately Dawn dishwashing detergent) in a chipped-like pattern prior to painting. Allow the soap to dry 2-3 hours or until it’s lost most of it’s shine. As seen in the example below, when carefully applied with a rubber stamp or a small paint brush, the detergent can be used to form irregular, chipped patterns. After the soap “chips” are over-sprayed with paint, the finish is chipped by simply wiping it gently with a lint-free tissue or cloth moistened with water; cotton buds work well. Soap can work as a barrier for both acrylics and lacquers and is a quick and easy “mask” for small areas.
To that end, prior to the model being sprayed with the RAF Dark Green mix, the aluminum areas on the center section and wing leading edges were stippled with Dawn detergent applied with a small pieces of textured rubber.
Spraying the Uppers:
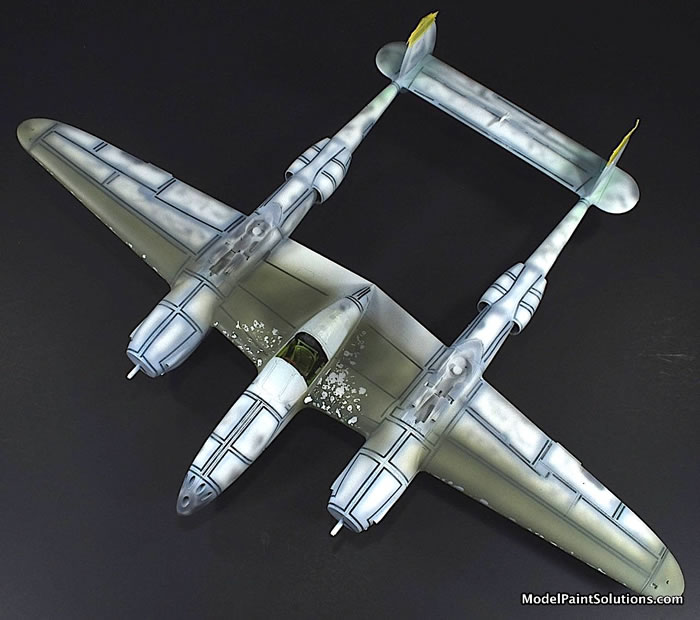
To overspray the weathering marks with RAF Dark Green, I opted for a lower concentration of paint (~40%). This was applied at ~12psi with an H-S Evolution fitted with a 0.20mm tip. Multiple light coats were applied to assess how well the underlying weathering marks remained visible. The additional coats were modulated accordingly to retain the weathering marks yet achieve sufficient coverage. Those areas that had been treated with soap chips were sprayed with multiple dry coats prior to a wet, fill coat to ensure the dried soap didn’t solubilize and run. After the paint was allowed to dry ~3 hours, a gentle wipe with a moistened tissue “chipped” those areas nicely and the model was set aside to dry.
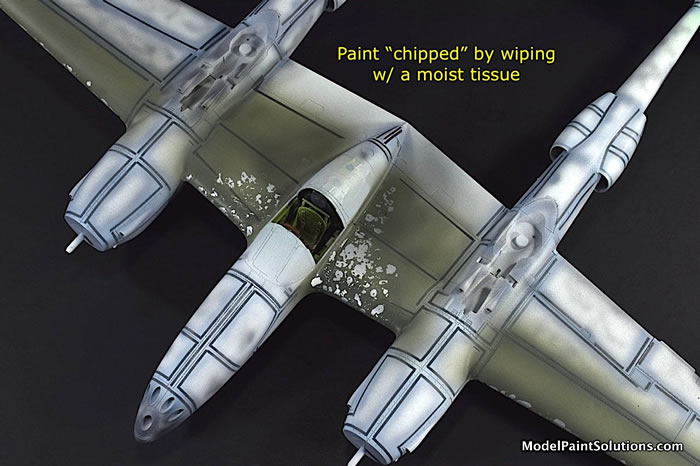
Once the RAF Dark Green had been allowed to dry (24 hours) decals were applied to the fuselage center section (using Micro-Set and -Sol) in preparation for the next coat of paint. Care was taken to remove any portion of a decal covering a “chip.” In addition, the turbo chargers were added to both booms following a coat of Mission Burnt Metal and Mission Steel for highlights.
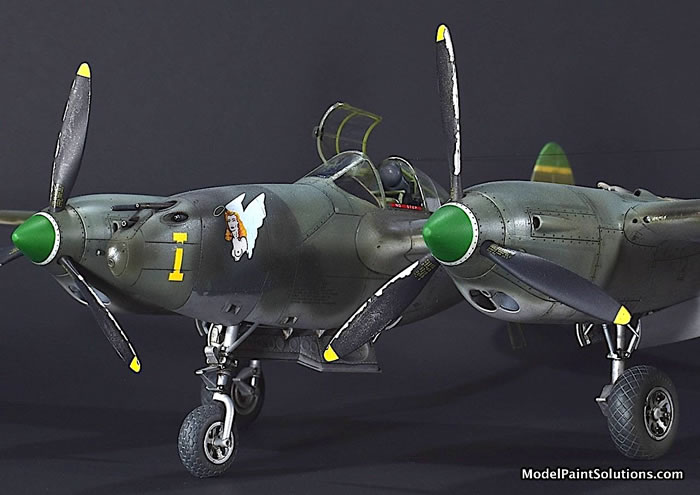
The fuselage center section and leading edges of the wings were then over-sprayed with Mission Olive Drab (MMP-024). The pattern laid down loosely followed the high wear, chipped areas on the the center section and the leading edges of the wings as depicted in the Kagero publication. The coverage was modulated so as to leave portions of the chipped areas visible through the top coat. Right after the paint was shot, sharpened toothpicks were used to make small nicks and scratches.
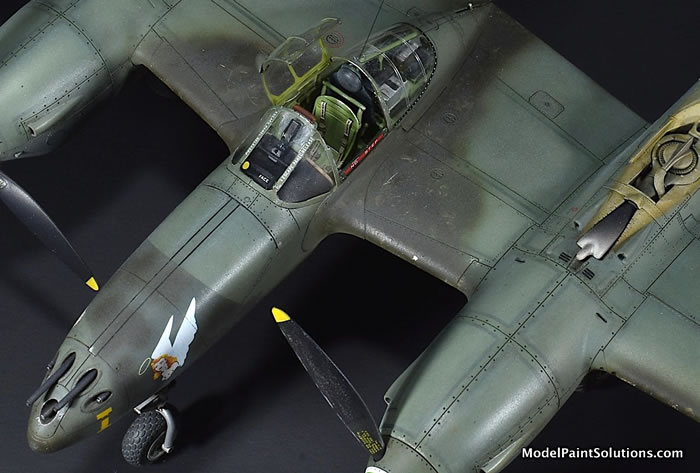
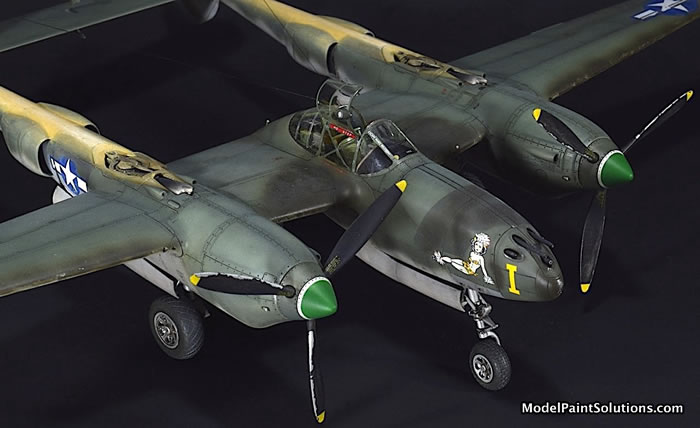
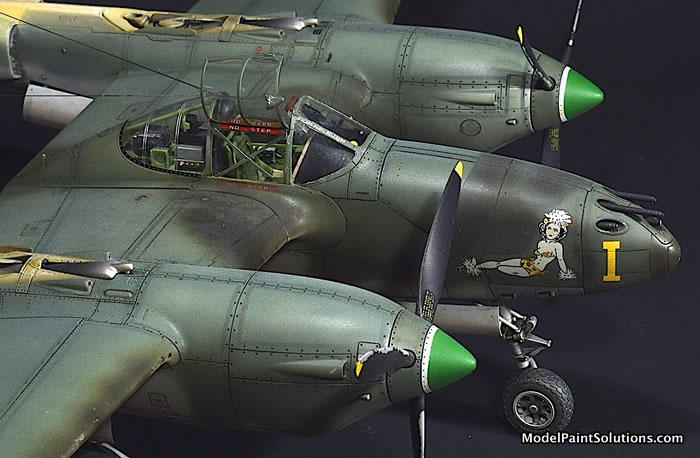
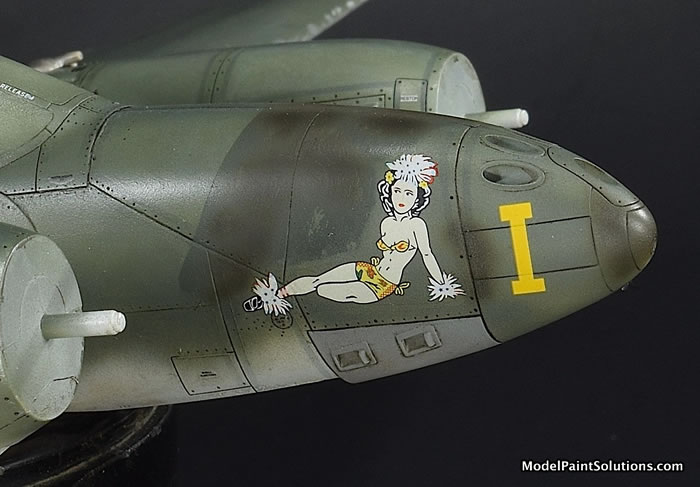
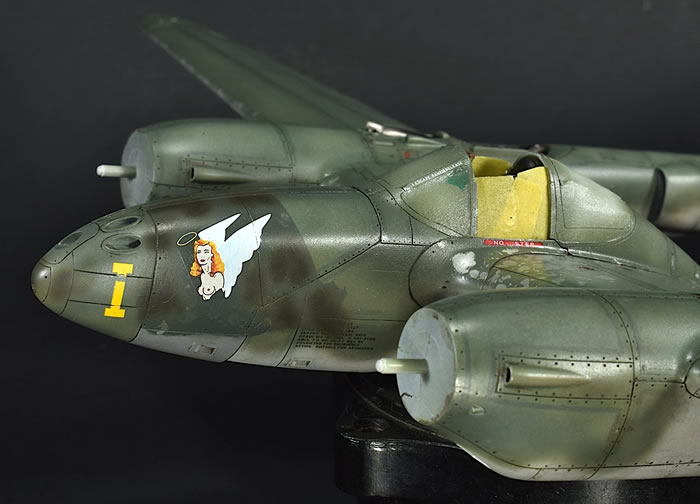
The nose art decals; “Wind City Ruthie” on the starboard nose and a topless, winged angel (author’s description) on the port, were applied using Micro-Set and -Sol. The decals responded beautifully. After a quick coat of Mission Clear Primer over the decals, the nose was masked off for the hard, angled line between the two shades of green. In addition, a few dabs of soap were applied with a micro brush next to “Ruthie” and the “Angel” in preparation for replicating scuffed areas that show the lighter, underlying green. Mission Olive Drab (MMP-024) was then shot on the nose and around the decals.
After the soaped areas around Ruthie and the Angel were chipped with a moist tissue, Mission Olive Drab (MMP-026; diluted 40:60 with CP30) was applied with an H-S Infinity fitted with a 0.15mm tip. This darker green was shot in an irregular pattern around each decals loosely following the art work provided in the Kagero book.
At this point I turned my attention to the belly and started the weathering process by preparing some rendered oils. In brief, oil paints are rendered by placing them on a thick piece of cardboard for multiple hours during which time the heavier oils leach into the paper leaving the concentrated pigments. Small amounts of the pigments (head of a pin) are then mixed with an odorless thinner (~1-2ml: AK, Mona Lisa or similar) to make washes of the required opacity for weathering.
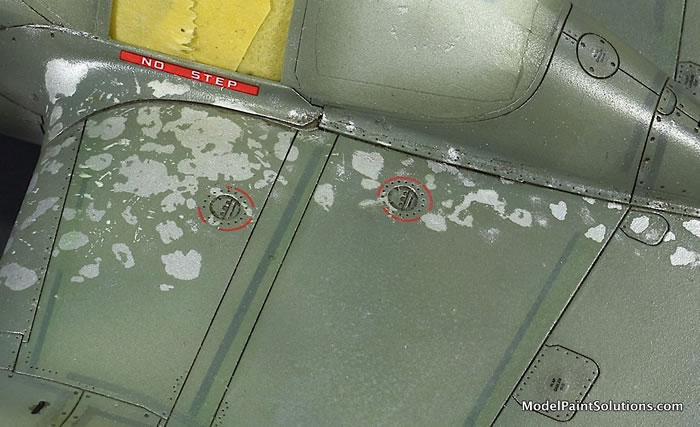
The process is started by placing a small drop of wash in the center of an access panel. If the drop is appropriately sized, it will spread to the outer limit of the panel and stop at the inscribed line. Multiple applications to the same panel will result in a darkened finish versus the areas around the panel. Once satisfied with the result, the panels were sealed with a light coat of Mission Clear Primer.
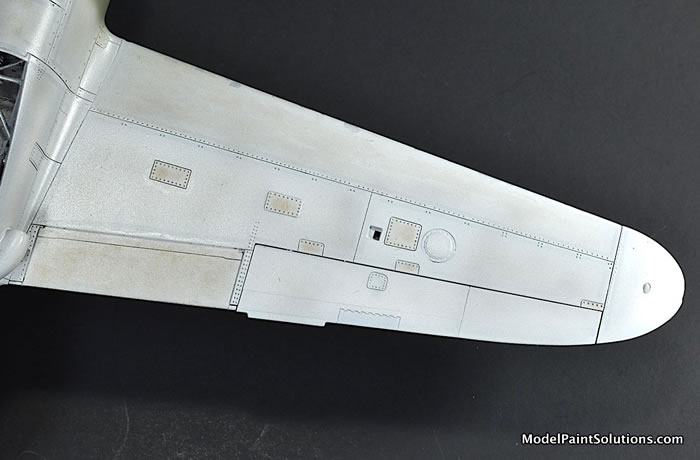
When dry, a more dilute mix of rendered pigments in odorless thinner was applied to the entire surface of the wing and allowed to dry. The pronounced egg-shell-finish of the Mission Neutral Grey, obtained by using Mission Polymix instead of Clear Primer for dilution, was highlighted by the wash producing a very fine, mottled appearance most noticeable in the centers of panels and wing sections (Asterisks *).
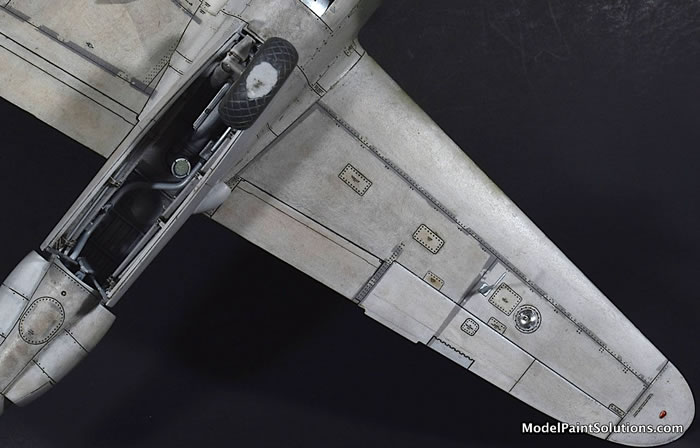
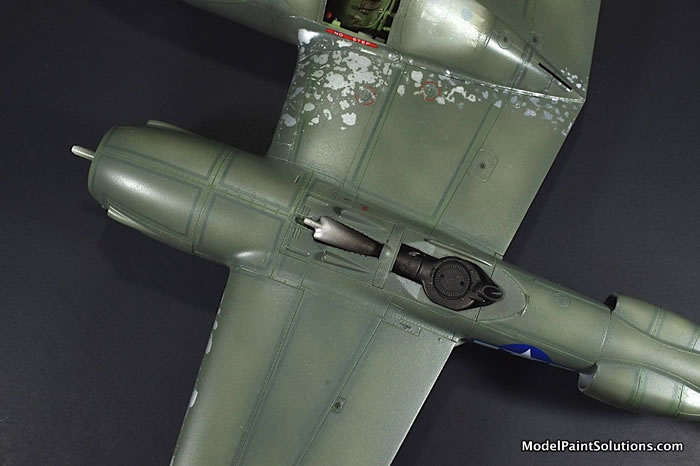
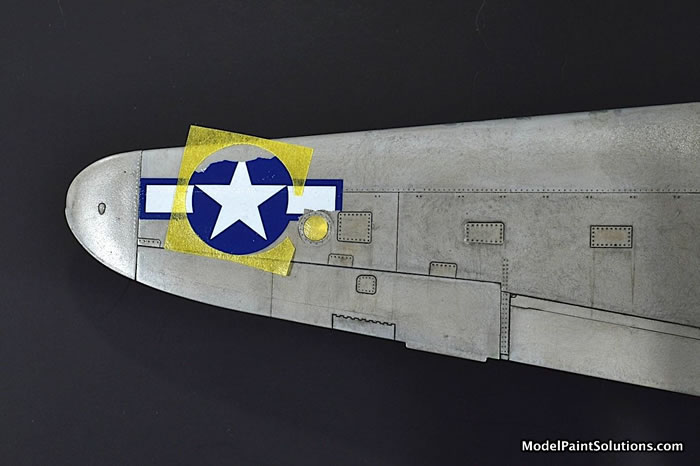
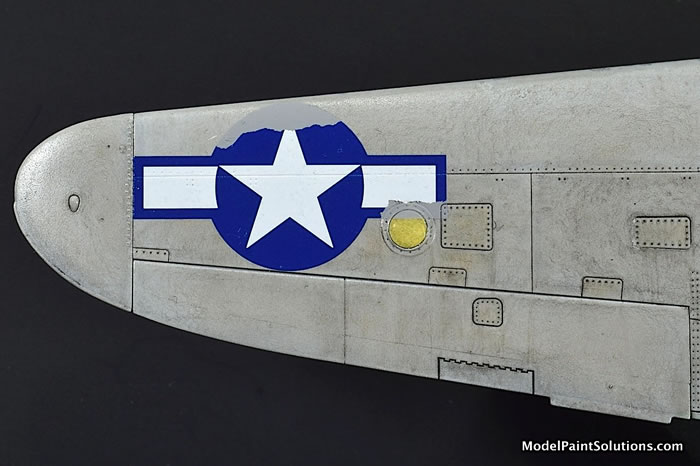
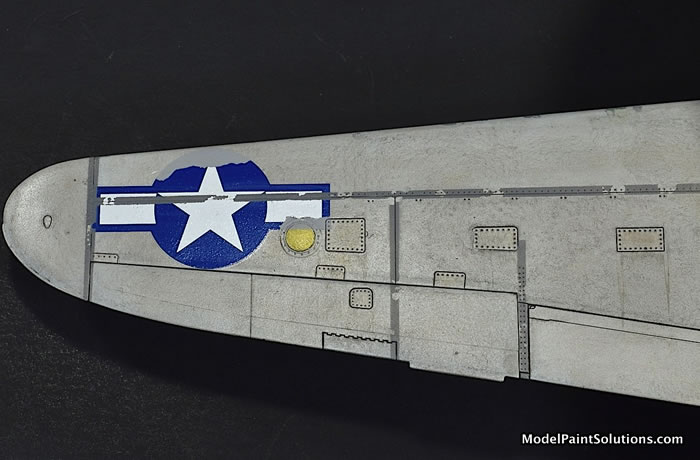
Once the washes were sealed with a coat of CP30, decals were applied using Micro-Set and -Sol. At this point I decided to make a portion of the national insignia look as though it had peeled off revealing the underlying primer coat. To do this, the upper portion and the side of the decal (overlaying the landing light) was cut with a with scalpel prior to removal from the sheet. The decal was applied with -Set and -Sol, shot with a protective coat of Clear Primer, and then a circle mask was cut from Tamiya tape. With the surrounding area masked off and Masking Sol R applied to the edge of the ripped decal, the missing portions of the insignia were shot with Mission Neutral Grey with a couple drops of Slate Grey added for a different hue. Once this was dry, the work was protected with a light coat of Clear Primer in preparation for the next round of masking.

Replicating Weatherization Marks: Version 2.0
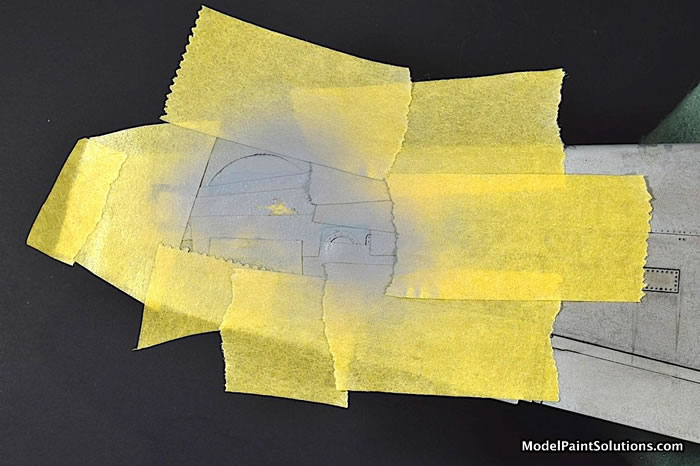
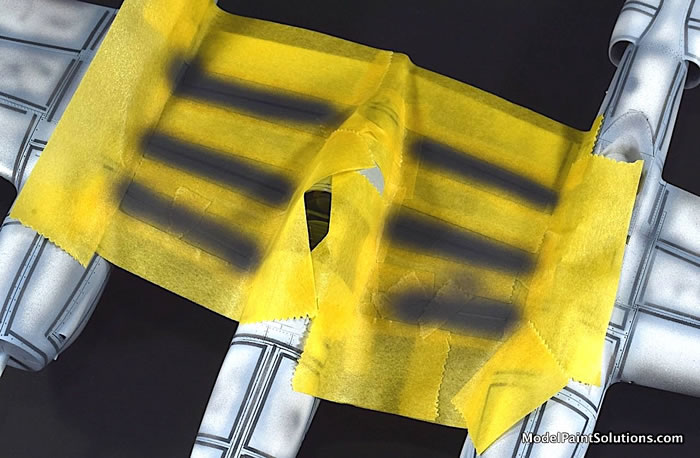
Using strips of Tamiya tape, the weatherization marks on the belly were masked for painting. Prior to shooting paint, small blotches of soap were applied along the masked line using a small piece of textured rubber. As seen in the accompanying picture, the piece of rubber was affixed to the end of a yellow microbrush for easy handling.
Mission Slate Grey was shot over the masked lines at ~10psi with an H-S Infinity fitted with a 0.15mm tip. Once the paint was dry (~45 minutes), the tapes were pulled and the line was wiped with a moist tissue resulting in the soaped areas “chipping” and adding variability and wear to the line. Additional weathering in the form of rendered oils was applied to the damaged national insignia to blend it in with the surrounding areas. Satisfied with the look of the weathering line over the national insignia, the same process was performed on the insignia on top of the wing minus any damage.

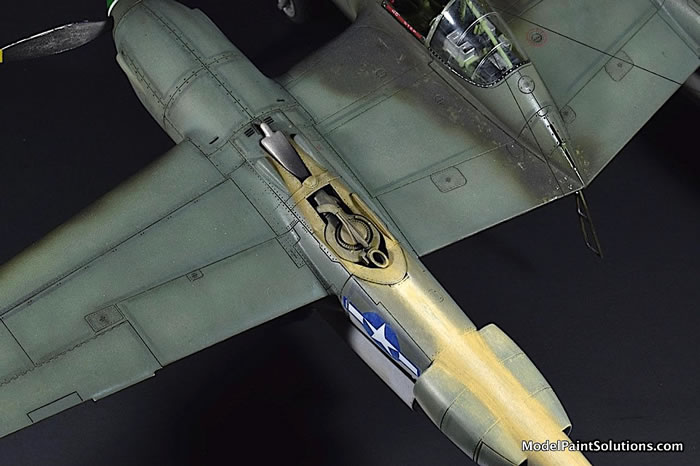
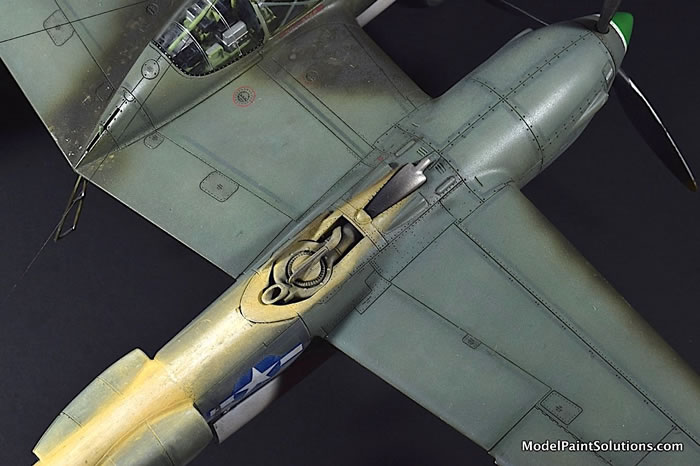
With the decals applied and most of the paint chipping completed, the model was given a light coat of Clear Primer in preparation for replicating the pronounced discoloration so commonly seen on the dorsal aspect of the tail booms just aft of the turbocharges. This was done with the following rendered oils produced by 502 Abteilung and Windsor and Newton: White, Buff, Yellow Ochre, Burnt Umber, and Black. The colors were blended into 3-4 final colors which were sequentially applied from darkest to lightest.
The process was started by placing a dollop of the darkest color on a piece of Tamiya tape aligned with a panel line that exhibited a break in the discoloration on pictures and art work of the 1/1 subject. This was blended back onto the booms using a small brush barely moist with odorless thinner. When this was dry, a light coat of Clear Primer was shot to protect later and after this was dry, the next lightest color was applied using the same tape/dollop technique and blended onto the underlying darker color.

Once I was satisfied with the look on the booms, the area between the turbochargers and the boom panel line were weathered with the same rendered oils and blended in with the weathering on the booms.
While weathering the tail booms, streaks of the same colors were lightly applied to the vertical stabilizers. A final coat of CP30 was applied to seal the rendered oils. This was followed by a light coat of Mission Flat (diluted to 25% with Mission Thinner) that was applied to the entire model.
Finishing Up:
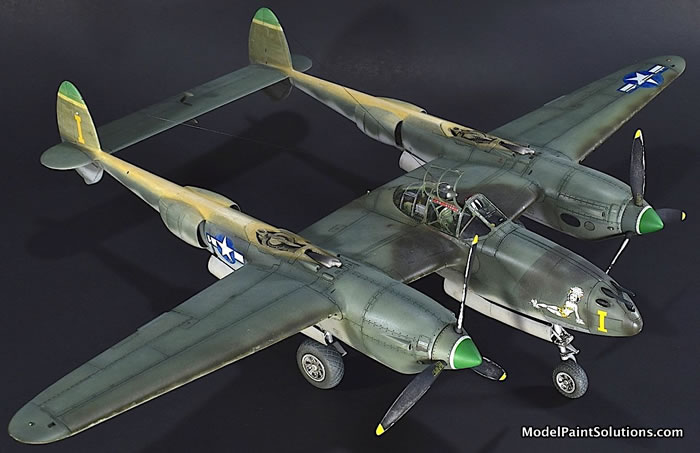
With the model weathered and sealed in a light coat of Flat, masking tapes were pulled from the canopy sections and assembled with no issues. Likewise the nose and main gear, and gear doors which had been painted and weathered separately were affixed with thick CA glue (Bob Smith).
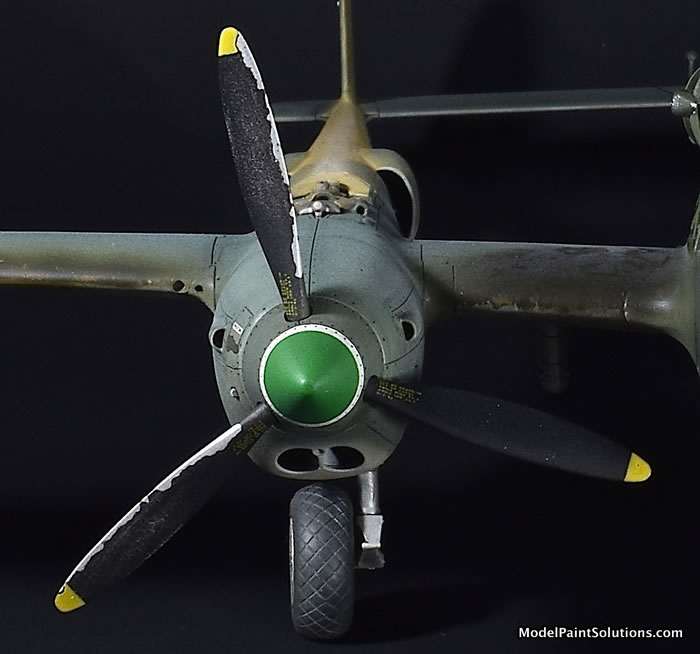
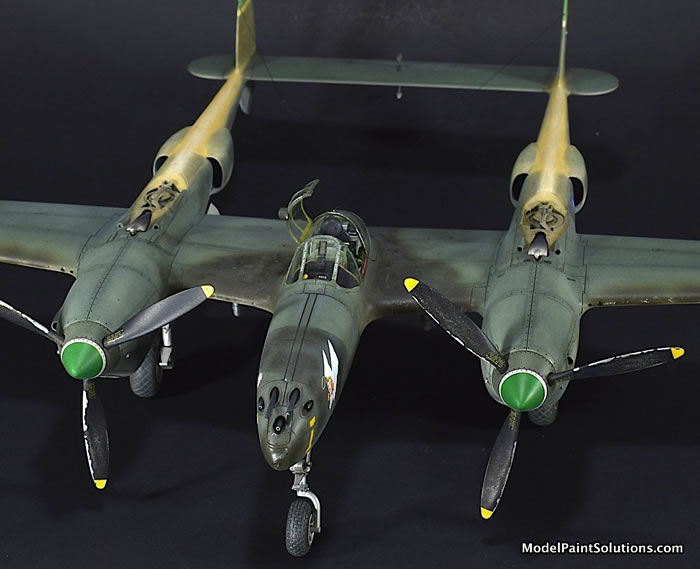
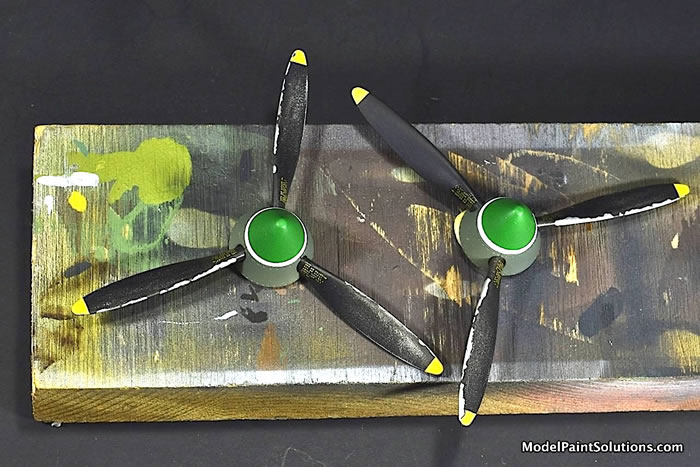
To mimic wear on the propellors, they were first shot with Mission White Primer followed by Mission White Aluminum and a protective coat of CP30 that was allowed to dry for 48 hours. To replicate chipping to the leading edges of the blades, “chips” of soap (Dawn) were applied with a piece of textured rubber prior to shooting the blades with LifeColor Black.
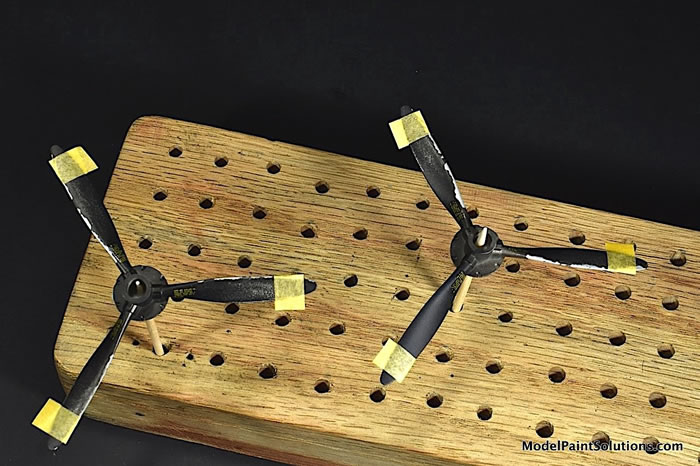
After the soap was removed with a moist tissue revealing the chipped leading edges, the centers of the blades were gently wet-buffed with Micromesh 6,0000 pads to replicate wear. I opted to use LifeColor for this step as it responds very well to the wet buffing step. With the worn areas protected with another coat of………….you guessed it; CP30, the tips were masked with Tamiya tape and a few blotches of soap were applied directly over “chips” so they’d show through the yellow after painting. The yellow used was Mission (MMP-007) that had been nudged with a few drops of Mission Red for hue. After the paint had dried (~45 minutes), a quick wipe with a moist tissue revealed the chips through the yellow tips. One blade was left as pristine as possible to suggest it was a recent replacement due to wear or damage. When the blades are combined with the hubs, painted Mission RAF Dark Green, Tractor Green, and White the resulting assemblies looked sufficiently convincing.
Once the props and aerials (Uschi line) were hung, the model was given a final and selective coat of Mission Flat applied with a 0.15mm tip. This allowed me to dull out small areas that retained too much shine without spraying more Flat than required and getting the frosty/snowy effect.
And with that, I sat back, took a long draw from my glass of adult modeling lubricant, and basked in the finality of it all:)
Whew! Thanks for sticking in there! The Tamiya P-38 is a beautiful model and well worth the effort requited. It’s not without its quirks however. I suggest adding part D23 (main gear door retract arms) to the model during final assembly. To attach these parts per the instructions results in them being in the way of your hands for the remainder of the build; not ideal. As has been commented on in multiple reviews, the fit of the kit components is amazingly tight. So tight that extra effort should be made to ensure all of the major components are perfectly aligned and free of any paint on their mating surfaces prior to committing with glue. Failure to do so will result in misalignments that will be transferred through subsequent assemblies making for much more work.
Now go paint something!
—John
For more on this review visit Modelpaintsolutions.com.
Text and images copyright © 2021 by Model Paint Solutions.
Text and Images Copyright © 2020 by Model Paint Solutions
Page Created 16 April, 2021
Last updated
16 April, 2021
Back to HyperScale Main Page
Back to Reviews Page

|
 Home
| What's New |
Features |
Gallery |
Reviews |
Reference |
Forum |
Search
Home
| What's New |
Features |
Gallery |
Reviews |
Reference |
Forum |
Search