Harrier GR.1/3
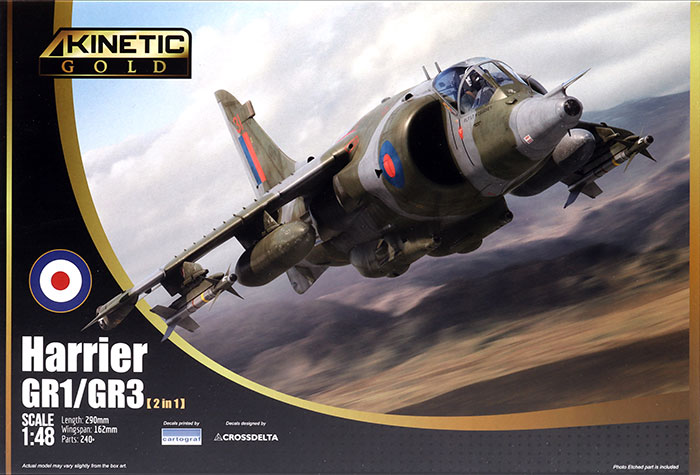
Kinetic, 1/48 scale
S u m m a r y |
| Item No. |
Kinetic Model Kits Item No. K48060 - Harrier GR.1/3 |
| Contents and Media: |
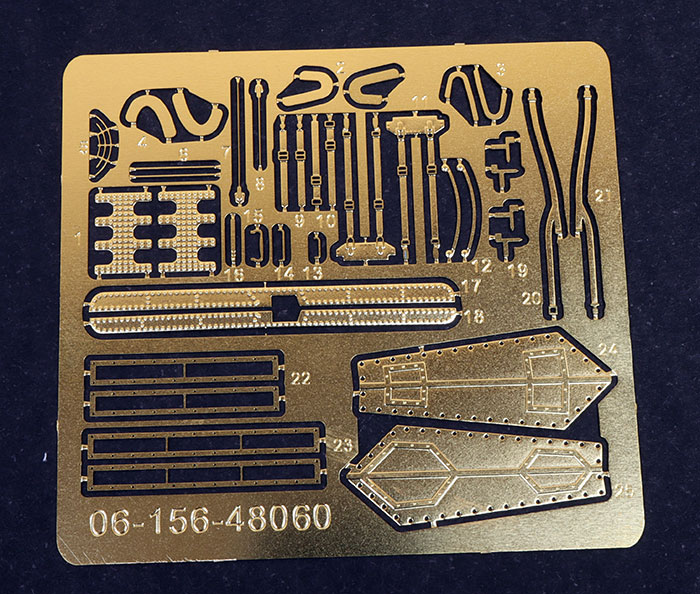
352 parts in grey plastic and 18 parts in clear; 36 photo-etched parts on one fret; markings for seven aircraft. |
| Scale |
1/48 |
| Price: |
USD$43.99 plus shipping available online from Lucky Model |
| Review Type: |
FirstLook |
| Advantages: |
High quality moulding; nicely detailed; new wing, fuselage and detail sprues; recessed panel lines and rows of rivets; optional position flaps (extended or closed); straightforward parts breakdown; high quality decals designed by Crossdelta and printed by Cartograf. |
| Disadvantages: |
|
| Recommendation: |
This is another really nice Harrier from Kinetic, and easily the best GR.1/3 out there now. Kinetic's Harriers are well detailed, offer many useful options and alternative position parts, and provide a wealth of ordnance. Engineering appears straightforward and it should not be a difficult build. At only USD$43.99, I thinkit is a bargain too! |
Reviewed
by Brett Green

The Hawker Siddeley Harrier is a British military aircraft. It was the first of the Harrier Jump Jet series of aircraft and was developed in the 1960s as the first operational ground attack and reconnaissance aircraft with vertical/short takeoff and landing (V/STOL) capabilities and the only truly successful V/STOL design of that era.
The Harrier was developed directly from the Hawker Siddeley Kestrel prototype aircraft, following the cancellation of a more advanced supersonic aircraft, the Hawker Siddeley P.1154. The RAF ordered the Harrier GR.1 and GR.3 variants in the late 1960s.
During the Harrier's service, the RAF positioned the bulk of aircraft in West Germany to defend against a potential invasion of Western Europe by the Warsaw Pact forces; the unique abilities of the Harrier allowed the RAF to disperse their forces away from vulnerable airbases.
Harrier squadrons saw several deployments overseas including an important role in the Falklands War.
The Harrier's ability to operate with minimal ground facilities and very short runways allowed it to be used at locations unavailable to other fixed-wing aircraft. The Harrier received criticism for having a high accident rate and for a time-consuming maintenance process.
The Harrier was exported to the United States as the AV-8A, for use by the US Marine Corps (USMC), in the 1970s. The USMC used their Harriers primarily for close air support, operating from amphibious assault ships, and, if needed, forward operating bases.
The Harrier GR.1, GR.1A and GR.3 were single-seat versions for the RAF. The RAF ordered 118 of the GR.1/GR.3 series, with the last production aircraft delivery in December 1986.
122 were built.
For more technical details and tips, see Nick Greenall's Additional Notes later in this review.
Kinetic released their excellent 1/48 scale Sea Harrier FA2 in September 2014, followed by an equally good Sea Harrier FRS.1 in October 2015 then a two-seat trainer in 2017.
Kinetic has now followed up with their much anticipated Harrier GR.1/3.
Until now, early Harriers have been thin on the ground in 1/48 scale. Tamiya released a kit in 1979, but this suffered from accuracy and outline issues.
Monogram released a 1/48 scale AV-8A Harrier in 1981. This kit was a product of its day with pretty good detail but raised panel lines and notoriously poor fit.
The first Airfix 1/48 scale Harrier was a GR.3 in 1988 based on their earlier 1983 Sea Harrier FRS.1. This kit lacked detail, had raised panel lines and was a challenge to build. I recall starting one of these Airfix Harriers some decades ago but never finishing it.
At last, Kinetic has delivered a quality Harrier in 1/48 scale.
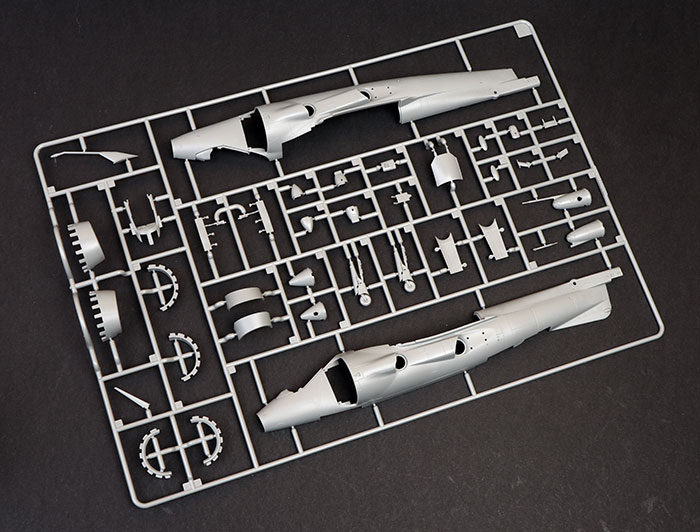
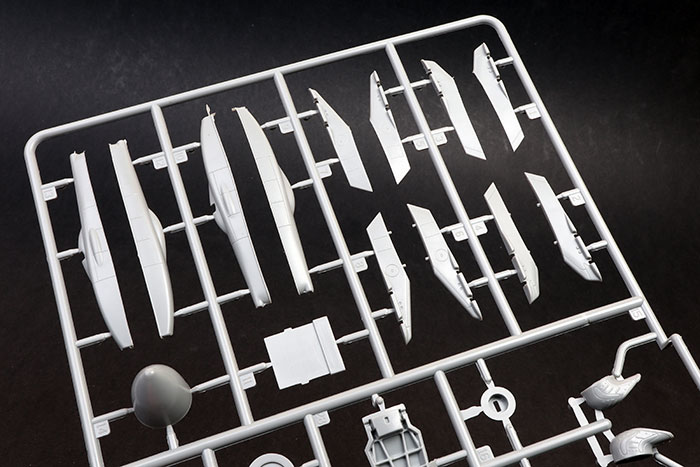
Kinetic's 1/48 scale Harrier GR.1/3 comprises around 300 parts in light grey plastic, 20 parts in clear and a photo-etched fret. Markings for one GR.1, one GR.1A and five GR.3s.
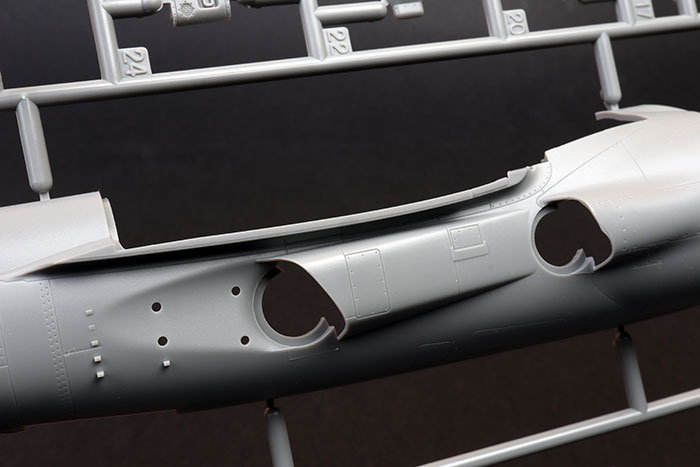
The new parts are moulded onto a revised sprue. This includes the new fuselage halves, alternative noses and more.
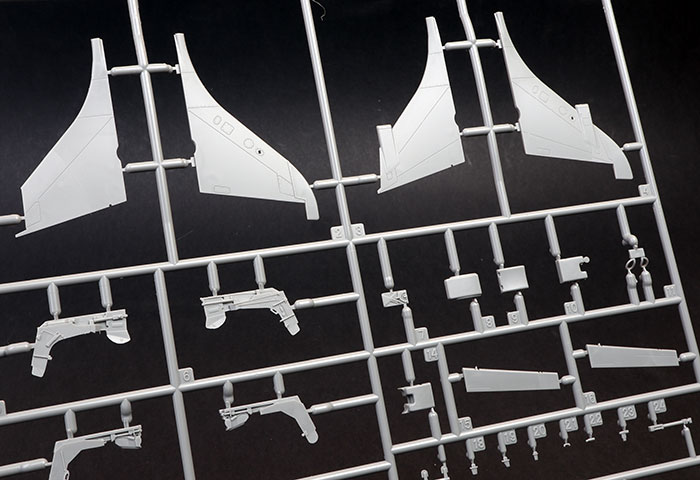
The fuselage is presented as two main halves plus a separate alternative nose cones. The kit also includes the tall fin, the RWR fin and the original fin.
The wing boasts fine and sharp recessed panel lines, and a nice smooth surface. The old wing is included too, so make sure you use the right one (both photos below are the GR.1/3 wing BTW)!
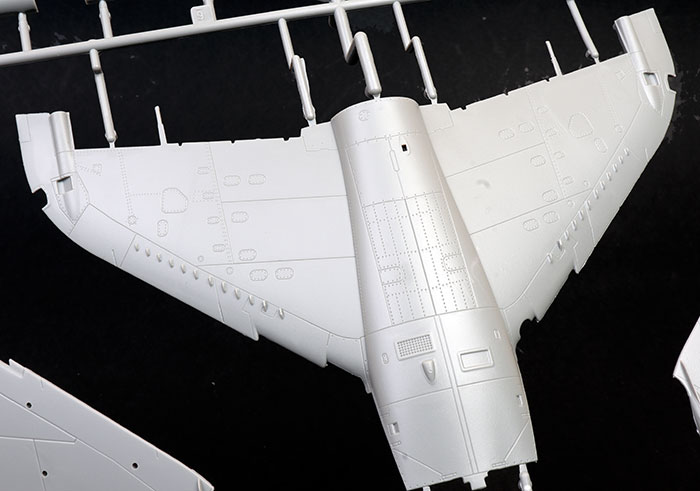
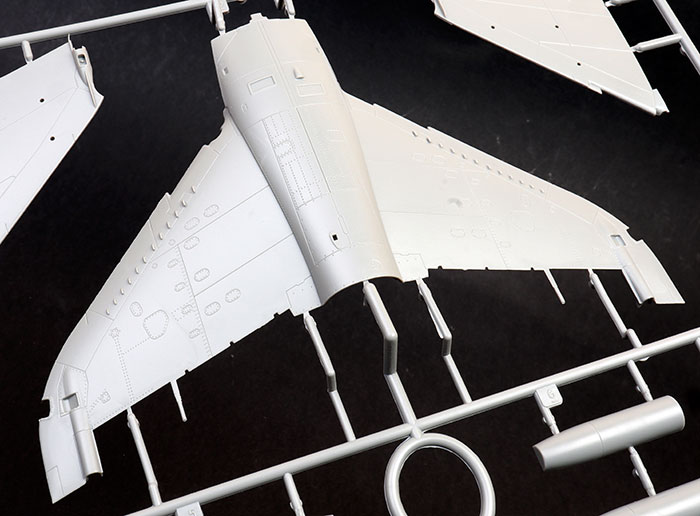
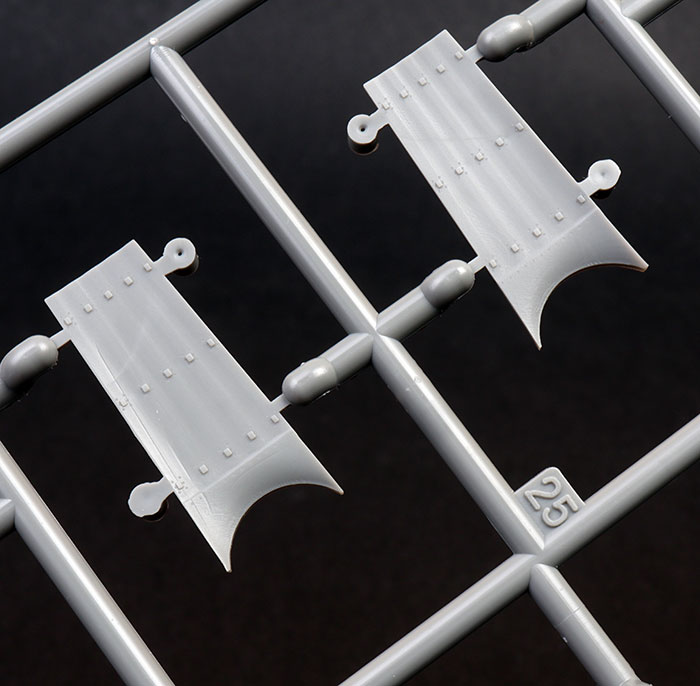
In common with the Sea Harrier FA2, surface detail looks very nice, with recessed panel lines, vents and rivets over the airframe.
Moulding quality is high, with minimal ejector pin circles, seam lines or sink marks. There is only a little fine flash to clean up here and there.
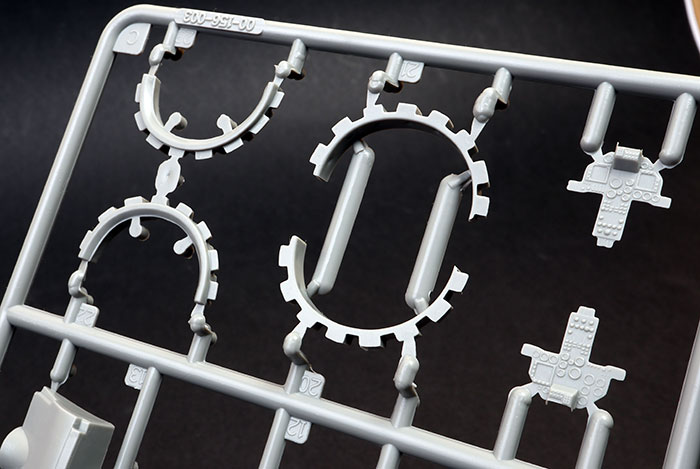
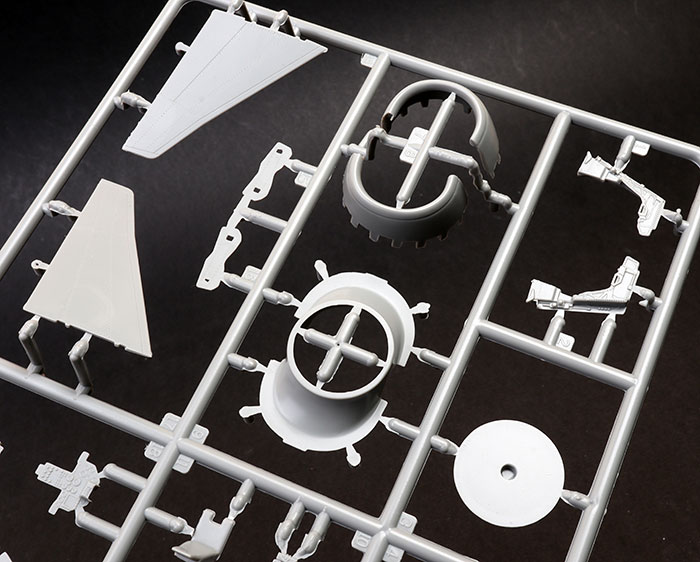
Some of the moulding is really clever too, notably the one-piece nozzles. All four nozzles are connected by a rotating mechanism.
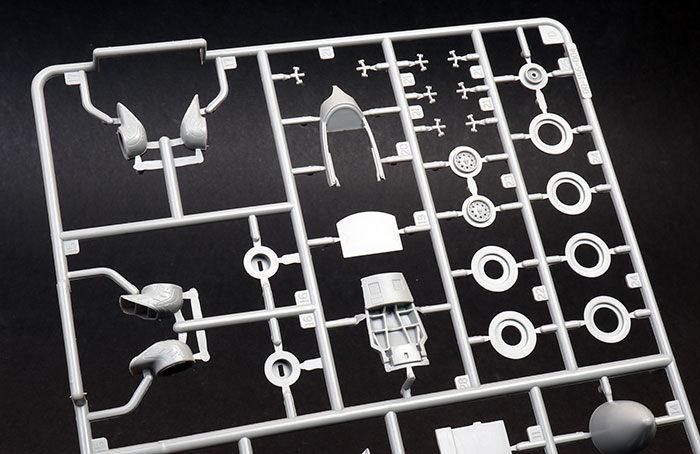
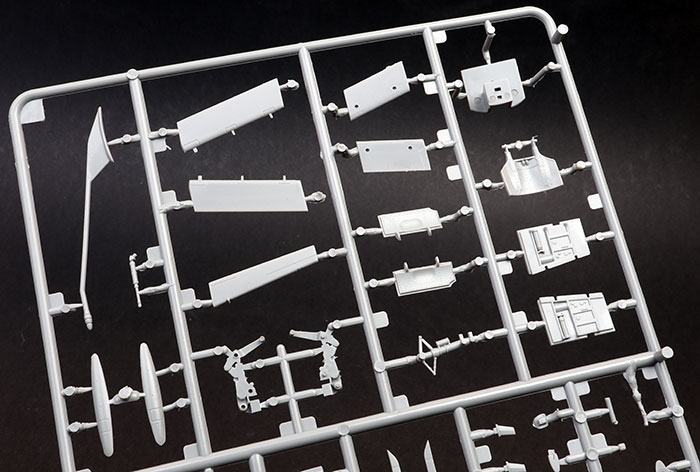
The cockpit detail is nice straight from the box, with raised detail on the side consoles and instrument panels; and excellent moulding on the sides of the ejector seat. Photo-etched harness straps are also included.
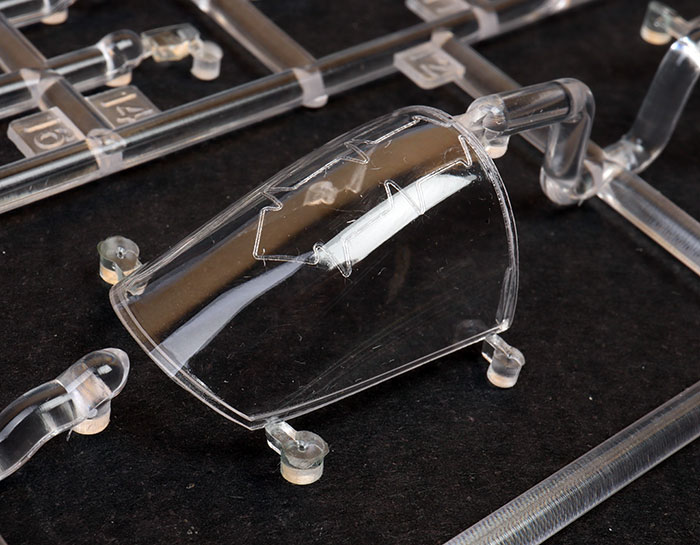
The canopy is split into windscreen and opening section.
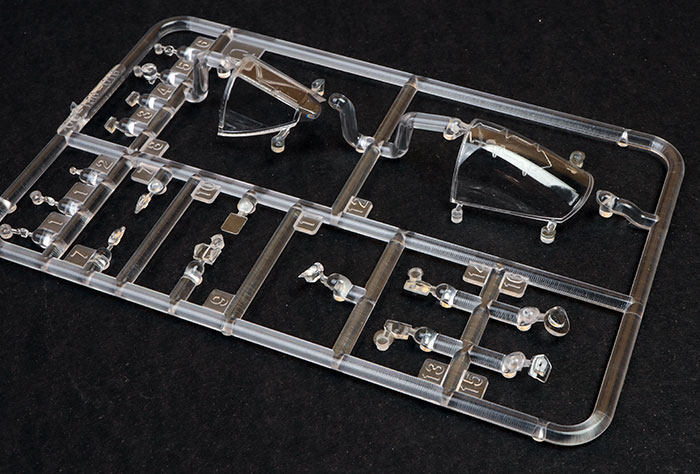
The latter features the prominent detonation chords moulded into the top.
The stressed metal effect on the nozzle blast shields looks great.
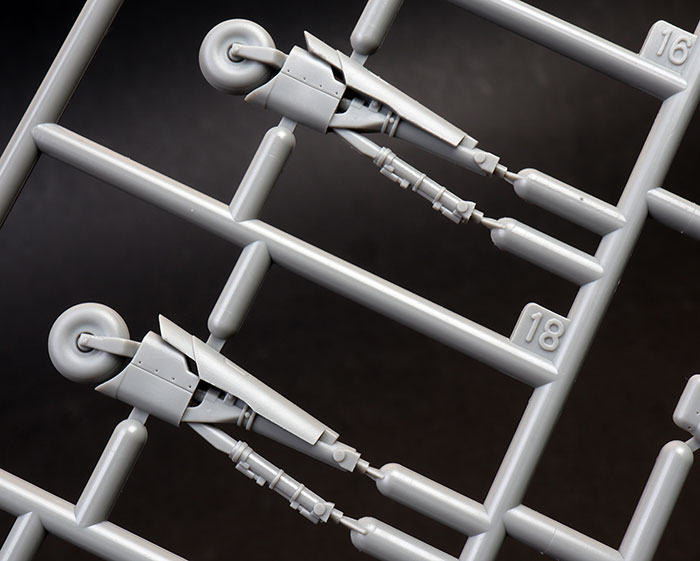
Optional parts are provided for open or closed auxiliary blow in doors; open or closed air brakes; and the control surfaces and flaps are all offered as separate parts, allowing them to be posed to taste. Landing gear doors may be fixed open or closed too.
The photo-etched fret provides additional detail parts including scale thickness wing fences, slime lights and harness straps.
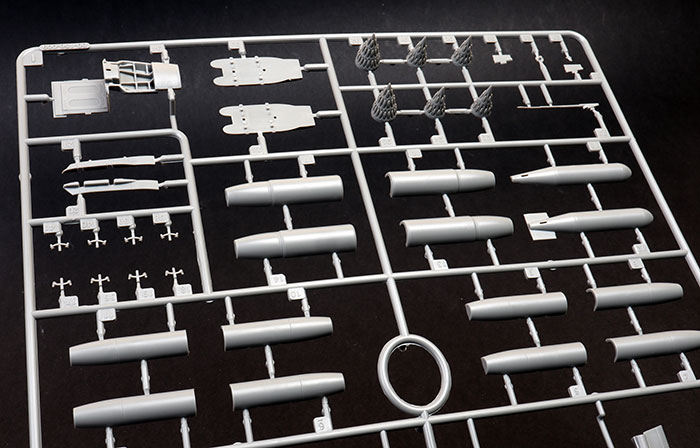
Of the 350-odd grey plastic parts, 140 are dedicated to ordnance.
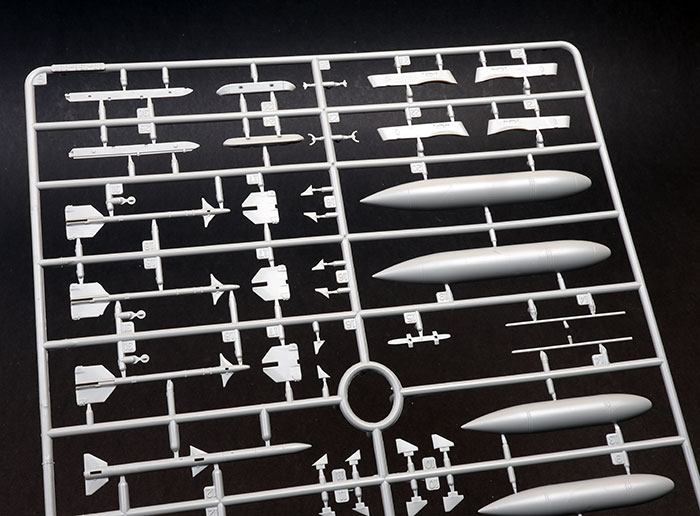
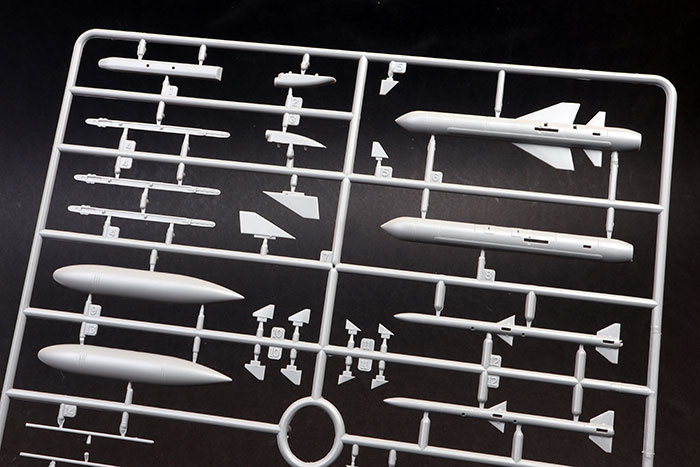
You'll have plenty of additional weapons to add the spares box!
Markings
Decals are designed by Crossdelta and luxuriously printed by Cartograf.
Finishes are mostly the 1970s camouflage of Dark Sea Grey and Dark Green upper surfaces over Light Aircraft Grey, although three wraparound schemes are also included.
I like that alternative roundel decals are supplied for the open blow-in doors.
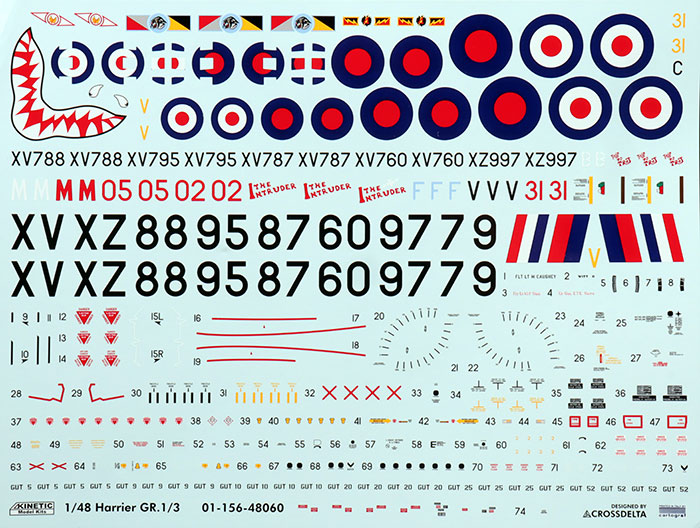
Colour callouts are offered for AMMO Mig, Vallejo and GSI Creos (I believe this is Gunze-Sangyo acrylic), Tamiya and Humbrol paints.
Additional Notes - An Overview |
by Nick Greenall from IPMS (UK) Harrier SIG
Patience rewarded! This new kit of the Harrier GR.1 / GR.3 has been a long time coming. Let’s celebrate that Kinetic have done what no British, or other kit manufacturer has yet done, despite many requests... provided kits for the whole family of first-generation Harriers in this scale, completing the set with the GR.1 / GR.3. Thank you to Raymond Chung, Laurent Stern, David To and all the team at Kinetic and to Daniel Lee at CrossDelta from all model-making Harrier Fans across the globe!
Rather than trying to cram every option into one box, the sensible yet bold decision was made to release separate kits for the Royal Air Force’s GR.1s and GR.3s, the United State Marine Corps’ AV-8A, and the Spanish Navy’s AV-8S; this latter being due for release by AMMO-Mig in the new year with decals to enable all Spanish AV-8S from 1980 when the ARMADA lettering began to be made plus one further USMC AV-8A and a winter-camouflaged (TBC) RAF GR.3 option.
(As I write this work is ongoing with CrossDelta on the AV-8S kit’s markings.) The after-market decal manufacturers have already been busy for the RAF and USMC options and can pick up the markings for the Royal Thai Navy’s AV-8As… Yes, the RTN used the AV-8A designation for the Harriers it acquired from Spain. Equally, the aftermarket teams can have fun producing all the lumps, bumps and lift-improvement devices needed for USMC AV-8Cs. Time to get technical...
How to Identify a Harrier GR.1 From a GR.1A or GR.3… It’s NOT All Nose and Fin Shapes!
The type designation of all 1st generation RAF Harriers has nothing to do with the shape of the airframe’s nose, fin or tail-stings. It was determined solely by the mark of Rolls-Royce Pegasus engine fitted.
-
GR.1 - Pegasus 6, Mk.101 of 19,000lbs thrust. Harriers XV738-XV762 and XV776-XV810 were built as GR.1s. The two-seater with the Pegasus Mk.101 was the T.2.
-
GR.1A - Pegasus 10, Mk.102 of 20,500lbs thrust fitted from 1971. XW630-XW924 were built as GR.1As. The surviving GR.1s were upgraded in service. The GR.1 and GR.1A had two large electrical system cooling vents on top of the engine covers and no circular mesh vents in the tail-sting. The two-seater with the Pegasus Mk.102 was the T.2A.
-
GR.3 - Pegasus 11, Mk.103 of 21,500lbs thrust and an improved electrical system, installed from 1976. Early in-service upgrades retained the original airframe shapes but lost the two vents on the engine covers and acquired seven circular mesh vents in the bullet-shaped tail-sting – two underneath, two each side and one on top offset to port. After a few months a smaller vent for the new electrical system appeared offset to starboard in front of the mesh covered GTS/APU intake, seen subsequently on all GR.3s and Sea Harriers. The two-seater with the Pegasus Mk.103 was the T.4.
Complicating matters and leading to all sorts of confusion about the GR.3 were the Phase 4 Modifications of to early GR.3s which also began in 1976. These added the Ferranti Laser Ranger and Marked-Target Seeker (LRMTS) in a new thimble-shaped nose and the Marconi passive Radar Warning Receiver unit and radomes to the fin and tail-sting; also increasing the fin’s height by 5 inches. XV760 was the first in-service GR.3 to have the LRMTS nose and RWR fitted, with XZ128 being the first new production GR.3 built with those Mods. The last GR.3 built was XZ999, before four Falklands War attrition replacements ZD667-ZD670 finished the line.
In summary… Yes, all Harriers with the LRMTS nose and RWR fittings are GR.3s but, not all GR.3s have the LRMTS nose and RWR fittings. Check the engine cover and tail-sting for vents on Harriers with the original nose, fin and tail-sting shapes to confirm the mark!
Enough Harrier geekery, to the kit!
Highlights
This kit builds on the improvements made by Kinetic to the build-quality of the earlier Sea Harrier kits with the release of the two-seater kit. I have yet to have the plastic in my hands, but I know that those who have built it have said everything goes together very smoothly with minimal filler needed around the wing to fuselage joints.
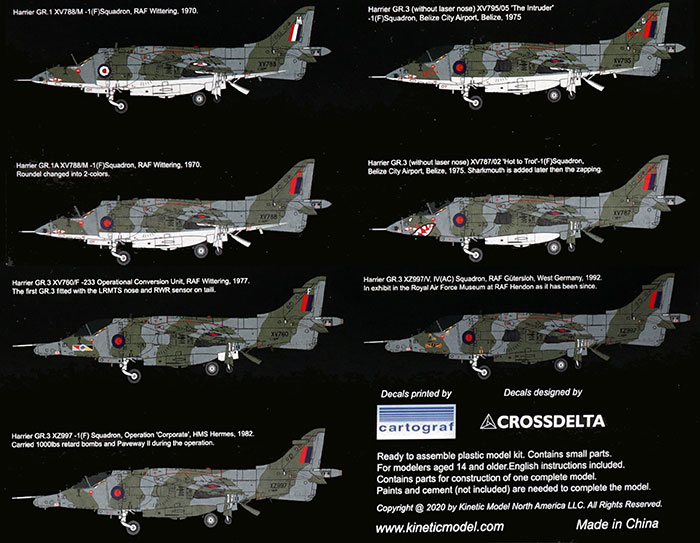
Seven marking options cover an early GR.1s of 1969-70 to the final RAF GR.3 schemes of 1990, with two early GR.3s deployed to Belize in the mix. The subject of Airfix’s original 1/24 scale GR.1A kit XV788/M of 1(F) Squadron is recognised as a GR.1 in its original gloss colours with three-colour roundels and as a GR.1A in its matt colours with two-colour roundels. Option 7 - GR.3 XZ997/V - is now preserved in the RAF Museum at Cosford in the IV(AC) Squadron colours it wore when it left RAF service in August 1990. If only there had been room to do 3(F) and 20 Squadrons, later 1417 Flight (Belize) and 1453 Flight (Falklands) options too. The schemes chosen were done in the knowledge that the aftermarket decal producers had many RAF schemes already covered, including for those units the kit’s markings do not cover.
BIG Tip
I know this will be heresy to many modellers, but the best advice I can give you is to:
-
decide on which mark, and
-
markings scheme you are building the model as, referring to photographs, and then
-
READ the instructions carefully, highlighting all references to your chosen mark and marking option.
Refer to the instructions throughout the build for guidance on the nose/fin/tail-sting/details combinations needed for each marking option provided. Note also the painting callouts added throughout the instructions.
Why is this a Big Tip? Harriers are complex beasts, with changes to UHF aerial shapes, the addition/removal of lumps and bumps and other detail items to trip up the unwary.
More Tips to Get Your Harrier Looking the Part…
-
Fuselage – Some modellers stray from the instruction’s build sequence and do it this way:
-
Fit the intake/front wheel-well pieces (P25, P26) into each fuselage half.
-
Add the intake interior parts (N11, N12) to the outside of each half, then
-
Fit the intake exteriors to each half with open/closed auxiliary doors in place
-
N1 and N2 (open) use these for a parked Harrier on the ground, engine off.
-
N4 and N6 (closed) use these for a Harrier in flight at speed; not hovering or taxying!
-
For a Harrier in the hover or taxying, modify N1 and N2 to show all doors open.
-
Fit the cockpit tub in one half before joining the fuselage halves together
-
Finish the intakes with parts P34 and C3
-
Add the main undercarriage bay and airbrake bay assembly into the rear fuselage
-
Replace the nozzle mechanism with a 36mm (approx.) spacer fitted between the nozzle openings to keep the fuselage the correct width for adding the wings to.
-
Wingtips – Remove the small raised triangles ahead of the outrigger fairings inside parts I1 and I3. Adjust the shape of both parts to better fit with part I2 along the outer edge of the outrigger fairings.
-
Wing Leading Edge – Fill the step under the dog-tooth ahead of the inboard pylons and the step down on the fillet underneath where the wing meets the fuselage.
-
Wing trailing edge – Thin down the inside surfaces of the trailing edges to avoid any step down to the ailerons and flaps.
-
Flaps – Usually up on parked Harriers, unless the aircraft had hydraulic issues. Pilots were fined for leaving them down so causing extra work for armourers and maintainers! Often seen 8-degrees down in lower speed flight (under 180kts) to provide increased lift.
-
Ailerons – Usually level on parked Harriers, occasionally one up, one down. NEVER both down on any first-generation Harrier single-seater GR.1, GR.1A, GR.3, AV-8A, AV-8S or Sea Harrier; or any 1st gen twin-stick. Use aileron hinge parts E4 on both sides. (The ability to drop both ailerons was a Harrier II development i.e. the AV-8B series, GR.5/7/9 and the two seaters - TAV-8B, T.10/12.)
-
Tailplanes – Check with photographs to get the correct anhedral and ‘stick-forward cows get bigger’ position of tailplanes on parked Harriers. Fill the step in the port tailplane (C17) underside’s leading edge.
-
Outrigger legs – For all GR.1/GR.1As and most GR.3s use parts N18 without the tie-down rings moulded on them. For Falklands War GR.3s, including XZ997/31 in marking option 6, use the outrigger legs from sprue E, parts E28, with the tie-down tings on them. For the later XZ997/V with IV(AC) Squadron use parts N18.
-
Pilot’s step – Fit P39 if the model depicts a Harrier with the canopy open, engine running or not. The step was connected to the canopy by a cord - close the canopy and the step retracts.
-
Undercarriage door and airbrake positions – Parked 1st generation Harriers front undercarriage bay doors were usually open with the twin main bay doors closed, unless they had been manually opened for inspection. The front doors could be opened/closed manually too on the ground. When the engine was running both front and main doors closed automatically to minimise foreign object damage. The airbrake is usually partially dropped on parked and taxying Harriers; see photographs.
-
Inboard pylons – For all GR.1/GR.1A/GR.3s use parts P27, P28, P32 and P33 with their straight leading edges. The instructions call-out the part numbers correctly, but the drawings show the Sea Harrier’s different shaped pylons (D1-D4) - do NOT use those!
-
Wing fences – should be fitted perpendicular to the wing leading edge, the longest sections of parts PE2 and PE3 being on the wing upper surface; ease the slots with a razor saw.
-
Radar Altimeter Aerials – None of the kit’s marking options need part PE24 fitted; these aerials only being fitted to some Harrier GR.3s in the late 1980s – check photographic references for the GR.3 you are depicting!
-
ALE-40 Chaff/Flare Dispenser – Fitted to some GR.3s which served during the Falklands War and then to many of the fleet after the war but not to XZ997! Part D28 left over from the FA.2 kit can be used if the GR.3 you build had ALE-40s; modify part I34 as needed.
-
Main nozzle fairing 8-fingered reinforcing plate (PE1) – This was only fitted to some GR.3s from the mid-1980s where the area had been damaged by heat and is only needed on XZ997/V in this kit.
-
PE Fret – This item has been expanded to include all Kinetic Harrier PE parts, so some parts are not needed for this kit, e.g. 5, 14, 15, 17, 18, 19 are two-seat Harrier parts; 22, 23 are for the AV-8S and any AV-8A with formation lights. PE25 is for US-style of radar altimeter aerial panel used on the AV-8A and AV-8S.
-
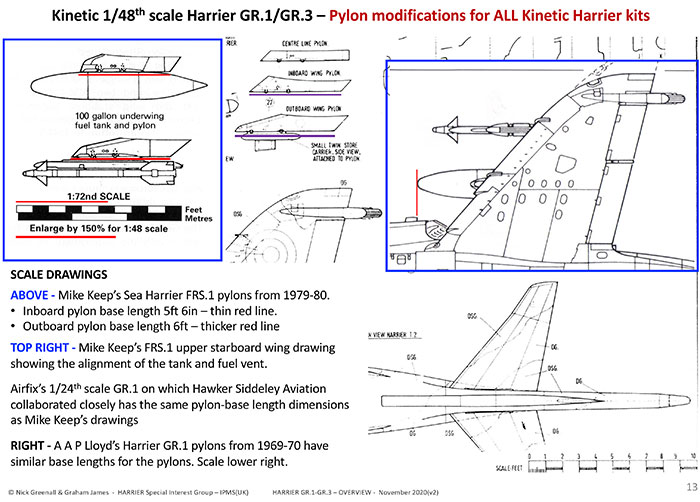
Ordnance – We asked for better, but the cost of new tooling is prohibitive when trying to keep the kit sensibly priced, so Raymond is leaving this to the aftermarket people. Eduard and ResKit now produce excellent UK ordnance for all Harriers and Sea Harriers, though a few gaps remain to be plugged. Note: Of the kit’s tank options, RAF Harriers only used 100-gallon tanks, they did not carry the Sea Harrier’s larger 190-gallon tanks.
-
Pylons - Watch Out! Discovered too late to change… The inboard pylons need their location adjusting backwards because when fitted “as made” they ‘throw’ the 100-gallon tanks 4-5mm too far forward; the tip of the tank’s nose should be level with the rear edge of the small fuel vent E10 when it’s in place. The inboard pylons are also 4mm too long, this needs to be removed from their trailing edges. The outboard pylons need moving 3mm outboard and also need moving back about 2mm. Adjust all pylons’ upper surfaces so they do not carry their stores nose down. Time for some fettlin’…
Looking forward to seeing some fantastic Harrier GR.1 and GR.3 builds on the forums and on the tables at shows in 2021.
All the best
Nick Greenall
l
This is another really nice Harrier from Kinetic, and easily the best GR.1/3 out there now. Kinetic's Harriers are well detailed, offer many useful options and alternative position parts, and provide a wealth of ordnance.
Engineering appears straightforward and it should not be a difficult build. At only USD$43.99,I think it is a bargain too!
Thanks to Lucky Model for the sample
Review Text and Images Copyright © 2020 by
Brett Green
Except Additional Notes Copyright © 2020 by Nick Greenall
and Pylon Diagram Copyright © 2020 by Nick Greenall and Graham James
Page Created 8 December, 2020
Last updated
9 December, 2020
Back to HyperScale Main Page
Back to Reviews Page

|
 Home
| What's New |
Features |
Gallery |
Reviews |
Reference |
Forum |
Search
Home
| What's New |
Features |
Gallery |
Reviews |
Reference |
Forum |
Search