Eduard's 1/72 scale
MiG-21MF
|
MiG-21MF |
by Nicholas Pirnia

I love Eduard kits and had been looking forward to their 1/72 MiG-21’s for quite a while. I picked up this MiG-21MF at my local hobby shop and couldn’t resist the urge to begin building it immediately.
This kit really flies together! Part of this ease is the native finesse and detail built into the kit. It is easily the most detailed out of the box kit that I have built. The cockpit and ejection seat are exceptionally well done for an injected model and I really don’t see the benefit of a resin seat.
The kit also includes a comprehensive photo-etched fret that integrates seamlessly with the kit. I chose not to use the instrument panel photo-etch despite my love for these additions since matching Eduard’s version of Soviet cockpit turquoise seemed a bit challenging. Instead I used the instrument and console decals; when coupled with the delicate raised detail of Eduard’s cockpit along with oil wash and dry brushing the results are very convincing. I think that a well done decal matched to raised detail gives a better overall effect than colored photo-etch in many cases, especially with some new techniques like Bondic for instrument glass. With the main assembly, engineering of this kit is very impressive with positive fit throughout and the build moves along quickly.
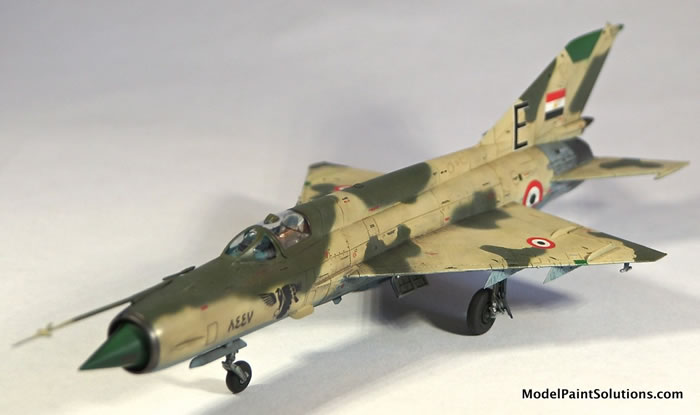
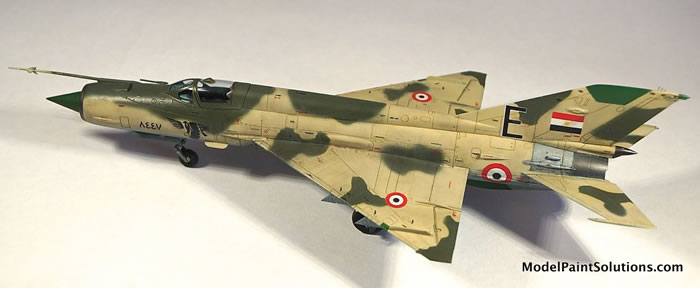
When I first opened the book I was quite taken with the Egyptian scheme. I have a strong preference for “line-birds” and this scheme was both striking and perfectly pedestrian at the same time. It proved to be a bit more challenging than expected, but I’m still glad I chose it. This was also only my second model painted with Mission Models paints having recently converted from using Gunze and Mr. Paint lacquers. Mission Model paints really are outstanding and have transformed my painting process. Gunze and Mr. Paint are excellent of course, but my modeling bench is indoors and a shared office space with my wife. She is not tolerant of even the faintest of lacquer odors (to be fair, this is only her strong instincts of self-preservation!).
I first tried Mission paints out on the Meng F-102 and came away very impressed! I can now airbrush at my desk and fumes are not an issue. Using a 70:30 blend of Mission Thinner and Clear Primer to dilute Mission Paints for spraying as described on MPS (see below), makes Mission paints spray like Gunze lacquers thinned with Mr. Leveling Thinner and just about as well as Mr. Paint lacquers.
One of the drawbacks of Mission Models paints (MMP) is that they are new to the market and their selection of colors is not as extensive as Gunze or Mr. Paint. The primary upper surface color for the Egyptian MiG-21MF scheme was a tan with relatively cool tones and no good match within the MMP line. I decided to mix a custom color and found that 5 parts insignia white, 2 parts Sandgelb, and 1 part green zinc chromate provided a great match with the Eduard color profile. The model was degreased with 98% isopropyl alcohol and primed with MMP black primer. This goes down very smoothly and buffs/sands very nicely once dry. I previously used Gunze Mr. Surfacer 1500 (black) and the MMP black primer behaves very similarly. The biggest difference is that you need to give the MMP primer more time to be really dry before sanding. The Mr. Surfacer is sand-able within 15-30 minutes while I wait at least an hour for the MMP primer and it certainly becomes more durable after a few hours more of drying.
Eduard provides masks for the dielectric panels so I started with those using MMP’s tractor green color, which proved to be a really good match for Soviet bright green. With those masked, I moved on to the undersurface, which was painted in MMP Hellblau. The Hellblau was thinned with the 70:30 mix of MMP Thinner with Clear Primer or “CP30” as it’s called. The paint was carefully mottled to create tonal variation and then carefully blended to create some baseline weathering in the paint coat.
To mask for the dark green I used a new product, Mr. Paint Masking Putty. This stuff works like blue tack, but does not leave any residue and is very low tack. It is very moldable and can be easily positioned to create any pattern desired. Just be careful since it sticks to itself far better than anything else. It worked very well, but created relatively hard demarcation lines so I decided to edge the camo free hand to create softer demarcations.
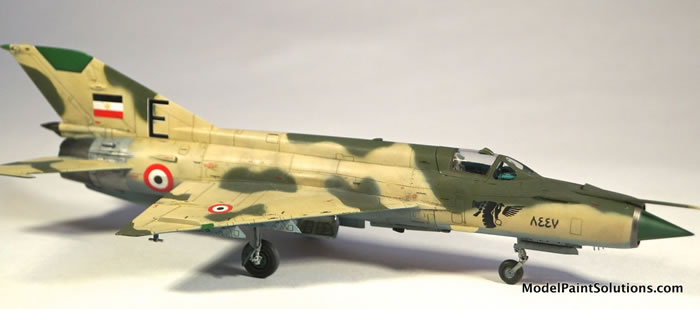
With the main camouflage wrapped up, I masked for the metal rear fuselage and exhaust, which were painted with Vallejo Metal Colors. These paints work very well for small metal details (leading edges, exhaust, etc). Their dull aluminum is a particularly convincing color and dries to a “kitchen foil” sheen that indeed looks like worn aluminum aircraft skin. The metal colors Steel and Exhaust Manifold were used for the remaining exhaust sections while Exhaust Manifold was used for the leading edge of the nose intake. The Metal colors were sealed with Vallejo’s Metal Gloss Coat, which maintains the metallic sheen quite well. Once sealed with metal gloss, these areas were masked and a coat of Mission Models Gloss was applied to the model.
With the Gloss solidly dry (I gave it 24 hours), decaling commenced. While I love this MiG-21 from Eduard I loathe the number of stencils that have to be applied. If you choose to use all of them like a diligent modeler….you will be facing roughly 200 1 mm x 2-3 mm decals to apply. I consoled myself with the reminder that I can use more practice with decals, but that could only do so much for motivation! I managed to do all (or nearly all accounting for decal or user malfunctions) of the fuselage and upper wing decals, but chose to do very few of the lower wing decals since they are not particularly visible when the model is sitting on the shelf. The Eduard decals are thin and well printed, but don’t slide very well. They responded to Mr. Hobby Decal solutions and settled into panel lines pretty well.
Once decaling was complete (finally!) I proceeded with weathering. MiG panel line washes were used, specifically “Ochre” for the tan portions and “Blue-Grey” for the green portions. Things like control surfaces were highlighted with “Blue Dirt”. The model was given an overall initial coat of Mr. Weathering Multi-Gray applied in small sections with a small brush and then stippled into the surface. This provided an overall coat of “grime” that helped to blend together colors and provided a subtle “scale effect” by slightly de-saturating the colors and decals.
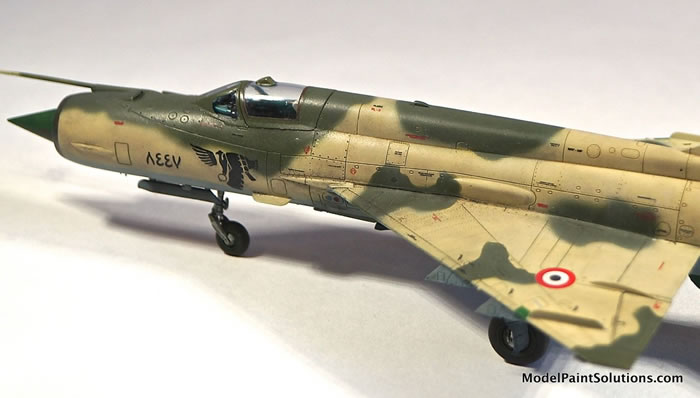
Multi-grey was used throughout the airframe while a bit of transparent blue was added to the multi-grey in the metal areas to add a touch of heat-staining effects. It also acts as a mild dull coat that reduces the gloss sheen ahead of the planned matte varnish. Following the initial grime layer, the metal was masked and AK Interactive Matte Coat was misted on to dull the sheen. The last step was to proceed with oil paints, a mix of Abteilung 502 and Windsor & Newton oil paints, mostly “Dust”, “Sienna”, “Sepia”, and “Starship filth” to add grime, streaking, and evidence of foot traffic to the wings and portions of the fuselage.
With weathering complete, I attached the landing gear and used Molotow Chrome for the oleo struts and applied an oil wash to the landing gear. The wheel hubs were painted bright green and the tires painted with Mission Tire Black. The tires were weathered by airbrushing transparent dust onto the tread surface and then blending with stippled oil paints on the tire sidewall. A few small details were brush painted with Vallejo Metal Color Dull Aluminum (it also brush paints surprisingly well) and remaining small details were attached. With that the build was complete and proudly set on the display shelf.
For more on this review visit Modelpaintsolutions.com
Text and Images Copyright © 2020 by Model Paint Solutions
Page Created 29 June, 2020
Last updated
29 July, 2020
Back to HyperScale Main Page
Back to Reviews Page

|
 Home
| What's New |
Features |
Gallery |
Reviews |
Reference |
Forum |
Search
Home
| What's New |
Features |
Gallery |
Reviews |
Reference |
Forum |
Search


