Eduard's 1/48 Bf 109 G-2/R1/Trop
Afrika Dual Combo
|
Messerschmitt Bf 109 G-2/R1/Trop |
by Floyd S. Werner Jr.

Hobby Boss's 1/48 F4U-7 Corsair is available online from Squadron.com
The German African campaign started with the landing by the Afrika Korps to help out the Italians. This harsh environment seesawed back and forth. This allowed the Bf-109 to evolve from the Emil and to the Gustav. Special Tropical variants were developed for the aircraft.
It is with this Eduard has released this boxing. This boxing includes the Friedrich and Gustav variants. The box top is a beautiful painting of Marseille’s F-4/Trop and a beautiful G-2 with mottled camouflage. Very motivational. The box itself is a sturdy cardboard box.
Inside the box are lots of light grey sprues. There are two of each sprue, I and H, which are the common sprues for the entire F and G line. There are two sprues that feature the unique fuselage and wings for the aircraft. You are able to build one F and one G model. You can’t build two Fs or two Gs. Two clear sprues are there as well for the canopy. There will be plenty of leftovers on the G sprue.
There are two sets of Brassin intakes with the associated sand filters is included. These are beautifully cast in light grey resin. I do wish that they were made with the base attached but you’ll have to sand off the kit base and add the resin pieces.
There are three photo etch frets, two pre-painted and one brass fret. The pre-painted ones are specific for the aircraft variant. The brass one is just for the Friedrich.
The kit includes a set of masks for both aircraft. Eduard provides masks for the F canopy but I believe them to be not quite right. They have the center section as a two part affair per side but I believe it needs to be a single piece. It is easy to mask the center section with some Tamiya tape.
The instructions are printed on high quality paper in full color. The instructions have been broken down with the F being the first part, the G being the second part, and finally the paint and stencil data. The subjects are given a letter identifier so you will have to choose your subjects early. That will allow you to open the proper holes and use the proper equipment.
The decals are simply gorgeous. It is a simple single sheet with the aircraft specific markings on top and the aircraft type stencils on the bottom. It is interesting that the F model dashed do not walk lines are thinner than the Gustav. There are markings for 12 aircraft, seven F-4/Trops and five G-2/Trops.
That is a lot of items in a single box, so let’s see how it goes.
I’ll be building the G-2/R-1 that is on the cover with its RLM 80 overspray over the RLM 78/79.
The model begins in the cockpit as is usual. The parts allow you to decide whether you want to use the pre-painted photo etch or the plastic kit parts. I chose to do a mixture of both. I wanted to use the pre-painted instrument panel but not the floor mounted control boxes or the rudder pedals. Building up the cockpit is easy enough. It just takes careful painting to bring it to life. I like to add the instrument panel backing plate (Part H3) to the fuselage side. This ensures that the panel is aligned and by doing this the pre-painted photo etch will slot into place with minimal fuss and you are assured that they are aligned properly. With that in place and most of the cockpit assembled, minus the seatbelts and clear fuel line, the entire cockpit is sprayed with Tamiya German Grey. A wash of Lamp Black artist oils thinned with turpenoid gives it depth. A highlight of RLM 02 and silver makes the interior worn and lived in. When that is done it is simple matter to build up the instrument panel. Once that is attached along with the seatbelts, I flat the entire interior with Alclad flat. Then a drop of Krystal Kleer is added to each instrument to replicate the glass. The fuel line is painted up and added last.
The exhausts and the tail wheel have to be assembled prior to the fuselage being assembled. The fuselage halves have to be carefully removed from the sprue attachments. I use a razor saw right next to the detail on the fuselage to cut about half way through the attachment. Then I use my nippers on the inside. This ensures that the minimal detail is lost.
The fit of the fuselage halves is perfect. The only part that required any filler was where I made a mistake. Detail was restored with Dymo tape, scriber and a Rosie the Riveter wheel. I elected to leave off the supercharger intake until much later. I had to modify it to fit the Brassin intake anyhow.
The tail assembly goes together without any trouble.
The wings are up next. Before I assemble the wings I do something that is not in the instructions. I add the upper inner flaps now while I can get to the mounts. I use some locking tweezers to hold them in place and add a bead of Tamiya Extra Thin cement to the attachment point and let that sit overnight. That does a couple of things for me. The first is that the attachment is very secure and then, most importantly, the angle is set perfectly as designed. While I was setting the upper flap position I did the same thing with the lower flaps as well.
Once that was done the wings were built up and they fit perfectly. The only part that will require filling is piece I3 which is the part to block the ammo chute openings on the bottom. It’s simple but the part does require a small amount of filler as it has a slight sink hole and the fit is not as secure as I would have liked. I replaced the pitot tube as I would inevitably break it off. Some Albion Alloy tubing was used to replace the kit part.
The wing to fuselage joint is the weakest part of the kit in my opinion. It is okay but it does require some filler on the bottom. For some reason Eduard put the join in a V shape as opposed to a panel line. This causes a few issues. One thing that you need to do is fill the line. It also means that the one panel line is incomplete as well on the fuselage part. This was rescribed with Dymo tape and a pin vice. Another thing that has to be done before sanding is the panel screws need to be deepened because they are a little shallow. Once they are deepened just a little super glue and accelerator is all it takes to fill the join.
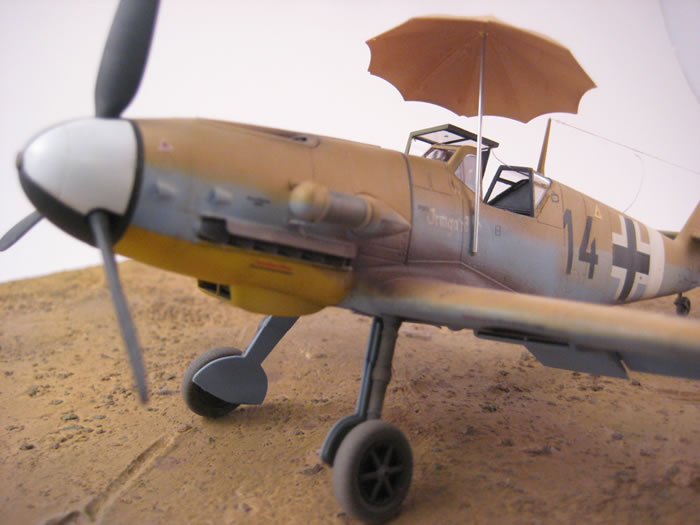
The radiators, both the nose and wing ones, are added. Eduard offers up some photo etch for the stiffeners and actuators at the front of the radiators. I thought that they were too flat. I used a #80 drill bit and drilled a hole and added some stretched sprue. I didn’t add the photo etch radiator faces as I think the plastic ones work great and they are hard to see.
Before adding the landing gear I remove the little raised area in the mounting hole for the landing gear. I do this by using a pin vise to establish the center and then a drill that removes the remaining raised ejector pin. This allows the landing gear to sit perfectly. I like to add my landing gear now to give the model something to sit on while painting it. So they were treated to a pre-shade of NATO Black and then given a coat of Mr. Paint RLM 02. When dried a Molotov chrome pen was used to paint the oleos.
The canopy sections were masked off using the enclosed masks. They performed flawlessly. I added the gunsight. I replaced the clear portion with some acetate to remove the mold line and make it thinner. The front and rear canopy portions were added. The open portion of the canopy was masked off as were the landing gear.
The whole model was then given a wipe with a dust free rag and Testor’s Plastic Prep. The canopy and area were painted with Tamiya German Grey prior to painting the entire model with Alclad Grey Primer and Microfiller. Any areas were cleaned up and re-primed. Now it was time to paint the model.
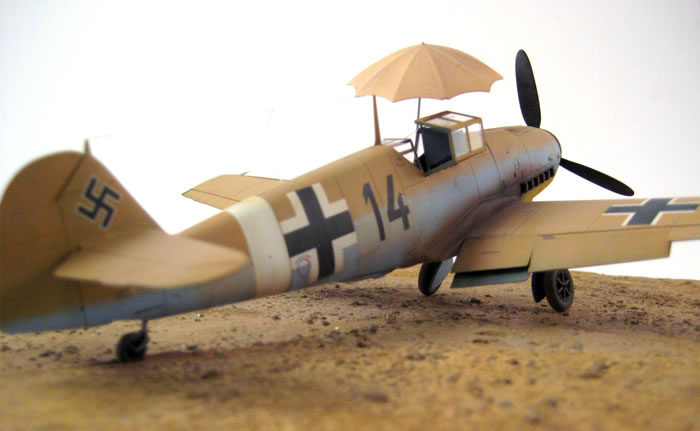
I painted the model with Mr. Paint colors. I did use Alclad White Primer for the wingtips and band. These were masked off and the model was pre-shaded with Tamiya NATO Black. I was initially going to do the one model from the kit instructions with the RLM 80 oversprayed with RLM 79. I added the white portions of the markings with Alclad White Primer. These were masked off after they were dry and the real painting could begin. Mr. Paint RLM 78 was added to the belly and this was followed up with RLM 80 Dark Green was added to the upper surfaces. This was then oversprayed with Mr. Paint RLM 79. It came out okay, but I really wasn’t liking it. So, I needed a Plan B.
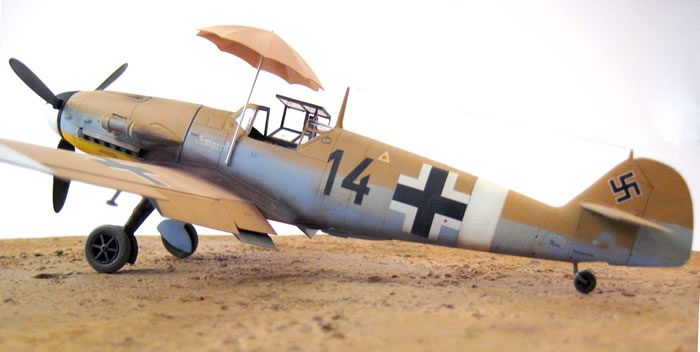
Plan B- I finally decided to do ‘Irmgard’ which isn’t in the boxing. I’ve always been fascinated with the photo recon aircraft and I had the decals available. So I needed to add two things on the belly, the tubes that come out of the engine area that deflect the oil from the engine and the actual camera housing. The deflectors were done with .020 plastic rod glued into place. I couldn’t find a diagram of how it was supposed to look so I did what made sense to me. The deflector is plainly seen in the photo of the crashed aircraft.
I didn’t have the photo recon housing but went ahead and started repainting the model anyhow. First thing I had to do was pop off the lower photo etch access panel. This area was cleaned up and a new panel was scribed into the plastic. If I didn’t do this the photo recon housing wouldn’t fit later. The lower surfaces were wrapped up on the side of the model with RLM 78. The upper surface was then added with MR. Paint RLM 79. It looked a little more yellow than I was used to but I didn’t find it too objectionable. I’m glad that I left off the intake until later in the build as it made painting easier. With the previous painting showing slightly through the new paint the monotone was broken up. A very nice happenstance. The exhausts were then masked off and sprayed.
I had to find a new photo recon housing. I wanted to use an Aeroclub one like I did recently but couldn’t find another one. I used the housing from an old Fujimi Bf-109G-10/R2. After adding a drop of smoke to the backside of the part I attached it to the belly, masked off the camera window and painted it like the rest of the belly.
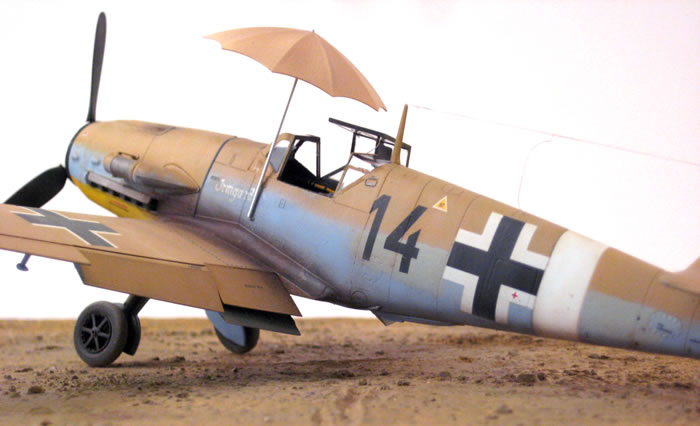
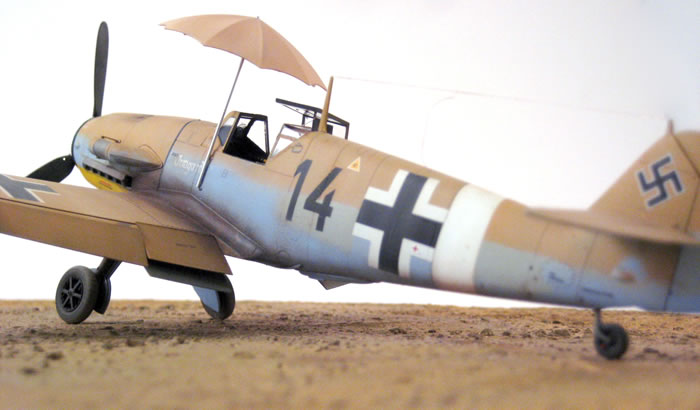
The whole model was given a coat of Tamiya Clear thinned with Mr. Leveling Thinner and left to dry overnight. The decals from the kit worked flawlessly. I did need to source some decals from my decal binders. I used the black 14 from an EagleCal sheet and the Irmgard was from the late Keith Davidson of Red Pegasus Decals. We had talked about doing this model in its various guises and he was nice enough to do up some decals for me. So between the numbers and the name that was all that I added that wasn’t in the kit as far as markings went.
These were all sealed with Alclad Flat in preparation of the weathering. Since the RLM 79 was a little yellow I decided to try my hand at using some Mig Filters. I used an orange to make the color more vibrant. This was followed up by a wash of Burnt Umber artist oils. Titanium Buff and White were used to fade the paint with particular attention on the upper surfaces. Chipping was added with a sponge and Model Master Magnesium and a silver pencil. Some Mig Pigments were added to the upper surfaces to add a layer of dust to the airframe. The exhaust stains were pretty prominent on the real thing, so I used some Mig pigments to build it up slowly. I didn’t like some of it so I had to repaint some and start over again, but I think this just added another layer of soot to the exhaust. Some oil streaks were added to the belly and the weathering was done.
I pulled the masks off of the canopy but wait what happened to the one? I’m sure I added all the masks, but one was missing off of the rear canopy frame. How could I miss this? Did it get stuck on some other tape and I not notice it? Whatever, after a few choice words, I broke out a toothpick that was sharpened to a point and proceeded to remove the paint from the window area. A little touch up here and there and thankfully catastrophe adverted. A huge sigh of relief
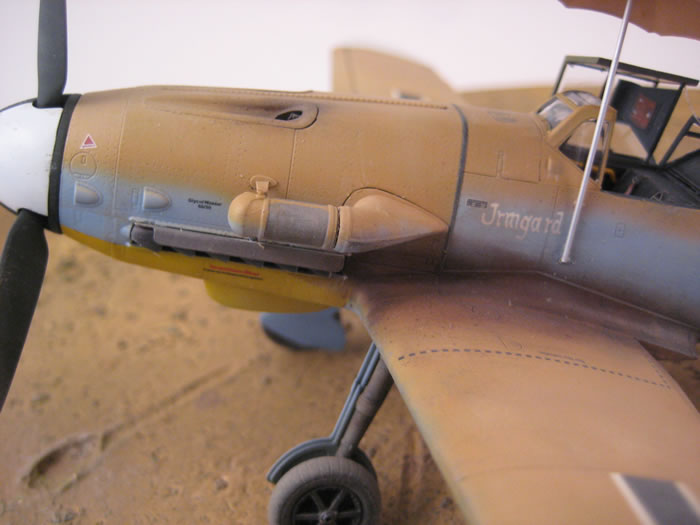
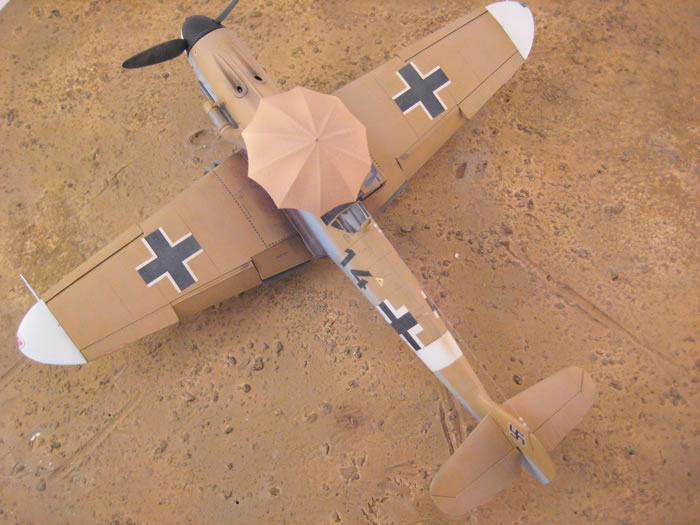
I added the remaining little parts, including the supercharger intake, wheels, gear doors and the canopy. The antenna wire was added from EZ Line. I liked the way the model came out, but I thought it needed something else, so I had Pete Hamann do up an umbrella in CAD in 1/48th scale. My initial thought was to have it with stripes around it but I couldn’t figure out how to do that with the necessary consistency, so I went with a light brown, Tamiya Desert Yellow to be precise. This was added to the model by drilling a hole for the support strut in the umbrella and inserting and Albion Alloy .03mm aluminum tube. This was just super glued to the umbrella supports since the real thing just clipped into place. And with that the model was done.
Is this a perfect kit? No but I don’t know any that are. The strange breakdown of the wing to fuselage join is a pain to deal with but not too bad. The toothy exhausts aren’t too unsightly. I don’t mind them. I would have liked the wing tip lights to be clear, but I’ve learned to live with them.
The fit of these kits is excellent. The rivet detail is a nice touch. They are refined and look really good under a coat of paint. Some things do need to be scribed and some detail would benefit from a rivet tool but even, so these are great kits. I’ve built a little over ten now and I enjoy every one of them and look forward to building more of them.
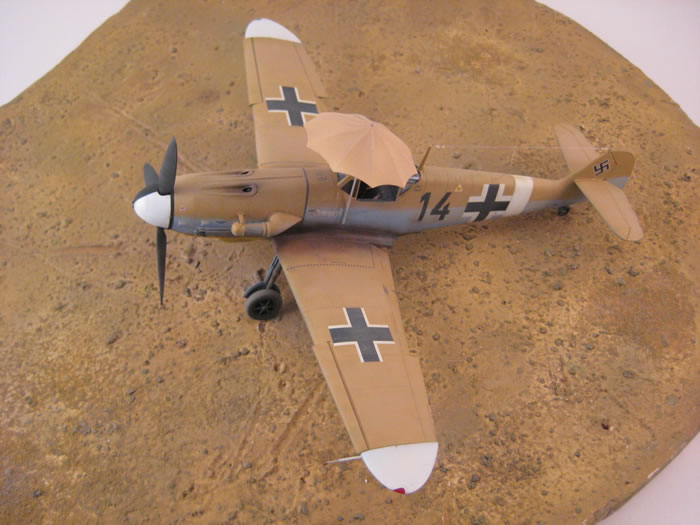
The Afrika boxing provides you with lots of options. The two kits, decals for 12 aircraft, masks and photo etch for both types makes this a winning kit.
I did deviate by adding the photo recon housing, deflector tubes, and umbrella, as well as, some decals but the overall kit is gorgeous. The molds are still very good with no flash. The results are well worth the price of admission.
I can highly recommend this and all of Eduard’s 109s. They aren’t perfect, but they are pretty damn close and look great when finished. The F and G-2 kits are the easiest of the bunch to build as the forward cowlings are solid. There are some excellent subjects included in this boxing. One thing that I didn’t particularly like in this release was the new resin sand filters and intake. I liked the filters but the need to sand off the mount on the supercharger intake was a big pain. I don’t know why they didn’t mold that as one piece with the intake and make two types, one for the F/G-2 and one for the G-6. It takes some work, but they do look nice installed.
Text and Images Copyright ©
2019 by Floyd S. Werner Jr.
Page Created 17 January, 2020
Last Updated
17 January, 2020
Back to
HyperScale Main Page

|
Home
| What's New |
Features |
Gallery |
Reviews |
Reference |
Forum |
Search