Contrail 1/72 scale
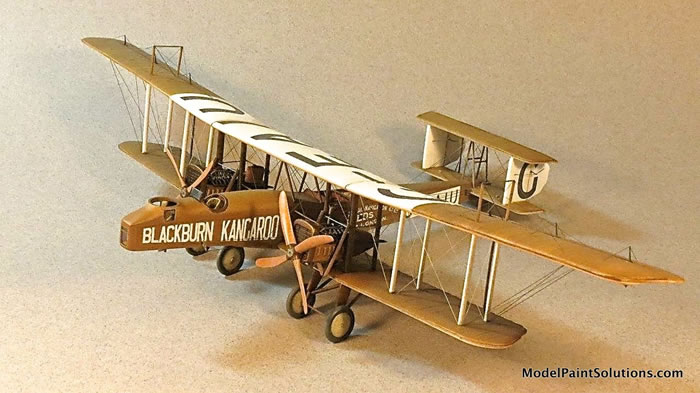
Blackburn Kangaroo
by Tim Nelson

Hobby Boss' 1/72 P-61A Black Widow is available online from Squadron.com
Summary
Description: 1/72 Contrail Blackburn “Kangaroo”
Kit #:?
Scale: 1/72
Contents and Media:
The kit is comprised of vacuformed, styrene, and white metal parts. Much scratch building of was required.
Price:?
Review Type: Build
I’ve said it before, and I’ll say it again: civil aircraft of the inter-World War years are among the most fascinating, colorful, and appealing genres of aviation. This era shaped the modern transportation world, with profound influence on technology, history, and culture. Yet, modelers have long been underserved by kits of these important subjects in favor of endless variations of ever-popular World War II subjects. That state of affairs has changed slightly in recent years, with a smattering of kits emerging to delight the “golden age” civil aircraft modeler. But rewinding to the 1980s, it was a desolate landscape indeed.
History
The Blackburn Kangaroo is that rare military type whose modified civil career ended up being more important. Initially designed by Robert Blackburn’s company as a bomber, the Kangaroo saw limited action during the Great War. Following the Blackburn TB, a zwilling-like twin-fuselage design introduced in August 1915, the GP (“General Purpose”) seaplane was the major step to what would become the Kangaroo.
The Royal Naval Air Service (RNAS) ordered 20 GP’s in 1917 but the order was changed to a landplane to enable land-based anti-submarine patrols; this landplane version was dubbed the RT1 Kangaroo and the ultimate recipient was the new Royal Air Force (RAF). (Why the name “Kangaroo” was chosen is unclear, but it appears to have nothing to do with speed or agility.) An otherwise brief and pedestrian military career was highlighted by the sinking, in partnership with the destroyer HMS Ouse, of the German submarine UC70 on 28 August, 1918. Following the armistice in November 1918, the Kangaroo was immediately surplused.
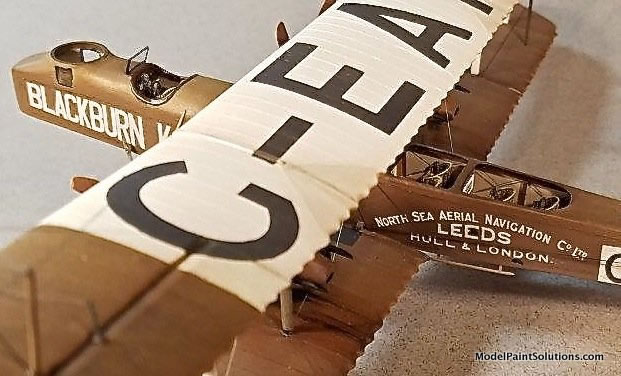
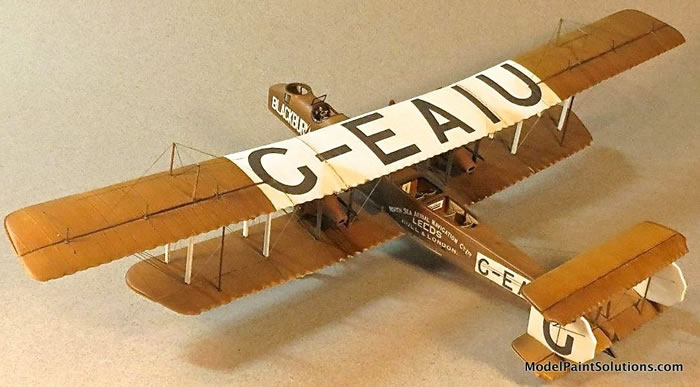
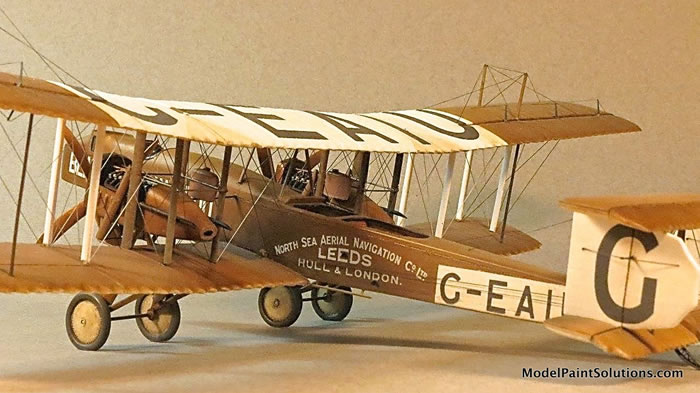
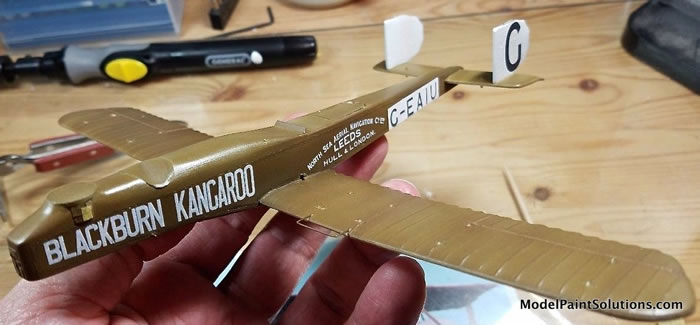
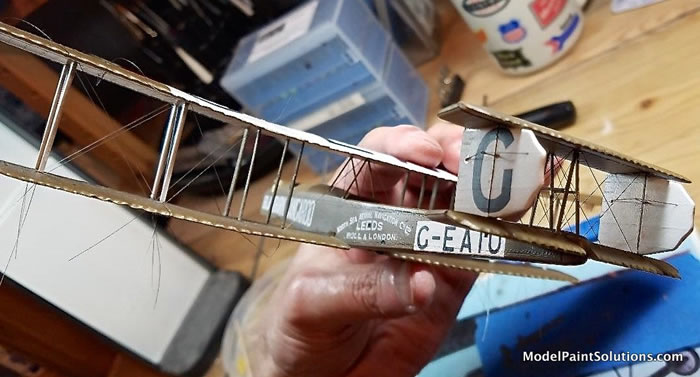
When civil aviation resumed in the United Kingdom in May 1919, the Grahame-White Aviation Company purchased three Kangaroos and put them to use giving open-seated joy rides based at Hendon in greater London. One Kangaroo unsuccessfully attempted to win the offered prize for the first UK to Australia flight (eventually claimed by a Vickers Vimy). The remaining Kangaroos were reacquired by Blackburn, which formed a commercial subsidiary in April 1919 called the “North Sea Aerial Navigation Co. Ltd.” The new company immediately started hauling freight within the UK. In August 1919, the company sent Kangaroo G-EAIT to the first major postwar European aviation exhibition, the Eerste Luchtverkeer Tentoonstelling Amsterdam (ELTA). This machine had been equipped with an enclosed 7-passenger cabin, and proceeded to “wow” ELTA attendees with joy rides. To meet demand, the closed-cabin G-EAKQ and then the open-cabin G-EAIU were sent.
It is estimated the three Kangaroos carried well over 1000 people on joy rides during their several weeks at the ELTA, most of whom were flying for their first time.
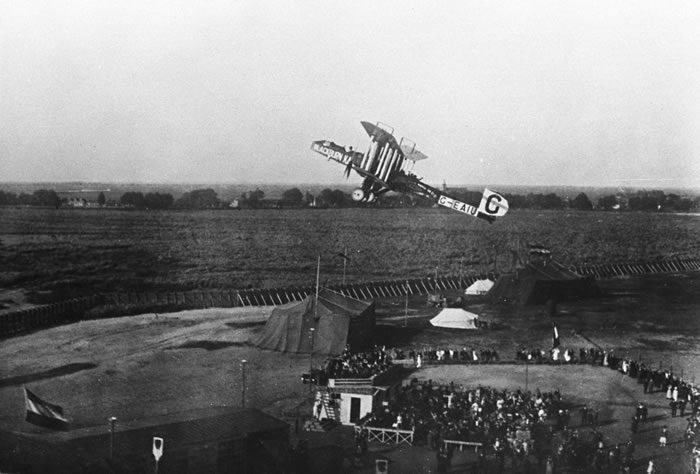
Blackburn Kangaroo G-EAIU (Courtesy of Rob Mulder, www.europeanairlines.no)
The various Kangaroos continued to carry freight and passengers within the UK, as well as on cross-channel runs to destinations such as Amsterdam. Financial woes ended this service within a year, but ever-popular joy rides continued, while other types began to be introduced to airline service. Some Kangaroos were converted to dual-place trainers, serving into the late 1920s. Two machines (G-EAMJ and G-EAIU) even competed in the 1922 King’s Cup race – they didn’t win.
The Kangaroo is the epitome of “ungainly,” but that is a big part of its charm. To our eternal misfortune, no Kangaroos survive today, although rumors persist of one airframe (G-EAOW) hidden away in Crete after its forced landing while attempting the UK to Australia journey in 1919.
The Kit
Contrail, Gordon Sutcliffe’s enterprise, produced a line of vacuform kits of a wide variety of subjects ignored by the major kitmakers. Within the vacuform genre, Contrail kits were somewhere in the top half: below Rareplanes and Esoteric, but well above some others we won’t bother to name. These kits are all about the subject matter: if Tamiya did it that’s what you’d build, but Tamiya didn’t do it, so here we are. However, there is a creative, freeform artistic aspect to vacuform modeling, sort of like a blank canvas, that can be very rewarding – if approached with the right attitude.
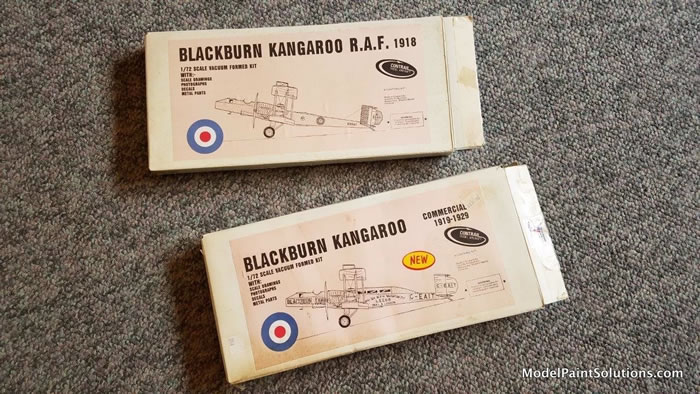
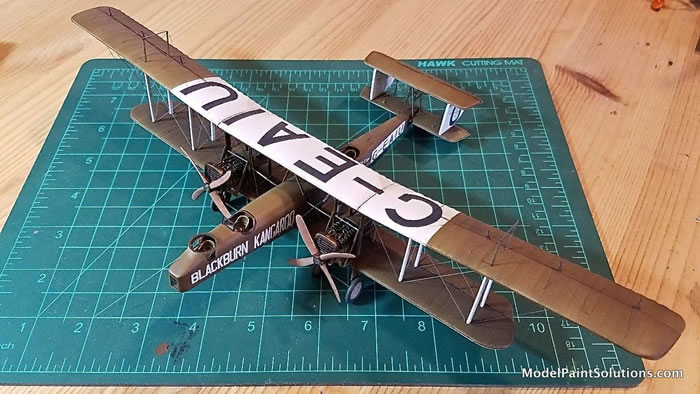
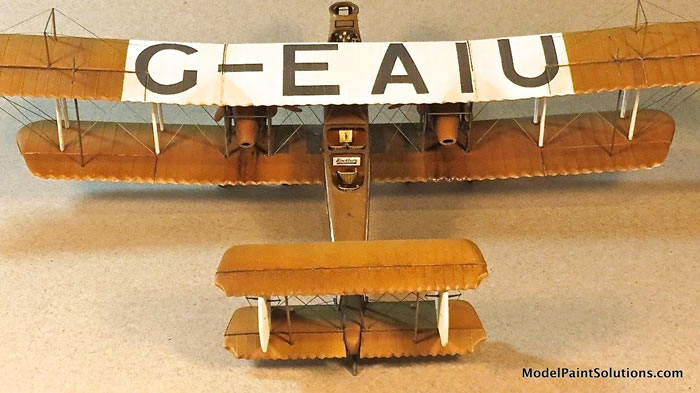
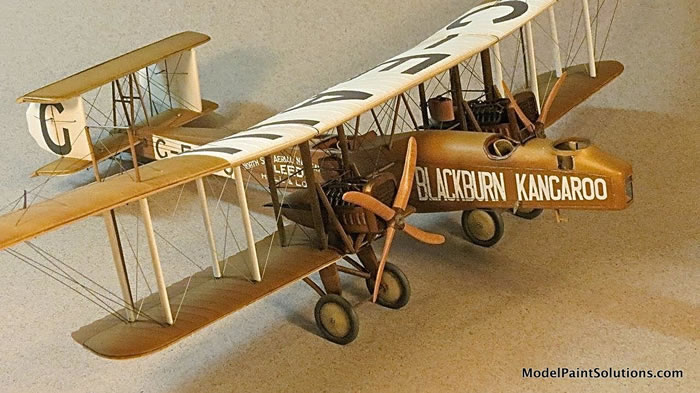
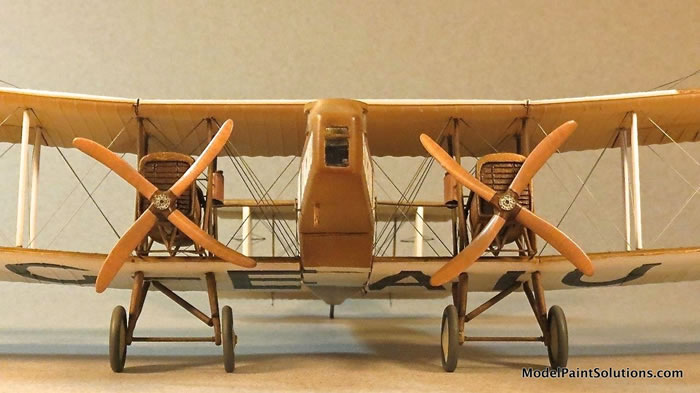
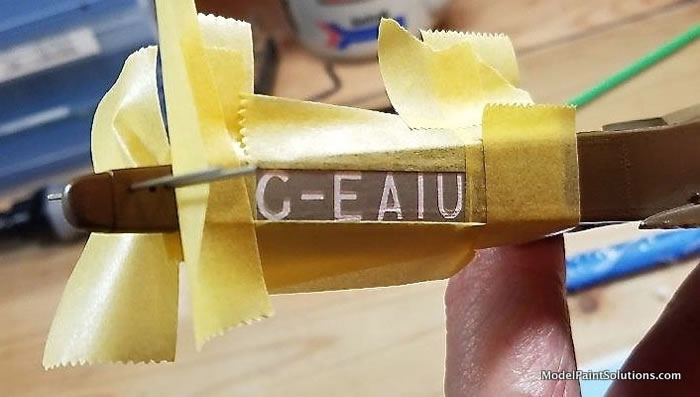
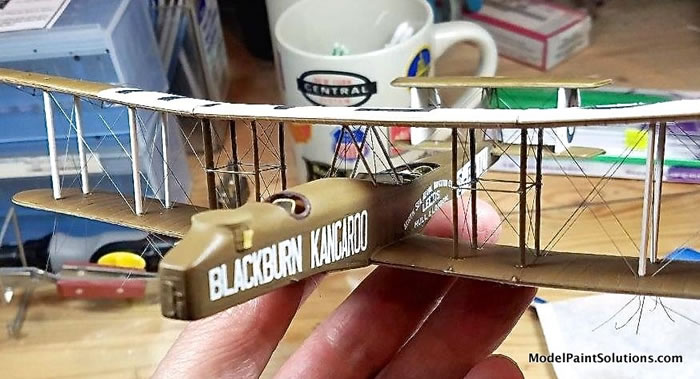
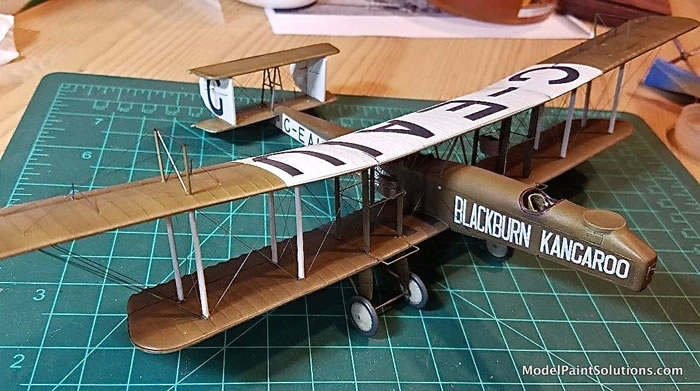
Surprisingly, Contrail actually produced THREE kit versions of the Kangaroo family. I possessed two of them, the “R.A.F. 1918” version and the “Commercial 1919-1929” version with enclosed passenger cabin. (Another version, the floatplane GP, is the rarest of the three.) I have been enthralled by the Kangaroo since it first came to my consciousness years ago. As part of our NorthWest Scale Modelers display installing at The Museum of Flight in Seattle in December 2019, I desperately wanted this delightful subject included. The cabin version would be natural, but I love the idea of an open-air joy ride experience in a crate such as this. So, I began to focus on modifying the wartime version to G-EAIU, the open-air joy ride airplane sent to the ELTA at Amsterdam in 1919.
The R.A.F. decal set included in the kit would be useless to me, and likely too brittle anyway. Anticipating this build in 2016, I approached Mika Jernfors at Arctic Decals to commission civil decals for both of my land-based Control kits. His decals for two of the ELTA machines (G-EAIT and G-EAIU), and accompanying information, are first rate in every respect.
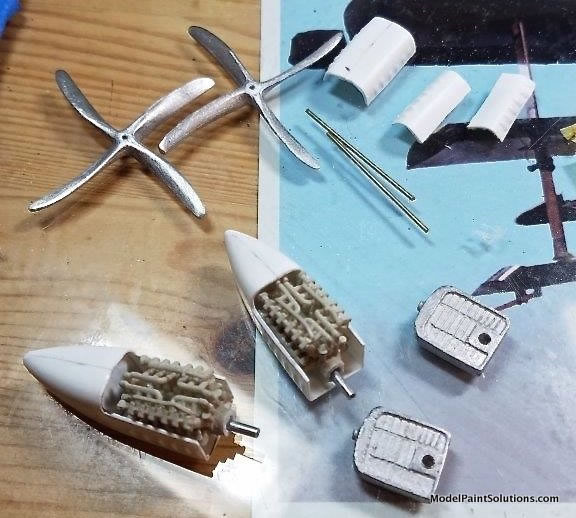
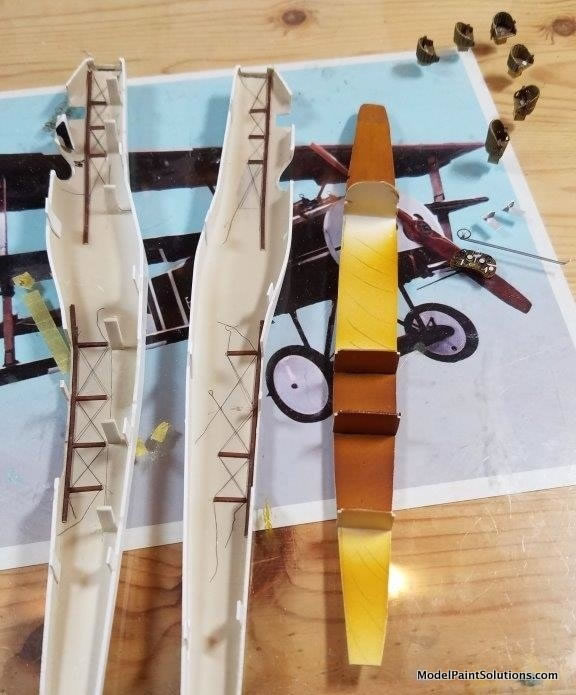
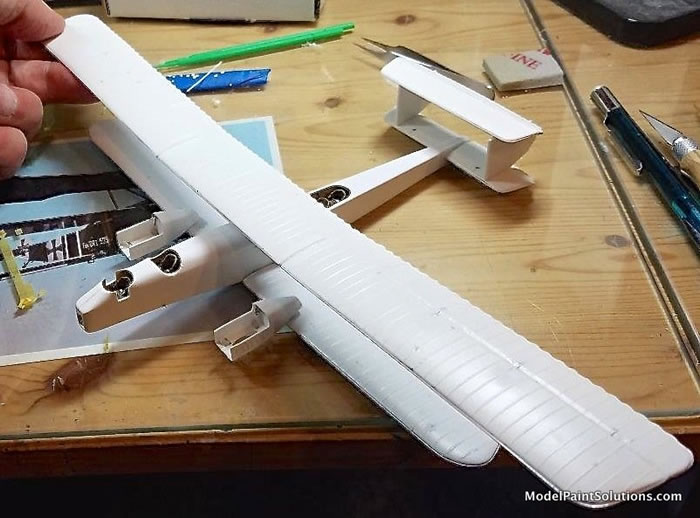
The kit contains the expected vacuformed styrene sheets with the major components. It also includes several lengths of “airfoil” strut stock (too flimsy to use), and white metal parts for the landing gear, propellers, and engine radiators – these latter parts are all decent and I used them without modification.
Contrail produced vacuform kits with basic shapes that were generally accurate. However, these kits can be enhanced greatly with some added details. My list of modifications includes the following:
-
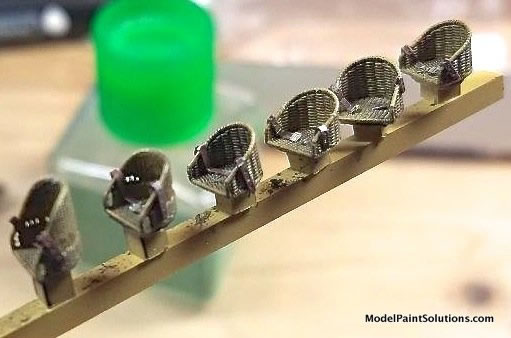
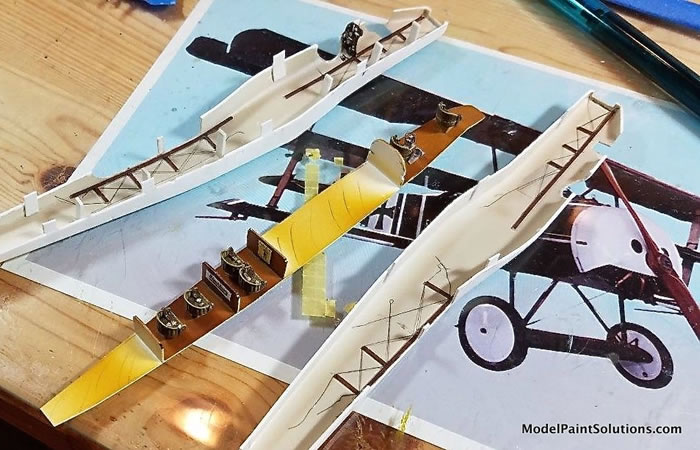
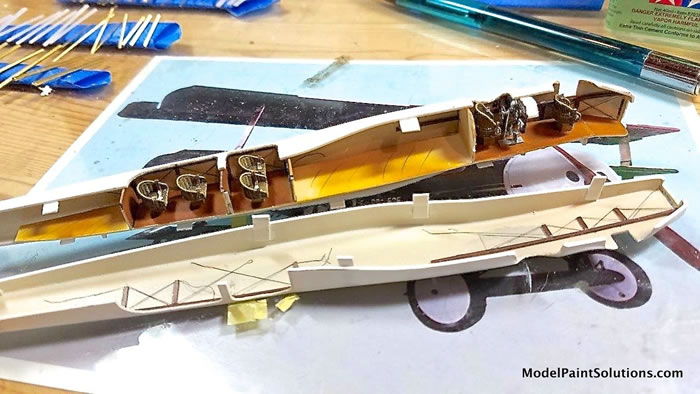
Scratchbuilt interior with cockpit using the Brengun 1/72 “WWI details” photo-etch set, some spares box bezels, punched discs, and seat belts. Pilot and passenger seats are a mix of the wonderful BarracudaCast “British WWI Wicker AGS Seats” (BR72257 and BR72258) – these seats capture amazing detail and really look the part.
-
Corrected (increased) outboard dihedral of upper wing
-
Scratchbuilt tail skid, engine oil tanks
-
Scratchbuilt grommet and pulley system for elevator control cables
-
Spares struts as appropriate for needed strength, size, and shape (Contrail styrene and Strutz brass)
-
Shortened fuselage at rear end per drawings (Ref. Windsock Datafile 137)
-
Shortened landing gear per drawings (Ref. Windsock Datafile 137)
-
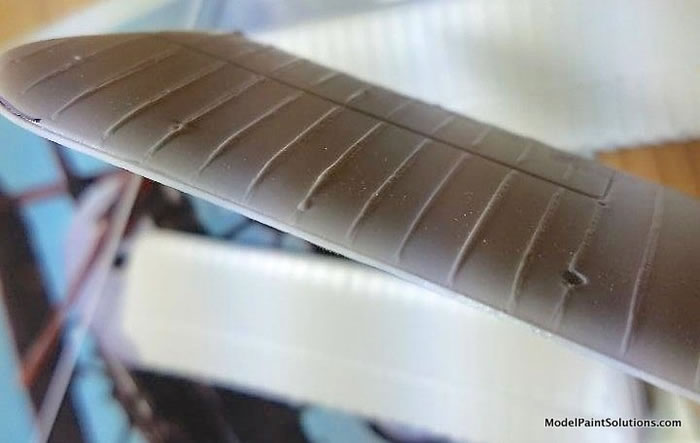
“Accurized” aileron hinges, and replaced some lost rib detail
-
Installed leading edge strip on wings and horizontal tail surfaces – much easier than trying to clean up the seam and match ribs
-
Corrected shape of engine rear nacelles, per photographs
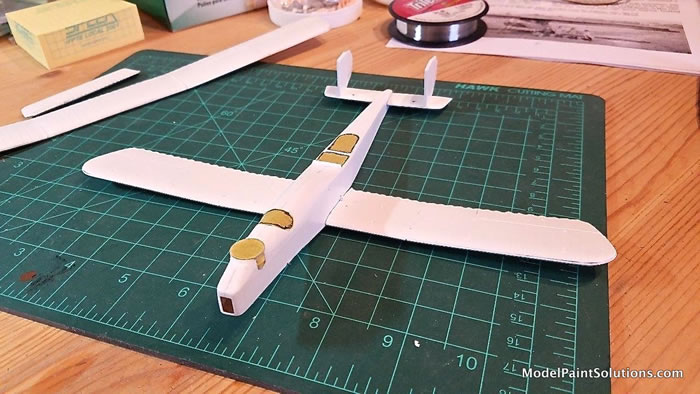
Basic vacuform techniques are well documented, so we won’t retread that ground here. After parts separation, sanding mating surfaces, and basic cleanup, the first priority was beginning the process of modifying the ‘Roo from a bomber to a civil transport. This mainly involved planning the passenger seat locations and opening appropriate holes for them.

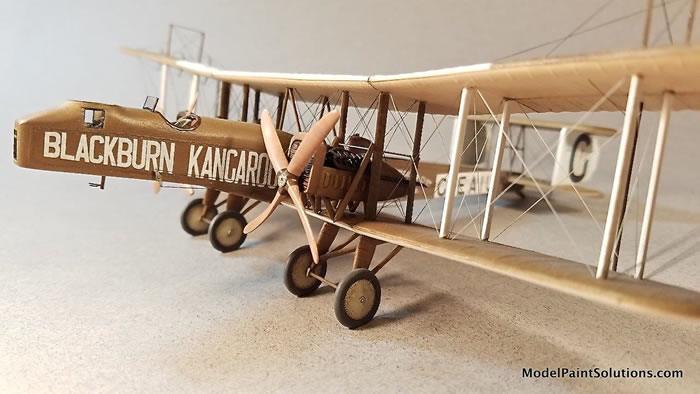
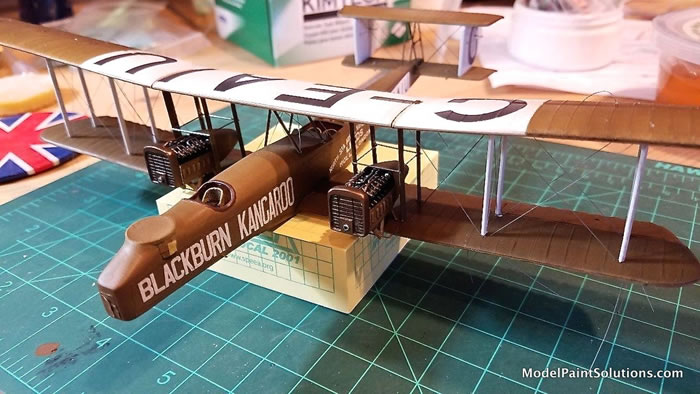
A little detail at natural visual focal points goes a long way in making these plain-jane vac kits more interesting. Photos show many Kangaroos operating with cowlings removed, so taking an idea from Claudio Luchina (see References), I robbed two Roden Brisol F.2B kits of their Rolls-Royce Falcon engines. These little jewels were a nice addition.
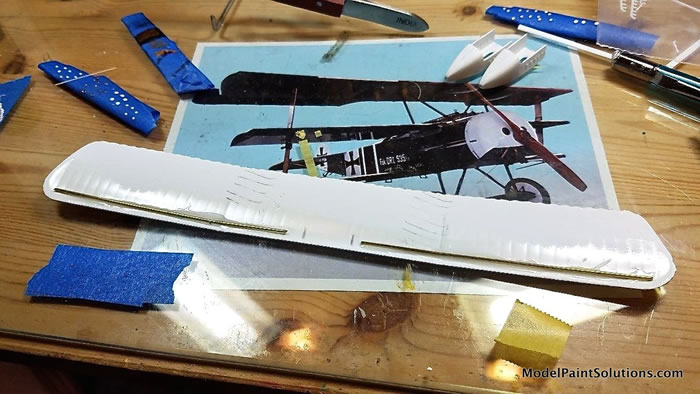
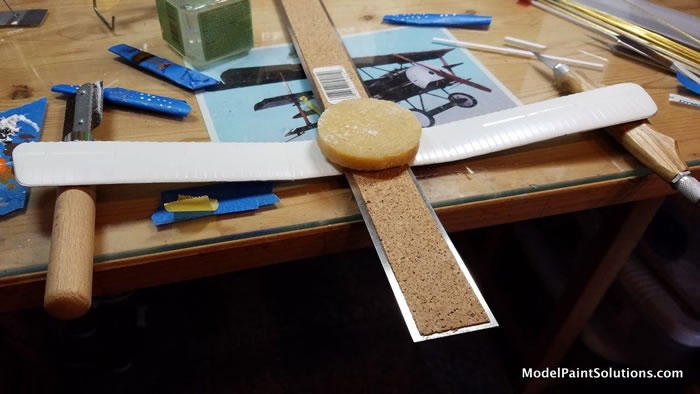
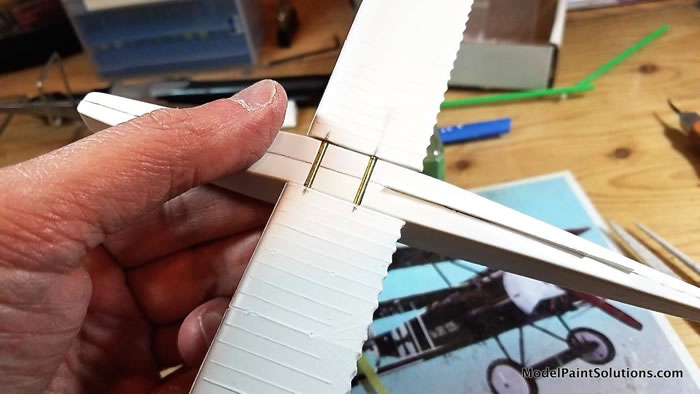
The wings were likely strong enough with their basic styrene thickness, but to be safe, I expoxied in a simple, near full span brass rod spar. I would later add two brass spars at the root for attachment to the fuselage per the prototype (with a lot of test-fitting). The upper wing had insufficient dihedral, so I corrected that with slices along the upper wing-fold line (Kangaroo wings were designed to fold aft, just outboard of the engines, for ground storage). (The dihedral correction was not just cosmetic – the upper wing needs to be parallel to the lower wing.)
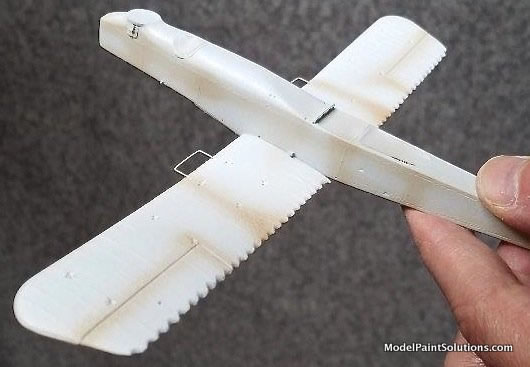
Wing ribs are a bit heavy, and do not align from top to bottom, but redoing all of that would bust my time budget for the project. I cheated on tedious seam cleanup by applying a small styrene strip along all wing and tail leading edges. Trailing edges had to be heavily massaged to match up the scallops between ribs, with preference given to the much more visible topside. Another subtle molding issue is the attempt at molding the stitching along the fuselage; it’s asymmetric on each side but again, I lived with it.
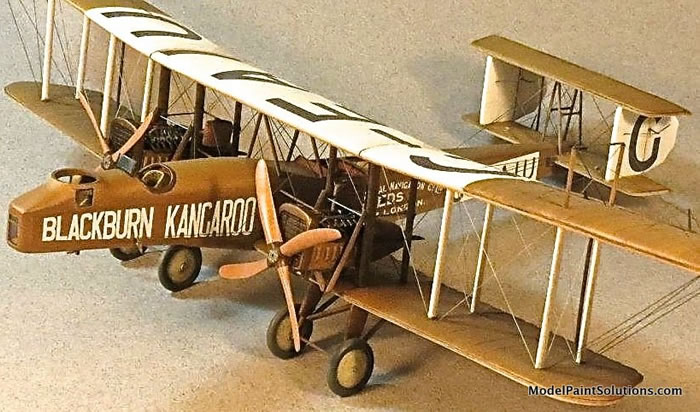
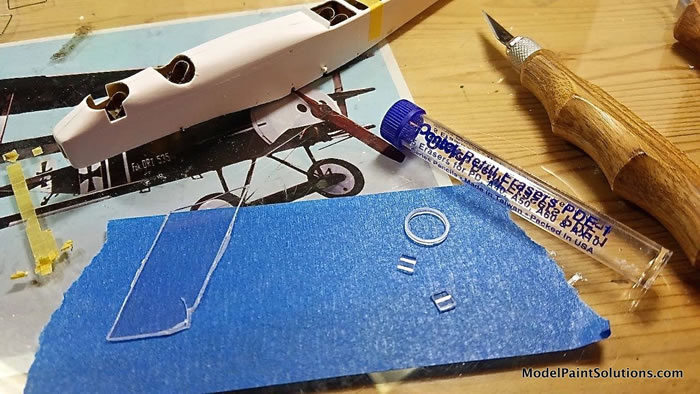
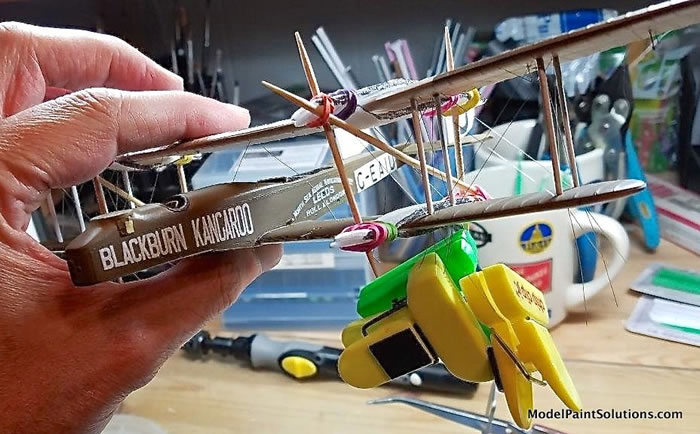
Building up the cabin, installing it, and closing the fuselage came next. I created a couple of speculative period posters to dress up the aft passenger cabins. Meanwhile, some other tasks like fabricating an instrument panel, fashioning the tail skid, and correcting the rear of the engine nacelles were checked off. One of the Kangaroo features I sweated over was the former nose gunner’s position; this area would be a real visual focal point and needed to be clean. Photos clearly show the side windows having a curved shape. Scanning my workbench, my eye fell upon a Pentel eraser cylinder (for mechanical pencils); this had just the right contours and was optically pure. I set about sawing out suitable sections. A complete circle cross-section cut yielded a crisp gun ring on top. After installing and fairing in these items, the nose passenger station was good to go – what a view this lucky guy or gal must’ve had! Again, let me plug the delightful BarracudaCast British wicker seats – something rewarding for the viewer in another really important visual focal point.
After some masking to protect the interior, it was time for the fun part - painting. These were the materials I used for different purposes (Mission Models acrylics unless noted):
-
Primer: Alclad grey overall, Krylon white on wings and tail (since lower wing and tail bottoms would be white anyway)
-
Wicker seats: 33.33% each Brown (MMP-002), Yellow (MMP-007), and White (MMP-001), followed by raw umber artist oil wash
-
Preshade and mottling: MMP-060 Dark Tan
-
Clear-doped linen (CDL) on upper wing and tail bottoms: MMP-043 British Portland Stone RAL 64
-
PC10 Light: 75% MMP-026 Olive Drab, 25% MMP-012 Rotbraun
-
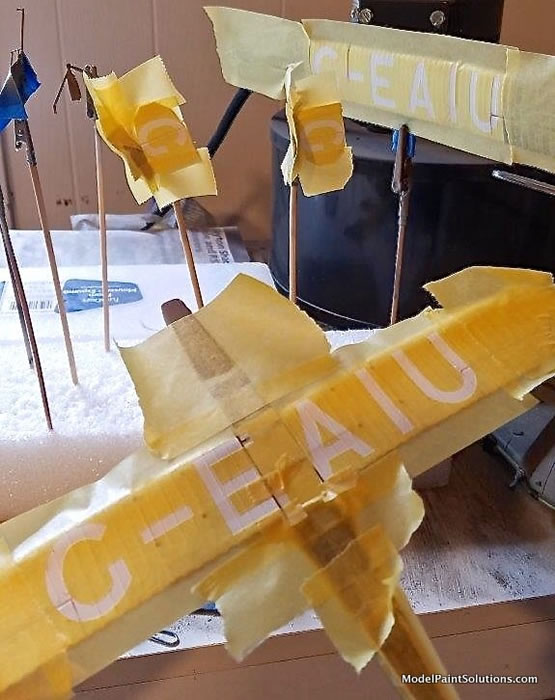
Registration letters: 50% MMP-047 Black, 50% MMP-001 White (stencils made with Silhouette Cameo 3 cutter, using scans of the Arctic Decals set as a reference)
-
Final finish: Vallejo Satin
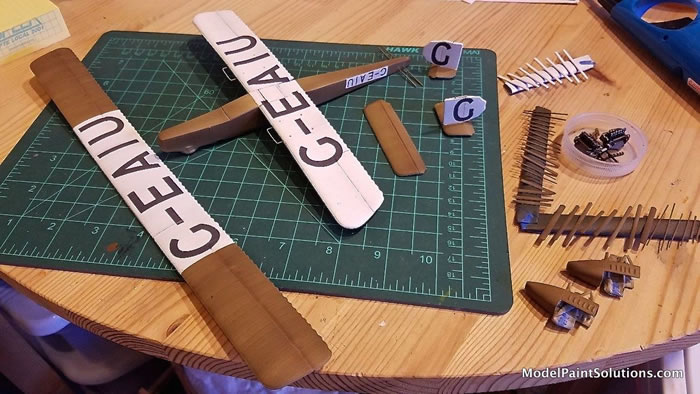
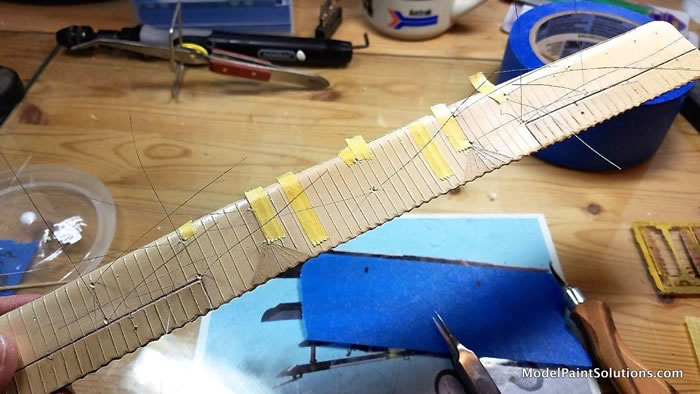
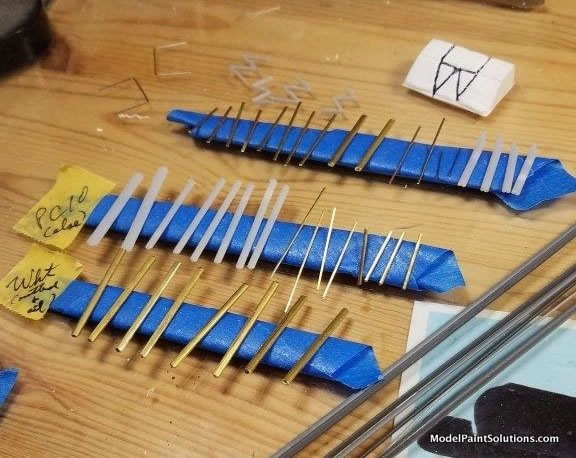
I used a variety of aftermarket strut material. Since there would be significant tension in some of the rigging, I opted to install brass Strutz stock for the outboard wing interplane struts (painted white per the prototype), cabane struts, top wing kingposts, and center struts for the horizontal tail. These airfoil shaped struts are strong but, with no flex, can be a bit difficult to install between the wings. I used Contrail’s own airfoil strut stock, better than what came with the kit, in the inboard locations; not as strong, but their flexibility makes them easier to install. I mount all struts in dimples made with a #50 drill bit tip, and I shape the strut ends to fit – simple and quick. The molded-in strut recesses were vague and misaligned, so much careful measuring and filling was required to relocate them, especially on the lower wing.
As with struts, rigging was accomplished with different materials for different purposes, all secured with thin CA glue using the Glue Looper 2 tool:
-
Trilene 2-lb test fishing line for maximum strength in mid and outboard wing areas. This was anchored in the top wing and fed all the way through the lower wing, then secured.
-
“Wonder Wire” for “double blind” runs not lending themselves to passing through the lower wing.
-
Uschi “Rig That Thing” line (Standard) for control cable runs, and a few serpentine runs (such as the engine mount structure. I mounted this black line on a coat hanger and treated it to several passes of Mission MMM-008 White Aluminum to try to give it a more metallic look – didn’t quite get the effect I wanted.
As always, I pre-drilled all holes and fashioned a Jack Matthews “godsend” jig to mount the wing and do initial key rigging.
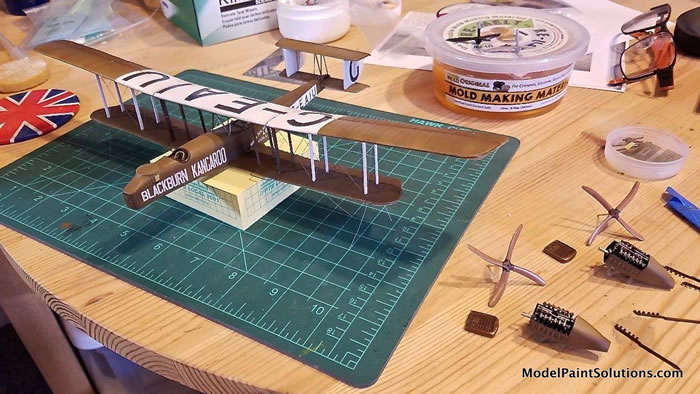
At this point, it was time to put the ‘Roo on its legs. I installed the kit’s white metal landing gear, braced with Strutz brass struts, and it just didn’t look right. Looking back at the best ‘Roo drawings I’m aware of (Ref. Windsock Datafile 137), I realized to my horror that the gear are dramatically too long. After so many builds of this nature, I still blindly trust the kitmaker to produce dimensionally accurate parts, only to frequently find out otherwise. These late build corrections are always a joy! I removed the gear, sawed off the appropriate length, drilled holes for replacement mounting rods, and remounted them. A ‘Roo needs the right stance!

Final assembly on a build such as this is a bit stressful – difficult to install new things without wrecking old things. But slow and steady is the recipe, and I gingerly installed things like the control surface horns (appropriated from spiky parts of the Eduard Spitfire Mk. XVI landing flaps photoetch set), and the long cable runs. The latter is a Rube Goldberg exercise on the ‘Roo, running from a bellcrank outside the cockpit, through grommets of some sort over the lower wing, aft to a pulley arrangement on the horizontal tail root, then to another mid-span pulley on the horizonal tail, then back to the elevator: all scratchbuilt and multiplied by four!
A final coat of satin clear and, 100 years to the month after it flew joy rides in Amsterdam, I jumped for joy that the ‘Roo was done!
This build consumed 150 hours over a period of 10 weeks. I could point out two dozen things wrong with the build, but I’ll refrain. It joins a couple of other Kangaroo kits that have been built worldwide in the last 35 years. I’d like to thank Claudio Luchina for his advice on the kit, and general inspiration (see References). The model was fortunate to win First Place in the Vacuform Aircraft category at the 2019 IPMS/USA National Convention in Chattanooga, Tennessee.
This Blackburn Kangaroo and other models of the early civil air transport era will be on display at The Museum of Flight in Seattle from December 6, 2019 to May 7, 2020.
By the way, I still have that Contrail “Commercial 1919-1929” Kangaroo kit in my stash, but I think I’m only good for one ‘Roo build per lifetime. Look for it on eBay soon!
For more on this review visit Modelpaintsolutions.com.
Text and Images Copyright © 2019 by Model Paint Solutions
Page Created 4 October, 2019
Last updated
5 October, 2019
Back to HyperScale Main Page
Back to Reviews Page

|
 Home
| What's New |
Features |
Gallery |
Reviews |
Reference |
Forum |
Search
Home
| What's New |
Features |
Gallery |
Reviews |
Reference |
Forum |
Search