Hasegawa's 1/48 scale
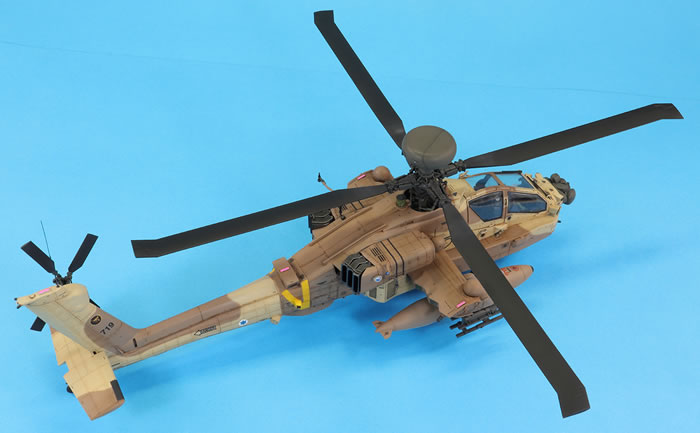
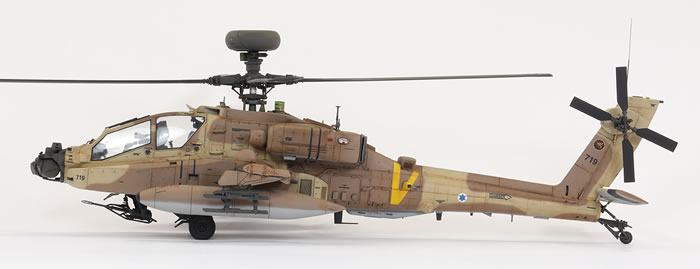
Boeing AH-64DI Saraf
with Wingman Models conversion set and decals; and Master gun, pitots and antenna
|
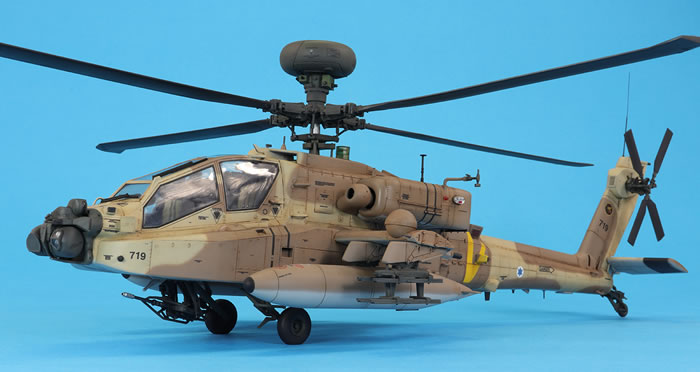
Boeing AH-64D-I Saraf Hornet Squadron, Israeli Air Force, Israel 2006
|
by Jon Bryon

Hobby Boss's 1/48 F4U-7 Corsair is available online from Squadron.com
As the next model to follow this one will demonstrate, I am a sucker for a bargain: Wonderland Models, Edinburgh 2003…a Hasegawa 1/48 AH-64D JGSDF…£15…but I already have an AH-64D…do I need it?…no…can I resist it?…no… And so I bought it. I had hoped (vainly) that I could make it as an ‘A’, but no; you can’t. Over the years I swapped the decals for the WAH-64D ‘Royal Army’ (sic) boxing with plans to build a Dutch version without the radar, but this was hardly an inspiring option.
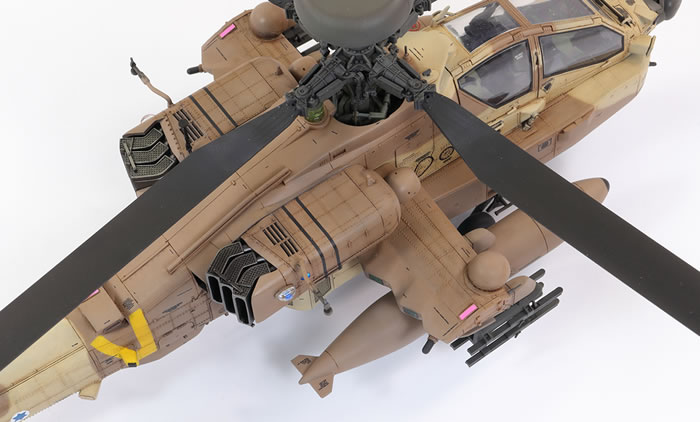
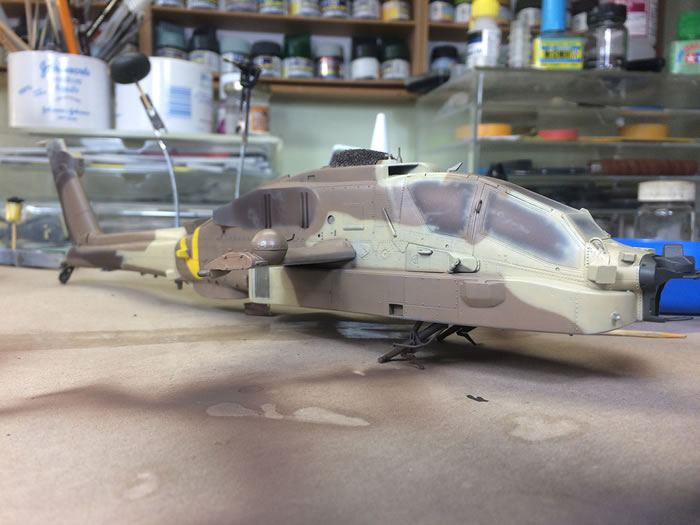
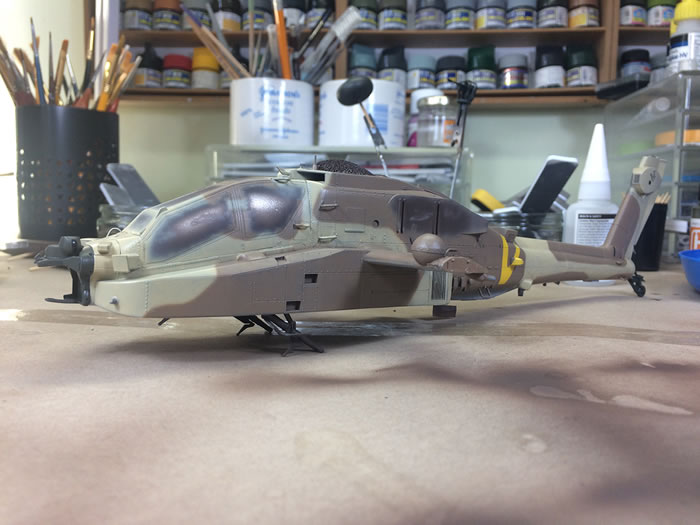
My interest was piqued, then, when many years later I came across the Wingman Models (ex-Isracast) conversion set for the Israeli AH-64D-I Saraf. This was a far more interesting proposition: great bulbous globes on the wings, big chaff buckets on the wing trailing edges and rear upper fuselage, loads of other lumps and bumps, and a cool colour scheme. And it was all in the set: resin, PE, decals and mask. This looked great.
Unfortunately it was out of production when I found out about it, but a few months later was available around the £50 mark. Ouch. Never mind the fact I later had to buy a second set, but that’s another story…
In all honesty, the resin is workmanlike. The parts have a lot of surface texture on them and are poorly finished. A good deal of this did not become really evident until painting as the grey resin hides a lot of the imperfections. The casting quality has nothing on Aires or Hypersonic. The PE is very nice and the decals are great; just be prepared for some work.
The basic kit I have described in my previous US Army AH-64D article (https://jonbryon.com/hasegawa-1-48-boeing-ah-64d-longbow-apache/) and much of what I wrote there is applicable here. There are though, of course, many differences.
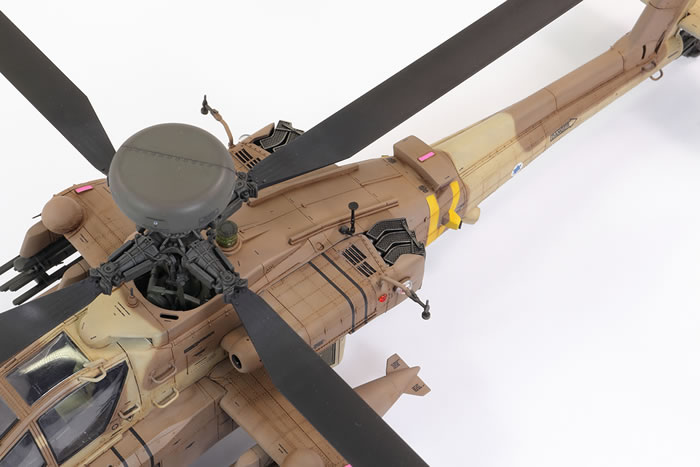
Having read a few articles on using this set, I was aware there were issues with that huge resin lump containing the chaff buckets to the rear of the rotor housing. No kidding. It fitted like this:
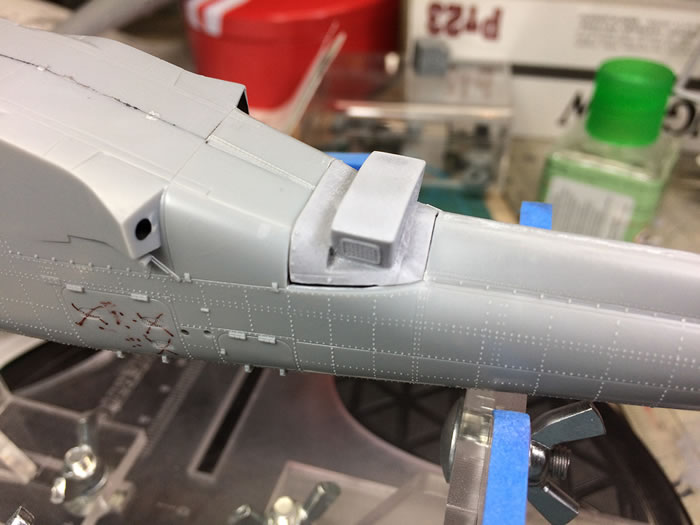
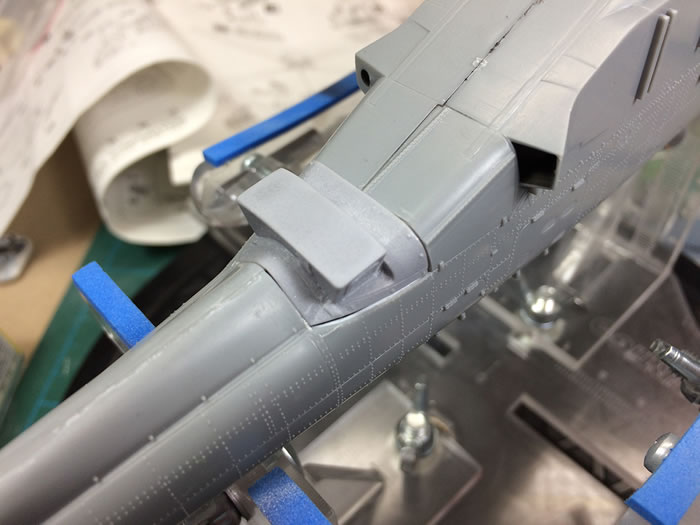
Much Milliput and CA later, it looked like this:
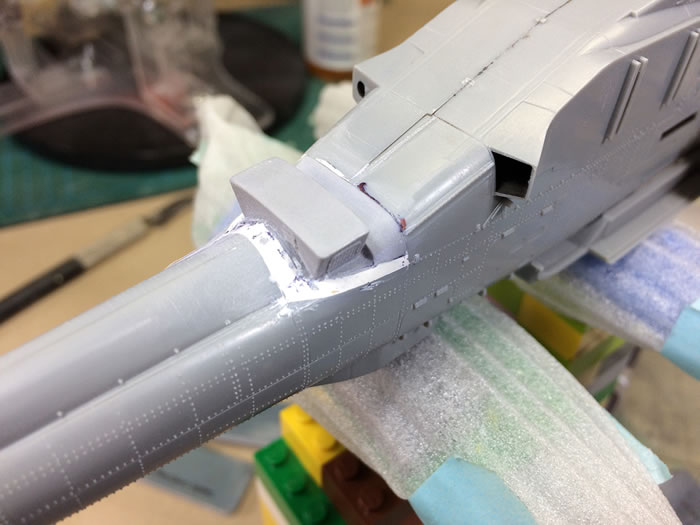
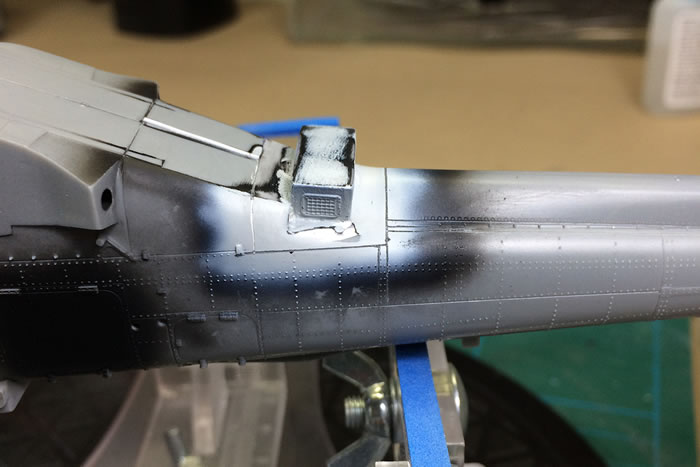
This was a bit of a mojo killer, but I got there in the end. Some resin rivets from Archer Fine Transfers dressed things up a bit and it turned out like this:
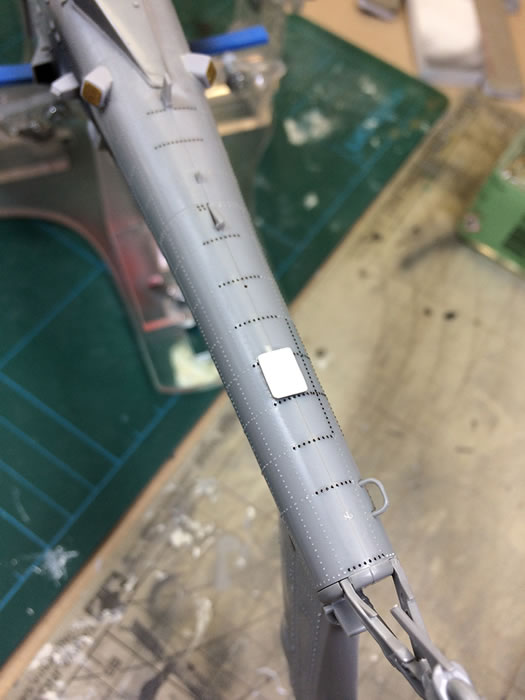
Talking of resin rivets, they were used as with the US Army Apache to replace rivets lost through sanding, such as here under the rear tail:
The Wingman Models set is pretty comprehensive. Some of the resin sensor pods do not fit well and needed a lot of Mr Dissolved Putty to fair them in. Getting a neat finish is always harder than it should be. I think a lot of my filler woes would be solved if someone just made a filler with the material properties of margarine that could then be set by UV light without shrinking. Please someone, make it!
There are omissions within the set, however, and some things the modeller of an Israeli Apache should be aware of. I picked these up from the excellent AH-64A/D Peten and Saraf in IAF service by Ra’anan Weiss. This is an great resource and I highly recommend it.
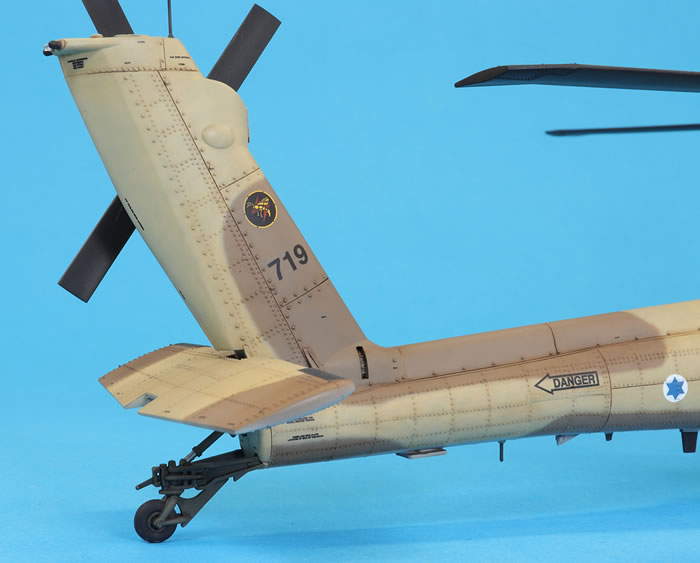
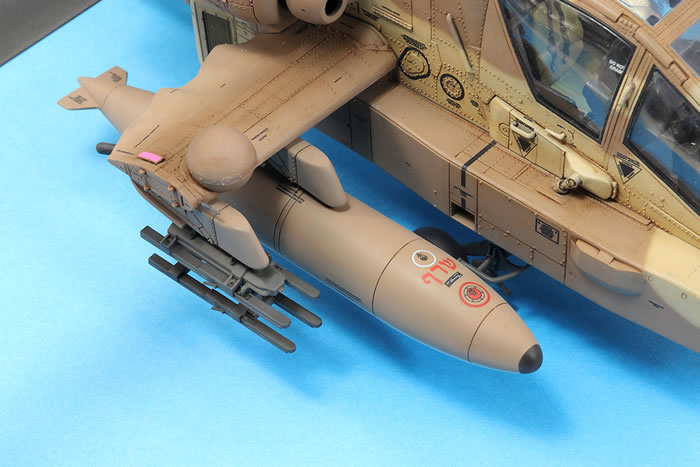
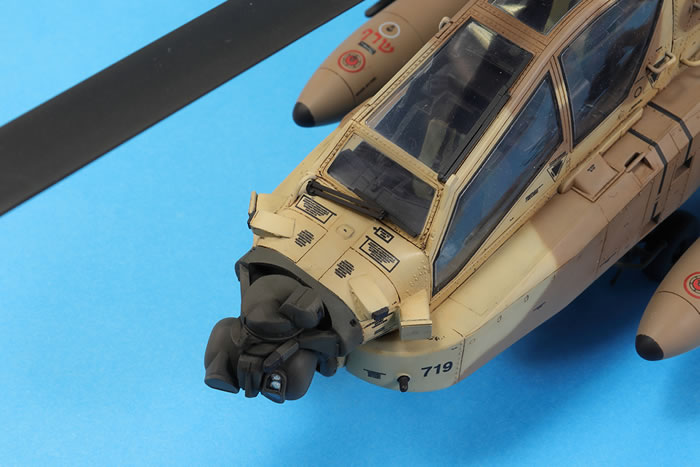
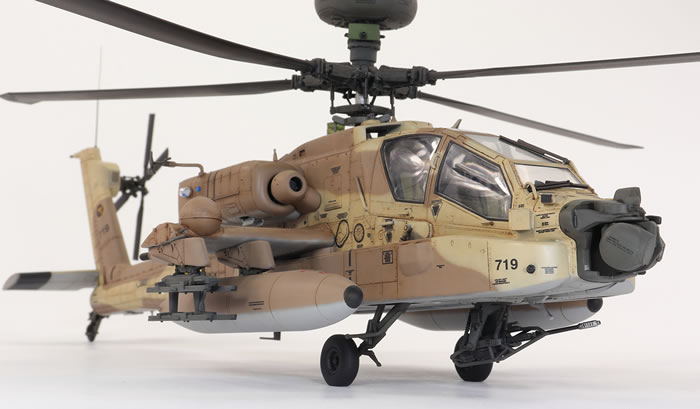
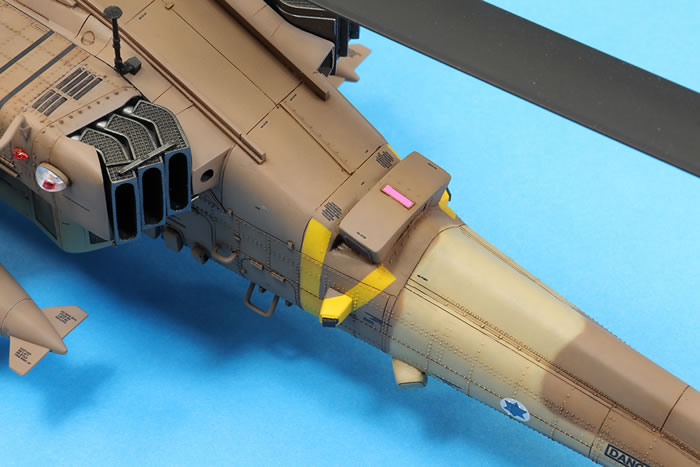
First, the set is missing a ‘plate’ under the rear fuselage. You can see I scratchbuilt this in the above photo, although mine is too large. Second, you need to figure out exactly which AH-64D you’re going to make. Some had blanking plates on the fuselage sensor bumps (provided by Wingman); others had black sensors (not provided). Some have an older style of PVNS turrent (the turret on top of the nose provided by Hasegawa) and some have a newer one (not provided). Some have the Longbow radar fitted, and others don’t. Airframe 719 appeared in many photos and matched most closely what Hasegawa and Wingman give you.
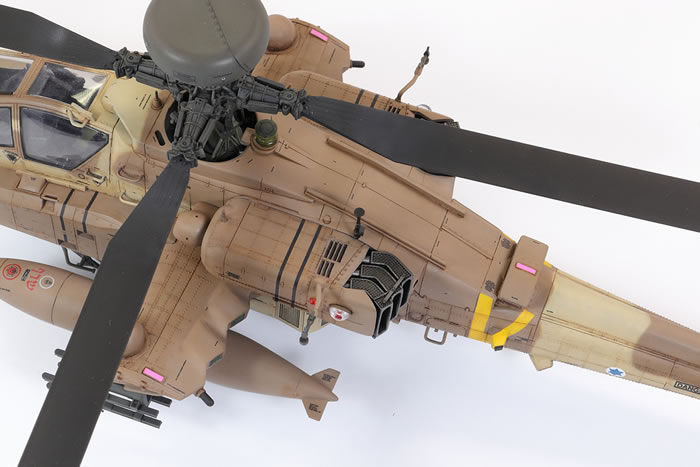
The Wingman instructions are quite complete in what Hasegawa parts need to be omitted (but miss out part J33 – don’t fit that). Follow them carefully and compare with photos. I did not bother replacing the moulded plastic grills with their PE replacements as I have great difficulty properly fairing flat PE panels into the fuselage and the injection moulded detail is fine. I made an exception for the grill at the top of the tail. Similarly, I did not make the PE disco light IR jammer (that looked far too complicated) and used the Hasegawa parts – they’re on the Q sprue and not mentioned in the instructions. As with my other AH-64D, I cut out the cooling doors from under the engine pods, but rather than make my own doors, used the PE parts provided by Wingman.
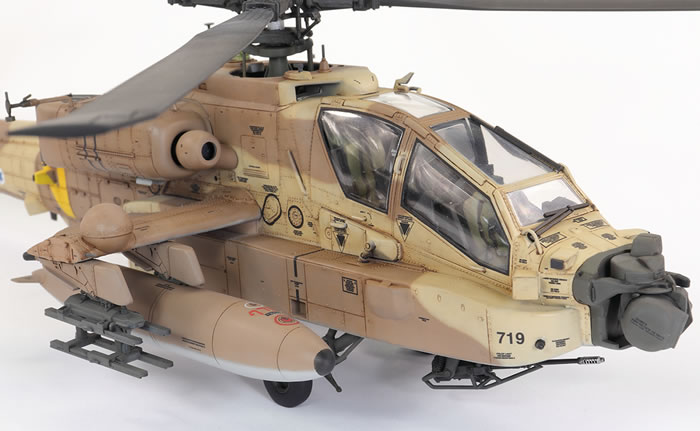
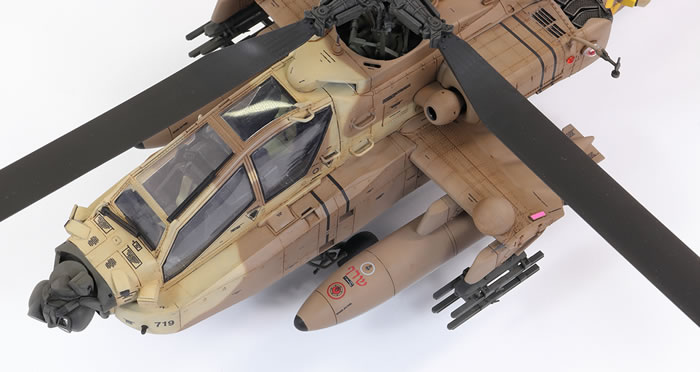
The other significant deviation from the Wingman instructions was to replace the fuel tanks. These are provided as great chunks of resin. The moulding is okay, but there are a few flaws and I did not really like them. I discovered that they are almost identical to the fuel tanks Academy provide in their 1/48 UH-60 kits, to the point where it looks like Wingman used them for the masters. I decided working with plastic was much easier and so those on the finished model are the Academy tanks. The price I paid for this is that the pylon mounting is not quite as accurate as it should be and the tanks sit too level to the ground (they should be more nose up). As usual, I only discovered this after they were attached and I don’t fancy reworking the mounting.
On my US Army Apache the landing gear ended up wonky so I took a different approach. This time I installed and built up the gear before the big side bays were attached. This allowed me, using a jig made up from a steel baking try, lots of neodymium magnets and a set of steel gauges, to get everything square while it was accessible.
Hasegawa mould the starboard canopy framing between the front and rear cockpit doors as part of the starboard fuselage half. I have no idea why they did this; it’s very silly and extremely vulnerable. I managed to avoid damaging it on my first Apache; not so with the second and it was accidentally snapped off.
The de-icing wires for the main rotor blades (parts F1) are for earlier Apaches, so I left these parts off. The main rotors have a slight warp in them, unfortunately in the wrong direction, so they deflect up rather than down.
I was very unhappy with the way the canopy sealant came out on my US Army Apache and wanted to try a different method. I used Bare Metal Foil as the main masking material, carefully cut with a scalpel. If you try this, be aware that removing the BMF is very difficult.
I decided to prime the model in Mr Mahogany Surfacer 1000. The idea was that the mahogany undercoat would give a warmer variation in tone for the sand and brown camouflage colours that go over the top. I’ve found that using a black primer can make warm shades a little too cool. The primer was thinned quite heavily with Mr Rapid Thinner that produced a nice smooth finish applied with an Iwata RG-3L:
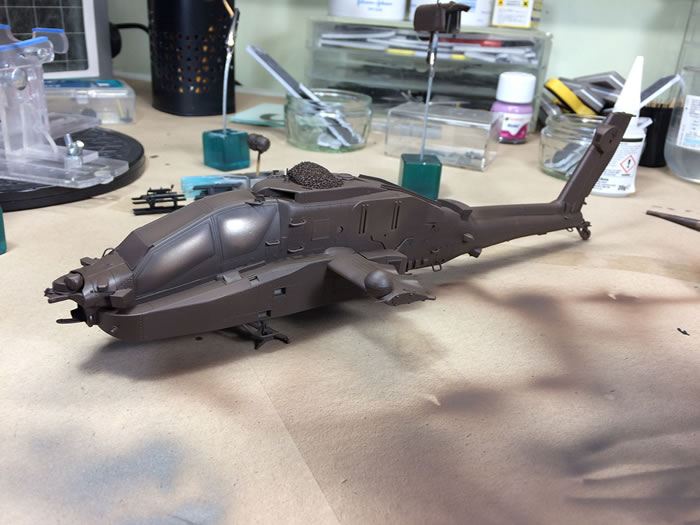
The primer coat did show up the roughness of the Wingman parts, in particular the new sensor lumps and the replacement wings. The latter should really be sanded smooth, the imperfections filled and the surface detail rebuilt with resin rivets, but life is too short and I pressed on.
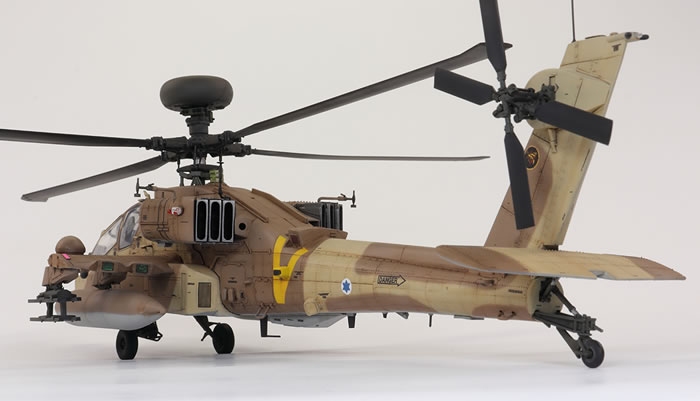
I used Hataka’s dedicated set for Israeli helicopters for the four main colours: dark green for areas like the nose, rotors, gun and landing gear, light grey for the undersides and the sand and brown for the main camouflage. The paint is a lacquer that performs quite well when thinned with Mr Leveling Thinner and I intended to spray the three main colours (grey, sand and brown) freehand.
The first coats were marbled on with my Iwata Custom Micron B and then blended with the same, allowing some of the underlying mahogany to show through. The Isradecal book showed that the camouflage demarcations could vary from quite tight to very sloppy, so I did not worry too much about small amounts of overspray.
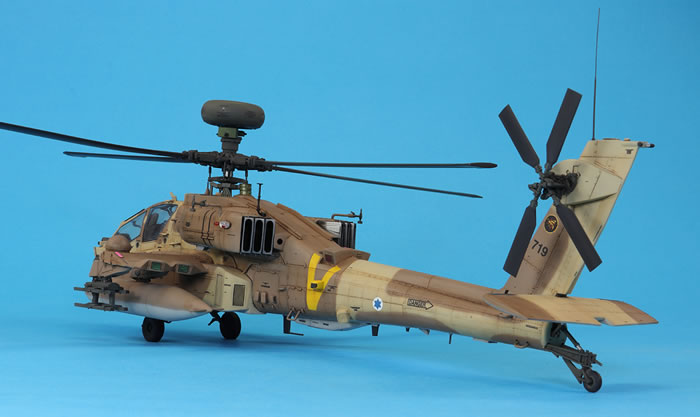
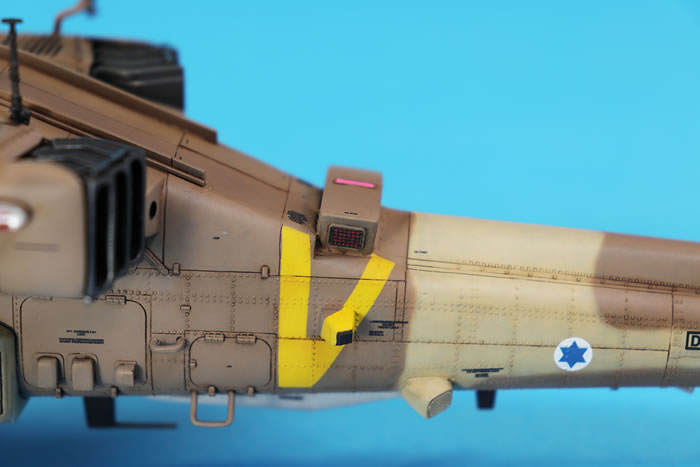
The yellow ‘V’ was always going to cause me a problem for two reasons: it goes very awkwardly over some sensors, and it would require me to mask over the resin decal rivets I had applied in the vicinity. I had no idea if the rivets would pull up when the masking was removed. It took a long time using the kit-supplied mask (suitably butchered) and fine Aizu masking tape to mask the shape out and spray the ‘V’. Initially I used the recommended paint in the Hataka set, but realised quite quickly it is not right for the Saraf. Wingman recommend FS13538 yellow and I had this on hand in the form of Mr Color 329 Yellow which matched the photos in the book much better. I was mightily relieved when no rivets came up as the masking was removed.
The black panels on the tailplane were masked and sprayed and I used some small circle masks for the noses of the fuel tanks. These are prototypically wonky. The black sealant between the fuselage side pods and the main body was inked in using a very fine (0.03mm) black pen. The canopy seal was also black, but I noticed from the photos that it did not quite follow the moulded seal and was squared off at the corners. This made it easier to mask and spray using some very fine (0.4mm) Aizu tape. Time consuming, but the final result is far, far better than on my other Apache.
I used KColor XW100 acrylic gloss to protect the paint from the weathering to follow. Following their instructions I applied it at about 30PSI through a 0.6mm needle, which was perfectly satisfactory for my purposes.
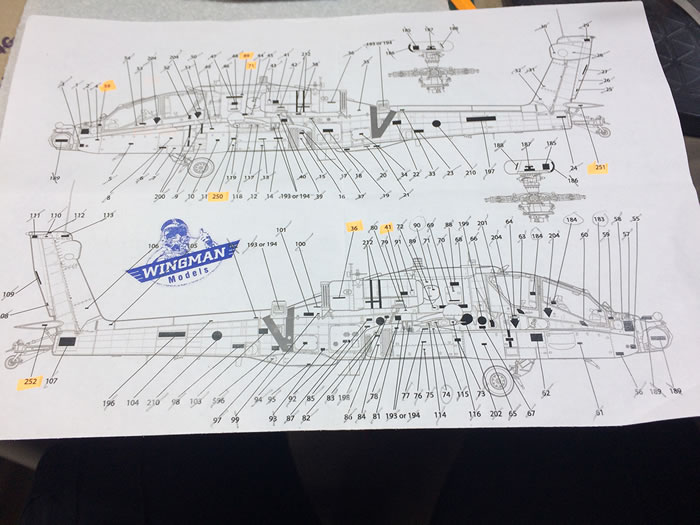
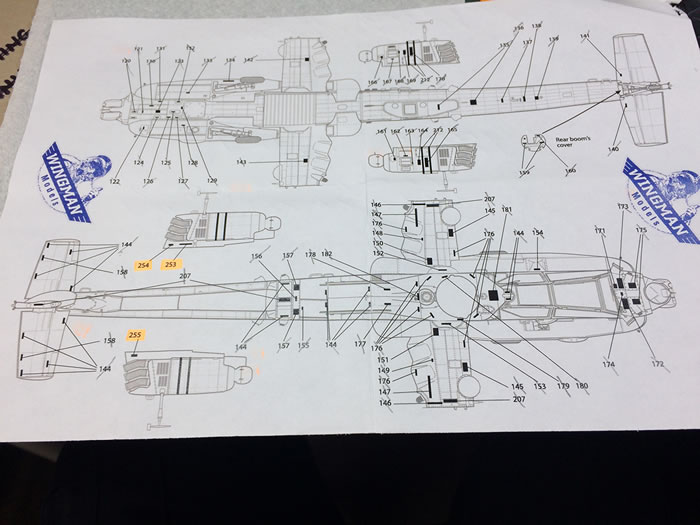
The Wingman decals are thin and went down well over a puddle of Mr Mark Setter. I used Mr Mark Softer to get some of them to conform over the more prominent raised detail. There are far more decals than you’d think; around 200 stencils alone. Wingman do not provide all the decals called out in their instructions (highlighted):
I already had a fair amount of tonal variation in the paint from my brown-basing, and I was pretty happy with that. I mixed some brownish tones from oil paints and applied a wash which added some more variation. I’ve returned to thinning my oil paints with Zippo lighter fluid as I find it nice and mild.
The flat coat is Mr Color GX113, but I ran out when I was almost done and getting it quickly is impossible (I usually buy it on Ebay from Taiwan as it’s cheaper). I resorted to decanting some Mr Super Clear Flat from an aerosol. I’ve had this lying around for many years (I bought it when I lived in China, probably in 2012) and tried airbrushing it neat. It dried staggeringly fast and staggeringly flat. It did affect the colour slightly, making it a little paler, but that worked really well on this particular model. Later on I used it to matt down a few glossy spots and tried thinning it with Mr Rapid Thinner. This was a mistake, as it had a chalky finish. You can see this on one of my rotor blades.
Final construction was relatively straight forward; there are just a lot of bits and pieces to add. I made a mistake with the large clear parts on each engine pod. I assumed they should be coloured red/blue for left/right, but actually they should be red on both sides. This was impossible to correct as the blue had dried solid when I found out and would not budge.
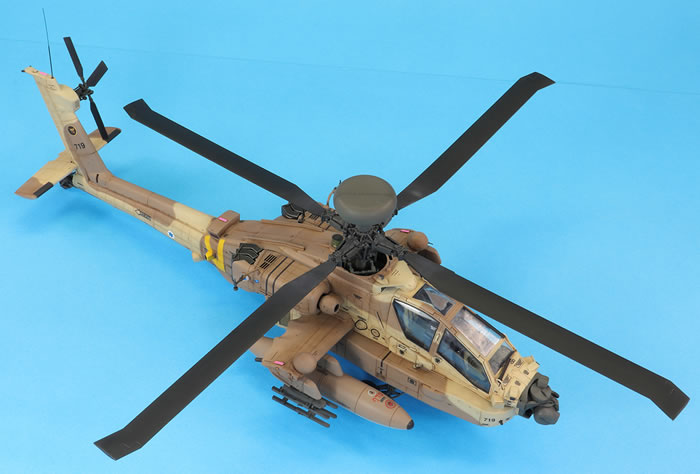
The gun barrel, wing pitots and tail aerial are all by Master and make a subtle improvement to the model. The windscreen wipers are from the Hasegawa kit; I knew I’d never be able to do justice to the PE Wingman wipers and would rather have something neatly overscale rather than tatty and in-scale.
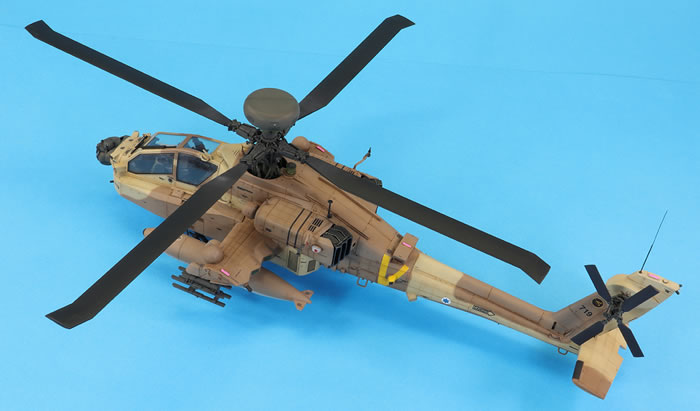
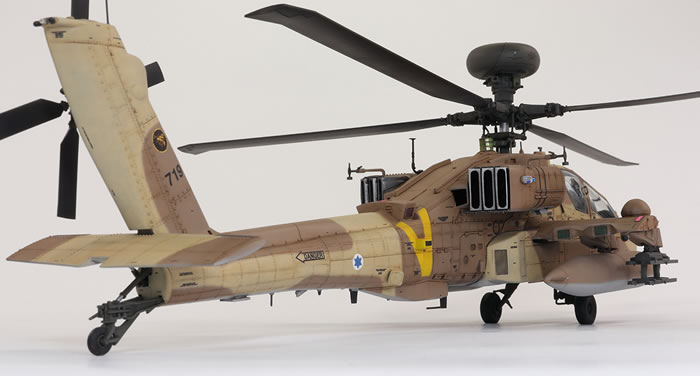
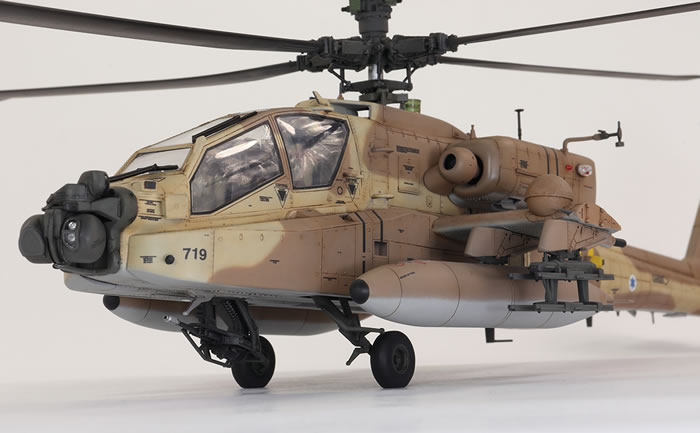
I have mixed feelings about the finished article. I really like the subject matter and it makes a great contrast to the dark green US Army Apache next to it in my display case. The base Hasegawa kit is great and I’ve had fun putting two of them together. However, the Wingman set is a bit of a disappointment, mainly because of the relatively poor casting quality but also because it was not quite complete and the fit rather poor.
Were I after the perfect Saraf, I would try to get Hasegawa’s own AH-64D-I (sadly out of production) which I would expect to have better moulded resin for the main components. It would still need updating with the Wingman set to make up for some of what’s missing and would certainly be a very expensive project, but probably produce a better result.
For more articles like this, please visit my website at www.jonbryon.com
Text and Images Copyright ©
2019 by Jon Bryon
Page Created 27 December, 2019
Last Updated
27 December, 2019
Back to
HyperScale Main Page

|
 Home
| What's New |
Features |
Gallery |
Reviews |
Reference |
Forum |
Search
Home
| What's New |
Features |
Gallery |
Reviews |
Reference |
Forum |
Search