|
Heinkel He 111 H-6
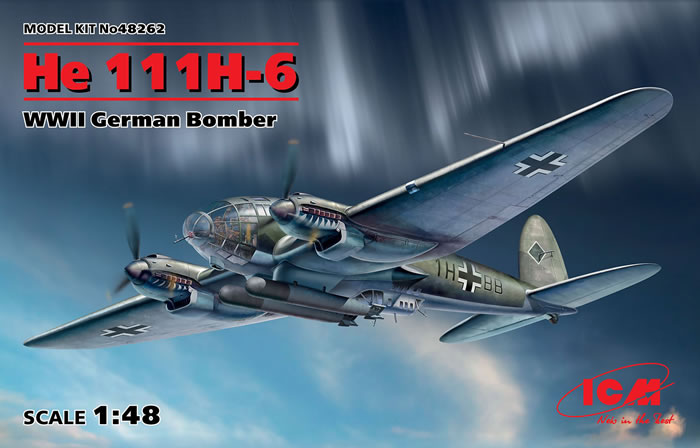
ICM, 1/48 scale
S u m m a r y : |
Catalogue Number: |
ICM Kit No. 48262 - Heinkel He 111 H-6 |
Scale: |
1/48 |
Contents & Media |
14 sprues of grey plastic parts; two sprues of clear plastic; markings for four aircraft. |
Price: |
Available online from these stockists:
Click here for currency conversion |
Review Type: |
First Look. |
Advantages: |
High quality plastic parts; high level of detail; crisp and fine surface textures; comprehensive instructions. |
Disadvantages: |
|
Conclusion: |
This appears to be a pretty accurate-looking kit with all the right curves in all the right places, and also a very intuitive and interesting assembly sequence. For example, you can’t build the wing separately to the fuselage, as the through-spars incorporate fuselage interior, and the bomb cells are loaded into the fuselage after main fuselage assembly, complete with the lower belly. Apart from the ripples in the glazing (which I don’t think will be too noticeable when assembled), the quality of this kit really is excellent, and ICM are setting new standards, outside of their Asian counterparts. This is also a kit with serious value for money, coming in at around £40. Plenty of buildability and one of those kits that really excites me. Hopefully, I’ll make a start very soon.. |
Reviewed by James Hatch

ICM's 1/48 scale Heinkel He 111 H-6 is available online from Squadron.com
The Heinkel He 111 was a German aircraft designed by Siegfried and Walter Günter at Heinkel Flugzeugwerke in 1934.
Throughout development it was described as a wolf in sheep's clothing because the project masqueraded the machine as civilian transport, though from conception the Heinkel was intended to provide the nascent Luftwaffe with a fast, medium bomber.
Perhaps the best-recognised German bomber due to its distinctive extensively glazed greenhouse nose of later versions, the Heinkel He 111 was the most numerous Luftwaffe bomber during the early stages of World War II.
The bomber fared well until the Battle of Britain, when its weak defensive armament was exposed. Nevertheless, it proved capable of sustaining heavy damage and remaining airborne.
As the war progressed, the He 111 was used in a variety of roles on every front in the European theatre. It was used as a strategic bomber during the Battle of Britain, a torpedo bomber in the Atlantic and Arctic, and a medium bomber and a transport aircraft on the Western, Eastern, Mediterranean, Middle Eastern, and North African Front theatres.
The He 111 was constantly upgraded and modified but became obsolete during the latter part of the war. The German Bomber B project was not realised, which forced the Luftwaffe to continue operating the He 111 in combat roles until the end of the war.
Manufacture of the He 111 ceased in September 1944, at which point piston-engine bomber production was largely halted in favour of fighter aircraft. With the German bomber force virtually defunct, the He 111 was used for logistics.
The H variant of the He 111 series was more widely produced and saw more action during World War II than any other Heinkel variant.
Owing to the uncertainty surrounding the delivery and availability of the DB 601 engines, Heinkel switched to 820 kW (1,100 hp) Junkers Jumo 211 powerplants, whose somewhat greater size and weight were regarded as unimportant considerations in a twin-engine design. When the Jumo was fitted to the P model, it became the He 111H.
German-built He 111s remained in service in Spain after the end of the Second World War, being supplemented by Spanish licence-built CASA 2.111s from 1950. The last two German-built aircraft remained in service until at least 1958.
The H-6 variant (the subject of this review) was a torpedo bomber and could carry two LT F5b torpedoes externally. It was powered by Jumo 211F-1 engines, had six MG 15s and one MG FF cannon in forward gondola
Courtesy of Wikipedia.
I think it would be pretty fair to say that 1/48 Heinkel He 111 kits have been few and far between over the last years. In fact, before the initial ICM He 111H-3 version which was released towards the end of 2017, the last was another re-boxing of the old Monogram kit that dates back to 1994, and seen subsequently under Revell, Hasegawa, and Revellogram labels. It seemed that almost every other German twin had seen some release or other, apart from another Heinkel. Well, when ICM announced that they were to give us a newly-tooled He 111H-3, it was fair to say that many Luftwaffe fans were extremely pleased. The breakdown of the model also invited future versions to be released, and 6 months later, this is exactly what we got. ICM has a reputation for accurate model kits, with plenty of detail inside as well as refined external details. Their Ju 88 kits have seen numerous version releases, both with ICM themselves, and also with Revell and Special Hobby.
No one can accuse ICM’s newer kits of having flimsy boxes, as per one German manufacturer. This one comes in a sturdy corrugated cardboard box with a locking tab, and with a separate, glossy product lid sat snugly over this. Box art depicts a France-based machine flying relatively low over the French countryside, towards dusk, with one box edge showing a couple of the FOUR schemes that can be built from this H-6 torpedo-carrying version. Once you cut through the clear disc tabs, remove the lid and open the box, you will find SEVEN sprues of medium-grey styrene and ONE of clear, tightly packed into a single clear sleeve. Normally I don’t like this approach, but there was pretty much no way these were going to rub over each other. The clear sprue was also packed into a separate sleeve within this main one. Now, those 7 sprues are actually common to the previous He 111H-3 release, as a second clear sleeve contains a further FIVE light grey sprues, and a separately bagged clear one. This brings the total sprue count to FOURTEEN! Of course, a healthy parts count is on definitely on the plate here.
A heavy 28-page instruction manual lay in the bottom of the box, and tucked within this is a long and narrow decal sheet. This kit contains no PE parts.
Sprue A
Our first sprue brings us two of the main parts; namely the fuselage halves. It’s impossible to ignore these, so I’ll look at them first. These are very similar to how Revell went about their 1/32 kit, in that the upper forward fuselage is a separate piece, that can of course be an indication of other variants coming our way. Externally, detail is superb and very refined, with evenly and neatly recessed, narrow panel lines and a slightly proud wing root fairing with rivet fasteners. Elsewhere, however, no rivets are depicted. I quite like the difference that a riveted surface creates with a finished project, so will add these myself with a beading tool. The rudder is moulded separately, as is the belly. With the latter, two parts options are provided on this sprue, and those are for a bomb-doors closed, and doors open option. That certainly negates any ill-fitting doors that wouldn’t perhaps sit flush. Perhaps one thing that I’m not keen on are the aerial arrangement runners that are moulded to one of the lower fuselage halves. This makes removing seams a far more difficult task. Easy to fix though: slice off the detail and fit it later when seams are gone. Only a niggle really.
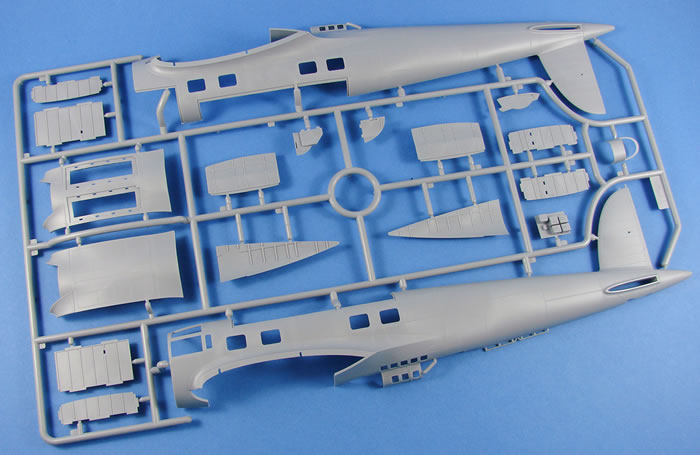
Internally, I think ICM have made a very reasonable job of recreating the structural elements of this aircraft, with such detail extending from the nose, back to just aft of the belly gondola. There are some ejector pin marks though, but these are generally shallow enough to simply rub them away with a fibreglass pen, or other lightly abrasive tool. You will note that due to moulding limitations, ICM has had to produce a wing root insert to glue into position within the fuselage, and you might want to blend this in to the surrounding detail. This is the same solution that HK Models used on their 1/32 B-17 Fortress kits. Similar inserts exist for the lower bomb bay walls, but these sit primarily between the two main spar and bulkhead parts that form the basis of the construction.
Note also the port and starboard wheel well walls, as well as the ceiling for this area. Fore and aft walls are moulded to the main spars. These walls will provide basic constructional elements and could/should be enhanced further by the modeller, with a little plasticard and wire. I’m not going to really criticise this due to the price of the kit, and the area providing a far more than adequate basis for detailing further.
Other parts on this sprue are for the lower gondola, cockpit sidewalls, and radio equipment wall.
Sprue B1 & B2
Both of these have the wing upper and lower panels as their main components, moulded with integral landing flaps. I would quite have liked to have seen these separate, and it will take some work for the modeller to achieve. However, the ailerons are separate items, moulded as halves on one of these sprues. As per the fuselage, external wing detail is very refined, with superbly thin and even panel lines and port access details. No rivets here again, except for key lines and those around fuel tank panels and upper nacelle fairings.
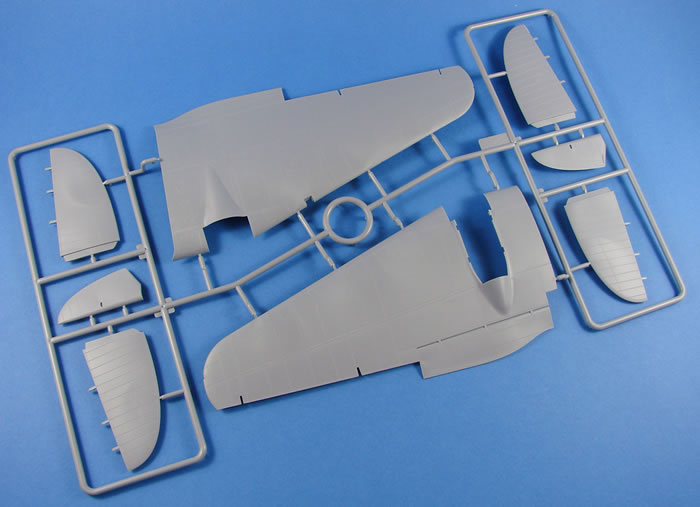
Internally, positive channels are moulded for the main wing spars, creating what looks to be a very sturdy and unambiguous assembly. Going back to the ailerons, these have very subtle rib and fabric details, and shouldn’t need any toning down.
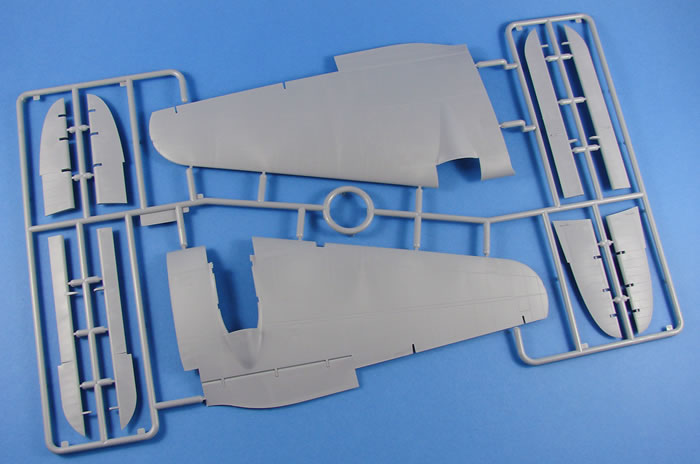
Other flying and control surfaces are moulded here also. These are the stabiliser, elevators and rudder, moulded as traditional halves. These of course exhibit the same finesse as seen generally on external surfaces.
Sprue C (x2)
Where there are generally multiples of specific components, then these are the sprues on which you will find them. This model is equipped with two complete Junkers Jumo 211 A-3 engines, comprising of almost 20 parts each. I really am very impressed with the detail on these, and they certainly convincing against my reference material, including personal photographs of the 211. As with the wheel bays, just a little lead wiring should be all that’s needed to bring these to life. Unusually, the prop shafts are moulded into the main engine halves, instead of having a separate, captive pin that will allow the props to rotate.
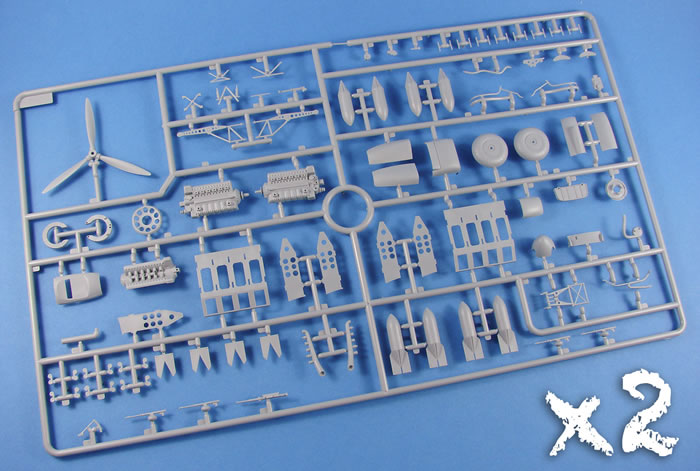
I did say this model had a full interior, and further evidence is seen here with multipart bomb bay cages, plus a full complement of eight SC500 bombs that sit within the cage’s vertical cells. Don’t get too excited though, as these AREN’T for use with this H-6 release! Nice additions to your spares box though.
Other parts on this sprue include the numerous engine cowl parts, and the forward cowl ring with its characteristic lightening holes. Wheels are moulded as halves, but these aren’t weighted. They also aren’t used, as alternatives are provided on a new sprue, but they still aren’t weighted. Maybe Eduard will oblige us…
Sprue D1
Unless it’s tied into more future releases, I admit that I don’t understand the nomenclature of the sprues D1 and D2. They seem unrelated. This particular sprue contains those two chunky main spars, complete with integral fuselage bulkheads and moulded bulkhead and main gear bay details. Note also other internal bulkheads, and for the cockpit itself. ICM has designed a rather tidy main cockpit, that is generally spread over both this sprue and D2, and should look great as it is, out of box. No doubt that Eduard will still be able to persuade us to invest further though. Decals are provided for enhancing the cockpit further, and these are clearly labelled on the instructions sheet. Internal parts on this sprue include the rear cockpit wall, cockpit floor, multi-part pilot seat with head armour, ammunition racks etc.
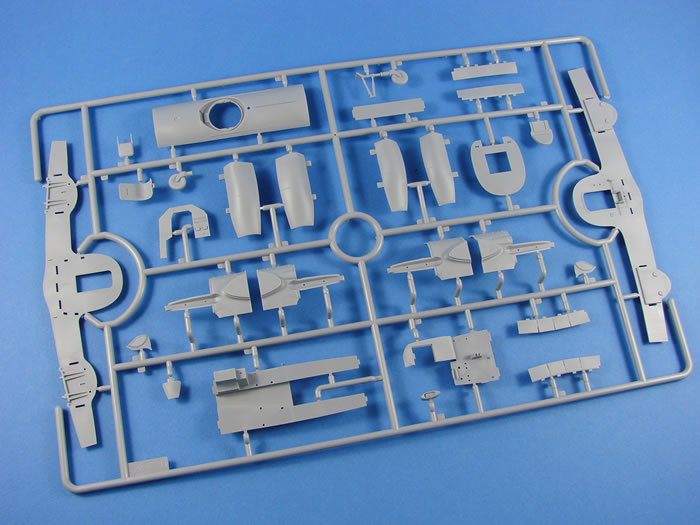
Other parts here include the upper fuselage deck with moulded cupola gun traverse gearing, engine cowl to wing cowl fairings, splayed bomb bay door option, tail wheel that is moulded in situ with strut, and the main gear bay doors. Unusually, these last items have no detail moulded internally. This would definitely need addressing.
Sprue D2
Someone at ICM had the foresight to include most of this kit’s more fragile and smaller parts on this sprue, meaning you can safely stash this to one side during the course of building.
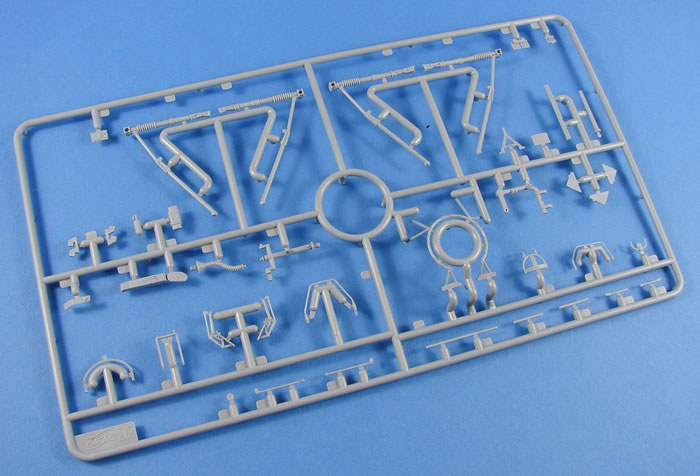
On here you will find the undercarriage struts and braces, ammunition rack components, rudder pedals and linkages, smaller cockpit components, control yoke and torsion tube, bomb aimer/co-pilot seat, MG mounts, etc.
Sprue E
This last sprue of generic He 111 parts contains all of the clear components. Where the varying items have sections that aren’t a part of a window etc. then these are frosted. Framing is pretty good, and this shouldn’t be too difficult to mask up for airbrushing. Even easier if Eduard release masks for this kit. What I do note is that whilst the clear areas have a good transparency, these areas look a little rippled, and more so when you look at through them to things in the distance. However, whilst this isn’t particularly good, if you look at things that are in close proximity to the clear areas, then this isn’t as noticeable. I have some faith that this won’t be too obvious when the model is complete, but don’t quote me.
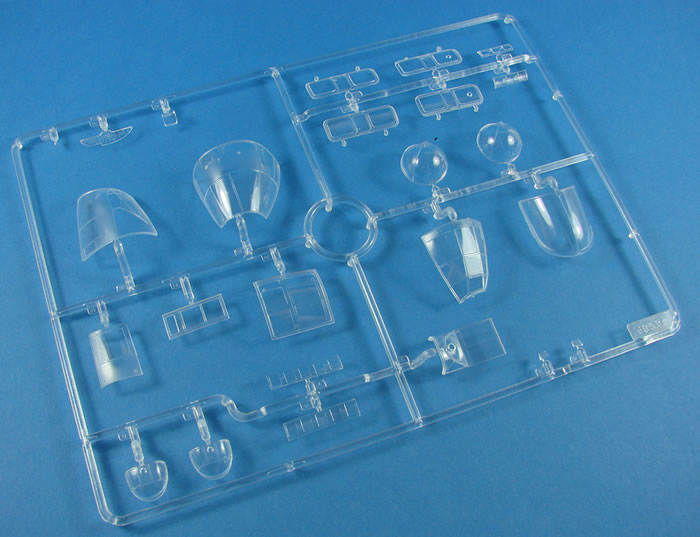
The He 111’s famous glazed nose is comprised of three parts. Care will definitely be needed in assembling these. Two options are supplied for the lower gondola glazing, as are weapons too. Note that the instrument panel is moulded here too. I’ve never seen the point of clear IPs, but that might only be my mileage. Instrument decals are supplied for this and other cockpit areas, but you may choose to punch out the individual dials and apply them separately. It certainly makes for a cleaner finish.
Sprue E1
This new, clear sprue contains just four parts. Two of these are for the upper gunner position and the options here are for an open glazed area with a retracted canopy, or a closed version. I’m glad to see they provided optional parts instead of having to assemble this.
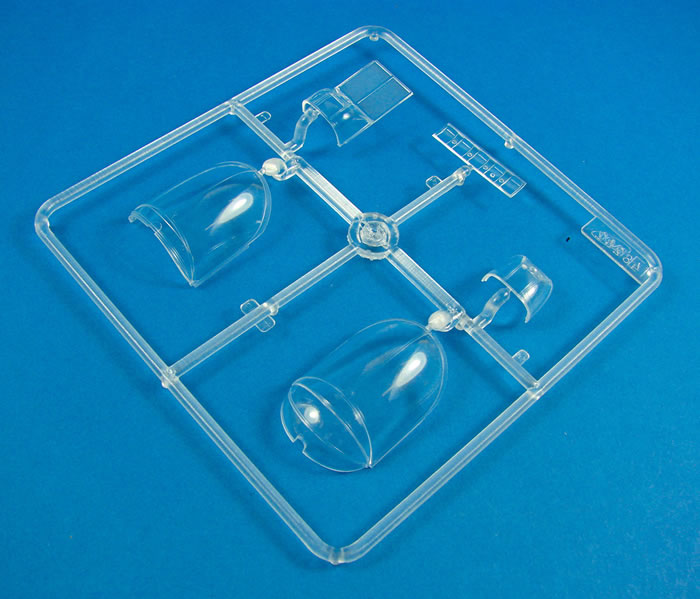
The remaining two parts are for the front and rear of the ventral gondola. The standard of glazing here is actually nicer than the main canopy parts.
Sprue G
The first of our new grey sprues contains two underbelly sections. One of these is for the torpedo-carrying machine, and the other for the one carrying an external bomb payload. There are some slight differences here. Of course, the ETC racks sit over the He 111s bomb doors, and with this machine, you won’t fit the internal bomb racks. They are showed as not for use with this release.
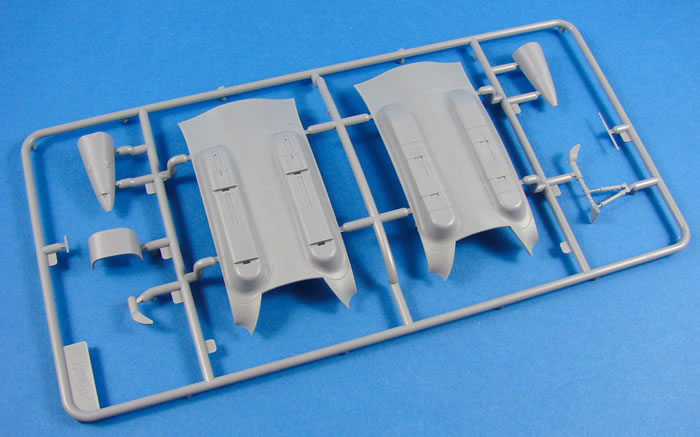
Two scheme options provided in this kit have the tail with the rear-facing MG. Parts are provided here for that, but you will need to take a saw to the kit and remove the original tail. Maybe a slight oversight in ICM’s original modular design. The last parts are for the new tail wheel strut and ventral gondola.
Sprue F (x2)
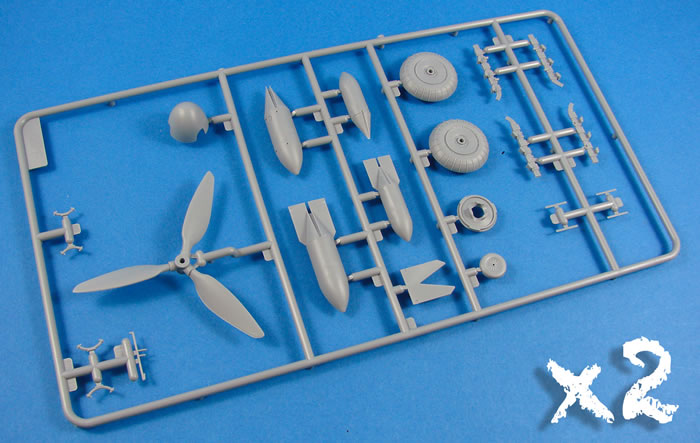
These identical sprues contain the new props and spinners, two-part exhausts (thus hollow!), and external bomb load.
Sprue H1 & H2
Not wanting to waste time and cost, of course, ICM has provided the same sprues in this release as for the Ju 88A-4/Torp. After all, they are the same weapons. Just remember that the racks won’t be needed as they are moulded to the underside of the new parts on Sprue G.
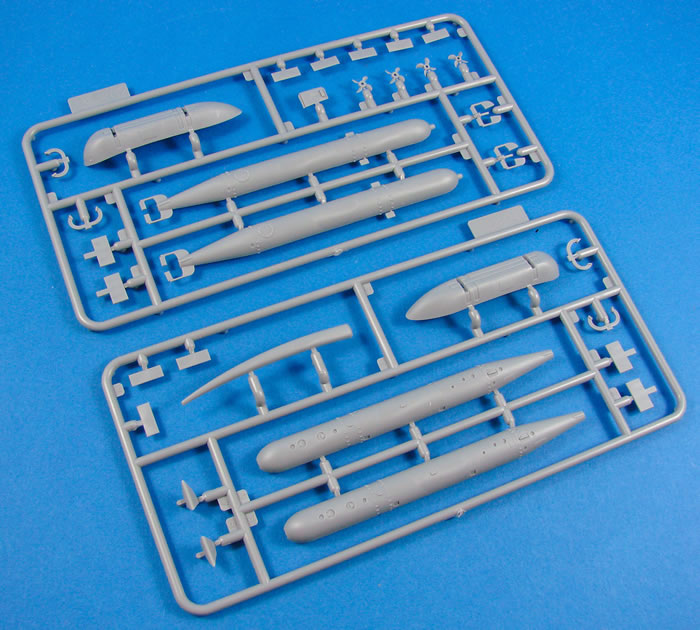
The torpedoes themselves are moulded as halves, with separate propulsion impellors and a fin modification unit that is similar to the ones that the Japanese used on their torpedoes at Pearl Harbour, allowing the torpedo to operate very close to the water’s surface.
Detail on these is excellent, and laden with two of these, this He 111 version should look particularly unusual and menacing.
Decals
One decal sheet is included, and there is no indication of where it is printed. I am assuming this is a homebrew ICM product. Printing is fairly thin and carrier film is minimal. Everything also appears to be in full register. No swastikas are included.
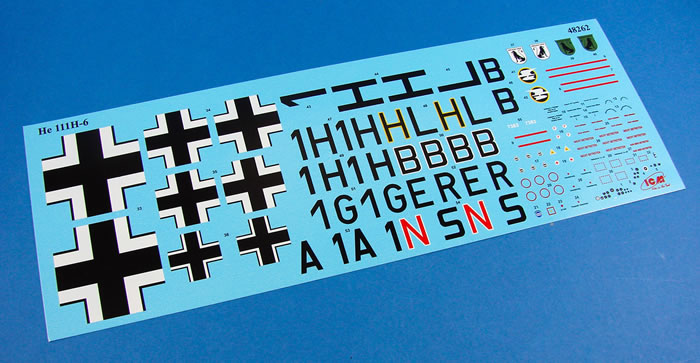
A full set of stencils is included, along with the markings for the FOUR machines. These are:
-
He 111H-6, 3./KG26, Norway, Summer 1941
-
He 111H-6, Stab I/KG26, Bardufoss, Norway, July 1942
-
He 111H-6, 8./KG53, Poland, June 1941
-
He 111H-6, 7./KG27, Russia, November 1941
Instructions
I quite like ICM’s approach to the assembly manual, with the result being totally clean in approach and fuss-free. Starting with a history of the type, plus a colour chart for both Revell and Tamiya paints, a full parts plan is then printed, and then 116 constructional sequences.
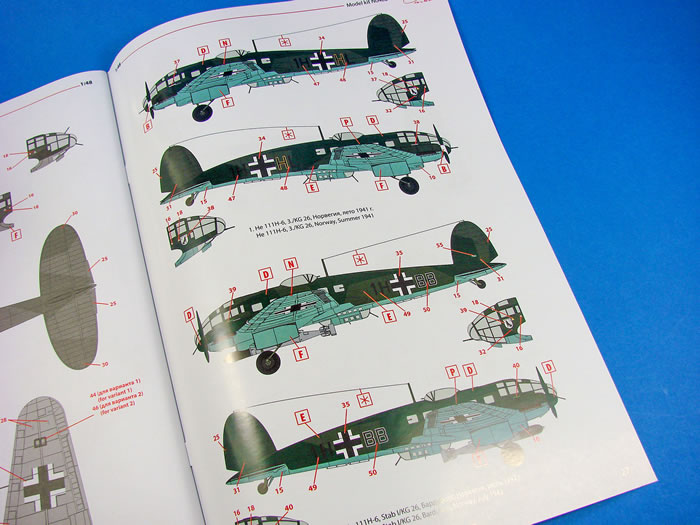
Assembly illustration is very clear, with colour annotation and selective use of shading to make some drawings clearer, such as where the 3D could mess with your mind! The last pages are taken over with a stencil drawing and four colour profiles for the supplied schemes. Decal placement and paint application is clear.
This appears to be a pretty accurate-looking kit with all the right curves in all the right places, and also a very intuitive and interesting assembly sequence. For example, you can’t build the wing separately to the fuselage, as the through-spars incorporate fuselage interior, and the bomb cells are loaded into the fuselage after main fuselage assembly, complete with the lower belly. Apart from the ripples in the glazing (which I don’t think will be too noticeable when assembled), the quality of this kit really is excellent, and ICM are setting new standards, outside of their Asian counterparts. This is also a kit with serious value for money, coming in at around £40. Plenty of buildability and one of those kits that really excites me. Hopefully, I’ll make a start very soon.
Thanks to ICM for the review sample.
Review Text and Images Copyright © 2018 by James Hatch
Page Created 28 August, 2018
Last updated
29 August, 2018
Back to HyperScale Main Page
Back to Reviews Page |
