Eduard's 1/48 scale
Messerschmitt Bf 109 F-2
by Floyd S. Werner Jr.

Eduard's 1/48 scale Messerschmitt Bf 109 F-2 is available online from Squadron for only $39.99!
Summary
Review Name: Bf 109 F-2
Reviewer: Floyd S. Werner, Jr.
IPMS No.: 26266
Review Product Type: Aircraft
Review Type: Details
Scale: 1/48
Manufacturer: Eduard
Manufacturer website: www.eduard.com
Mfr Stock No.: 82115
MSRP: $49.95
Provided by: Eduard
Vendor Web Site: www.eduard.com
Direct Link to Item
Background
The Bf 109 F-2 was the first real variant of the Freidrich that was produced in significant quantities. Some F-0 and F-1s were issued but the F-2 was the first mass produced version.
The new streamlined shape made for what many consider the ultimate version of the 109. There are no prominent bumps and bulges anywhere. It is a sleek and sexy version of the Messerschmitt.
In the Box
Eduard has released the F-4 previously, and did release the F-2 in their Royal Class kit. This is the first time that they have offered the F-2 by itself. The light grey sprues are still blemish free and feature great detail. If you’ve built any of the F-4s or G-2s you are very familiar with the plastic. There is also a sprue of clear which has the canopy and the fuel supply line for the cockpit.
There are three frets of photo etch. One is the pre-painted type which is primarily concerned with the cockpit and instrument panel. The next one is in brass, LEPT-2 has the same components as the F-4 fret. The big difference in this release is the inclusion of LEPT-3. This is the first time that the ETC-50 rack can be used to its full potential. LEPT-3 allows you to build the SC-50 bombs, which is one of the marking options, by providing the bomb fins along with the sway braces.
As a Profipack kit there are masks included. They are the Kabuki tape type and allow you to mask the windows. Pay attention as you have to mask and paint the inside of the aft window prior to adding the rear canopy. There are also some small masks for the tail wheel too.
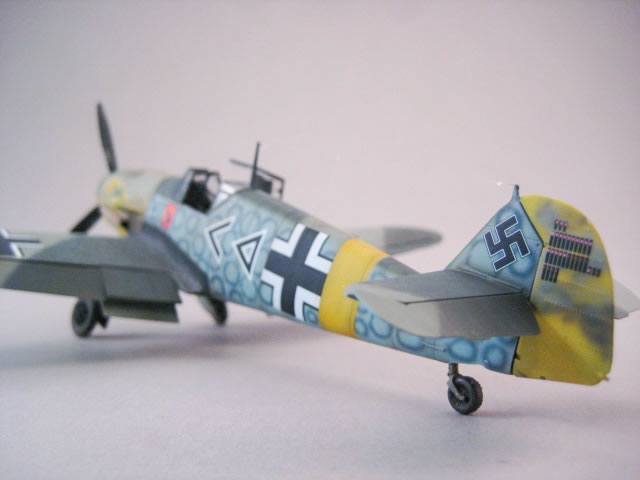
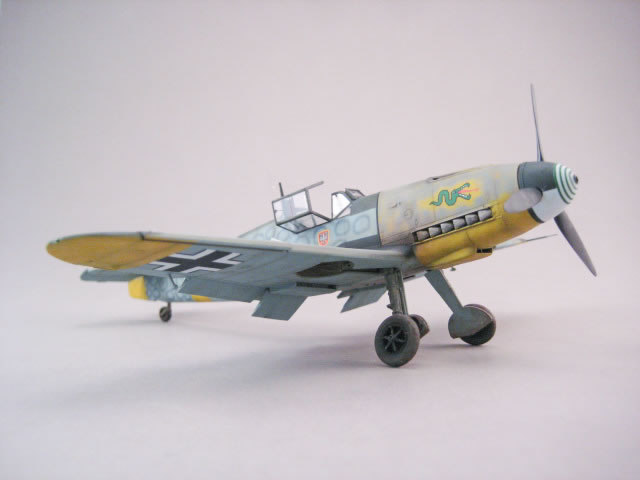
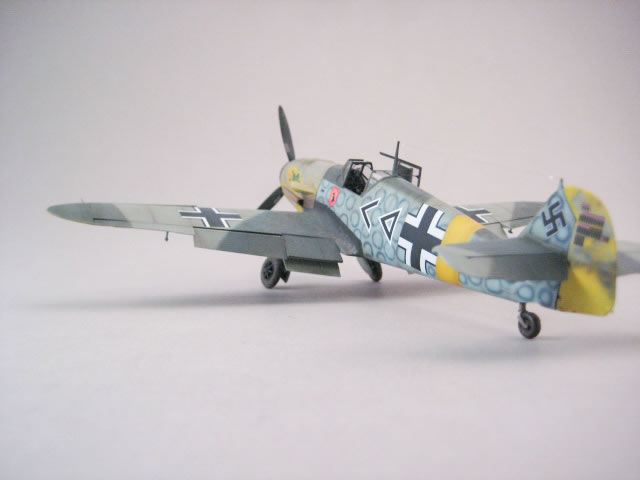
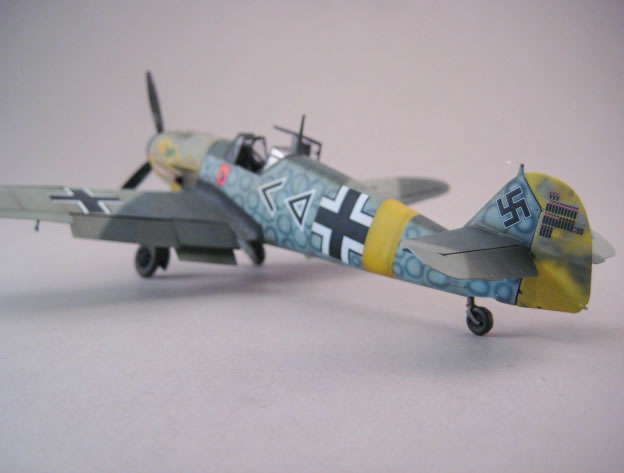
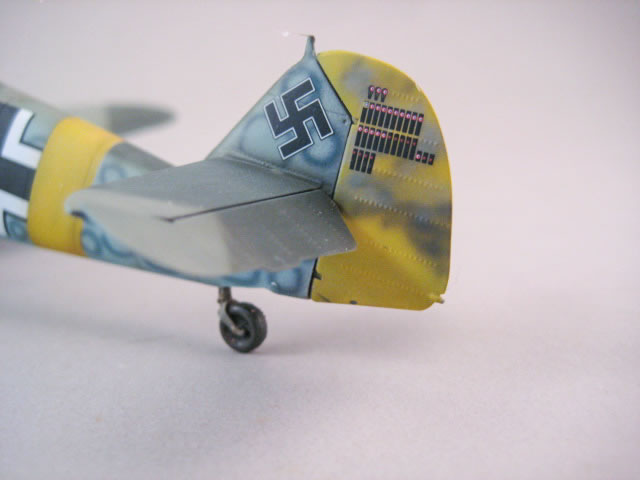
There are decals for five different aircraft. They range from the white washed aircraft of Hptm. Hans Phillip to the squiggly pattern of JG54 to the ‘normal’ aircraft of the Channel and Russian Front. One aircraft is an F-2/b of JG51 which is the bomber variant of the F-2. This is where those SC-50s come into play. The decals themselves come on two different sheets. One is stencils, which is superb, and the other sheet contains the markings. The stencils are the best that Eduard has produced. The red and black wing walk area ‘dashes’ are very small and look the best of any I’ve seen. All the writing can be seen. All the decals are printed by Eduard and they are very thin and in register. The marking sheet features beautiful colors and color saturation. There are swastikas provided if you are in the US. In case you don’t have them there are two part swastikas included.
The instruction book is printed in color on high quality paper. Color callouts are in the Gunze ranges. I did notice that the instructions forget to mention to add I9 to fill the holes in the bottom of the wings, which the Friedrich didn’t have.
But does it all work together? Let’s see.
The build starts before you cut parts from the sprue. It is important to figure out which aircraft marking option to figure out what needs to be added. On this model there is the option for the bomb rack. I liked the offerings in the kit but I had something different in mind. I elected to use the EagleCal decals for my aircraft. Now that I had decided what I wanted to do it was time to get building.
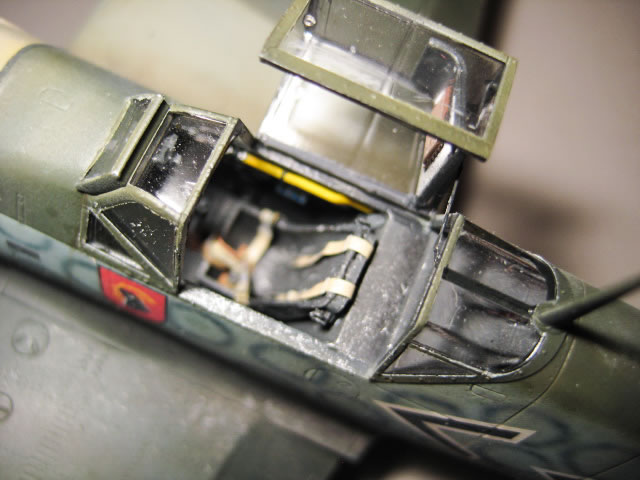
Like most kits this one starts in the cockpit. The cockpit is very complete. The photo etch parts work perfectly. I had the new Brassin F Early seat so I elected to use that in this build as well. I painted the cockpit Tamiya Dark Grey. I then added a wash of black artist oils and RLM 02 dry brushing. Silver pencil and some sponge weathering were added to ‘age’ the cockpit. The seatbelts were from the seat set and worked flawlessly.
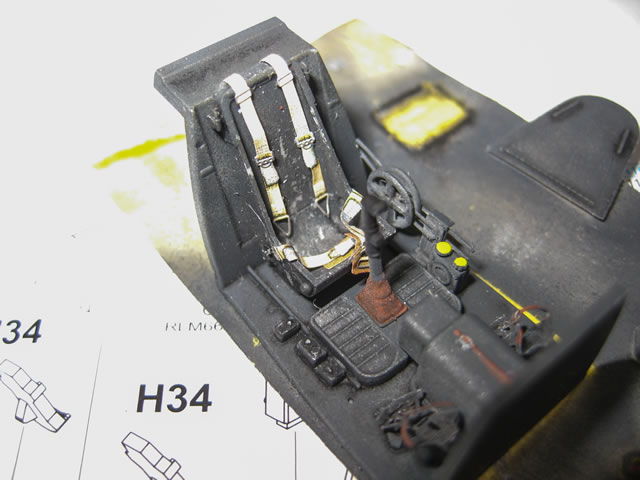
Brassin landing gear were going to be used and in that set is a tail wheel assembly that has to be installed prior to joining the fuselage halves. I like to install the support for the instrument panel now and then after it has dried in place I then build up the pre-colored photo etched panel. This ensures that the panel fits perfectly and aligns everything. I then flat coat the instrument panel and let it dry. A drop of Krystal Kleer is added to the instruments to replicate the glass faces. It also helps to hold the panels together. Once that is done the two halves are joined and they fit perfectly.
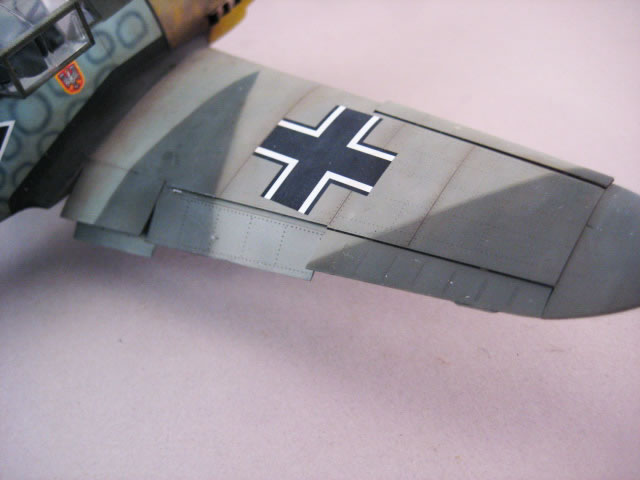
While that was drying I went to work on the wings. These fit perfectly. I wanted to add some of the photo etch pieces from the PE set. The landing gear troughs are a nice addition and just like the real thing. I used my Small Tool photo etch bending tool to get it to fit. There is nothing to say about the wings except they fit perfectly.
Adding the wings to the fuselage was no problem at all. The key is to make sure the wings are flush with the fuselage. Eduard has put this join arbitrarily in the middle of a panel instead of on a panel line. If you aren’t careful you may need to add some filler. I did not. Just a couple of swipes with a sanding stick and the join vanished.
The tail planes were added. I elected to use the Brassin flight controls and flaps. These were added at this time. I lowered the elevators slightly for some visual interest. The rest of parts worked out well. The inner flaps on the Friedrich have a very unique boundary layer set up. This required some folding of photo etch to fit to the upper flaps. This is a key feature of the Friedrich.
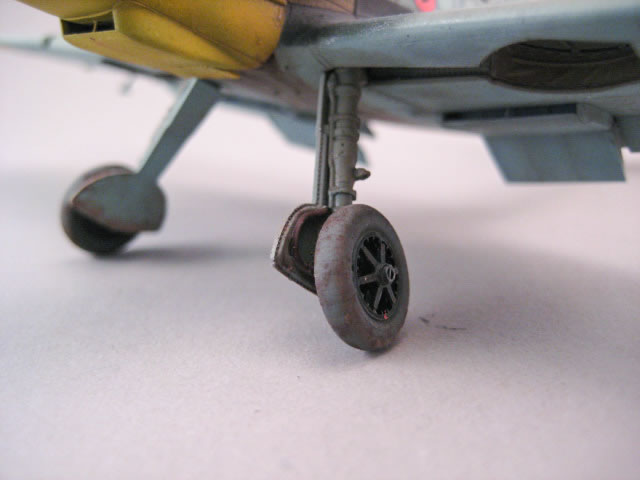
I added my Brassin landing gear at this time to protect the flaps from damage. They were attached with five-minute epoxy and allowed to set.
Canopy masks were added and the inside of the rear section was painted now. The interior masking was removed. This is important. Don’t add the canopy section without removing the masks. The front and aft canopy sections were added to the model in preparation for painting. Again they fit perfectly. The center section was used to ‘mask’ the opening and with the tape it was held securely in place.
With everything together, I wiped the model down with Testor’s Plastic Prep. This is key especially on the resin pieces. The cockpit area was sprayed with Dark Grey as it would show through. Then the entire model was sprayed with Alclad Grey Primer and Microfiller. One or two spots were touched up and reprimed. Dark Grey was used to pre-shade the entire model. I don’t stay in the lines. I used the lines and then I apply random sprays to break up the paint colors and provide a variation. The yellow portions of the model were then sprayed with Mr. Paint RLM 04. The yellow was allowed to dry overnight then masked off. A small amount of grey primer was added where there was overspray and Dark Grey added again. The model was then painted with Mr. Paint RLM 65 was sprayed where appropriate. Wait that must be a typo. No it isn’t. I looked at the pictures and think the colors were the early RLM 65/02 and 70. This was then oversprayed with a little RLM 71. That is my story and I’m sticking to it. The tonal qualities will prove me right.
Anyhow the RLM 02 was laid down on the wings and fuselage spine. I did add some of the mottling to the rudder. I left the masks on the forward cowling until I had the Tatzelwurm masks in place. RLM 71 was added to the one portion of the wing.
All the masks were removed. After tracing the Tatzelwurm I added it to the cowling and added the oversprayed mottling in RLM 02. Some minor detailing was done by msaking off the seal for the cowling and the exhaust area and spraying them Tamiya NATO Black.
I masked off areas for the wheel wells and landing gear legs and sprayed them RLM 02. The liner in the wheel wells were picked out with Tamiya Khaki. Then the entire model was given a coat of Tamiya Clear. I don’t think it really needed it with the Mr. Paint but you can’t be too careful, especially with my subject choice as the rings were all decals and on top of them were the other stencils.
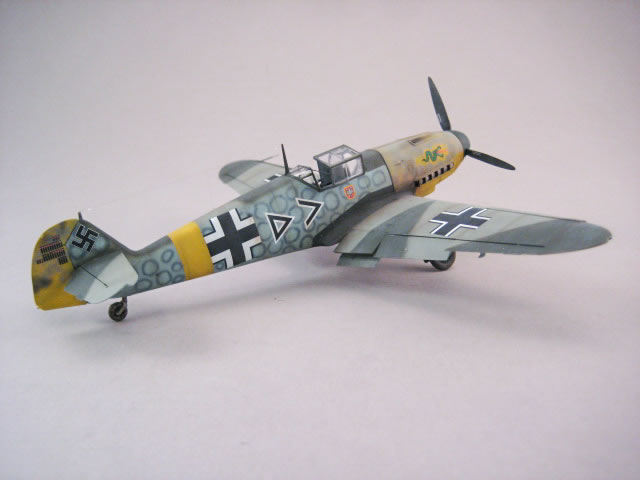
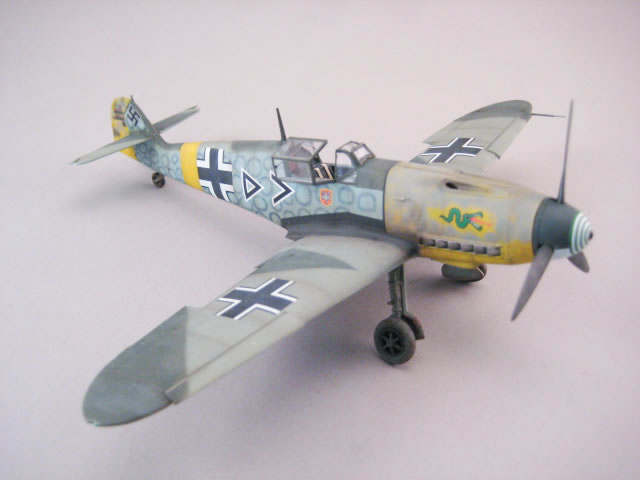
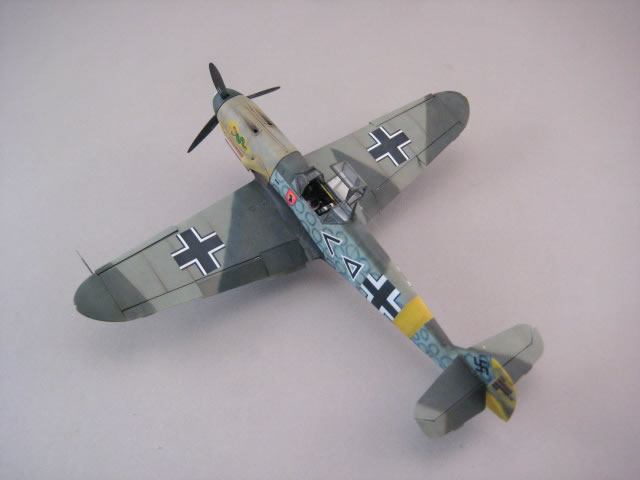
I’ve always wanted to build the ‘smoke rings’ of Hauptman Hans van Hahn. It is unique enough to be instantly recognizable. There is nothing wrong with the marking options in the Eduard kit but I thought now was the perfect time to see if the decals would work. EagleCal makes these decals with the ‘smoke rings’ in decal form. They go the entire length of the fuselage. I had to see if they fit the Eduard kit. I’m happy to say that they do. Some very minor trimming is required here and there but really nothing to worry about. I laid the smoke rings down and then added the national markings from Eduard. One thing I noticed was that the smoke ring decals appeared to be a little thick. I figured a coat of Future should make life good. After all the decals had been added a coat of Future was added to get the markings to level out. Then a coat of Alclad Klear Matte was added over that. The markings looked awesome. I was worried about the spinner decal but that proved to be a non-issue. I did touch up the ring closest to the cannon opening slightly but only slightly.
It was time to weather the model. I started with a wash of the panel lines with Burnt Umber artist oils thinned with turpenoid. Once that had dried a dot filter was added to the upper surface with Buff and Titanium White artist oils. Some burnt umber was added in areas such as the exhausts and where the mechanics would grab. These were blended in with a soft damp brush of Turpenoid. Working front to back on the wings and top down on the fuselage.
After that was done, chipping was added with a silver stamp pad and some sponge and silver pencils. Once satisfied the exhaust was added. I used a very soft small brush and some Mig Pigments for Dark Mud and Black Smoke. You have to build it up slowly so as not to overdue the effect.
Some burnt umber, burnt sienna and lamp black were added to the belly and streaked back with a brush that was damp with turpenoid. Again it is important to build this up slowly.
I added a very, very thinned streaking with Tamiya Buff from front to back and top to bottom to blend the model with any base I put it on. This thinned dusting coat was added to the tires as well.
On the belly I used Mig’s Mud effects in a brush and then flicked it with my finger to get the staining and mud thrown up from operating from a grass strip.
Finally some Mig Pigment Dry Mud and Dark Mud were added to the wing walk and tires. I sealed everything with another coat of Alclad Flat which sealed everything so I didn’t have to worry about fingerprints in the dust.
The masks were removed and they performed as advertised. I then added the canopy, antenna mast and antenna to bring this all together.
Overall these Eduard Bf 109s are fun, simple builds. This is the second one I’ve built of this version, the first being the Royal Class release. I can say without a doubt I’ll be building more. Many more. The fit is phenomenal. The only issue I have with the kit is where Eduard put the rear wing panel line which just requires some care to get correct. The rest of the kit is a dream.
The Profipack has everything that you need to build a great kit. Heck the Weekend Edition is a great value too. I love the photo etch instrument panel and the extra items for the cockpit. The extra PE fret is a nice addition as well. I did not use the PE flaps as I had the Brassin resin/PE ones to use but that fret is a worthy addition.
The Brassin items I used were great and fit perfectly. The landing gear were nicely detailed and easy to use. The Brassin wheels are a step above the kit ones. The Brassin control surfaces are easy to use but it is up to you if they add anything. They do make it easy to articulate the control surfaces though. I like them and will have no issue using them again. The Brassin Flaps are a requirement for this version.
The Friedrich has a very unique inner flap on the top and I liked the resin ones slightly better than the full PE ones in the PE set, but you can’t go wrong either way. The EagleCal decals performed well as I expected them to.
Bottom line, another winner from Eduard. You can literally build these Profipacks in a weekend should you choose to. The fit is perfect and all the stuff in them just makes the build that much more fun. The hardest part will be deciding on a paint scheme. I love Eduard’s Bf 109E/F/G kits. The look awesome built up. Some may not like the rivets. I do. Simple, fun and easy to build at a reasonable price. What is not to like? Keep up the great work Eduard. When will we see the G-10, G-6AS, or the Avia S-199? I can’t wait to see what is next.
Thanks to Eduard and IPMS/USA for the review copy. You can obtain yours by contacting Eduard directly at www.eduard.com or your local hobby shop on online retailer.
Model, Images and Text
Copyright © 2018 by Floyd S. Werner Jr.
Page Created 1 June, 2018
Last Updated
1 June, 2018
Back to HyperScale Main Page
|
 Home
| What's New | Features | Gallery | Reviews | Reference | Resource Guides | Forum |
Home
| What's New | Features | Gallery | Reviews | Reference | Resource Guides | Forum |