Revell's 1/48 scale
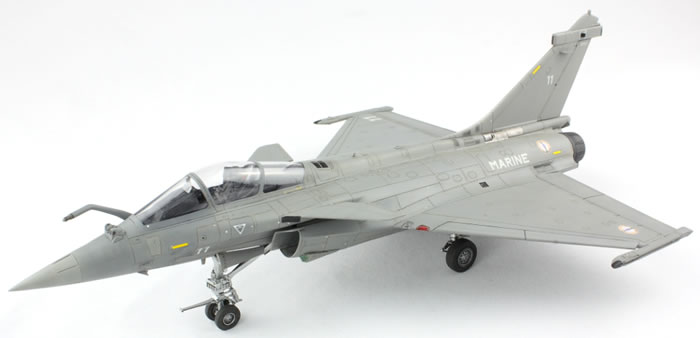
Dassault Rafale
by Jon Bryon
|
|
Dassault Rafale |

Hasegawa's 1/48 scale F-15E is available online from Squadron.com
At the turn of the millenium Revell produced a few kits which, in my opinion, were the apogee of their design prowess in 1/48. The F-86D Sabre Dog, F-15E Strike Eagle, F-84G/E Thunderchief (which I haven't built yet) and this Rafale particularly stand out; there may have been more. These kits were lauded for high levels of accuracy, great fit, superb detail and refined surface features. I bought the others as soon as I could, such were their reputations, but I held back on the Rafale since I knew it didn't represent a production aircraft.
However, on one summer's day in June 2002, whilst camping in Brighton, I came across this kit in a Model Zone for £14.99, which by anyone's measure, must be considered a bargain.
Years passed and the Rafale sat in my stash. In about 2007 I ordered the Wolfpack Rafale M Mass Production set, which I assumed would contain all the parts I'd need to get an in-service Rafale. After all, how many differences could there be?
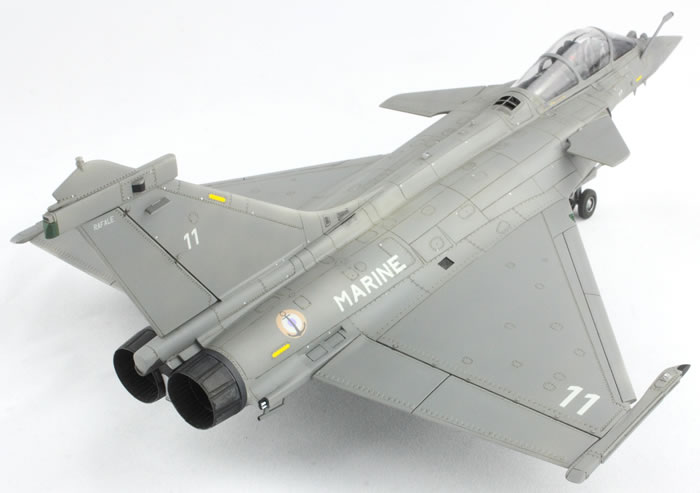
Well, it turns out rather a lot. This year the Rafale rose near to the top of my 'to-build' pile, and I fancied an easy ride, so launched into the kit with some aplomb. And then I began to uncover a whole list of issues with the kit, which continued right up until completion, and hence the finished product is still less accurate than it could have been. In the event that you are as ignorant of the finer details of the Rafale as I am, here is a list of all that needs to be corrected to get an in-service machine from 2007:
(I should, before commencing, mention that I was building the first issue of this kit. I know that subsequent editions, including the B model, have updated moulds that do much better reflect a production Rafale. Since I don't have a newer boxing, I'm afraid you're on your own in figuring out which corrections you do or don't need to make to the later kits.)
In no particular order:
-
The wing tip pylons in the kit need updating. The Wolfpack set provided these in resin.
-
The chaff dispensers on the upper rear fuselage are missing. Wolfpack provides these in resin.
-
The canon cover in the kit is the wrong shape. Wolfpack provides a resin replacement.
-
The gun vent is missing. Wolfpack provides a resin replacement, but it is the wrong shape for a Rafale in 2007. I discovered this too late to do anything about it.
-
I am pretty sure the panel line for the nose is too far forward. Wolfpack provides a resin replacement with some updated detail (overdone in my opinion) that unfortunately replicates the error. Again, I discovered this too late, and it creates the illusion the model has a nose that's too pointy.
-
The refuelling probe sits at the wrong angle in both the horizontal and vertical dimensions. I didn't do anything about this, but wish I had...
-
The kit would have you add a pitot to the port side of the nose (part 75). This is not on the real aircraft.
-
Some small protrusions on both sides of the front fuselage, under the windscreen next to the slimelights, are missing in the kit. I added these from scrap styrene.
-
The light on the spine is in the wrong place. I discovered this too late.
-
The forward ECM transmitting antenna (the front of the 'box' towards the top of the tail) has a circular panel that isn't on the real thing. I sanded it off.
-
The vertical protrusion (not sure what it is) at the very top of the tail is too big. I left it alone.
-
The aft ECM transmitting antenna (at the rear top of the tail) is completely the wrong shape. I modified by sanding and adding some scrap styrene.
-
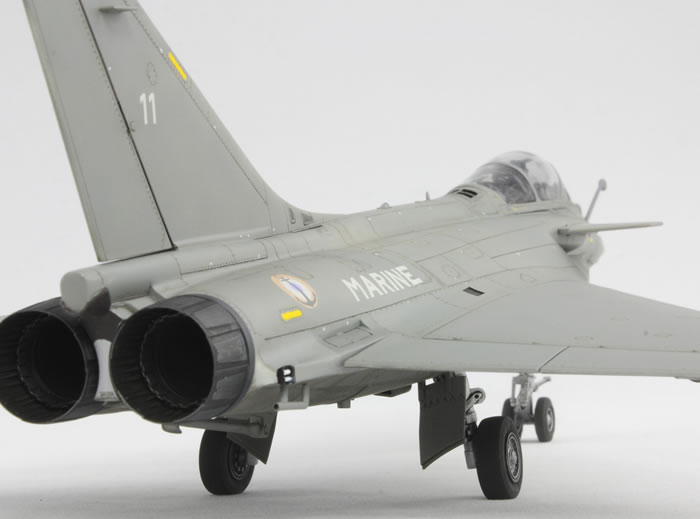
The very tip of the rear fuselage, which is a kind of cylindrical structure between and above the engine exhausts, should have a dark coloured shield-like cover, which I presume is some protector from the engine heat. Whatever it is, it's not on the kit and rather prominent. I added it from thin sheet styrene and replicated the shape by sticking masking tape to the kit, drawing the shape on and then transferring it to the plastic sheet.
-
The sides of the rear fuselage, in between the trailing edge of the wing and the engines are technically correct. However, the Rafale I was modelling had (as do many) the SPIRALE countermeasure equipment installed here. These are provided in another Wolfpack set (not the one I had) and in later Revell boxings. I, unfortunately, had to make mine from scratch. I used sections of bracing pylons from an old Academy MH-60 Black Hawk for the basic structure, faired into the fuselage with Milliput. The ends were shaped with a cut out, and fine plastic rods sanded to a half-round section were added to complete the detailing. It's somewhat crude, but better than not doing it at all. After I'd done it all I discovered (of course!) that I'd got my dimensions wrong and they don't extend to the rear far enough. Oh well; you win some, you lose some!
-
The 4 pitch and yaw sensors under the nose are all missing. Revell has moulded location holes, and show them on the painting diagram, but they were not in this kit. I presume later boxings have them. I cut up some photo-etched Sidewinder fins, which were a good match, and superglued them on at the end of the build.
-
At the junction between the upper wing and fuselage on the starboard side there should be an intake. This is quite prominent, but missing in the kit. I didn't add it.
-
The light under the intake shouldn't be there. I realised too late...
-
The surface detail at the very tail of the aircraft, in between the engine exhausts, is incorrect. I filled it all in.
-
I think Revell has moulded an extra grill on the starboard side at the front of the base of the tail. I discovered this late and didn't bother confirming.
-
The kit instrument panel is not accurate for a production Rafale M. I left it alone.
-
The kit decals for the 'in service' aircraft are fictional. I would need replacements...see below!
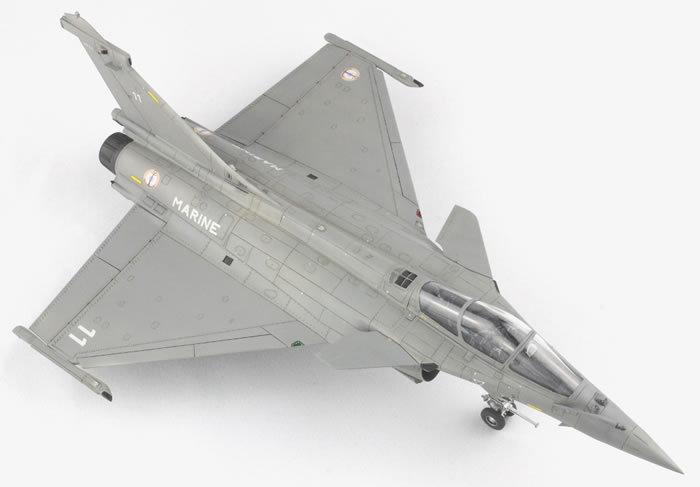
I think that about covers the plastic. The list grew slowly during the course of the build and decisions as to what to bother with were usually made on how far along the model was. In the end, I'm pretty happy that I have a substantially more accurate model than if I'd done nothing!
Construction is, thankfully (given the length of that list!), straightforward. The cockpit is well appointed and I didn't spend that long on it as I knew I would close the canopy. I lost the HUD and had to form a new one from the spares box. The angle at which the seat should sit is not obvious, so I left the seat out until I was ready to attach the canopy to ensure they didn't foul each other.
The fuselage is horizontally split, and fitted reasonably well. Before joining I used some black-painted plastic card to prevent see-through from the vents on the rear underfuselage. Lots of prominent surface detail is cut by the seam and difficult to replace, especially around the nose where the curves are very sharp. The slimelights in particular are hard to preserve. I separated the canards from each other so they could be added at the end. The tail and spine fit pretty well.
Many construction articles in magazines and on the web complained that the fit of the intakes is poor. I actually found it to be quite good and had no major seams to deal with. Where the intakes meet the fuselage in the very centre of the underside is inaccurate, but looks neat, so I left it.
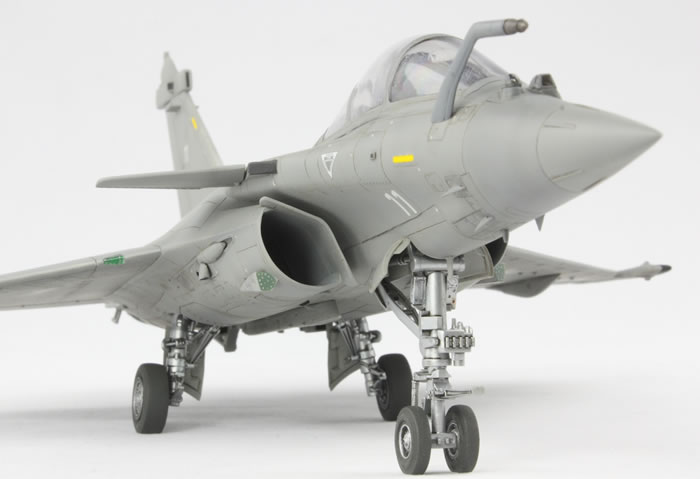
A much bigger problem with the intakes is that there is no trunking, just a gaping hole into the fuselage. It's a difficult hole to close off because it's a very irregular shape. I eventually managed to create some plastic card blanking plates that I inserted from the rear of the intakes before attaching them. Painted black they prevented any see-through into the fuselage.
The wings fit well, and I attached the upper halves to the fuselage before the lower wings. There was a small gap underneath that I filled with slivers of plastic card; the upper side had no gap. The engineering is nicely done such that seams on the trailing and leading edges are minimal. Three clear lights are added to the leading edges; these fit quite poorly and I used superglue to fair them in. The wingtip pylons were cut off and replaced with the Wolfpack resin items, which fitted beautifully.
The resin nose was another matter, and was too small in diameter. I used a spacer of plastic card to help, but on the model you can still see an imperfection in the transition. It's also not clear which orientation the nose should be fitted in. I did it right, thought I'd done it wrong, snapped the nose off and reattached it, then realised I'd done it wrong again, snapped it off again and did it right for the second time... Having said all that, the Wolfpack resin is very nicely cast and easy to work.
Looking ahead through the instructions it was clear that the undercarriage is very complex. The aperture for the main gear is very small, and there's a lot to fit in. For better or worse, I decided to build all the undercarriage units in situ, without gluing the legs in so the completed units could be removed for painting and finishing. Test runs showed that this would be possible, although I confess that at the end, squeezing the completed main gear units into the small void was 'interesting'. I think it was worth it though, and at this stage the completed undercarriage was painted Mr Color Gun Chrome. For the first time I tried using a wash made of Tamiya acrylic gloss black heavily thinned with Johnson's Klear. I really liked this wash and will use it again in the future. The wheels are nicely detailed and I tried a new technique on the hubs: the whole wheel was painted with Lifecolor's Tyre Black and then the hubs drybrushed with Humbrol 11 Silver. I very much like the effect and shall try this again for silver/aluminium wheels in the future.
The IR and TV sensors ahead of the windscreen fit well. They are slightly clumsily moulded compared to the real thing, but fine for 1/48. Wolfpack provides a blanking plate here, but I couldn't find images of production Rafales in 2007 without these sensors.
I didn't want to arm my Rafale, and was happy to settle for no underwing pylons. Someone in America needed them, and I was only too happy to send them off. Unfortunately I completely forgot to fill the holes for the rear underfuselage pylons. They are very small, so unnoticeable unless you're looking for them!
By now I had a complete airframe and just needed to add and mask the canopy. This I did with Tamiya Extra Thin cement, and found the fit to be pleasantly good. I didn't add the canopy mirrors (part 73) since I couldn't get them to seat well, and it's not noticeable. Masking was done with Tamiya tape and aided by small die-cut masking circles made by Gunze Sangyo on a sheet; these allow the tight curves to be masked accurately.
Thoughts now turned to finising. As mentioned above, the kit decals are useless. The Rafale M is not well served by aftermarket decals; most sets are extremely expensive, unavailable, or only give a couple of options amidst loads of other aircraft I'm not interested in. Fortunately, a very kind chap called Stephen on Britmodeller offered to send me a Rafale option from Model Alliance's World Airpower Update No.2. These included the main markings, but no stencils, for Rafale M #11 in 2007 or 2008 (you could choose). Thanks Stephen!.
Model Alliance's instructions, and Revell's, recommend FS36375 as the main airframe colour. When making the intakes I'd sprayed this colour onto the fuselage in the areas that would be hard to reach later and found it far too blue and pale compared to the good photos of #11 in 2007 and 2008 on airliners.net. After much searching on the web, I came across someone who'd painted a Rafale in FS26231, which is much darker. His model looked much closer to the photos, so I used the Mr Color version (317) and was very happy with the match.
I primed the model with Mr Base White and then masked off some panels to be painted with Mr Color Gloss Black; some panels were clearly darker in the photos and I attempted to reproduce that with pre-shading. Mr Color 317 was then misted over in thin coats. It didn't work terribly well, and I ended up re-masking these panels and using Mr Aqueous Hobby Color Smoke to post-shade the darker panels. The radome and a couple of other panels were lighter, and these were sprayed a lighter grey (I forget which) before going back over them with thinned 317. A small panel on the tail ECM box was much lighter and airbrushed a pale grey. There's a metallic panel at the base of the port side of the fin which I finished in Alclad II Aluminium.
Various panels should also be black and dark green. The black I generally replicated using black bits of decal, since I could get much greater precision that way. The dark green was airbrushed on. Prominent rivet detail, especially on the SPECTRA ECM equipment on the intakes, was touched in using a pin and grey paint. Not as neat as I would have liked it to be!
Another very noticeable feature from the photos were white dots on various parts of the airframe, usually near rivets on panels. Using photos, many of these were added using dots of white paint. There should be many more, but I was going for the general effect.
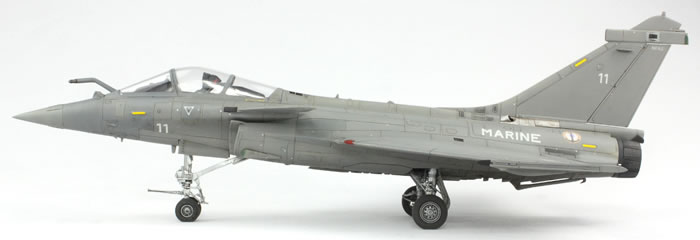
A coat of Johnson's Klear was airbrushed next in preparation for decals and weathering. I had no usable stencils, but the emergency canopy release markings are quite visible. I used the kit decals for these, and since they are far too bright, toned them down with an overspray of 317. As for the other stencils...I'd just have to live without them. Rafales are remarkably featureless anyway.
Time then to add the main markings! Expectations were high -- although I'd got them for free, they command a high price tag and looked very nicely printed. And they were superb decals, with not a sign of silvering and not really needing any setting agents (I used them anyway, of course!). They were tough, thin and in register. A real shame then they were so badly researched! The roundel colours are completely wrong, being more peach in colour than toned-down red. The 'MARINE' markings are the wrong shape and too big. The tail markings for Flotille 12F are, for #11, wrong as they should face left on both sides, not forward as supplied. I left them off to model #11 in 2007 rather than 2008, but I would love to have added them. The colours of the '11' markings and 'MARINE' are also far too bright and prominent. This may be because they were printed to look right against FS36375, but I think Model Alliance should have done a much better job in researching the colour of the airframe. To make matters worse, the decal numbering on the instructions is completely error-laden, and in this case it matters; the '11' markings, for example, are difficult to tell apart. In short, unimpressed.
My signature style of finishing thus far has been darkly highlighted panel lines with little other weathering. I make no apologies for this; it's a style I love to look at and I make no pretence that it is 'realistic'. But recently I've found myself drawn to try and replicate reality a little more. This has not been easy for me as I still really like my well-established style, and even after finishing this kit would love to see it on my shelf with the idealised black panel lines and little else.
Using the new Ammo Panel Line Washes I highlighted the panel lines with Deep Grey. This is more subtle than black, although will still be too dark for many. Moving surfaces were outlined in black. Using a brilliant photo of the underneath of Rafale #5, I set about reproducing the filthy rear underfuselage between the undercarriage doors and engine exhausts. This took place over several weeks with different layers of Lifecolor Tensocrom, Flory Models Dark Dirt, Ammo washes and neat oil paint of various colours. The staining is very specifically restricted to certain panels and has quite a distinctive appearance, which I believe I've captured quite well. Some subtle airbrushing completed this area. The rest of the airframe was left relatively clean. Photos of #11 from 2013 show a much, much dirtier airframe with plenty of touch-up painting, reminiscent of US Navy aircraft in the tactical paint scheme.
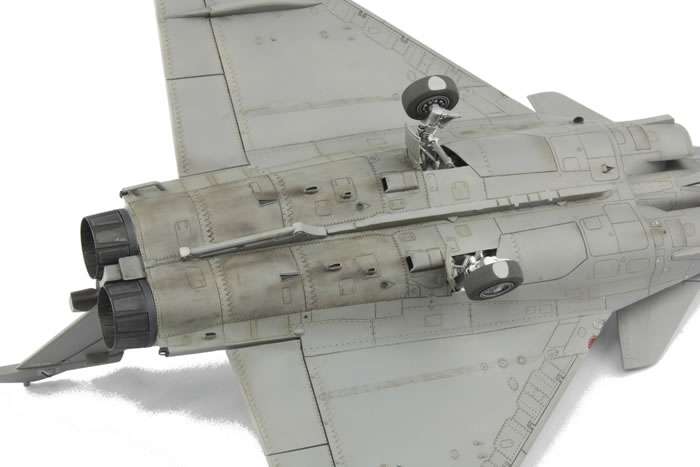
Distinctive staining under the wings where the main pylons are usually mounted was recreated by laying down masking tape and dabbing on Tensocrom burnt brown with a cotton bud, and then wiping it away almost immediately (this stuff dries so fast as to be almost unworkable). This matched photos nicely.
Once all that was done, the exhausts were added. These had been painted in Alclad II Steel and then washed several times with Tamiya Black Panel Line Wash. Photos showed these to be a matt black colour. Mr Aqueous Hobby Color Flat was mixed with a little Tamiya Semi-Gloss acrylic and sprayed over the airframe, including the exhausts.
Things had been going pretty well up till now. Spirits were high; there'd been no major disasters. Until I removed the canopy masking and wanted to throw the whole thing against the wall. There was fogging on the inside of the canopy. I was (and still am) utterly mystified by this. The canopy was glued on some time (many days, if not weeks) before it was masked without any sign of fogging. What happened in between masking and finishing? The only thing I can think of is that the engines were attached with superglue, and maybe fumes travelled up the fuselage, but even that seems a bit far-fetched. I am genuinely puzzled and frustrated, because I've no idea how to prevent this on the next model... I did mull over for quite a long time what to do about it, but none of the options looked attractive. The canopy was well and truly welded to the fuselage, so removal wasn't an option. I thought about drilling unobtrusive holes through which to pour Klear, but in the end decided that getting Klear through a tiny hole without it pouring over the whole model (or worse, cockpit) was impossible, and I'd still be left with a nasty hole to try and make good. I was defeated and just left it. I used to bath all my canopies in Klear and haven't done this for a while...maybe it's a step I need to reinstate.
Somewhat dejected, I set about finishing the model. The undercarriage was a tight squeeze, but fitted well. The main doors are a pain to mount as they are designed to be fitted closed, and they don't seat well. The little yaw and pitch vanes were superglued on, which was fun since they have nowhere to mount. The refuelling probe was last on and doesn't sit at an accurate angle. Were I to build this again I would pin the probe to the fuselage earlier on to try and get a better look.
And all of a sudden it was done. It's a good looking aircraft in my opinion, low-key but curvy. I like it clean and I like my attempt at finishing. One wing sits slightly lower (by about 2mm) than the other, which is because I didn't pay enough attention when attaching them to the fuselage. The decals are off in colour and design, but that's not terribly noticeable owing to the minimal markings. It's good. Except for that stupid poxy canopy which mocks me every time I look at the model and reminds me that it doesn't matter how good everything else is, one mistake (even if you don't know what caused it) is all it takes to undermine everything else. Oh well, there's always next time! For now, there's a Rafale sitting in my display cabinet, somewhere near the back...
To see more articles like this please visit my website at www.jonbryon.com/model_index.html.
Text and Images Copyright ©
2014 by Jon Bryon
Page Created 2 March, 2014
Last Updated
2 March, 2015
Back to
HyperScale Main Page

|
Home
| What's New |
Features |
Gallery |
Reviews |
Reference |
Forum |
Search