|
Mig-15
Profipack Edition
Eduard, 1/72 scale
S
u m m a r y |
| Catalogue Number: |
Eduard Kit No. 7057 – MiG-15 (Profipack Edition) |
| Scale: |
1/72 |
| Contents and Media: |
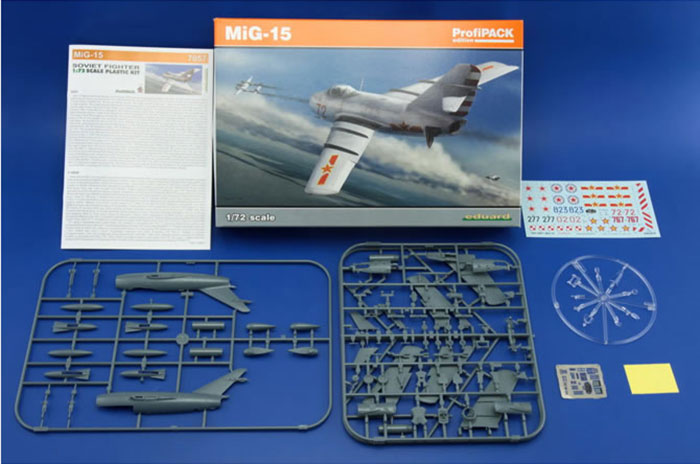
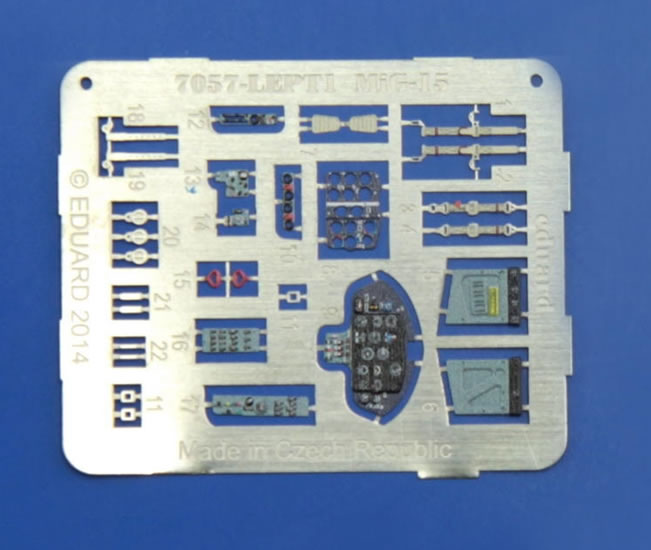
55 grey airframe and six clear styrene canopy parts, one coloured PE fret, a pre-cut paint mask, and decals for five subjects. |
| Price: |
Available on-line from:
Click for currency conversion. |
| Review Type: |
FirstLook |
| Advantages: |
Simply a superb kit. It is accurate, very well detailed, with top quality components, and great value too. |
| Disadvantages: |
There is no early ASP-1N gun-sight (but a minor quibble). |
| Conclusion: |
Eduard’s range of MiG-15 kits are the most accurate and best detailed 1/72 Fagots available. Whether you wish to build a MiG-15 or MIG-15bis in this scale, you would have to have rocks in your head to buy any other brand kit but Eduard’s, be it a Weekend, Profipack, or Dual Combo Edition (where you get one of each variant) Besides their quality, all packages are priced very competitively in my opinion. This a superbly engineered, top quality product, and one of the finest injected jet fighter kits in 1/72-scale produced to date. To find its equal in terms of out-of-the box detail and completeness you need to shop among the best resin kit makers like CMR and spend considerably more. But, if even more detail is your thing, Eduard still has you covered with its various Brassin PE detail sets. I cannot recommend this kit highly enough. |
Reviewed by Mark Davies

Eduard’s MiG-15bis Profipack Edition is available online from Squadron.com
The Mikoyan-Gurevich MiG-15 (Fagot) surprised Western forces upon its service debut, and outclassed the Western fighters it opposed in the Korean War until the United Nation fielded North American F-86 Sabres to counter it. Both designs were the amongst the first widely deployed swept-wing fighter designs, and both would achieve well-deserved iconic status.
The MiG-15 exploited captured German aerodynamic research and, just as importantly, a license-built British Rolls-Royce Nene jet. The latter came about as a result of late-1940’s British government lunacy to share technology in accordance with a wartime offer; despite the onset of the cold-war. Much of the credit is of course also due to the MiG design Bureau, as far more was involved than simply cobbling together other nations’ ideas.
The MiG-15 effectively founded a dynasty of jet-fighters, and one of the most widely produced aircraft ever; with around 18,000 built when licensed production outside of the Soviet Union is included. Without doubt, it is one of the most widely used post-WWII fighters, and introduced jet-powered warplanes to a multitude of air forces. Several still fly today in private hands as Warbirds, and perhaps there are still some two-seat MiG-15UTI trainer versions in military service somewhere.
Check out Wikepedia here for more insight into the MIG-15’s history, development and service.
Previous 1/72 MiG-15 Kits
Several kits have preceded Eduard’s MiG-15 kits in The One Truce Scale. Here is a quick summary based on my personal experience plus reading kit reviews and build articles (I will not distinguish between whether a MiG15 or MiG-15bis is represented):
-
Airfix – First try from 1958, long-run, very basic and inaccurate. They tried again in with a new long-run tooling in 2010 but should not have bothered; the new kit has heavy recessed panel lines and is still inaccurate in shape.
-
Dragon (re-boxed by Italeri & Hobbycraft) - From 1993, long-run, some nice detail but covered in recessed rivets, very inaccurate wing, fuselage and undercarriage both a bit too short.
-
Gran - From around 2006, classic limited run, but generally accurate.
-
Hobby - Boss From around 2007, long run, modern easy-build, generally accurate (also offered a UTI 2-seater).
-
KP/Korpro (re-boxed by Mastercraft) - From the 1970’s? Long-run with fine raised detail, generally accurate, moulding in very hard plastic, often with flash, for many years the benchmark for Fagots (also offered a UTI 2-seater).
-
Panda – From the 1960/70’s judging by its appearance, long-run, simplified detail and inaccurate.
-
Zhengdefu – From about 2000, long-run, under-scale (it is about 1/77), heavy recessed surface detail, basic and inaccurate for 1/72-scale.
-
There have also been MiG-15 kits from, Charmore, Coma/Aermech (1/69-scale), LFI MZMPI, Nitto, Vacukit, and ZP Ruch; all of which I know nothing about, except that they rate as insignificant.
As things stand, the best readily available Fagots are from China, with Hobby Boss’s two offerings. Despite their many good points, their simplicity leaves the field open for a company like Eduard to deliver us a kit that the MiG-15’s iconic status deserves.
The Contents
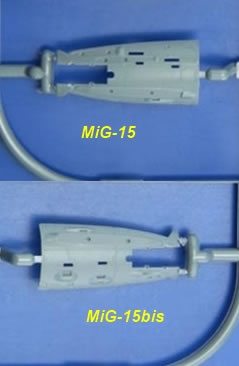
Numerous variants of the MiG-15 were produced, but aside from the two-seat trainer versions, the differences are not that readily apparent as many differences are either internal or externally very subtle to many. The two most significant fighter variants are the MiG-15 and improved MiG-15bis. Eduard has issued kits of both of these, appearing in several boxings, including Profipack, Weekend and Dual Editions. Brett Green took a “First Look” at Eduard’s MiG-15bis Profipack Edition here on HyperScale in February this year. All but the sprue with the fuselage halves are common to both kits. I believe that a MiG-15UTI is planned as well.
The parts come in a top-opening box and are enclosed in resealable cellophane bags, as is the coloured PE fret (with card stiffener) and pre-cut paint mask.
The decals are loose in the box with their tissue-paper protective covering. The instructions are provided as a glossy colour printed booklet. They include a parts map and have very clear and easy to follow drawings. English is used throughout. Paint colours are cross-referenced to Gunze’s Aqueous and Mr. Color paint ranges (stocked and sold by Eduard on-line), and detail colour call-outs are provided throughout. A copy of the instructions can be down-loaded or opened as a PDF by clicking here.
The Kit
The kit is straightforward with a conventional parts breakdown, and is well-engineered. Parts are crisply moulded with delicate recessed surface detail, and include some quite delicate pieces. There is just the tiniest hint of the mould seam in one or two places however. It is not enough to be called flash, but it does mean this kit is just not quite as crisp as a Tamiya kit is, for example, despite initial appearances. These tiny seams were only apparent to me under magnification.
The cockpit is very well detailed for the scale, in part due to the use pre-coloured PE, although this is optional in the case of the instrument and side panels, where decals may be use instead (most will opt to use the coloured PE I think). There is a very nicely done seat, detailed control column, PE rudder pedals and various small controls. The cockpit and nose wheel-well are enclosed within the intake trunking as per the original plane. I think that the cockpit will look superb when finished, despite its small size.
A lengthy two-piece jet-pipe is blanked of by a turbine face, although I think this would only be visible with the aid of a torch. The cockpit and jet-pipe sub-assemblies are enclosed in the fuselage halves along with the separate rudder.
The forward underside from the wing leading-edge to the nose-ring is a separate piece; this provides the nose wheel-well, three gun mounting points, and ejection chute detail for the two 23-mm cannons. The instructions identify the need for nose ballast to be placed under the cockpit floor to prevent tail-sitting, but I would advise to include some more right behind the cockpit as well to be safe, as the under-floor space is quite small. The nose ring caps this area off, but only after fitting a clear part to form the front of the intake spitter. This is a clever touch, as being clear it enables the intake landing-light to be realistically represented. There is a pre-cut mask to cover the light, which would otherwise be a small and tricky shape to protect from paint – Well done Eduard! The three canons are moulded as barrels and their fairings, and these simply fit to the nose underside.
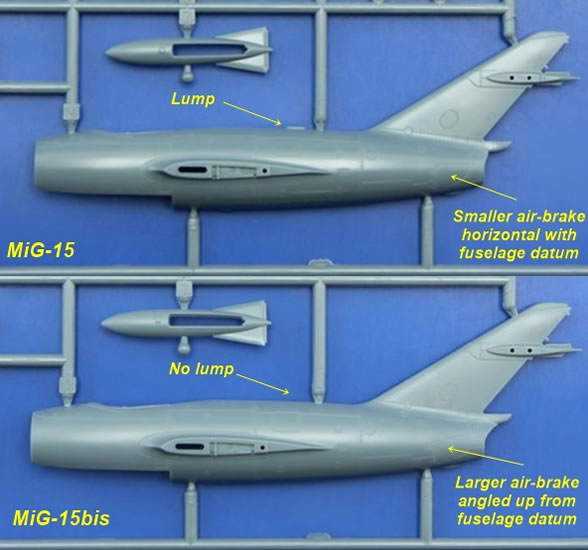
There is a clear circular cover to fit to the rear ventral fuselage which on the real machine covered the ARK-5 radio-compass fitted to late MiG-15’s (and standard on the MiG-15bis and UTI). I suggest filling in the panel lines surrounding this cover and over-painting it if you are making an earlier MiG-15. As it happens, none of the colour plans show this clear cover as present. If you do need use it I think that the small bulge ahead of the tailfin should be removed as I believe that the ARK-15 replaced the RPKO-10M radio semi-compass that the bulge represents (if in doubt, check your references where possible).
There is a clear part for the gun-sight, which is clearly an ASP-3N gyro-site (a copy of the US Mk.18 captured in Korea), rather than the more primitive ASP-1N sight fitted to the MiG-15 initially. This looked like a British Mk.2D, or similar to that seen in many WW2 Soviet piston-engined fighters. No doubt the later sight was retrofitted to MiG-15’s, but I think for a Korean War example or other early example that an early-style site should be used.
The two-piece canopy is acceptably thin and very clear. There is a clear armoured-Glass panel behind the pilot’s head-rest and rear decking to fit inside the sliding portion of the canopy. Eduard provides alternate decking depending on whether you model the canopy open or closed. I think that this is a practical measure due to moulding limitations and the need for the canopy to sit correctly in either position (there is a diagram illustrating this). The important thing is to decide which way you intend to display your model before cementing the decking inside the canopy. I should also mention of course, that being a Profipack Edition the kit has pre-cut paint masks for the canopy.
All that remains for the fuselage is to fit the antenna mast; possibly a dorsal blade antenna (depends on the markings option selected), plus the nose wheel and its doors. The nose-wheel and it leg are one-piece, as to be expected given its size, but it still looks very finely done indeed.
The wings are divided into top and bottom halves, with the trailing-edge for both moulded with the top piece to provide a sharp finish. The instructions advise which of the partial holes in the lower wing halves to fully penetrate to locate the drop tanks if wished. The two single-piece tailplanes simply locate onto the tailfin. Two of the colour scheme options require a shallow circular “bite” to be removed at about 40% chord from the upper edge of the inboard wing fences. Unfortunately, Eduard does not give dimensions for this, but they do provide an over-scale drawing for guidance. They do however give dimensional guidance for the insertion of the wing-mounted pitot, which is a nice touch.
The wheel wells are boxed in and feature moulded detail on the inside of the wing. The main legs are very nicely done, and are garnished with some PE details. There is a choice of wheel hub style, but the choice is not cross-referenced to the markings options. The undercarriage doors are nicely detailed, and the instructions include a couple of detail sketches to guide the angled placement of the doors.
The sheer quality of Eduard’s moulding is apparent from the accompanying images and supported by Brett’s review I linked to earlier. Kits like this make Eduard for me in many ways Tamiya’s closest rival, almost their equal (Tamiya moulding is just a bit crisper), when it comes to 1/72-scale aircraft kits. In fact, some might say, that in this scale at least, the coloured PE and paint-masks put the Czech brand ahead of the Japanese one. If this is not enough for you then Eduard offers extra resin and PE detail from it Brassin and various PE ranges; take a look by clicking here.
MiG-15 & MiG-15bis Differences
With the MiG-15bis numerous internal changes were made, so it is worth mentioning these so as to point out those that Eduard has captured with its kits of the two main fighter variants. Of course, it is the external changes are those most significant to modellers, and the key points to note in 1/72-scale are:
-
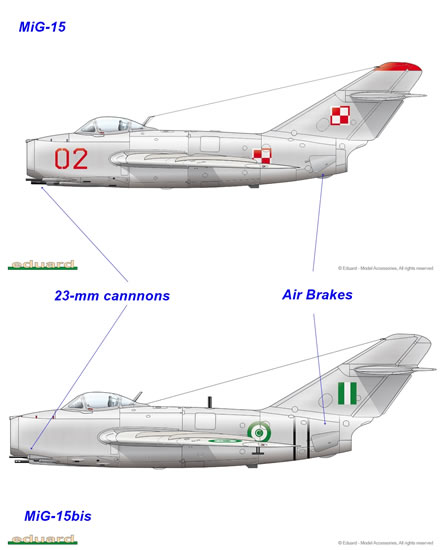
A change in the type and installation of the two 23-mm cannons (from NR-23 to NS-23) in all but the earliest production bis variants. The external difference being shorter fairings over the NS-23 cannons of the MiG-15bis and bulges around the case ejection chutes, when compared to the MiG-15’s NR-23 installation.
-
The MiG-15bis had a slightly larger jet pipe associated with its more powerful VK-1 engine (replacing the RD-45F), as well as a subtly different tail-cone.
-
Deletion of the earlier version’s landing light integrated with the air-intake divider to underside of the port wing just ahead of the wheel-well at the wing-root.
-
The MiG-15 bis had a rectangular clear panel covering a MRP-48P Marker-Receiver on the ventral rear fuselage.
-
All but late MiG-15 had a small bulge for the RPKO-10M radio semi-compass on the dorsal rear fuselage, whereas late-MiG-15 and all MIG-15bis had this replaced by a clear circular panel on the ventral rear fuselage following a change to ARK-5 radio compass.
-
In the MiG-15bis the gun-sight was changed from the MiG-15’s ASP-1N to an ASP-3N. The former was apparently similar to the RAF’s Mk.2D, whilst the latter was a copy of the early USAF’s Mk.18 gyro-stabilized sight used in the F-86.
-
Some MiG-15bis modified to fighter-bombers and were equipped to carry underwing payloads (MiG-15bis IB, SD-21, and SD-5).
All of these differences are reflected in Eduard’s MiG-15 and MiG-15bis kits as far as I can tell, except Eduard has missed supplying the ASP-1N gun-sight initially fitted to the MiG-15. I also mentioned earlier about the possible need to fill in the panel lines surrounding the ventral clear panel over the radio compass, something not mentioned in the review kit’s instructions, but it is mentioned for the MiG-15 kit in the Dual Combo Edition.
Engineering to accommodate the differences between the early and bis variants has not affected the complexity of kit’s breakdown. All the parts variations required are taken care of within what could be considered logical engineering to mould the shapes required, regardless of variant. In other words, you either use the parts intended for one variant or the other, and these are designed in the same way they would have been were there no choice to be had.
Marking Options
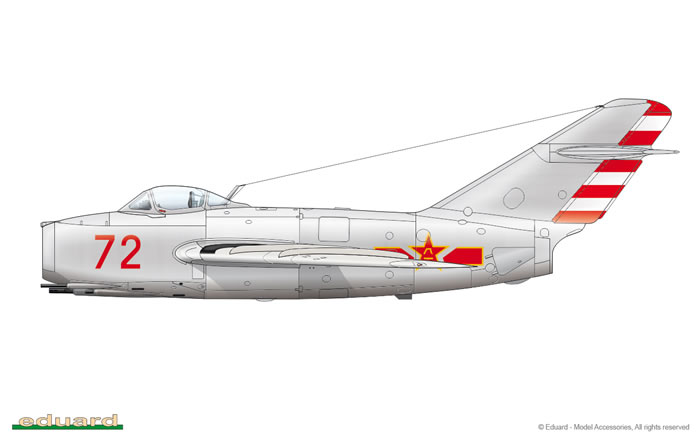
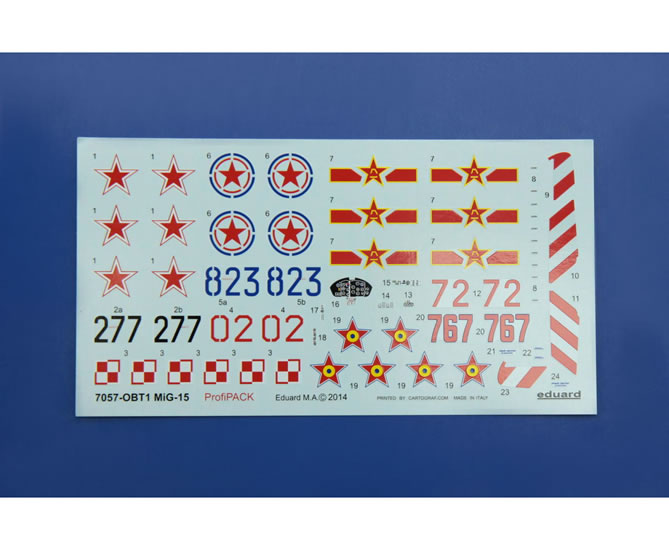
The Cartograf-printed decals look to be of superb quality, and the kit has five colour scheme options:
-
29th GIAP, Dachang Air Base, Shanghai, China, spring - summer 1950.
-
c/n 231767, Romanian Air Force, Deveselu Air Base, 1962.
-
Polish Air Force, 1st PLM, Warsaw - Babice Air Base, 1951.
-
c/n 108023, 176th IAP, Antung Air Base, Korea, April 1951.
-
c/n 120077, flown by Major Alexei A. Mikoyan, the Deputy CO of 274th IAP, Kubinka Air Base, early 50s
Eduard’s range of MiG-15 kits are the most accurate and best detailed 1/72 Fagots available. Whether you wish to build a MiG-15 or MIG-15bis in this scale, you would have to have rocks in your head to buy any other brand kit but Eduard’s, be it a Weekend, Profipack, or Dual Combo Edition (where you get one of each variant). Besides their quality, all packages are priced very competitively in my opinion.
This a superbly engineered, top quality product, and one of the finest injected jet fighter kits in 1/72-scale produced to date. To find its equal in terms of out-of-the box detail and completeness you need to shop among the best resin kit makers like CMR and spend considerably more. But, if even more detail is your thing, Eduard still has you covered with its various Brassin PE detail sets.
I cannot recommend this kit highly enough.
Thanks to Eduard for the sample
Review Text & Black Background Images Copyright © 2014 by Mark Davies
Page Created 1 July, 2014
Last updated
2 July, 2014
Back to HyperScale Main Page
Back to Reviews Page |
