Valom's 1/72 scale
Handley Page Hampden
by Roger Hardy
 |
Handley Page Hampden |

Airfix's 1/72 scale Handley Page Hampden is available online from Squadron
S
u m m a r y |
| Catalogue Number: |
Valom 72033 H.P. Hampden B Mk.1 |
| Scale: |
1/72 |
| Contents and Media: |
79 parts of grey styrene arranged over two sprues, 1 sprue of transparencies containing 13 parts, 1 fret of photo-etch for 22 parts, an acetate film and decals for two subjects. |
| Price: |
Purchased online from Hannants for £29.20 plus shipping |
| Review Type: |
Build Review |
| Advantages: |
Cleanly moulded short run kit with engraved panel lines and control surfaces. Accurate. |
| Disadvantages: |
‘Approximate’ main undercarriage installation. Transparencies not very transparent and poor fit. No slots for the machine guns. Modelling experience is required. |
| Conclusion: |
Generally a reasonable kit that, with a little care, can deliver an acceptable model of the Hampden. Recommended, but with reservations. |
 History History
The Handley Page HP.52 Hampden was a British twin-engine medium bomber of the Royal Air Force serving in the Second World War. With the Whitley and Wellington, the Hampden bore the brunt of the early bombing war over Europe, taking part in the first night raid on Berlin and the first 1,000-bomber raid on Cologne. It was designed to the same requirement as the Wellington. The newest of the three medium bombers, the Hampden, known as the "Flying Suitcase" because of its cramped crew conditions, was still unsuited to the modern air war and, after operating mainly at night, it was retired from Bomber Command service in late 1942. It was powered by two Bristol Pegasus XVIII 980HP radial engines.
The Mk I had a crew of four: pilot, navigator/bomb aimer, radio operator and rear gunner. Conceived as a fast, manoeuvrable, "fighting bomber", the Hampden had a fixed .303 in (7.7 mm) Browning machine gun in the forward fuselage. To avoid the weight penalties of powered-turrets, the Hampden had a curved Perspex nose fitted with a manual .303 in (7.7 mm) Vickers K machine gun and two more single .303 in (7.7 mm) Vickers K installations in the rear upper and lower positions. The layout was similar to the all-guns-forward cockpits introduced about the same time in the Luftwaffe's own medium bombers, notably the Dornier Do 17. The guns were thoroughly inadequate for defence, consequently, by 1940, the single guns had been replaced by twin Vickers K guns.
The fuselage was quite cramped, wide enough only for a single person. The navigator sat behind the pilot, and access in the cockpit required folding down the seats. Once in place, the crew had almost no room to move.
A total of 1,430 Hampdens were built: 500 by Handley Page, 770 by English Electric at Samlesbury in Lancashire; and in 1940–41, 160 in Canada by the Canadian Associated Aircraft consortium (although some were retained in Canada, 84 were shipped by sea to the United Kingdom).
http://en.wikipedia.org/wiki/Handley_Page_Hampden
The Kit
This model was reviewed in the box for Hyperscale by Peter Mitchell in 2008 at:
ttp://www.hyperscale.com/2008/reviews/kits/valom72033reviewgp_1.htm
so I won’t repeat it here. My first impression was that it looks very good and showed how each new issue from Valom is an improvement over the previous one. I don’t mind the surface detail because it tends to get reduced by the Alclad primer that I use and I’d rather see indented rivets and panel lines than a smooth surface. The moulding is flash-free and very crisp, as opposed to the normal soft moulding we are used to with limited run kits. Also, the moulding gates are quite fine so, less cleaning up to do.
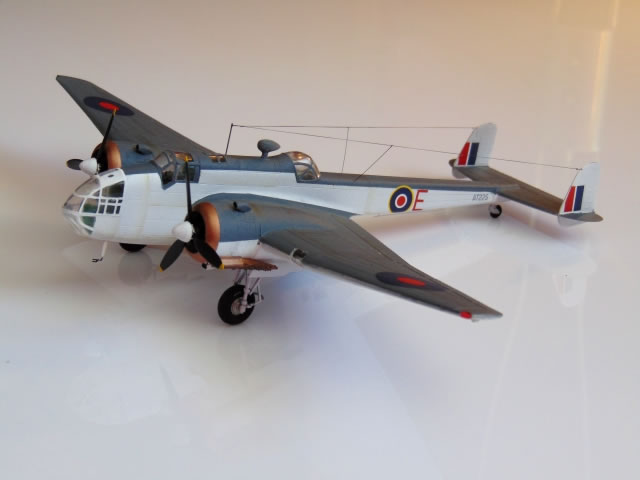
Overall, apart from the lack of locating pins, it looks like a mainstream model and a lot better than the old Airfix kit. I fancied making the grey & white Coastal Command aircraft that dated from 1943, well after the time when the Hampden had been withdrawn from front-line bomber service.
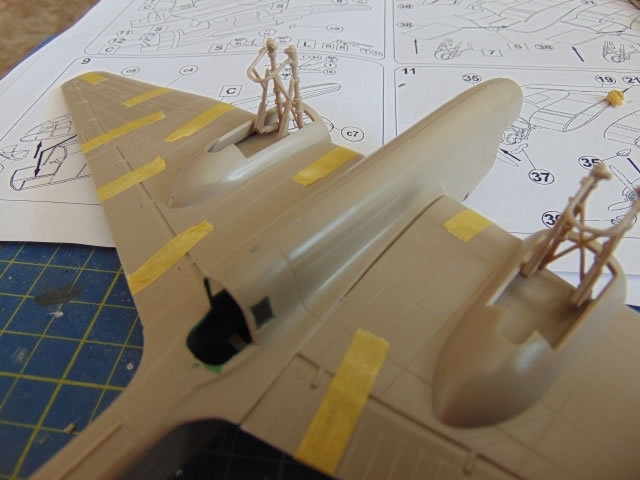
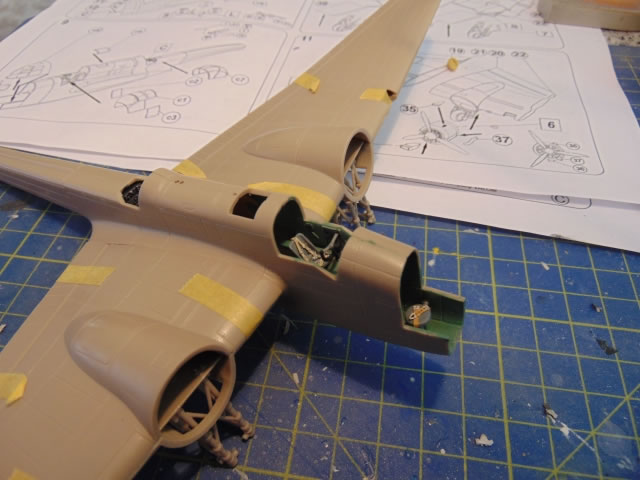
Construction starts with the cockpit which is adequately detailed. The transparencies are not that clear so a lot of detail would be wasted. When seated in the fuselage, my cockpit floor was off-centre but it was too late to remedy it. It would be better to increase the width of the cockpit floor with plastic card by about 2mm. For the nose, ventral and mid-upper crew members, there are stools. Photo-etched seat belts are provided although I used Eduard pre-coloured belts because I’m lazy and they look good. Compared to Eduard, the belts supplied look to be too wide and clunky. Before putting the fuselage halves together you need to add two ventral windows which don’t fit particularly well, I sealed them with Kristal Kleer but am concerned that they will always be a bit fragile and easy to poke out of position.

The tailplane needs a home-made insert to take the tailwheel. I didn’t attach the tail to the fuselage at this stage as there is no positive location and it is better to wait until the wings are on to ensure the correct orientation of the tail unit. (PS Actually in hindsight it would have been better to make a peg to positively fix the tail unit to the fuselage, otherwise it’s a butt joint and therefore weak. Mine broke off twice).
Sub-assemblies come next – the engines, nacelles and undercarriage. I had to trim the engines to get them to fit inside the cowlings. Incidentally, the Pegasus was a black engine with lighter cylinders.

The undercarriage is difficult to understand and almost impossible to build as per the instructions. I found it was best to assemble them by installing the parts together on the plate that inserts the undercarriage into the wing (also a mistake – see below). I had to do a bit of trimming but in the end, everything fitted OK. Incidentally, I have read that this plate is a bit of a token gesture but I suspect it may be correct as the retracted wheels stood well proud of the undercarriage doors.
The wings fit onto stub ribs on the fuselage sides and are a reasonable fit although the trailing edges don’t quite line up with the fuselage fairing. It is at this point that you realize that the undercarriage is at entirely the wrong angle so I pulled them out (thankfully I hadn’t used superglue), drilled the holes on the inner sides (nearest the fuselage) right through the plate, then re-cemented the legs so that they were vertical when looked at from the front (the inner struts can float in the new holes and you can superglue them into the correct position). I checked the dihedral which is correct when the upper surface of the centresection is exactly horizontal and parallel to the tailplane.
I now had the basic aircraft assembled, less a few details to be added after painting; I did add the undercarriage doors because they could be cemented against the legs for additional strength and I could pick out the undercarriage and wheel well colours later. I used Milliput to fill in the small gaps around the wing roots and nacelles because, if you’re careful, those joints need no more work. The fuselage seams needed a little scraping and wet-and-dry but nothing dramatic.
Once the dust is all gone, it’s time to add the transparencies. These are, incidentally, the most disappointing part of this kit; they are slightly cloudy so it’s hardly worth bothering with the cockpit detail plus they are generally a poor fit. The fit of the large nose glazing is particularly bad and needed a clothes peg to squeeze it into position, plus superglue and hope that there will be no clouding. The pilot’s canopy is in three parts as it is a bulged affair but should be essentially a fighter canopy; windscreen and sliding hood, not with separate side windows. The side windows do not fit either and have to be reduced in height by 0.5mm.
I brushed Alclad liquid primer to fill in the gaps and to try to blend the transparencies to the fuselage but from this point on I knew that this would be a second-rate model. The trouble with bad transparencies is that there’s nothing much even an experienced modeler can do about them. To make matters worse, this aircraft, at least the camouflaged one (the Coastal Command Meteorological Flight aircraft was apparently unarmed) should have machine guns fitted in the nose, mid-upper and ventral positions but this means cutting slots or drilling holes in the transparencies; always a fraught thing to do. Actually, the mid-upper transparency opened up to fire the gun but this has not been reproduced either, so those guns cannot be used unless you do surgery to the mid-upper transparency. Don’t forget that the upper nose transparency should also have a fixed machine gun that could be fired by the pilot. Another hole. I didn’t add this as my version was unarmed but I added a decal to show where the hole had been blanked-off.
Finally, on the transparency saga, the landing light in the port wing leading edge needs a backing plate and a landing light as it’s rather obvious and, without it, it is just an oblong hole in the wing.
Painting, Markings and Finishing Touches |
First, I masked the transparencies with kabuki tape then brushpaint varnish around the edges to stop paint bleed, then I used Alclad white primer and Tamiya XF-54 Dark Sea Grey. I use an Aztek A470 airbrush. The decals went onto the matt surface just fine with no silvering. The decals are limited to roundels, fin flashes and serials and are glossy but if you spray the entire finished model in a satin/matt finish, this is no problem. Otherwise, they would be rather obvious. I have no objection to simple decal sheets – reminds me of the original Airfix kits! I added a little weathering using a Tamiya weathering kit but overdid it on the white underside. White is a really tricky colour to weather.
Removing the masking from the transparencies, they looked better than I had expected. All that was left was to paint the exhaust rings, wheel wells and undercarriage, then add wheels, aerials, props and exhausts. My 1943 model should have hedgehog exhausts which I had to rob from an MPM Wellington Mk X. Finally I added the aerial wires from EZ-line fine.
Well, now that it´s finished, it looks better than I thought it would. The transparencies don’t shout out about the problems they caused and you can even see a little of the interior but there’s a limited amount that you can do to sort out these parts unless you resort to Falcon vacforms (which are for the Airfix kit in any case). Overall, it looks the part and I’m not too disappointed. Can I recommend it? I suppose on balance it’s an improvement over the 40-year old Airfix offering but it’s a lukewarm recommendation.
Model, Images and Text
Copyright ©
2014 by Roger Hardy
Page Created 10 October, 2014
Last Updated
10 October, 2014
Back to HyperScale Main Page
|
Home
| What's New | Features | Gallery | Reviews | Reference | Resource Guides | Forum |