Revell's 1/72 scale
Handley Page Halifax B Mk I/II, GR Mk II
by Roger Hardy
 |
Handley Page Halifax B Mk I/II, GR Mk II |

Revell's 1/72 scale Halifax is available online from Squadron
S
u m m a r y |
| Catalogue Number: |
Revell Kit No. 04670 - Handley Page Halifax B Mk I/II, GR Mk II |
| Scale: |
1/72 |
| Contents and Media: |
291 parts in light grey styrene; 47 parts in clear styrene; markings for two aircraft |
| Price: |
£17.77 plus shipping from Hannants (UK) |
| Review Type: |
Build Review |
| Advantages: |
Excellent fit of parts, no filler needed. Impressive. At last a model of the early Mark I Halifax. Moveable control surfaces. Large number of alternative parts to make most Merlin-engine variants. Amazingly good value. |
| Disadvantages: |
Propeller blades are later paddle-type and are incorrect for these variants. Poorly shaped engine naceelles. Undersized main and tail wheels. Instructions confusing in the extreme, two sprues of clear parts packaged together leading to damage. 14 sprues that are otherwise not identified by letter; you have to search for every part. Flimsy, end-opening box that cannot be used as a modelling tray. |
| Conclusion: |
Recommended to WWII RAF bomber aficionados. |
Background
 The Halifax was the RAF’s second new four-engined heavy bomber, the first being the Stirling and the third being the famous Lancaster. The Halifax was the RAF’s second new four-engined heavy bomber, the first being the Stirling and the third being the famous Lancaster.
Although in the shadow of its illustrious successor, the Halifax made a major contribution to the bombing effort and over 6000 were produced.
By the end of the war, they had largely been relegated to glider-towing and transport duties but remained in service until 1952 in Coastal Command.
The Kit
The Halifax has previously been kitted in 1/72 scale by Airfix (Mk III) and Matchbox I/II (also re-released as a Revell kit) both of which are now showing their age. This is the perfect illustration of Revell Reborn.
Over the past few years, Revell of Germany have clearly and decisively ‘upped’ their game in terms of quality and any of the ‘new tooling’ models can be bought with confidence that you are buying a model that is certainly on a par with Hasegawa quality (if not Tamiya) but at a fraction of the price. In fact, some of Revell’s kits (for example, the Heinkel He111H-6) are actually Hasegawa kits in Revell boxes. Whereas the kits are really first class, however, I’ve noticed that they are often let down by a little carelessness here and there. The kit comes in the usual flimsy, cheap box that is far too large for the kit and cannot be used as a modelling tray unless you cut it up. This is a niggle, I know, but surely the extra cost of providing a proper box would be negligible?
There are 14 sprues and the detail is all finely engraved. There are two clear plastic sprues (wonderfully clear) but these are packed together and one of the parts in my example was damaged. The MK I has a nose radome and turret above it. The pattern-maker decided to mold the radome and the skinny turret fairing together but this part is very very fragile. Both of these fairings had broken off and one was missing and I had to fettle a replacement from the alternative glass nose.
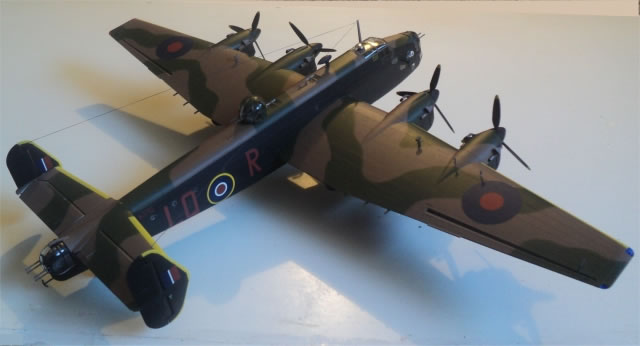
The Halifax was developed over the war and had different noses, different fins, square or rounded wing tips, different turrets and armament, in-line or radial engines, etc. The kit has most of these alternatives allowing any Mk I or Mk II variant to be made although I suspect there is no intention to make the radial-engined variants such as the Mk III or later versions. Even so, the two variants given on the decal sheet are as different as they could be; the brutish, ugly Mk I in brown/green/black camouflage or the more attractive Coastal Command GR Mk II in slate grey/grey/white. The former has the early tapered fins and turret in the nose, whereas the latter has the square fins and glass nose. There are alternative mid-upper turrets as well, plus you can choose three-or four-blade props but check your references as these only applied to a few GR Mk IIs. You have four choices of exhaust and intakes but which do you use? Good old internet.
Incidentally, although this kit has over 300 parts, the sprues are not identified by letter (as most kit manufacturers do) so you waste a lot of time looking for that tiny little bit on one of the 14 sprues. I only found my elusive third crew seat (part 8) when the kit was finished.
These two variants really are different but this is where the kit is let down: the instructions are massively confusing and it is very easy to get the wrong turrets in the wrong variants, accidentally use the glazed nose parts if you commit the sin of actually following the instructions (step 12). I get the impression that whoever wrote the instructions simply gave up towards the end, offering little help to the modeler in terms of alternative aerials and exhausts. It’s not helped by the fact that the instructions are clearly for the GR Mk II so if you are building the Mk I it’s best to keep checking the details of the variant you wish to build at every stage; in some cases, only the box artwork offers you any guidance. Incidentally, you have four choices of exhaust and intakes but which do you use? Good old internet.
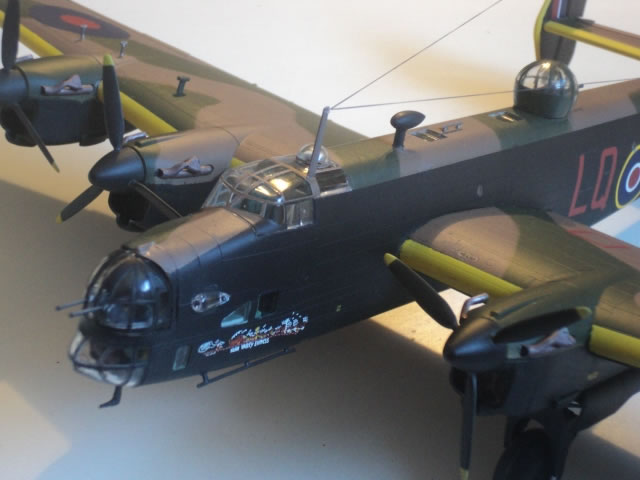
TI built this straight from the box (adding only the pilot’s seatbelts by Eduard) and generally followed the instructions except where they were wrong or made no sense. I decided to do an original Mk I but you need to make this decision early. The interior is fairly comprehensive and much of it can be seen through the large canopy and numerous windows. Oh, and don’t be fooled into thinking they haven’t given you enough crew seats (part 8); they appear on two different sprues and there’s a spare. I didn’t discover this until later so my navigator has to stand all the way to Germany and back. You don’t need to paint the interior aft of the rear cockpit bulkhead as recommended as it cannot be seen. The instrument panels are provided as decals and are fine, in my view.
Niggles about the instructions aside, the build progressed quickly and easily and the fit of parts was really first class. In fact, the only filler I had to use was where I’d been too energetic with the side cutters. The only inaccuracy I could find was that the propellers are all paddle-bladed and need to be modified to the slimmer early blade profiles. Sounds more difficult that it was and it was done in twenty minutes or so. I have heard that some think that the main wheels are a little too small but they look fine to me.
When I put the Boulton Paul turret into the mid-upper position, it sat far too high. This is the same turret fitted to the Hudson and it’s a globular thing, replaced later by the Frazer-Nash turret but this one simply didn’t look right. The remedy was to remove the plastic tangs inside the fuselage that stopped the turret sinking a bit lower. Now, it looks OK, but still a bit high. Maybe the Frazer Nash turret will fit better in the GR Mk II.
All of the control surfaces are moveable which some may like but I find a pain. Generally I glue them to stop them flopping about. However, I have to say that they look right; the overhang of the elevators, the Frise ailerons, all look good but please Revell, if you’re going to give us moveable control surfaces, let’s have flaps rather than all the others that are usually neutral on the ground.
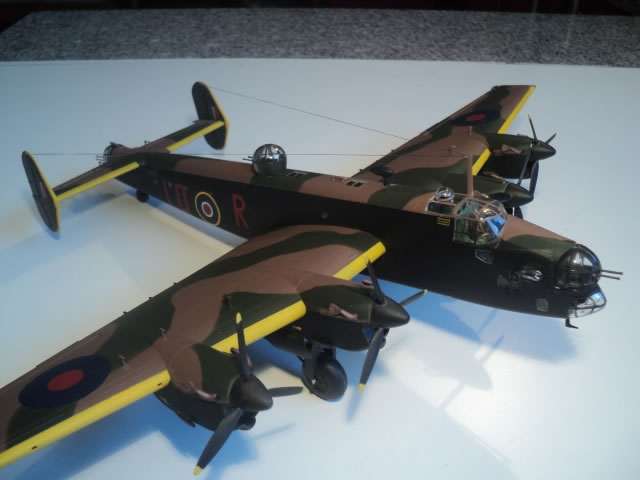
I did a bit of painting as I went on then, when it was ready for spraying, I used Tamiya primer then sprayed the yellow leading edges first, then masked them for the camouflage, then the black underside.
I masked the complex canopy and turret glazing using the Eduard kabuki tape masks (note that these are for the Mk II and you have to deal with the nose turret and bomb-aimer’s radome on your own). I used Tamiya paints and an Aztek airbrush. Before decaling, I sprayed some Tamiya satin varnish overall.
The decals were painless and went on well with limited silvering which responded well to Microscale decal solutions. Finally, I sprayed overall with matt varnish, removed the masks from the glazing and added all the final bits and pieces. Finally, I added the aerial wire from haberdashers’ elastic thread which is so perfect I wonder why everyone doesn’t use it. The whole build took me around four days.
Overall, this was a relatively stress-free build and I enjoyed it. How Revell can produce a kit of this kind of quality for less than £20 is beyond me; remember that the Hasegawa Lancaster is over £50!
The finished model looks sinister and ugly, exactly as it should. It sits right and looks good. I recommend adding photo-etched seat belts to the pilot’s seat as it is very visible, plus the canopy would be difficult to paint by hand, so get the Eduard masks which work well, even if they are hell on the eyes. So, I now have my first ever Halifax Mk I.
The GR Mk II looks so different from the Mk I that I immediately ordered another Halifax to do as a Coastal Command aircraft. Watch this space!
Strongly recommended.
Model, Images and Text
Copyright ©
2014 by Roger Hardy
Page Created 1 July, 2014
Last Updated
1 July, 2014
Back to HyperScale Main Page
|
 Home
| What's New | Features | Gallery | Reviews | Reference | Resource Guides | Forum |
Home
| What's New | Features | Gallery | Reviews | Reference | Resource Guides | Forum |